Configure Azure Multi-Factor Authentication Server for IIS web apps
Use the IIS Authentication section of the Azure Multi-Factor Authentication (MFA) Server to enable and configure IIS authentication for integration with Microsoft IIS web applications. The Azure Multi-Factor Authentication Server installs a plug-in that can filter requests being made to the IIS web server to add Azure Multi-Factor Authentication. The IIS plug-in provides support for Form-Based Authentication and Integrated Windows HTTP Authentication. Trusted IPs can also be configured to exempt internal IP addresses from two-factor authentication.
Important
In September 2022, Microsoft announced deprecation of Azure Multi-Factor Authentication Server. Beginning September 30, 2024, Azure Multi-Factor Authentication Server deployments will no longer service multifactor authentication (MFA) requests, which could cause authentications to fail for your organization. To ensure uninterrupted authentication services and to remain in a supported state, organizations should migrate their users’ authentication data to the cloud-based Azure Multi-Factor Authentication service by using the latest Migration Utility included in the most recent Azure Multi-Factor Authentication Server update. For more information, see Azure Multi-Factor Authentication Server Migration.
To get started with cloud-based MFA, see Tutorial: Secure user sign-in events with Azure Multi-Factor Authentication.
When you use cloud-based Azure Multi-Factor Authentication, there is no alternative to the IIS plugin provided by Azure Multi-Factor Authentication (MFA) Server. Instead, use Web Application Proxy (WAP) with Active Directory Federation Services (AD FS) or Microsoft Entra application proxy.
Using Form-Based IIS Authentication with Azure Multi-Factor Authentication Server
To secure an IIS web application that uses form-based authentication, install the Azure Multi-Factor Authentication Server on the IIS web server and configure the Server per the following procedure:
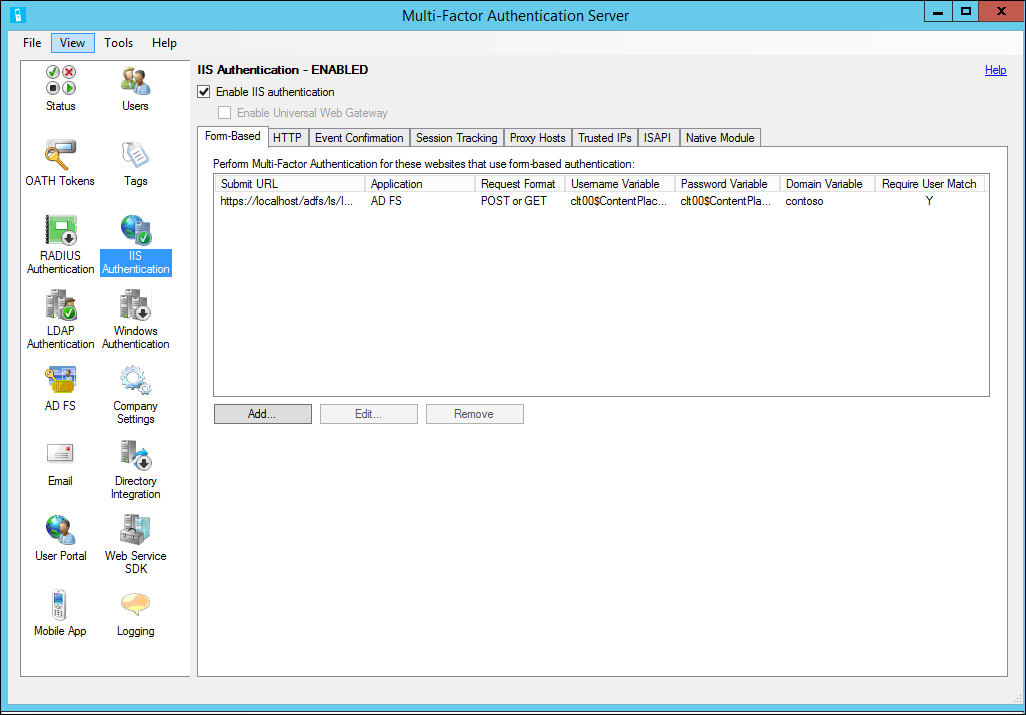
In the Azure Multi-Factor Authentication Server, click the IIS Authentication icon in the left menu.
Click the Form-Based tab.
Click Add.
To detect username, password and domain variables automatically, enter the Login URL (like
https://localhost/contoso/auth/login.aspx) within the Auto-Configure Form-Based Website dialog box and click OK.Check the Require Multi-Factor Authentication user match box if all users have been or will be imported into the Server and subject to multi-factor authentication. If a significant number of users haven't yet been imported into the Server and/or will be exempt from multi-factor authentication, leave the box unchecked.
If the page variables can't be detected automatically, click Specify Manually in the Auto-Configure Form-Based Website dialog box.
In the Add Form-Based Website dialog box, enter the URL to the login page in the Submit URL field and enter an Application name (optional). The Application name appears in Azure Multi-Factor Authentication reports and may be displayed within SMS or Mobile App authentication messages.
Select the correct Request format. This is set to POST or GET for most web applications.
Enter the Username variable, Password variable, and Domain variable (if it appears on the login page). To find the names of the input boxes, navigate to the login page in a web browser, right-click on the page, and select View Source.
Check the Require Azure Multi-Factor Authentication user match box if all users have been or will be imported into the Server and subject to multi-factor authentication. If a significant number of users haven't yet been imported into the Server and/or will be exempt from multi-factor authentication, leave the box unchecked.
Click Advanced to review advanced settings, including:
- Select a custom denial page file
- Cache successful authentications to the website for a period of time using cookies
- Select whether to authenticate the primary credentials against a Windows Domain, LDAP directory. or RADIUS server.
Click OK to return to the Add Form-Based Website dialog box.
Click OK.
Once the URL and page variables have been detected or entered, the website data displays in the Form-Based panel.
Using integrated Windows authentication with Azure Multi-Factor Authentication Server
To secure an IIS web application that uses Integrated Windows HTTP authentication, install the Azure Multi-Factor Authentication Server on the IIS web server, then configure the Server with the following steps:
- In the Azure Multi-Factor Authentication Server, click the IIS Authentication icon in the left menu.
- Click the HTTP tab.
- Click Add.
- In the Add Base URL dialogue box, enter the URL for the website where HTTP authentication is performed (like
http://localhost/owa) and provide an Application name (optional). The Application name appears in Azure Multi-Factor Authentication reports and may be displayed within SMS or Mobile App authentication messages. - Adjust the Idle timeout and Maximum session times if the default isn't sufficient.
- Check the Require Multi-Factor Authentication user match box if all users have been or will be imported into the Server and subject to multi-factor authentication. If a significant number of users haven't yet been imported into the Server and/or will be exempt from multi-factor authentication, leave the box unchecked.
- Check the Cookie cache box if desired.
- Click OK.
Enable IIS Plug-ins for Azure Multi-Factor Authentication Server
After configuring the Form-Based or HTTP authentication URLs and settings, select the locations where the Azure Multi-Factor Authentication IIS plug-ins should be loaded and enabled in IIS. Use the following procedure:
- If running on IIS 6, click the ISAPI tab. Select the website that the web application is running under (for example, Default Web Site) to enable the Azure Multi-Factor Authentication ISAPI filter plug-in for that site.
- If running on IIS 7 or higher, click the Native Module tab. Select the server, websites, or applications to enable the IIS plug-in at the desired levels.
- Click the Enable IIS authentication box at the top of the screen. Azure Multi-Factor Authentication is now securing the selected IIS application. Ensure that users have been imported into the Server.
Trusted IPs
The Trusted IPs allows users to bypass Azure Multi-Factor Authentication for website requests originating from specific IP addresses or subnets. For example, you may want to exempt users from Azure Multi-Factor Authentication while logging in from the office. In that case, you can specify the office subnet as a Trusted IPs entry. To configure Trusted IPs, use the following procedure:
- In the IIS Authentication section, click the Trusted IPs tab.
- Click Add.
- When the Add Trusted IPs dialog box appears, select the Single IP, IP range, or Subnet radio button.
- Enter the IP address, range of IP addresses or subnet that should be allowed. If entering a subnet, select the appropriate Netmask and click OK.
Feedback
Coming soon: Throughout 2024 we will be phasing out GitHub Issues as the feedback mechanism for content and replacing it with a new feedback system. For more information see: https://aka.ms/ContentUserFeedback.
Submit and view feedback for