Preparing user accounts for Lifecycle workflows tutorials
For the on-boarding, and off-boarding, tutorials you need accounts for which the workflows are executed. This section helps you prepare these accounts, if you already have test accounts that meet the following requirements, you can proceed directly to the on-boarding and off-boarding tutorials. Two accounts are required for the on-boarding tutorials, one account for the new hire and another account that acts as the manager of the new hire. The new hire account must have the following attributes set:
- employeeHireDate must be set to today
- department must be set to sales
- manager attribute must be set, and the manager account should have a mailbox to receive an email
The off-boarding tutorials only require one account that has group and Teams memberships, but the account is deleted during the tutorial.
Prerequisites
Using this feature requires Microsoft Entra ID Governance licenses. To find the right license for your requirements, see Microsoft Entra ID Governance licensing fundamentals.
- A Microsoft Entra tenant
- A global administrator account for the Microsoft Entra tenant. This account is used to create our users and workflows.
Before you begin
In most cases, users are going to be provisioned to Microsoft Entra ID either from an on-premises solution (such as Microsoft Entra Connect or Cloud sync) or with an HR solution. These users have the attributes and values populated at the time of creation. Setting up the infrastructure to provision users is outside the scope of this tutorial. For information, see Tutorial: Basic Active Directory environment and Tutorial: Integrate a single forest with a single Microsoft Entra tenant.
Create users in Microsoft Entra ID
Tip
Steps in this article might vary slightly based on the portal you start from.
We use Graph Explorer to quickly create two users needed to execute the Lifecycle Workflows in the tutorials. One user represents our new employee and the second represents the new employee's manager.
You need to edit the POST and replace the <your tenant name here> portion with the name of your tenant. For example: $UPN_manager = "bsimon@<your tenant name here>" to $UPN_manager = "bsimon@contoso.onmicrosoft.com".
Note
Be aware that a workflow will not trigger when the employee hire date (Days from event) is prior to the workflow creation date. You must set an employeeHiredate in the future by design. The dates used in this tutorial are a snapshot in time. Therefore, you should change the dates accordingly to accommodate for this situation.
First we create our employee, Melva Prince.
- Now navigate to Graph Explorer.
- Sign-in to Graph Explorer with the global administrator account for your tenant.
- At the top, change GET to POST and add
https://graph.microsoft.com/v1.0/users/to the box. - Copy the following code in to the Request body
- Replace
<your tenant here>in the following code with the value of your Microsoft Entra tenant. - Select Run query
- Copy the ID that is returned in the results. This is used later to assign a manager.
{
  "accountEnabled": true,
  "displayName": "Melva Prince",
  "mailNickname": "mprince",
  "department": "sales",
  "mail": "mprince@<your tenant name here>",
  "employeeHireDate": "2022-04-15T22:10:00Z",
  "userPrincipalName": "mprince@<your tenant name here>",
  "passwordProfile" : {
    "forceChangePasswordNextSignIn": true,
    "password": "xWwvJ]6NMw+bWH-d"
  }
}

Next, we create Britta Simon. This account is used as our manager.
- Still in Graph Explorer.
- Make sure the top is still set to POST and
https://graph.microsoft.com/v1.0/users/is in the box. - Copy the following code in to the Request body
- Replace
<your tenant here>in the following code with the value of your Microsoft Entra tenant. - Select Run query
- Copy the ID that is returned in the results. This ID is used later to assign a manager.
{
  "accountEnabled": true,
  "displayName": "Britta Simon",
  "mailNickname": "bsimon",
  "department": "sales",
  "mail": "bsimon@<your tenant name here>",
  "employeeHireDate": "2021-01-15T22:10:00Z",
  "userPrincipalName": "bsimon@<your tenant name here>",
  "passwordProfile" : {
    "forceChangePasswordNextSignIn": true,
    "password": "xWwvJ]6NMw+bWH-d"
  }
}
Note
You need to change the <your tenant name here> section of the code to match your Microsoft Entra tenant.
As an alternative, the following PowerShell script can also be used to quickly create two users needed to execute a lifecycle workflow. One user represents our new employee and the second represents the new employee's manager.
Important
The following PowerShell script is provided to quickly create the two users required for this tutorial. These users can also be created in the Microsoft Entra Admin center.
In order to create this step, save the following PowerShell script to a location on a machine that has access to Azure.
Next, you need to edit the script and replace the <your tenant name here> portion with the name of your tenant. For example: $UPN_manager = "bsimon@<your tenant name here>" to $UPN_manager = "bsimon@contoso.onmicrosoft.com".
You need to do perform this action for both $UPN_employee and $UPN_manager
After editing the script, save it and follow these steps:
- Open a Windows PowerShell command prompt, with Administrative privileges, from a machine that has access to the Microsoft Entra admin center.
- Navigate to the saved PowerShell script location and run it.
- If prompted select Yes to all when installing the PowerShell module.
- When prompted, sign in to the Microsoft Entra admin center with a global administrator for your tenant.
#
# DISCLAIMER:
# Copyright (c) Microsoft Corporation. All rights reserved. This
# script is made available to you without any express, implied or
# statutory warranty, not even the implied warranty of
# merchantability or fitness for a particular purpose, or the
# warranty of title or non-infringement. The entire risk of the
# use or the results from the use of this script remains with you.
#
#
#
#
#Declare variables

$Displayname_employee = "Melva Prince"
$UPN_employee = "mprince<your tenant name here>"
$Name_employee = "mprince"
$Password_employee = "Pass1w0rd"
$EmployeeHireDate_employee = "04/10/2022"
$Department_employee = "Sales"
$Displayname_manager = "Britta Simon"
$Name_manager = "bsimon"
$Password_manager = "Pass1w0rd"
$Department = "Sales"
$UPN_manager = "bsimon@<your tenant name here>"

Install-Module -Name AzureAD
Connect-MgGraph -Confirm

$PasswordProfile = New-Object -TypeName Microsoft.Open.AzureAD.Model.PasswordProfile
$PasswordProfile.Password = "<Password>"
New-MgUser -DisplayName $Displayname_manager  -PasswordProfile $PasswordProfile -UserPrincipalName $UPN_manager -AccountEnabled $true -MailNickName $Name_manager -Department $Department
New-MgUser -DisplayName $Displayname_employee  -PasswordProfile $PasswordProfile -UserPrincipalName $UPN_employee -AccountEnabled $true -MailNickName $Name_employee -Department $Department
Once your user or users are successfully created in Microsoft Entra ID, you can proceed to follow the Lifecycle workflow tutorials for your workflow creation.
Other steps for prehire scenario
There are some other steps that you should be aware of when testing either the On-boarding users to your organization using Lifecycle workflows with the Microsoft Entra Admin Center tutorial or the On-boarding users to your organization using Lifecycle workflows with Microsoft Graph tutorial.
Edit the users attributes using the Microsoft Entra admin center
Some of the attributes required for the prehire onboarding tutorial are exposed through the Microsoft Entra admin center and can be set there.
These attributes are:
| Attribute | Description | Set on |
|---|---|---|
| Used to notify manager of the new employees temporary access pass | Manager | |
| manager | This attribute that is used by the lifecycle workflow | Employee |
For the tutorial, the mail attribute only needs to be set on the manager account and the manager attribute set on the employee account. Use the following steps:
- Sign in to the Microsoft Entra admin center as at least a User Administrator.
- Browse to > Identity > Users > All Users.
- Select Melva Prince.
- At the top, select Edit.
- Under manager, select Change and Select Britta Simon.
- At the top, select Save.
- Go back to users and select Britta Simon.
- At the top, select Edit.
- Under Email, enter a valid email address.
- Select Save.
Edit employeeHireDate
The employeeHireDate attribute is new to Microsoft Entra ID. It isn't exposed through the UI and must be updated using Graph. To edit this attribute, we can use Graph Explorer.
Note
Be aware that a workflow will not trigger when the employee hire date (Days from event) is prior to the workflow creation date. You must set an employeeHireDate in the future by design. The dates used in this tutorial are a snapshot in time. Therefore, you should change the dates accordingly to accommodate for this situation.
In order to do this, we must get the object ID for our user Melva Prince.
Sign in to the Microsoft Entra admin center as at least a User Administrator.
Browse to > Identity > Users > All Users.
Select Melva Prince.
Select the copy sign next to the Object ID.
Now navigate to Graph Explorer.
Sign-in to Graph Explorer with the global administrator account for your tenant.
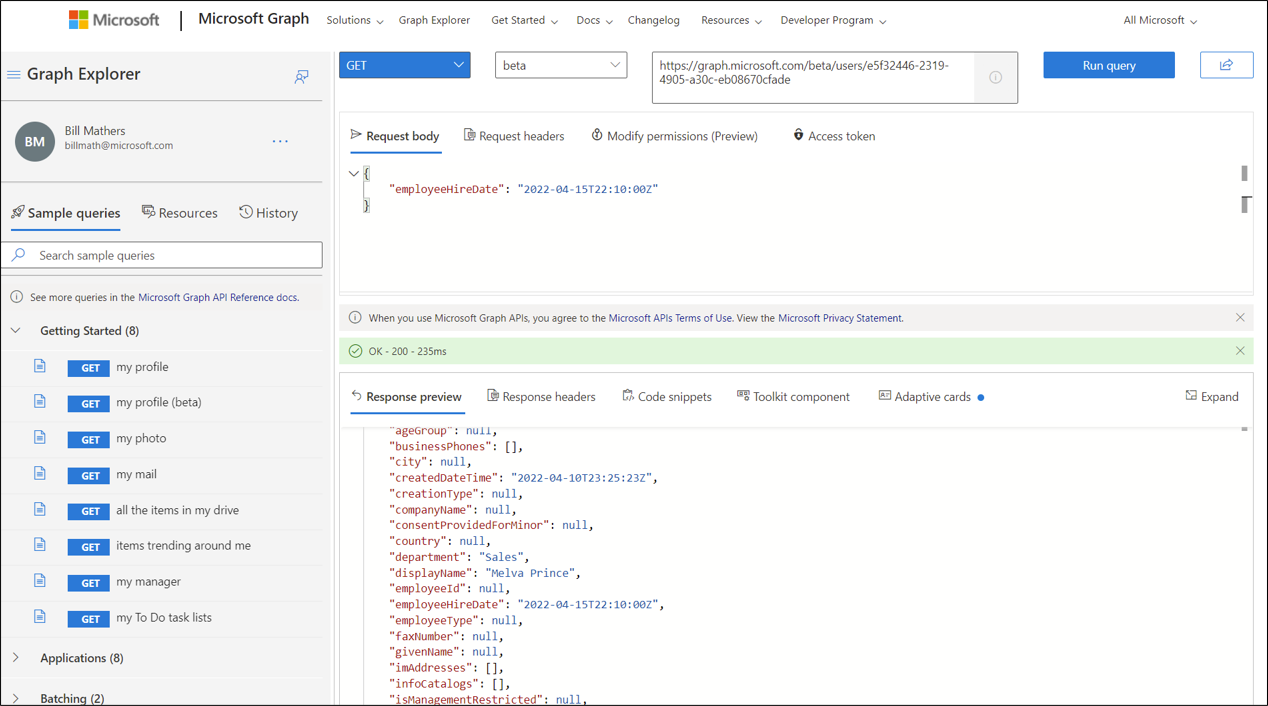
At the top, change GET to PATCH and add
https://graph.microsoft.com/v1.0/users/<id>to the box. Replace<id>with the value we copied before.Copy the following in to the Request body and select Run query
{
"employeeHireDate": "2022-04-15T22:10:00Z"
}
Verify the change by changing PATCH back to GET and v1.0 to beta. Select Run query. You should see the attributes for Melva set.


Edit the manager attribute on the employee account
The manager attribute is used for email notification tasks. It emails the manager a temporary password for the new employee. Use the following steps to ensure your Microsoft Entra users have a value for the manager attribute.
Still in Graph Explorer.
Make sure the top is still set to PUT and
https://graph.microsoft.com/v1.0/users/<id>/manager/$refis in the box. Change<id>to the ID of Melva Prince.Copy the following code into the Request body
Replace
<managerid>in the following code with the value of Britta Simons ID.Select Run query
{
  "@odata.id": "https://graph.microsoft.com/v1.0/users/<managerid>"
}
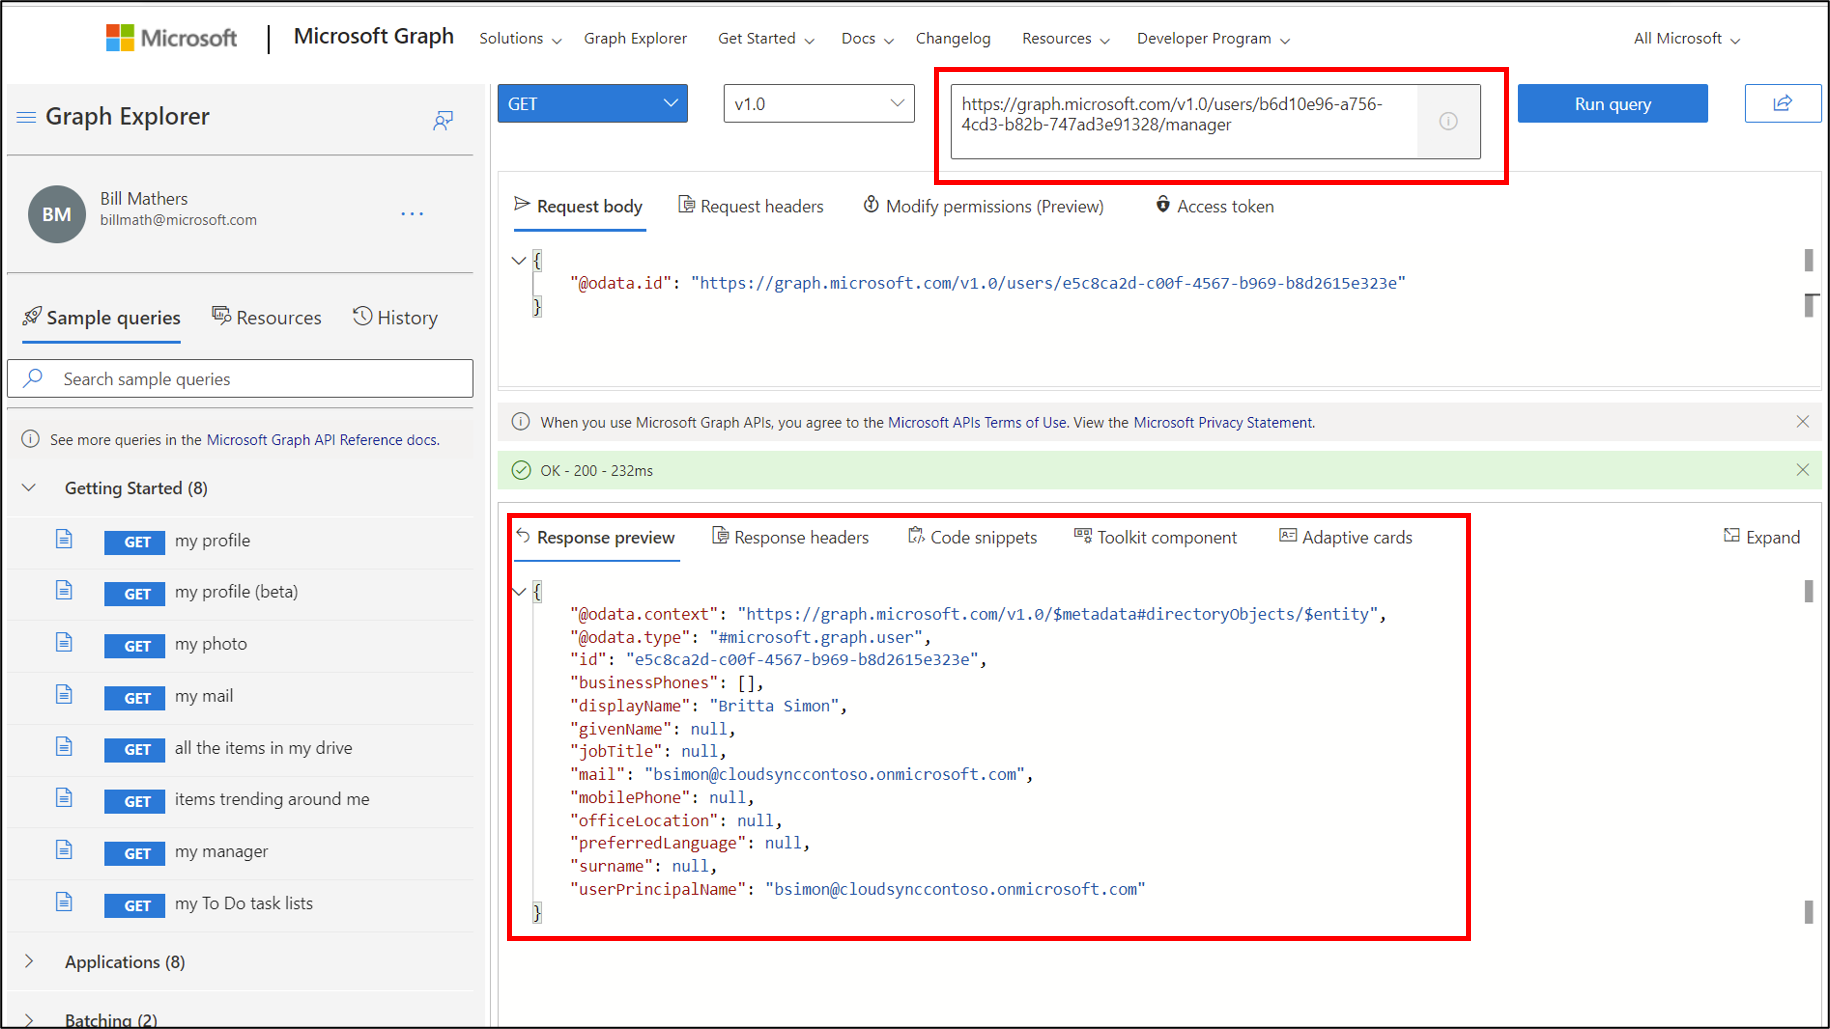
Now, we can verify that the manager is set correctly by changing the PUT to GET.
Make sure
https://graph.microsoft.com/v1.0/users/<id>/manager/is in the box. The<id>is still that of Melva Prince.Select Run query. You should see Britta Simon returned in the Response.


For more information about updating manager information for a user in Graph API, see assign manager documentation. You can also set this attribute in the Azure Admin center. For more information, see add or change profile information.
Enabling the Temporary Access Pass (TAP)
A Temporary Access Pass is a time-limited pass issued by an admin that satisfies strong authentication requirements.
In this scenario, we use this feature of Microsoft Entra ID to generate a temporary access pass for our new employee. It's mailed to the employee's manager.
To use this feature, it must be enabled on our Microsoft Entra tenant. To enable this feature, use the following steps.
- Sign in to the Microsoft Entra admin center as at least a Global Administrator.
- Browse to Protection > Authentication methods > Temporary Access Pass
- Select Yes to enable the policy and add Britta Simon and select which users have the policy applied, and any General settings.
Consideration for leaver scenario
There's an extra step that you should be aware of when testing the tutorials for either the Off-boarding users from your organization using Lifecycle workflows with the Microsoft Entra admin center tutorial, or with Microsoft Graph.
Set up user with groups and Teams with team membership
A user with groups and Teams memberships is required before you begin the tutorials for the leaver scenario.
Next steps
- On-boarding users to your organization using Lifecycle workflows with the Microsoft Entra admin center
- On-boarding users to your organization using Lifecycle workflows with Microsoft Graph
- Tutorial: Off-boarding users from your organization using Lifecycle workflows with The Microsoft Entra Admin Center
- Tutorial: Off-boarding users from your organization using Lifecycle workflows with Microsoft Graph
Feedback
Coming soon: Throughout 2024 we will be phasing out GitHub Issues as the feedback mechanism for content and replacing it with a new feedback system. For more information see: https://aka.ms/ContentUserFeedback.
Submit and view feedback for