Tutorial: Use pass-through authentication for hybrid identity in a single Active Directory forest
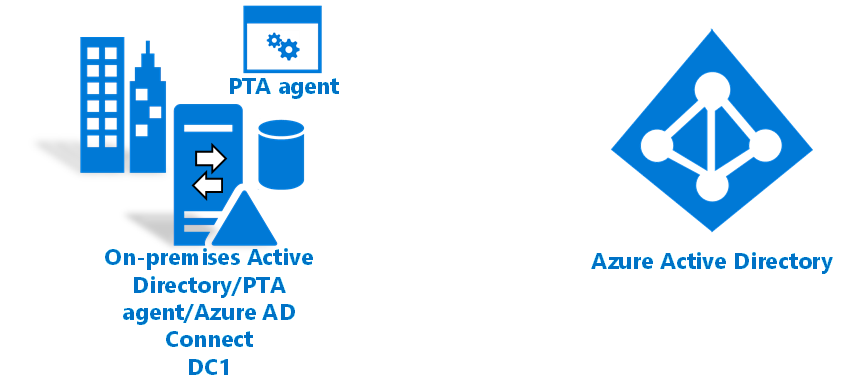
This tutorial shows you how to create a hybrid identity environment in Azure by using pass-through authentication and Windows Server Active Directory (Windows Server AD). You can use the hybrid identity environment you create for testing or to get more familiar with how hybrid identity works.
In this tutorial, you learn how to:
- Create a virtual machine.
- Create a Windows Server Active Directory environment.
- Create a Windows Server Active Directory user.
- Create a Microsoft Entra tenant.
- Create a Hybrid Identity Administrator account in Azure.
- Add a custom domain to your directory.
- Set up Microsoft Entra Connect.
- Test and verify that users are synced.
Prerequisites
- A computer with Hyper-V installed. We suggest that you install Hyper-V on a Windows 10 or Windows Server 2016 computer.
- An Azure subscription. If you don't have an Azure subscription, create a free account before you begin.
- An external network adapter, so the virtual machine can connect to the internet.
- A copy of Windows Server 2016.
- A custom domain that can be verified.
Note
This tutorial uses PowerShell scripts to quickly create the tutorial environment. Each script uses variables that are declared at the beginning of the script. Be sure to change the variables to reflect your environment.
The scripts in the tutorial create a general Windows Server Active Directory (Windows Server AD) environment before they install Microsoft Entra Connect. The scripts are also used in related tutorials.
The PowerShell scripts that are used in this tutorial are available on GitHub.
Create a virtual machine
To create a hybrid identity environment, the first task is to create a virtual machine to use as an on-premises Windows Server AD server.
Note
If you've never run a script in PowerShell on your host machine, before you run any scripts, open Windows PowerShell ISE as administrator and run Set-ExecutionPolicy remotesigned. In the Execution Policy Change dialog, select Yes.
To create the virtual machine:
Open Windows PowerShell ISE as administrator.
Run the following script:
#Declare variables
$VMName = 'DC1'
$Switch = 'External'
$InstallMedia = 'D:\ISO\en_windows_server_2016_updated_feb_2018_x64_dvd_11636692.iso'
$Path = 'D:\VM'
$VHDPath = 'D:\VM\DC1\DC1.vhdx'
$VHDSize = '64424509440'

#Create a new virtual machine
New-VM -Name $VMName -MemoryStartupBytes 16GB -BootDevice VHD -Path $Path -NewVHDPath $VHDPath -NewVHDSizeBytes $VHDSize  -Generation 2 -Switch $Switch

#Set the memory to be non-dynamic
Set-VMMemory $VMName -DynamicMemoryEnabled $false

#Add a DVD drive to the virtual machine
Add-VMDvdDrive -VMName $VMName -ControllerNumber 0 -ControllerLocation 1 -Path $InstallMedia

#Mount installation media
$DVDDrive = Get-VMDvdDrive -VMName $VMName

#Configure the virtual machine to boot from the DVD
Set-VMFirmware -VMName $VMName -FirstBootDevice $DVDDrive
Install the operating system
To finish creating the virtual machine, install the operating system:
- In Hyper-V Manager, double-click the virtual machine.
- Select Start.
- At the prompt, press any key to boot from CD or DVD.
- In the Windows Server start window, select your language, and then select Next.
- Select Install Now.
- Enter your license key and select Next.
- Select the I accept the license terms checkbox and select Next.
- Select Custom: Install Windows Only (Advanced).
- Select Next.
- When the installation is finished, restart the virtual machine. Sign in, and then check Windows Update. Install any updates to ensure that the VM is fully up-to-date.
Install Windows Server AD prerequisites
Before you install Windows Server AD, run a script that installs prerequisites:
Open Windows PowerShell ISE as administrator.
Run
Set-ExecutionPolicy remotesigned. In the Execution Policy Change dialog, select Yes to All.Run the following script:
#Declare variables
$ipaddress = "10.0.1.117"
$ipprefix = "24"
$ipgw = "10.0.1.1"
$ipdns = "10.0.1.117"
$ipdns2 = "8.8.8.8"
$ipif = (Get-NetAdapter).ifIndex
$featureLogPath = "c:\poshlog\featurelog.txt"
$newname = "DC1"
$addsTools = "RSAT-AD-Tools"

#Set a static IP address
New-NetIPAddress -IPAddress $ipaddress -PrefixLength $ipprefix -InterfaceIndex $ipif -DefaultGateway $ipgw

# Set the DNS servers
Set-DnsClientServerAddress -InterfaceIndex $ipif -ServerAddresses ($ipdns, $ipdns2)

#Rename the computer
Rename-Computer -NewName $newname -force

#Install features
New-Item $featureLogPath -ItemType file -Force
Add-WindowsFeature $addsTools
Get-WindowsFeature | Where installed >>$featureLogPath

#Restart the computer
Restart-Computer
Create a Windows Server AD environment
Now, install and configure Active Directory Domain Services to create the environment:
Open Windows PowerShell ISE as administrator.
Run the following script:
#Declare variables
$DatabasePath = "c:\windows\NTDS"
$DomainMode = "WinThreshold"
$DomainName = "contoso.com"
$DomainNetBIOSName = "CONTOSO"
$ForestMode = "WinThreshold"
$LogPath = "c:\windows\NTDS"
$SysVolPath = "c:\windows\SYSVOL"
$featureLogPath = "c:\poshlog\featurelog.txt"
$Password = ConvertTo-SecureString "Passw0rd" -AsPlainText -Force

#Install Active Directory Domain Services, DNS, and Group Policy Management Console
start-job -Name addFeature -ScriptBlock {
Add-WindowsFeature -Name "ad-domain-services" -IncludeAllSubFeature -IncludeManagementTools
Add-WindowsFeature -Name "dns" -IncludeAllSubFeature -IncludeManagementTools
Add-WindowsFeature -Name "gpmc" -IncludeAllSubFeature -IncludeManagementTools }
Wait-Job -Name addFeature
Get-WindowsFeature | Where installed >>$featureLogPath

#Create a new Windows Server AD forest
Install-ADDSForest -CreateDnsDelegation:$false -DatabasePath $DatabasePath -DomainMode $DomainMode -DomainName $DomainName -SafeModeAdministratorPassword $Password -DomainNetbiosName $DomainNetBIOSName -ForestMode $ForestMode -InstallDns:$true -LogPath $LogPath -NoRebootOnCompletion:$false -SysvolPath $SysVolPath -Force:$true
Create a Windows Server AD user
Next, create a test user account. Create this account in your on-premises Active Directory environment. The account is then synced to Microsoft Entra ID.
Open Windows PowerShell ISE as administrator.
Run the following script:
#Declare variables
$Givenname = "Allie"
$Surname = "McCray"
$Displayname = "Allie McCray"
$Name = "amccray"
$Password = "Pass1w0rd"
$Identity = "CN=ammccray,CN=Users,DC=contoso,DC=com"
$SecureString = ConvertTo-SecureString $Password -AsPlainText -Force

#Create the user
New-ADUser -Name $Name -GivenName $Givenname -Surname $Surname -DisplayName $Displayname -AccountPassword $SecureString

#Set the password to never expire
Set-ADUser -Identity $Identity -PasswordNeverExpires $true -ChangePasswordAtLogon $false -Enabled $true
Create a Microsoft Entra tenant
If you dont have one, follow the steps in the article Create a new tenant in Microsoft Entra ID to create a new tenant.
Create a Hybrid Identity Administrator in Microsoft Entra ID
The next task is to create a Hybrid Identity Administrator account. This account is used to create the Microsoft Entra Connector account during Microsoft Entra Connect installation. The Microsoft Entra Connector account is used to write information to Microsoft Entra ID.
To create the Hybrid Identity Administrator account:
- Sign in to the Microsoft Entra admin center.
- Browse to Identity > Users > All users
- Select New user > Create new user.
- In the Create new user pane, enter a Display name and a User principal name for the new user. You're creating your Hybrid Identity Administrator account for the tenant. You can show and copy the temporary password.
- Under Assignments, select Add role, and select Hybrid Identity Administrator.
- Then select Review + create > Create.
- In a new web browser window, sign in to
myapps.microsoft.comby using the new Hybrid Identity Administrator account and the temporary password.
Add a custom domain name to your directory
Now that you have a tenant and a Hybrid Identity Administrator account, add your custom domain so that Azure can verify it.
To add a custom domain name to a directory:
In the Microsoft Entra admin center.
Browse to Identity > Settings > Domain names.
Select Add custom domain.
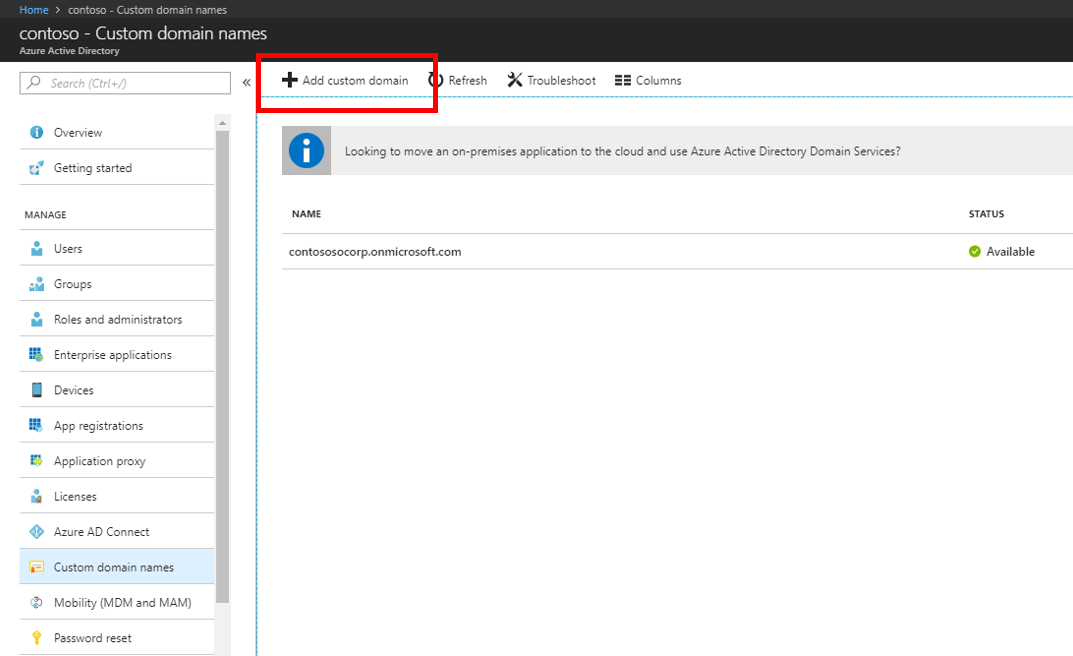
In Custom domain names, enter the name of your custom domain, and then select Add domain.
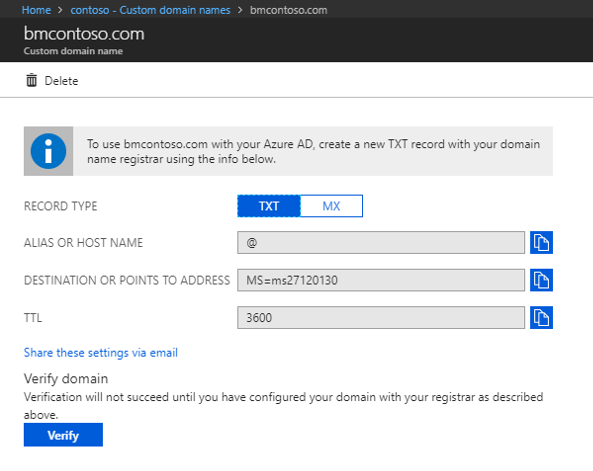
In Custom domain name, either TXT or MX information is shown. You must add this information to the DNS information of the domain registrar under your domain. Go to your domain registrar and enter either the TXT or the MX information in the DNS settings for your domain.
 Adding this information to your domain registrar allows Azure to verify your domain. Domain verification might take up to 24 hours.
For more information, see the add a custom domain documentation.
To ensure that the domain is verified, select Verify.

Download and install Microsoft Entra Connect
Now it's time to download and install Microsoft Entra Connect. After it's installed, you'll use the express installation.
Download Microsoft Entra Connect.
Go to AzureADConnect.msi and double-click to open the installation file.
In Welcome, select the checkbox to agree to the licensing terms, and then select Continue.
In Express settings, select Customize.
In Install required components, select Install.
In User sign-in, select Pass-through authentication and Enable single sign-on, and then select Next.
In Connect to Microsoft Entra ID, enter the username and password of the Hybrid Identity Administrator account you created earlier, and then select Next.
In Connect your directories, select Add directory. Then select Create new AD account and enter the contoso\Administrator username and password. Select OK.
Select Next.
In Microsoft Entra sign-in configuration, select Continue without matching all UPN suffixes to verified domains. Select Next.
In Domain and OU filtering, select Next.
In Uniquely identifying your users, select Next.
In Filter users and devices, select Next.
In Optional features, select Next.
In Enable single sign-in credentials, enter the contoso\Administrator username and password, and then select Next.
In Ready to configure, select Install.
When the installation is finished, select Exit.
Before you use Synchronization Service Manager or Synchronization Rule Editor, sign out, and then sign in again.
Check for users in the portal
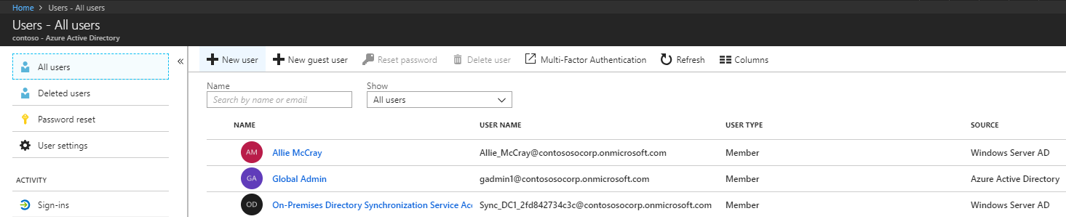
Now you'll verify that the users in your on-premises Active Directory tenant have synced and are now in your Microsoft Entra tenant. This section might take a few hours to complete.
To verify that the users are synced:
Sign in to the Microsoft Entra admin center.
Browse to Identity > Users > All users
Verify that the new users appear in your tenant.
Sign in with a user account to test sync
To test that users from your Windows Server AD tenant are synced with your Microsoft Entra tenant, sign in as one of the users:
Go to https://myapps.microsoft.com.
Sign in with a user account that was created in your new tenant.
For the username, use the format
user@domain.onmicrosoft.com. Use the same password the user uses to sign in to on-premises Active Directory.
You've successfully set up a hybrid identity environment that you can use to test and to get familiar with what Azure has to offer.
Next steps
- Review Microsoft Entra Connect hardware and prerequisites.
- Learn how to use customized settings in Microsoft Entra Connect.
- Learn more about pass-through authentication with Microsoft Entra Connect.
Feedback
Coming soon: Throughout 2024 we will be phasing out GitHub Issues as the feedback mechanism for content and replacing it with a new feedback system. For more information see: https://aka.ms/ContentUserFeedback.
Submit and view feedback for