Tutorial: Use a Linux VM system-assigned managed identity to access Azure Storage via access key
Managed identities for Azure resources is a feature of Microsoft Entra ID. Each of the Azure services that support managed identities for Azure resources are subject to their own timeline. Make sure you review the availability status of managed identities for your resource and known issues before you begin.
This tutorial shows you how to use a system-assigned managed identity for a Linux virtual machine (VM) to retrieve storage account access keys. You can use a storage access key as usual when doing storage operations, for example when using the Storage SDK. For this tutorial, we upload and download blobs using Azure CLI. You will learn how to:
- Grant your VM access to storage account access keys in Resource Manager
- Get an access token using your VM's identity, and use it to retrieve the storage access keys from Resource Manager
Prerequisites
- If you're not familiar with the managed identities for Azure resources feature, see this overview.
- If you don't have an Azure account, sign up for a free account before you continue.
- To perform the required resource creation and role management, your account needs "Owner" permissions at the appropriate scope (your subscription or resource group). If you need assistance with role assignment, see Assign Azure roles to manage access to your Azure subscription resources.
Create a storage account
If you don't have an existing storage account that you want to use in this tutorial you need to create one. You can also skip this step and grant your VM system-assigned managed identity access to the keys of an existing storage account.
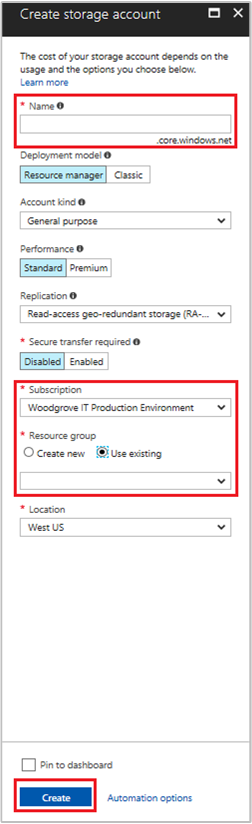
Select the +/Create new service button found on the upper left-hand corner of the Azure portal.
Select Storage, then Storage Account, and a new "Create storage account" panel will display.
Enter a Name for the storage account.
Deployment model and Account kind should be set to "Resource Manager" and "General purpose", respectively.
Ensure the Subscription and Resource Group match the ones you specified when you created your VM in the previous step.
Select Create.
Create a blob container in the storage account
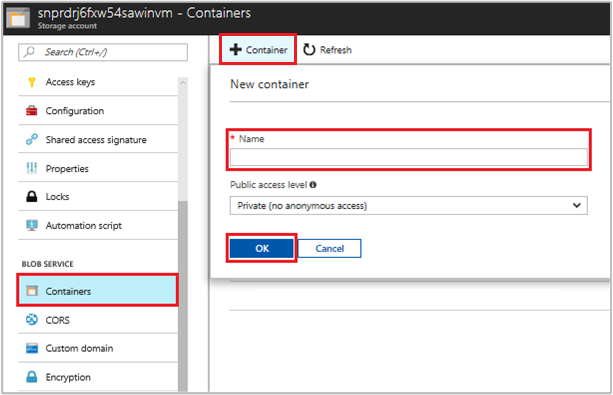
Later we will upload and download a file to the new storage account. Because files require blob storage, we need to create a blob container in which to store the file.
Navigate back to your newly created storage account.
Select the Containers link in the left, under "Blob service."
Select + Container on the top of the page, and a "New container" panel slides out.
Give the container a name, select an access level, then select OK. The name you specified will be used later in the tutorial.
Grant your VM's system-assigned managed identity access to use storage account access keys
Azure Storage doesn't natively support Microsoft Entra authentication. However, you can use your VM's system-assigned managed identity to retrieve a storage SAS from Resource Manager, then use the SAS to access storage. In this step, you grant your VM's system-assigned managed identity access to your storage account SAS. Grant access by assigning the Storage Account Contributor role to the managed-identity at the scope of the resource group that contains your storage account.
For detailed steps, see Assign Azure roles using the Azure portal.
Note
For more information on the various roles that you can use to grant permissions to storage review Authorize access to blobs and queues using Microsoft Entra ID.
Get an access token using the VM's identity and use it to call Azure Resource Manager
For the remainder of the tutorial, we work from the VM we created earlier.
To complete these steps, you need an SSH client. If you are using Windows, you can use the SSH client in the Windows Subsystem for Linux. If you need assistance configuring your SSH client's keys, see How to Use SSH keys with Windows on Azure, or How to create and use an SSH public and private key pair for Linux VMs in Azure.
In the Azure portal, navigate to Virtual Machines, select your Linux virtual machine, then from the Overview page select Connect at the top. Copy the string to connect to your VM.
Connect to your VM using your SSH client.
Next, you need to enter the Password you added when creating the Linux VM.
Use CURL to get an access token for Azure Resource Manager.
The CURL request and response for the access token is below:
curl 'http://169.254.169.254/metadata/identity/oauth2/token?api-version=2018-02-01&resource=https%3A%2F%2Fmanagement.azure.com%2F' -H Metadata:trueNote
In the previous request, the value of the "resource" parameter must be an exact match for what is expected by Microsoft Entra ID. When using the Azure Resource Manager resource ID, you must include the trailing slash on the URI. In the following response, the access_token element as been shortened for brevity.
{
  "access_token": "eyJ0eXAiOiJ...",
  "refresh_token": "",
  "expires_in": "3599",
  "expires_on": "1504130527",
  "not_before": "1504126627",
  "resource": "https://management.azure.com",
  "token_type": "Bearer"
}
Get storage account access keys from Azure Resource Manager to make storage calls
Now use CURL to call Resource Manager using the access token we retrieved in the previous section, to retrieve the storage access key. Once we have the storage access key, we can call storage upload/download operations. Be sure to replace the <SUBSCRIPTION ID>, <RESOURCE GROUP>, and <STORAGE ACCOUNT NAME> parameter values with your own values. Replace the <ACCESS TOKEN> value with the access token you retrieved earlier:
curl https://management.azure.com/subscriptions/<SUBSCRIPTION ID>/resourceGroups/<RESOURCE GROUP>/providers/Microsoft.Storage/storageAccounts/<STORAGE ACCOUNT NAME>/listKeys?api-version=2016-12-01 --request POST -d "" -H "Authorization: Bearer <ACCESS TOKEN>"
Note
The text in the prior URL is case sensitive, so ensure if you are using upper-lowercase for your Resource Groups to reflect it accordingly. Additionally, it’s important to know that this is a POST request not a GET request and ensure you pass a value to capture a length limit with -d that can be NULL.
The CURL response gives you the list of Keys:
{"keys":[{"keyName":"key1","permissions":"Full","value":"iqDPNt..."},{"keyName":"key2","permissions":"Full","value":"U+uI0B..."}]}
Create a sample blob file to upload to your blob storage container. On a Linux VM, you can do this with the following command.
echo "This is a test file." > test.txt
Next, authenticate with the CLI az storage command using the storage access key, and upload the file to the blob container. For this step, you need to install the latest Azure CLI on your VM, if you haven't already.
az storage blob upload -c <CONTAINER NAME> -n test.txt -f test.txt --account-name <STORAGE ACCOUNT NAME> --account-key <STORAGE ACCOUNT KEY>
Response:
Finished[#############################################################]  100.0000%
{
  "etag": "\"0x8D4F9929765C139\"",
  "lastModified": "2017-09-12T03:58:56+00:00"
}
Additionally, you can download the file using the Azure CLI and authenticating with the storage access key.
Request:
az storage blob download -c <CONTAINER NAME> -n test.txt -f test-download.txt --account-name <STORAGE ACCOUNT NAME> --account-key <STORAGE ACCOUNT KEY>
Response:
{
  "content": null,
  "metadata": {},
  "name": "test.txt",
  "properties": {
    "appendBlobCommittedBlockCount": null,
    "blobType": "BlockBlob",
    "contentLength": 21,
    "contentRange": "bytes 0-20/21",
    "contentSettings": {
      "cacheControl": null,
      "contentDisposition": null,
      "contentEncoding": null,
      "contentLanguage": null,
      "contentMd5": "LSghAvpnElYyfUdn7CO8aw==",
      "contentType": "text/plain"
    },
    "copy": {
      "completionTime": null,
      "id": null,
      "progress": null,
      "source": null,
      "status": null,
      "statusDescription": null
    },
    "etag": "\"0x8D5067F30D0C283\"",
    "lastModified": "2017-09-28T14:42:49+00:00",
    "lease": {
      "duration": null,
      "state": "available",
      "status": "unlocked"
    },
    "pageBlobSequenceNumber": null,
    "serverEncrypted": false
  },
  "snapshot": null
}
Next steps
In this tutorial, you learned how to use a Linux VM system-assigned managed identity to access Azure Storage using an access key. To learn more about Azure Storage access keys see:
Feedback
Coming soon: Throughout 2024 we will be phasing out GitHub Issues as the feedback mechanism for content and replacing it with a new feedback system. For more information see: https://aka.ms/ContentUserFeedback.
Submit and view feedback for