Configure cross-tenant synchronization
This article describes the steps to configure cross-tenant synchronization using the Microsoft Entra admin center. When configured, Microsoft Entra ID automatically provisions and de-provisions B2B users in your target tenant. For important details on what this service does, how it works, and frequently asked questions, see Automate user provisioning and deprovisioning to SaaS applications with Microsoft Entra ID.

Learning objectives
By the end of this article, you'll be able to:
- Create B2B users in your target tenant
- Remove B2B users in your target tenant
- Keep user attributes synchronized between your source and target tenants
Prerequisites
![]()
Source tenant
- Microsoft Entra ID P1 or P2 license. For more information, see License requirements.
- Security Administrator role to configure cross-tenant access settings.
- Hybrid Identity Administrator role to configure cross-tenant synchronization.
- Cloud Application Administrator or Application Administrator role to assign users to a configuration and to delete a configuration.
![]()
Target tenant
- Microsoft Entra ID P1 or P2 license. For more information, see License requirements.
- Security Administrator role to configure cross-tenant access settings.
Step 1: Plan your provisioning deployment
Define how you would like to structure the tenants in your organization.
Learn about how the provisioning service works.
Determine who will be in scope for provisioning.
Determine what data to map between tenants.
Step 2: Enable user synchronization in the target tenant
Tip
Steps in this article might vary slightly based on the portal you start from.
![]()
Target tenant
Sign in to the Microsoft Entra admin center of the target tenant.
Browse to Identity > External Identities > Cross-tenant access settings.
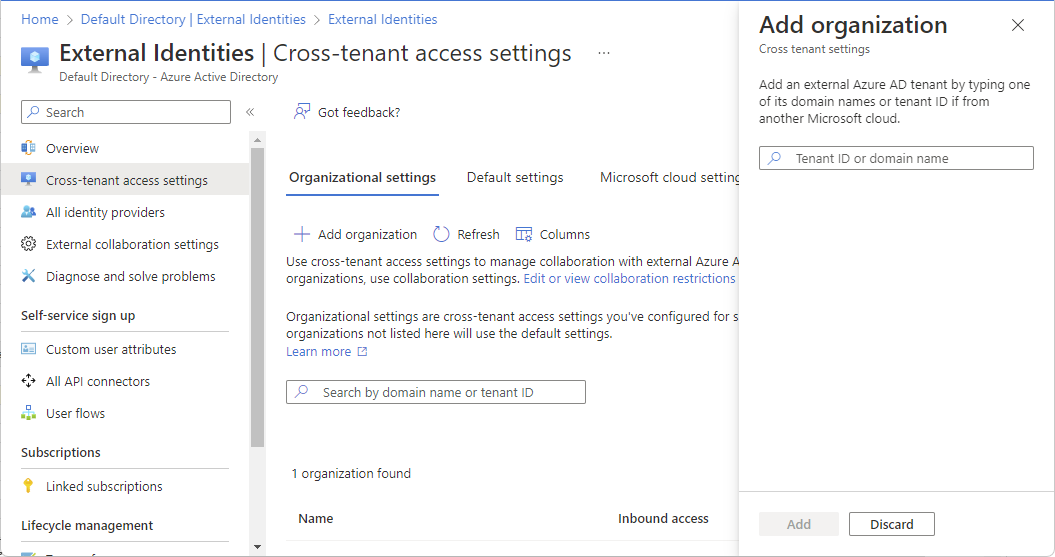
On the Organization settings tab, select Add organization.
Add the source tenant by typing the tenant ID or domain name and selecting Add.
Under Inbound access of the added organization, select Inherited from default.
Select the Cross-tenant sync tab.
Check the Allow users sync into this tenant check box.

Select Save.
If you see an Enable cross-tenant sync and auto-redemption dialog box asking if you want to enable auto-redemption, select Yes.
Selecting Yes will automatically redeem invitations in the target tenant.


Step 3: Automatically redeem invitations in the target tenant
![]()
Target tenant
In this step, you automatically redeem invitations so users from the source tenant don't have to accept the consent prompt. This setting must be checked in both the source tenant (outbound) and target tenant (inbound). For more information, see Automatic redemption setting.
In the target tenant, on the same Inbound access settings page, select the Trust settings tab.
Check the Automatically redeem invitations with the tenant <tenant> check box.
This box might already be checked if you previously selected Yes in the Enable cross-tenant sync and auto-redemption dialog box.

Select Save.

Step 4: Automatically redeem invitations in the source tenant
![]()
Source tenant
In this step, you automatically redeem invitations in the source tenant.
Sign in to the Microsoft Entra admin center of the source tenant.
Browse to Identity > External Identities > Cross-tenant access settings.
On the Organization settings tab, select Add organization.
Add the target tenant by typing the tenant ID or domain name and selecting Add.

Under Outbound access for the target organization, select Inherited from default.
Select the Trust settings tab.
Check the Automatically redeem invitations with the tenant <tenant> check box.

Select Save.


Step 5: Create a configuration in the source tenant
![]()
Source tenant
In the source tenant, browse to Identity > External Identities > Cross-tenant synchronization.
Select Configurations.
At the top of the page, select New configuration.
Provide a name for the configuration and select Create.
It can take up to 15 seconds for the configuration that you just created to appear in the list.
Step 6: Test the connection to the target tenant
![]()
Source tenant
In the source tenant, you should see your new configuration. If not, in the configuration list, select your configuration.

Select Get started.
Set the Provisioning Mode to Automatic.
Under the Admin Credentials section, change the Authentication Method to Cross Tenant Synchronization Policy.

In the Tenant Id box, enter the tenant ID of the target tenant.
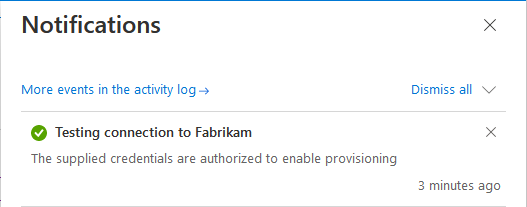
Select Test Connection to test the connection.
You should see a message that the supplied credentials are authorized to enable provisioning. If the test connection fails, see Troubleshooting tips later in this article.
Select Save.
Mappings and Settings sections appear.
Close the Provisioning page.


Step 7: Define who is in scope for provisioning
![]()
Source tenant
The Microsoft Entra provisioning service allows you to define who will be provisioned in one or both of the following ways:
- Based on assignment to the configuration
- Based on attributes of the user
Start small. Test with a small set of users before rolling out to everyone. When the scope for provisioning is set to assigned users and groups, you can control it by assigning one or two users to the configuration. You can further refine who is in scope for provisioning by creating attribute-based scoping filters, described in the next step.
In the source tenant, select Provisioning and expand the Settings section.
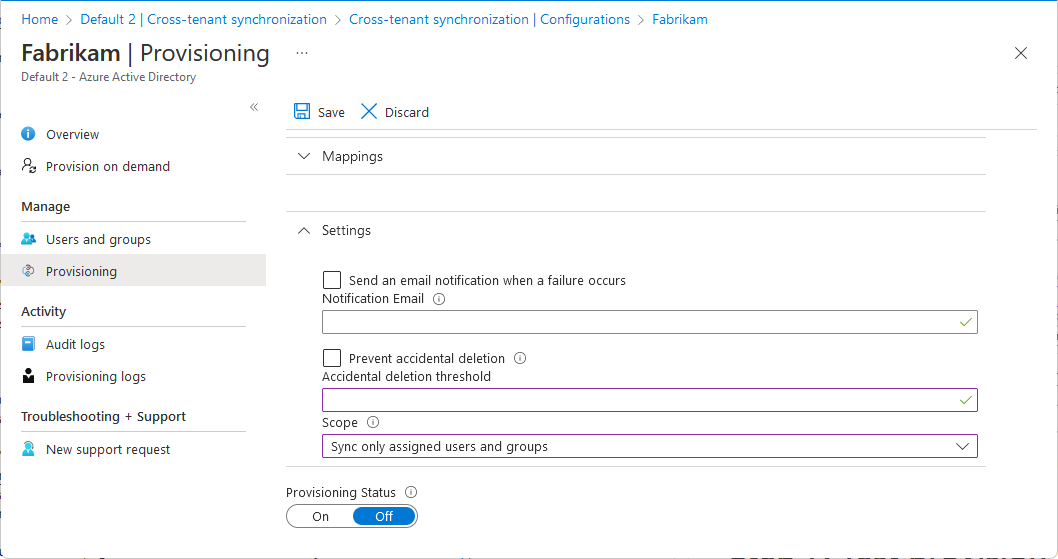
In the Scope list, select whether to synchronize all users in the source tenant or only users assigned to the configuration.
It's recommended that you select Sync only assigned users and groups instead of Sync all users and groups. Reducing the number of users in scope improves performance.
If you made any changes, select Save.
On the configuration page, select Users and groups.
For cross-tenant synchronization to work, at least one internal user must be assigned to the configuration.
Select Add user/group.
On the Add Assignment page, under Users and groups, select None Selected.
On the Users and groups pane, search for and select one or more internal users or groups you want to assign to the configuration.
If you select a group to assign to the configuration, only users that are direct members in the group will be in scope for provisioning. You can select a static group or a dynamic group. The assignment doesn't cascade to nested groups.
Select Select.
Select Assign.

For more information, see Assign users and groups to an application.


Step 8: (Optional) Define who is in scope for provisioning with scoping filters
![]()
Source tenant
Regardless of the value you selected for Scope in the previous step, you can further limit which users are synchronized by creating attribute-based scoping filters.
In the source tenant, select Provisioning and expand the Mappings section.

Select Provision Microsoft Entra ID Users to open the Attribute Mapping page.
Under Source Object Scope, select All records.

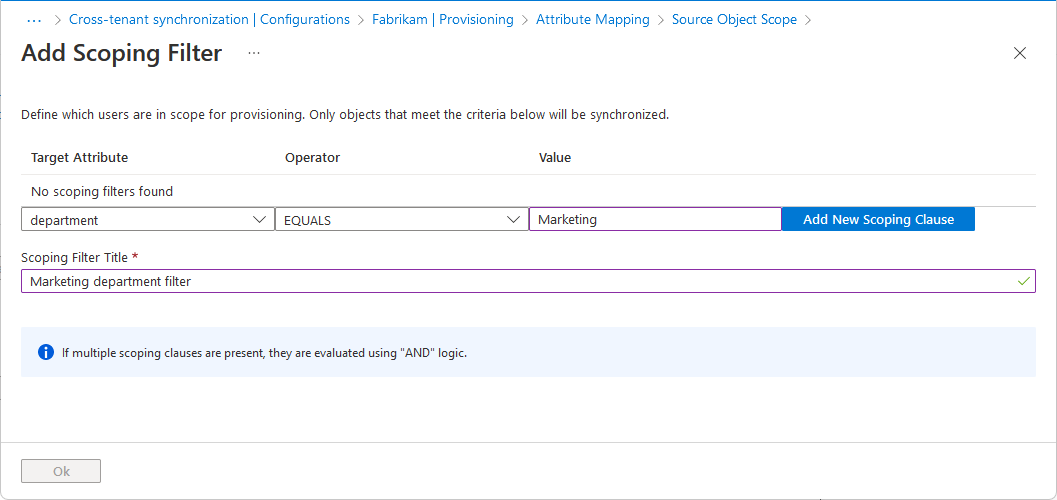
On the Source Object Scope page, select Add scoping filter.
Add any scoping filters to define which users are in scope for provisioning.
To configure scoping filters, refer to the instructions provided in Scoping users or groups to be provisioned with scoping filters.
Select Ok and Save to save any changes.
If you added a filter, you'll see a message that saving your changes will result in all assigned users and groups being resynchronized. This may take a long time depending on the size of your directory.
Select Yes and close the Attribute Mapping page.


Step 9: Review attribute mappings
![]()
Source tenant
Attribute mappings allow you to define how data should flow between the source tenant and target tenant. For information on how to customize the default attribute mappings, see Tutorial - Customize user provisioning attribute-mappings for SaaS applications in Microsoft Entra ID.
In the source tenant, select Provisioning and expand the Mappings section.
Select Provision Microsoft Entra ID Users.
On the Attribute Mapping page, scroll down to review the user attributes that are synchronized between tenants in the Attribute Mappings section.
The first attribute, alternativeSecurityIdentifier, is an internal attribute used to uniquely identify the user across tenants, match users in the source tenant with existing users in the target tenant, and ensure that each user only has one account. The matching attribute cannot be changed. Attempting to change the matching attribute or adding additional matching attributes will result in a
schemaInvaliderror.
Select the Member (userType) attribute to open the Edit Attribute page.
Review the Constant Value setting for the userType attribute.
This setting defines the type of user that will be created in the target tenant and can be one of the values in the following table. By default, users will be created as external member (B2B collaboration users). For more information, see Properties of a Microsoft Entra B2B collaboration user.
Constant Value Description Member Default. Users will be created as external member (B2B collaboration users) in the target tenant. Users will be able to function as any internal member of the target tenant. Guest Users will be created as external guests (B2B collaboration users) in the target tenant. Note
If the B2B user already exists in the target tenant then Member (userType) will not changed to Member, unless the Apply this mapping setting is set to Always.
The user type you choose has the following limitations for apps or services (but aren't limited to):
App or service Limitations Power BI - Support for UserType Member in Power BI is currently in preview. For more information, see Distribute Power BI content to external guest users with Microsoft Entra B2B. Azure Virtual Desktop - External member and external guest aren't supported in Azure Virtual Desktop. 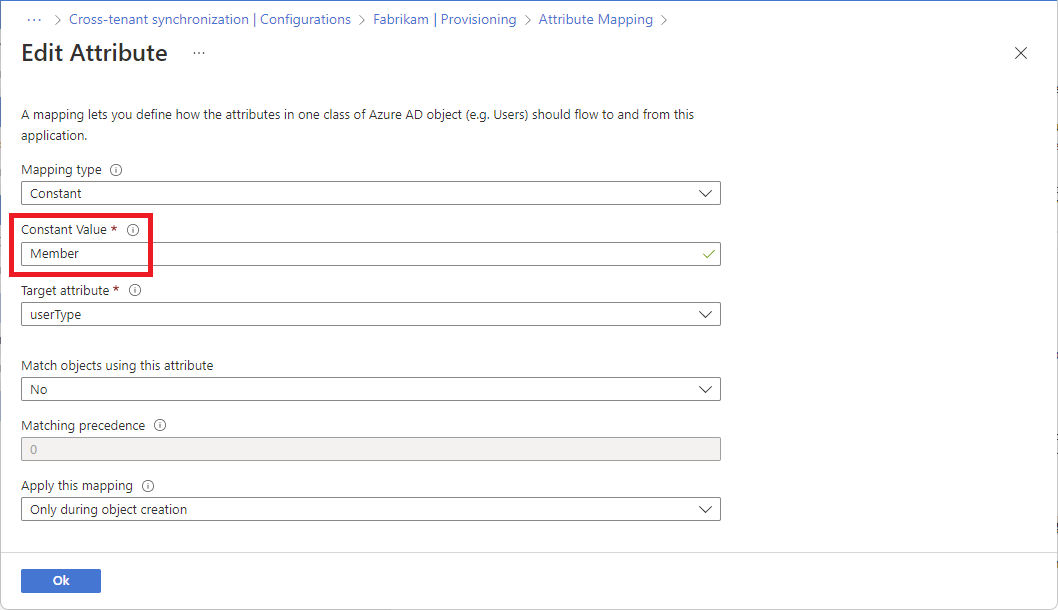
If you want to define any transformations, on the Attribute Mapping page, select the attribute you want to transform, such as displayName.
Set the Mapping type to Expression.
In the Expression box, enter the transformation expression. For example with the display name, you can do the following:
- Flip the first name and last name and add a comma in between.
- Add the domain name in parentheses at the end of the display name.
For examples, see Reference for writing expressions for attribute mappings in Microsoft Entra ID.


Tip
You can map directory extensions by updating the schema of the cross-tenant synchronization. For more information, see Map directory extensions in cross-tenant synchronization.
Step 10: Specify additional provisioning settings
![]()
Source tenant
In the source tenant, select Provisioning and expand the Settings section.
Check the Send an email notification when a failure occurs check box.
In the Notification Email box, enter the email address of a person or group who should receive provisioning error notifications.
Email notifications are sent within 24 hours of the job entering quarantine state. For custom alerts, see Understand how provisioning integrates with Azure Monitor logs.
To prevent accidental deletion, select Prevent accidental deletion and specify a threshold value. By default, the threshold is set to 500.
For more information, see Enable accidental deletions prevention in the Microsoft Entra provisioning service.
Select Save to save any changes.
Step 11: Test provision on demand
![]()
Source tenant
Now that you have a configuration, you can test on-demand provisioning with one of your users.
In the source tenant, browse to Identity > External Identities > Cross-tenant synchronization.
Select Configurations and then select your configuration.
Select Provision on demand.
In the Select a user or group box, search for and select one of your test users.
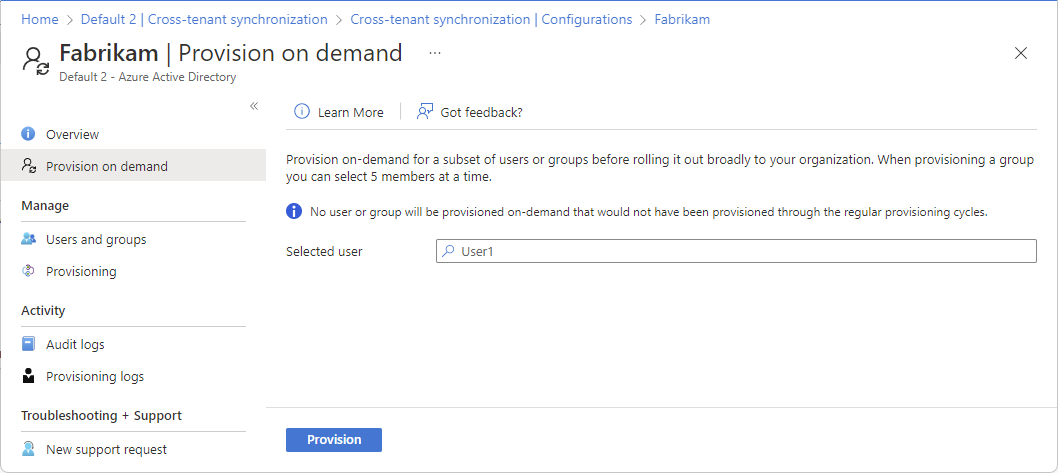
Select Provision.
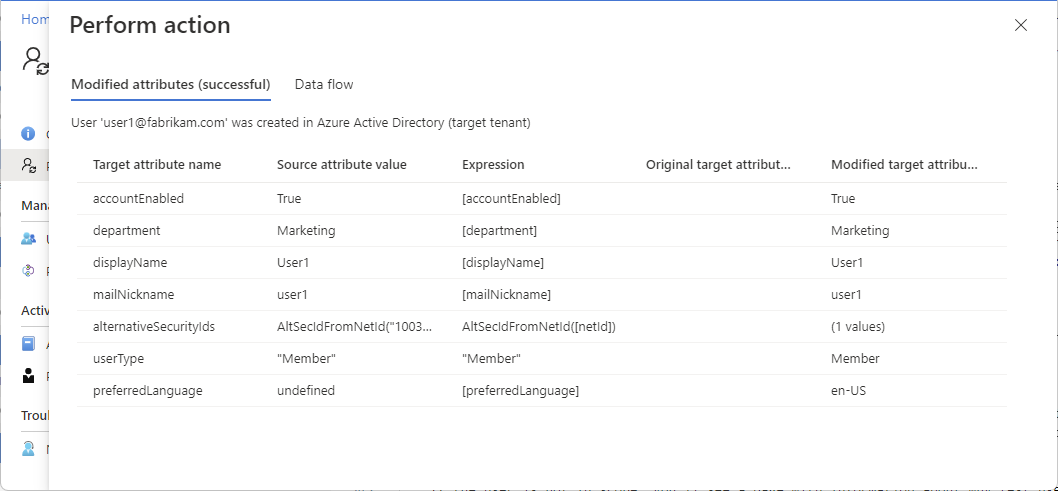
After a few moments, the Perform action page appears with information about the provisioning of the test user in the target tenant.
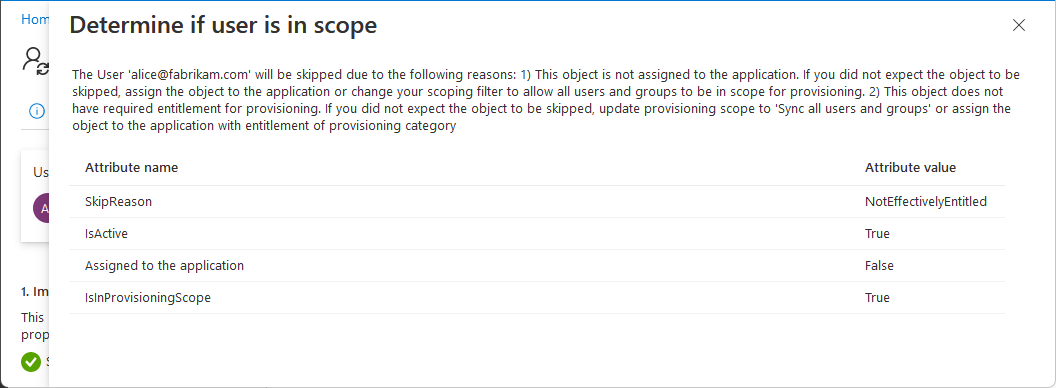
If the user isn't in scope, you'll see a page with information about why test user was skipped.
On the Provision on demand page, you can view details about the provision and have the option to retry.

In the target tenant, verify that the test user was provisioned.

If all is working as expected, assign additional users to the configuration.
For more information, see On-demand provisioning in Microsoft Entra ID.


Step 12: Start the provisioning job
![]()
Source tenant
The provisioning job starts the initial synchronization cycle of all users defined in Scope of the Settings section. The initial cycle takes longer to perform than subsequent cycles, which occur approximately every 40 minutes as long as the Microsoft Entra provisioning service is running.
In the source tenant, browse to Identity > External Identities > Cross-tenant synchronization.
Select Configurations and then select your configuration.
On the Overview page, review the provisioning details.

Select Start provisioning to start the provisioning job.

Step 13: Monitor provisioning
![]()
![]()
Source and target tenants
Once you've started a provisioning job, you can monitor the status.
In the source tenant, on the Overview page, check the progress bar to see the status of the provisioning cycle and how close it's to completion. For more information, see Check the status of user provisioning.
If provisioning seems to be in an unhealthy state, the configuration will go into quarantine. For more information, see Application provisioning in quarantine status.

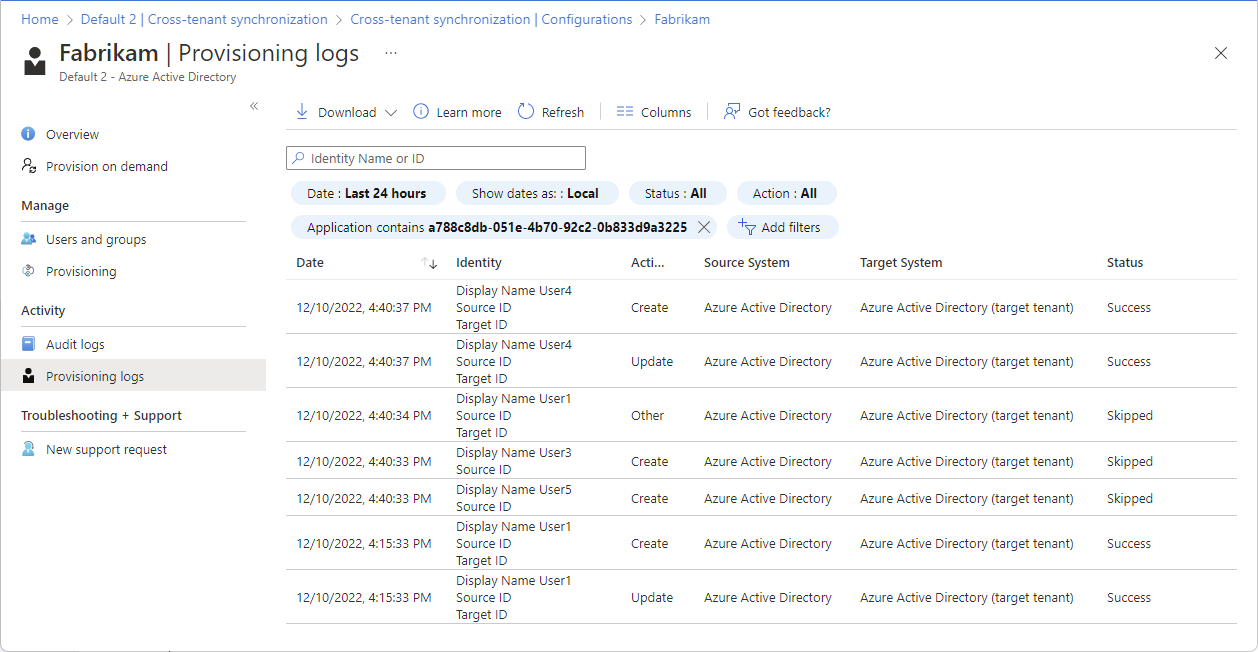
Select Provisioning logs to determine which users have been provisioned successfully or unsuccessfully. By default, the logs are filtered by the service principal ID of the configuration. For more information, see Provisioning logs in Microsoft Entra ID.
Select Audit logs to view all logged events in Microsoft Entra ID. For more information, see Audit logs in Microsoft Entra ID.

You can also view audit logs in the target tenant.
In the target tenant, select Users > Audit logs to view logged events for user management.


Step 14: Configure leave settings
![]()
Target tenant
Even though users are being provisioned in the target tenant, they still might be able to remove themselves. If users remove themselves and they are in scope, they'll be provisioned again during the next provisioning cycle. If you want to disallow the ability for users to remove themselves from your organization, you must configure the External user leave settings.
In the target tenant, browse to Identity > External Identities > External collaboration settings.
Under External user leave settings, choose whether to allow external users to leave your organization themselves.
This setting also applies to B2B collaboration and B2B direct connect, so if you set External user leave settings to No, B2B collaboration users and B2B direct connect users can't leave your organization themselves. For more information, see Leave an organization as an external user.
Troubleshooting tips
Delete a configuration
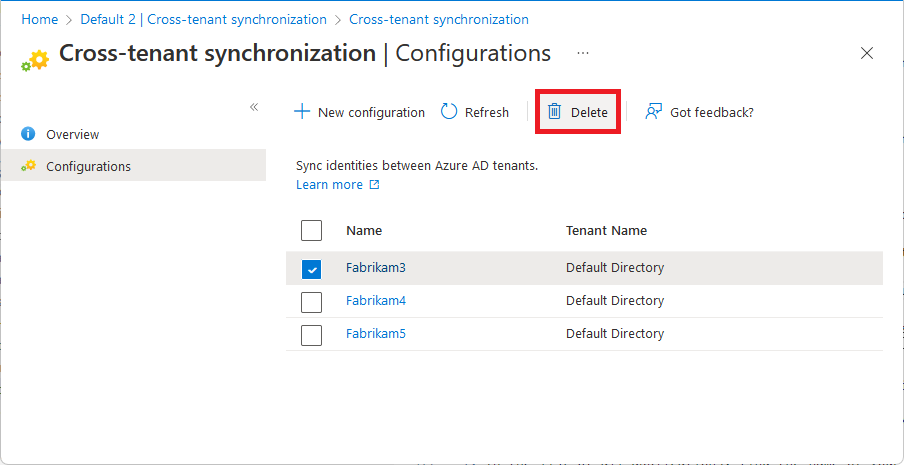
Follows these steps to delete a configuration on the Configurations page.
In the source tenant, browse to Identity > External Identities > Cross-tenant synchronization.
On the Configurations page, add a check mark next to the configuration you want to delete.
Select Delete and then OK to delete the configuration.

Symptom - Test connection fails with AzureDirectoryB2BManagementPolicyCheckFailure
When configuring cross-tenant synchronization in the source tenant and you test the connection, it fails with the following error message:
You appear to have entered invalid credentials. Please confirm you are using the correct information for an administrative account.
Error code: AzureDirectoryB2BManagementPolicyCheckFailure
Details: Policy permitting auto-redemption of invitations not configured.

Cause
This error indicates the policy to automatically redeem invitations in both the source and target tenants wasn't set up.
Solution
Follow the steps in Step 3: Automatically redeem invitations in the target tenant and Step 4: Automatically redeem invitations in the source tenant.
Symptom - Automatic redemption check box is disabled
When configuring cross-tenant synchronization, the Automatic redemption check box is disabled.

Cause
Your tenant doesn't have a Microsoft Entra ID P1 or P2 license.
Solution
You must have Microsoft Entra ID P1 or P2 to configure trust settings.
Symptom - Recently deleted user in the target tenant is not restored
After soft deleting a synchronized user in the target tenant, the user isn't restored during the next synchronization cycle. If you try to soft delete a user with on-demand provisioning and then restore the user, it can result in duplicate users.
Cause
Restoring a previously soft-deleted user in the target tenant isn't supported.
Solution
Manually restore the soft-deleted user in the target tenant. For more information, see Restore or remove a recently deleted user using Microsoft Entra ID.
Symptom - Users are skipped because SMS sign-in is enabled on the user
Users are skipped from synchronization. The scoping step includes the following filter with status false: "Filter external users.alternativeSecurityIds EQUALS 'None'"
Cause
If SMS sign-in is enabled for a user, they will be skipped by the provisioning service.
Solution
Disable SMS Sign-in for the users. The script below shows how you can disable SMS Sign-in using PowerShell.
##### Disable SMS Sign-in options for the users

#### Import module
Install-Module Microsoft.Graph.Users.Actions
Install-Module Microsoft.Graph.Identity.SignIns
Import-Module Microsoft.Graph.Users.Actions

Connect-MgGraph -Scopes "User.Read.All", "Group.ReadWrite.All", "UserAuthenticationMethod.Read.All","UserAuthenticationMethod.ReadWrite","UserAuthenticationMethod.ReadWrite.All"

##### The value for phoneAuthenticationMethodId is 3179e48a-750b-4051-897c-87b9720928f7

$phoneAuthenticationMethodId = "3179e48a-750b-4051-897c-87b9720928f7"

#### Get the User Details

$userId = "objectid_of_the_user_in_Azure_AD"

#### validate the value for SmsSignInState

$smssignin = Get-MgUserAuthenticationPhoneMethod -UserId $userId

{
    if($smssignin.SmsSignInState -eq "ready"){
      #### Disable Sms Sign-In for the user is set to ready

      Disable-MgUserAuthenticationPhoneMethodSmsSignIn -UserId $userId -PhoneAuthenticationMethodId $phoneAuthenticationMethodId
      Write-Host "SMS sign-in disabled for the user" -ForegroundColor Green
    }
    else{
    Write-Host "SMS sign-in status not set or found for the user " -ForegroundColor Yellow
    }

}

##### End the script
Symptom - Users fail to provision with error "AzureActiveDirectoryForbidden"
Users in scope fail to provision. The provisioning logs details include the following error message:
Guest invitations not allowed for your company. Contact your company administrator for more details.
Cause
This error indicates the Guest invite settings in the target tenant are configured with the most restrictive setting: "No one in the organization can invite guest users including admins (most restrictive)".
Solution
Change the Guest invite settings in the target tenant to a less restrictive setting. For more information, see Configure external collaboration settings.
Next steps
Feedback
Coming soon: Throughout 2024 we will be phasing out GitHub Issues as the feedback mechanism for content and replacing it with a new feedback system. For more information see: https://aka.ms/ContentUserFeedback.
Submit and view feedback for