Tutorial: Microsoft Entra integration with Jobscience
In this tutorial, you learn how to integrate Jobscience with Microsoft Entra ID.
Integrating Jobscience with Microsoft Entra ID provides you with the following benefits:
- You can control in Microsoft Entra ID who has access to Jobscience
- You can enable your users to automatically get signed-on to Jobscience (Single Sign-On) with their Microsoft Entra accounts
- You can manage your accounts in one central location - the Azure portal
If you want to know more details about SaaS app integration with Microsoft Entra ID, see what is application access and single sign-on with Microsoft Entra ID.
Prerequisites
To configure Microsoft Entra integration with Jobscience, you need the following items:
- A Microsoft Entra subscription
- A Jobscience single sign-on enabled subscription
Note
To test the steps in this tutorial, we do not recommend using a production environment.
To test the steps in this tutorial, you should follow these recommendations:
- Do not use your production environment, unless it is necessary.
- If you don't have a Microsoft Entra trial environment, you can get a one-month trial here: Trial offer.
Scenario description
In this tutorial, you test Microsoft Entra single sign-on in a test environment. The scenario outlined in this tutorial consists of two main building blocks:
- Adding Jobscience from the gallery
- Configuring and testing Microsoft Entra single sign-on
Adding Jobscience from the gallery
To configure the integration of Jobscience into Microsoft Entra ID, you need to add Jobscience from the gallery to your list of managed SaaS apps.
To add Jobscience from the gallery, perform the following steps:
- Sign in to the Microsoft Entra admin center as at least a Cloud Application Administrator.
- Browse to Identity > Applications > Enterprise applications > New application.
- In the Add from the gallery section, type Jobscience in the search box.
- Select Jobscience from results panel and then add the app. Wait a few seconds while the app is added to your tenant.
Configuring and testing Microsoft Entra single sign-on
In this section, you configure and test Microsoft Entra single sign-on with Jobscience based on a test user called "Britta Simon."
For single sign-on to work, Microsoft Entra ID needs to know what the counterpart user in Jobscience is to a user in Microsoft Entra ID. In other words, a link relationship between a Microsoft Entra user and the related user in Jobscience needs to be established.
In Jobscience, assign the value of the user name in Microsoft Entra ID as the value of the Username to establish the link relationship.
To configure and test Microsoft Entra single sign-on with Jobscience, you need to complete the following building blocks:
- Configuring Microsoft Entra Single Sign-On - to enable your users to use this feature.
- Creating a Microsoft Entra test user - to test Microsoft Entra single sign-on with Britta Simon.
- Creating a Jobscience test user - to have a counterpart of Britta Simon in Jobscience that is linked to the Microsoft Entra representation of user.
- Assigning the Microsoft Entra test user - to enable Britta Simon to use Microsoft Entra single sign-on.
- Testing Single Sign-On - to verify whether the configuration works.
Configuring Microsoft Entra single sign-on
In this section, you enable Microsoft Entra single sign-on in the Azure portal and configure single sign-on in your Jobscience application.
To configure Microsoft Entra single sign-on with Jobscience, perform the following steps:
Sign in to the Microsoft Entra admin center as at least a Cloud Application Administrator.
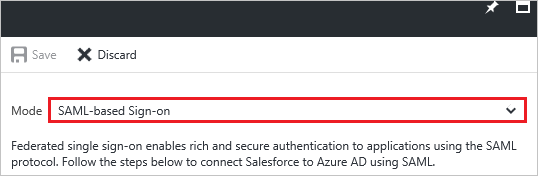
Browse to Identity > Applications > Enterprise applications > Jobscience application integration page, click Single sign-on.

On the Single sign-on dialog, select Mode as SAML-based Sign-on to enable single sign-on.
On the Jobscience Domain and URLs section, perform the following steps:
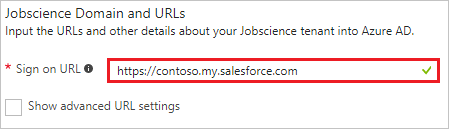
In the Sign-on URL textbox, type a URL using the following pattern:
http://<company name>.my.salesforce.comNote
This value is not real. Update this value with the actual Sign-On URL. Get this value by Jobscience Client support team or from the SSO profile you will create which is explained later in the tutorial.
On the SAML Signing Certificate section, click Certificate (Base64) and then save the certificate file on your computer.

Click Save button.

On the Jobscience Configuration section, click Configure Jobscience to open Configure sign-on window. Copy the Sign-Out URL, SAML Entity ID, and SAML Single Sign-On Service URL from the Quick Reference section.

Log in to your Jobscience company site as an administrator.
Go to Setup.

On the left navigation pane, in the Administer section, click Domain Management to expand the related section, and then click My Domain to open the My Domain page.

To verify that your domain has been set up correctly, make sure that it is in "Step 4 Deployed to Users" and review your "My Domain Settings".

On the Jobscience company site, click Security Controls, and then click Single Sign-On Settings.

In the Single Sign-On Settings section, perform the following steps:

a. Select SAML Enabled.
b. Click New.
On the SAML Single Sign-On Setting Edit dialog, perform the following steps:

a. In the Name textbox, type a name for your configuration.
b. In Issuer textbox, paste the value of SAML Entity ID.
c. In the Entity Id textbox, type
https://salesforce-jobscience.comd. Click Browse to upload your Microsoft Entra certificate.
e. As SAML Identity Type, select Assertion contains the Federation ID from the User object.
f. As SAML Identity Location, select Identity is in the NameIdentfier element of the Subject statement.
g. In Identity Provider Login URL textbox, paste the value of SAML Single Sign-On Service URL.
h. In Identity Provider Logout URL textbox, paste the value of Sign-Out URL.
i. Click Save.
On the left navigation pane, in the Administer section, click Domain Management to expand the related section, and then click My Domain to open the My Domain page.
On the My Domain page, in the Login Page Branding section, click Edit.

On the Login Page Branding page, in the Authentication Service section, the name of your SAML SSO Settings is displayed. Select it, and then click Save.

To get the SP initiated Single Sign on Login URL click on the Single Sign On settings in the Security Controls menu section.

Click the SSO profile you have created in the step above. This page shows the Single Sign on URL for your company (for example,
https://companyname.my.salesforce.com?so=companyid.
Tip
You can now read a concise version of these instructions inside the Azure portal, while you are setting up the app! After adding this app from the Active Directory > Enterprise Applications section, simply click the Single Sign-On tab and access the embedded documentation through the Configuration section at the bottom. You can read more about the embedded documentation feature here: Microsoft Entra ID embedded documentation
Creating a Microsoft Entra test user
The objective of this section is to create a test user called Britta Simon.

To create a test user in Microsoft Entra ID, perform the following steps:
In the Microsoft Entra admin center, navigate to Identity > Users > All users.

To open the User dialog, click Add on the top of the dialog.

On the User dialog page, perform the following steps:
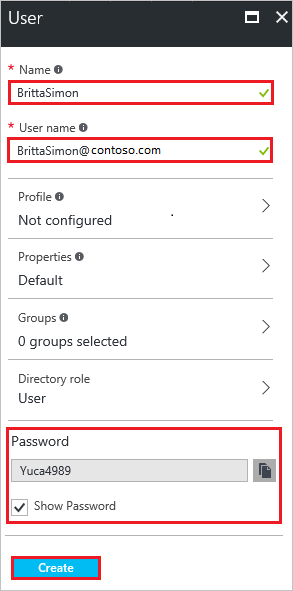
a. In the Name textbox, type BrittaSimon.
b. In the User name textbox, type the email address of BrittaSimon.
c. Select Show Password and write down the value of the Password.
d. Click Create.
Creating a Jobscience test user
In order to enable Microsoft Entra users to log in to Jobscience, they must be provisioned into Jobscience. In the case of Jobscience, provisioning is a manual task.
Note
You can use any other Jobscience user account creation tools or APIs provided by Jobscience to provision Microsoft Entra user accounts.
To configure user provisioning, perform the following steps:
Log in to your Jobscience company site as administrator.
Go to Setup.
Go to Manage Users > Users.

Click New User.

On the Edit User dialog, perform the following steps:

a. In the First Name textbox, type a first name of the user like Britta.
b. In the Last Name textbox, type a last name of the user like Simon.
c. In the Alias textbox, type an alias name of the user like brittas.
d. In the Email textbox, type the email address of user like Brittasimon@contoso.com.
e. In the User Name textbox, type a user name of user like Brittasimon@contoso.com.
f. In the Nick Name textbox, type a nick name of user like Simon.
g. Click Save.
Note
The Microsoft Entra account holder receives an email and follows a link to confirm their account before it becomes active.
Assigning the Microsoft Entra test user
In this section, you enable Britta Simon to use Azure single sign-on by granting access to Jobscience.

To assign Britta Simon to Jobscience, perform the following steps:
Sign in to the Microsoft Entra admin center as at least a Cloud Application Administrator.
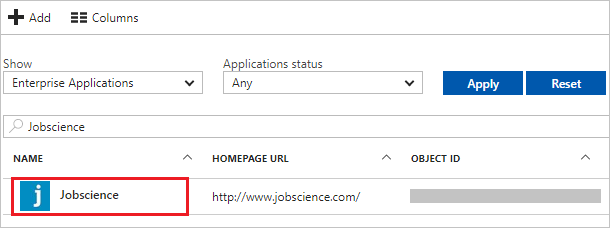
Browse to Identity > Applications > Enterprise applications > Jobscience.
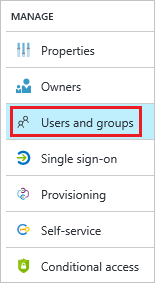
In the menu on the left, click Users and groups.
Click Add button. Then select Users and groups on Add Assignment dialog.
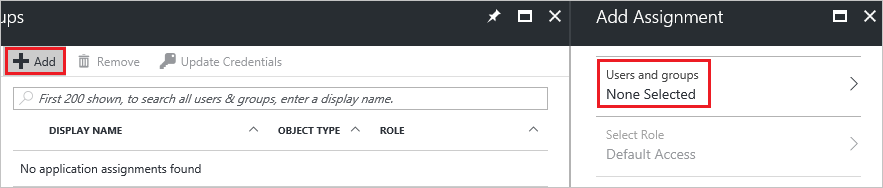
On Users and groups dialog, select Britta Simon in the Users list.
Click Select button on Users and groups dialog.
Click Assign button on Add Assignment dialog.
Testing single sign-on
In this section, you test your Microsoft Entra single sign-on configuration using the Access Panel.
When you click the Jobscience tile in the Access Panel, you should get automatically signed-on to your Jobscience application. For more information about the Access Panel, see Introduction to the Access Panel.
Additional resources
Feedback
Coming soon: Throughout 2024 we will be phasing out GitHub Issues as the feedback mechanism for content and replacing it with a new feedback system. For more information see: https://aka.ms/ContentUserFeedback.
Submit and view feedback for