Tutorial: Microsoft Entra Single sign-on (SSO) integration with SAP NetWeaver
In this tutorial, you'll learn how to integrate SAP NetWeaver with Microsoft Entra ID. When you integrate SAP NetWeaver with Microsoft Entra ID, you can:
- Control in Microsoft Entra ID who has access to SAP NetWeaver.
- Enable your users to be automatically signed-in to SAP NetWeaver with their Microsoft Entra accounts.
- Manage your accounts in one central location.
Prerequisites
To get started, you need the following items:
- A Microsoft Entra subscription. If you don't have a subscription, you can get a free account.
- SAP NetWeaver single sign-on (SSO) enabled subscription.
- SAP NetWeaver V7.20 required atleast
Scenario description
- SAP NetWeaver supports both SAML (SP initiated SSO) and OAuth. In this tutorial, you configure and test Microsoft Entra SSO in a test environment.
Note
Identifier of this application is a fixed string value so only one instance can be configured in one tenant.
Note
Configure the application either in SAML or in OAuth as per your organizational requirement.
Adding SAP NetWeaver from the gallery
To configure the integration of SAP NetWeaver into Microsoft Entra ID, you need to add SAP NetWeaver from the gallery to your list of managed SaaS apps.
- Sign in to the Microsoft Entra admin center as at least a Cloud Application Administrator.
- Browse to Identity > Applications > Enterprise applications > New application.
- In the Add from the gallery section, type SAP NetWeaver in the search box.
- Select SAP NetWeaver from results panel and then add the app. Wait a few seconds while the app is added to your tenant.
Alternatively, you can also use the Enterprise App Configuration Wizard. In this wizard, you can add an application to your tenant, add users/groups to the app, assign roles, as well as walk through the SSO configuration as well. Learn more about Microsoft 365 wizards.
Configure and test Microsoft Entra SSO for SAP NetWeaver
Configure and test Microsoft Entra SSO with SAP NetWeaver using a test user called B.Simon. For SSO to work, you need to establish a link relationship between a Microsoft Entra user and the related user in SAP NetWeaver.
To configure and test Microsoft Entra SSO with SAP NetWeaver, perform the following steps:
- Configure Microsoft Entra SSO to enable your users to use this feature.
- Create a Microsoft Entra test user to test Microsoft Entra single sign-on with B.Simon.
- Assign the Microsoft Entra test user to enable B.Simon to use Microsoft Entra single sign-on.
- Configure SAP NetWeaver using SAML to configure the SSO settings on application side.
- Create SAP NetWeaver test user to have a counterpart of B.Simon in SAP NetWeaver that is linked to the Microsoft Entra representation of user.
- Test SSO to verify whether the configuration works.
- Configure SAP NetWeaver for OAuth to configure the OAuth settings on application side.
Configure Microsoft Entra SSO
In this section, you enable Microsoft Entra single sign-on.
To configure Microsoft Entra single sign-on with SAP NetWeaver, perform the following steps:
Open a new web browser window and sign into your SAP NetWeaver company site as an administrator
Make sure that http and https services are active and appropriate ports are assigned in SMICM T-Code.
Sign on to business client of SAP System (T01), where SSO is required and activate HTTP Security session Management.
Go to Transaction code SICF_SESSIONS. It displays all relevant profile parameters with current values. They look like below:-
login/create_sso2_ticket = 2
login/accept_sso2_ticket = 1
login/ticketcache_entries_max = 1000
login/ticketcache_off = 0  login/ticket_only_by_https = 0
icf/set_HTTPonly_flag_on_cookies = 3
icf/user_recheck = 0  http/security_session_timeout = 1800
http/security_context_cache_size = 2500
rdisp/plugin_auto_logout = 1800
rdisp/autothtime = 60
Note
Adjust above parameters as per your organization requirements, Above parameters are given here as indication only.
If necessary adjust parameters, in the instance/default profile of SAP system and restart SAP system.
Double-click on relevant client to enable HTTP security session.

Activate below SICF services:
/sap/public/bc/sec/saml2
/sap/public/bc/sec/cdc_ext_service
/sap/bc/webdynpro/sap/saml2
/sap/bc/webdynpro/sap/sec_diag_tool (This is only to enable / disable trace)
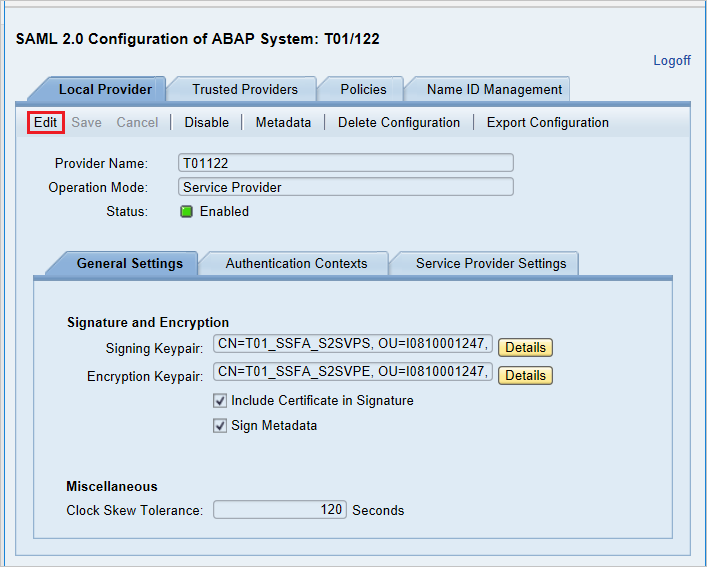
Go to Transaction code SAML2 in business client of SAP system [T01/122]. It will open a user interface in a browser. In this example, we assumed 122 as SAP business client.
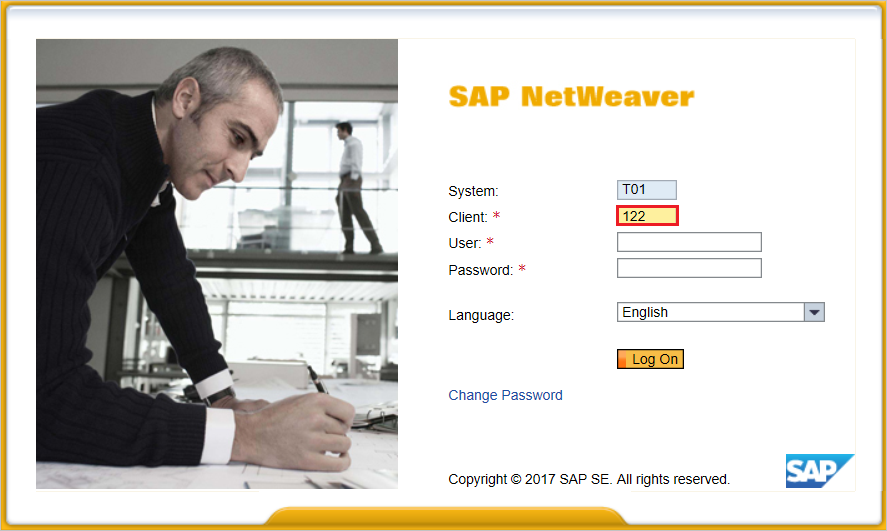
Provide your username and password to enter in user interface and click Edit.
Replace Provider Name from T01122 to
http://T01122and click on Save.Note
By default provider name come as
<sid><client>format but Microsoft Entra ID expects name in the format of<protocol>://<name>, recommending to maintain provider name ashttps://<sid><client>to allow multiple SAP NetWeaver ABAP engines to configure in Microsoft Entra ID.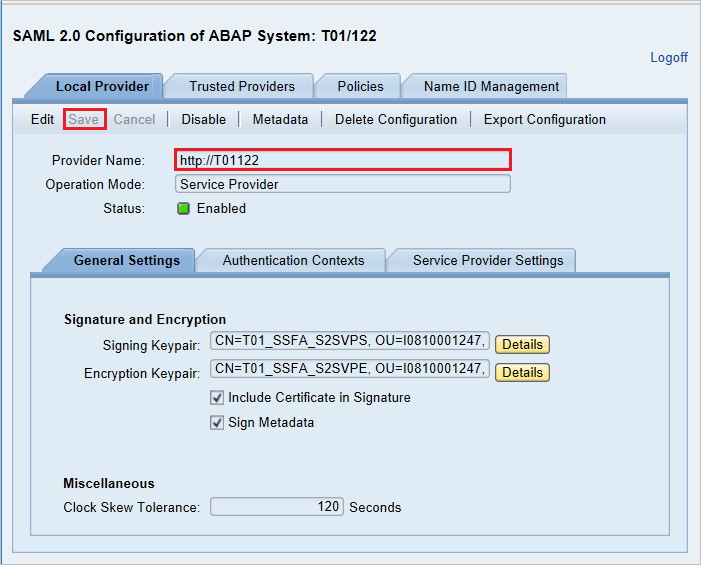
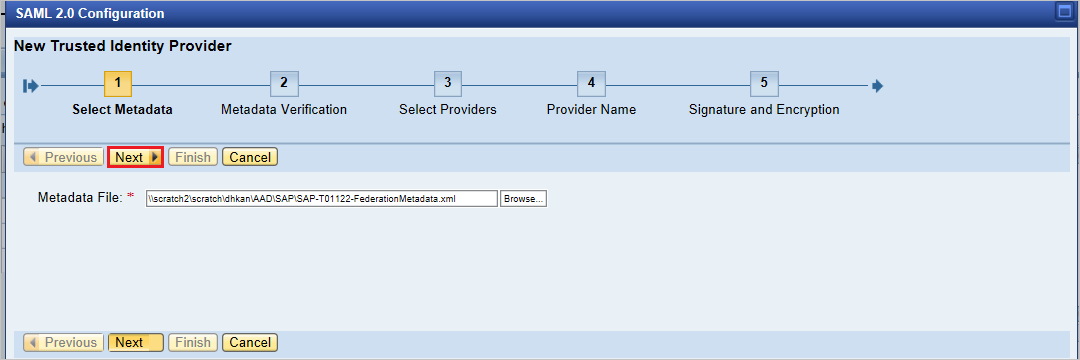
Generating Service Provider Metadata:- Once we are done with configuring the Local Provider and Trusted Providers settings on SAML 2.0 User Interface, the next step would be to generate the service provider’s metadata file (which would contain all the settings, authentication contexts and other configurations in SAP). Once this file is generated we need to upload this in Microsoft Entra ID.
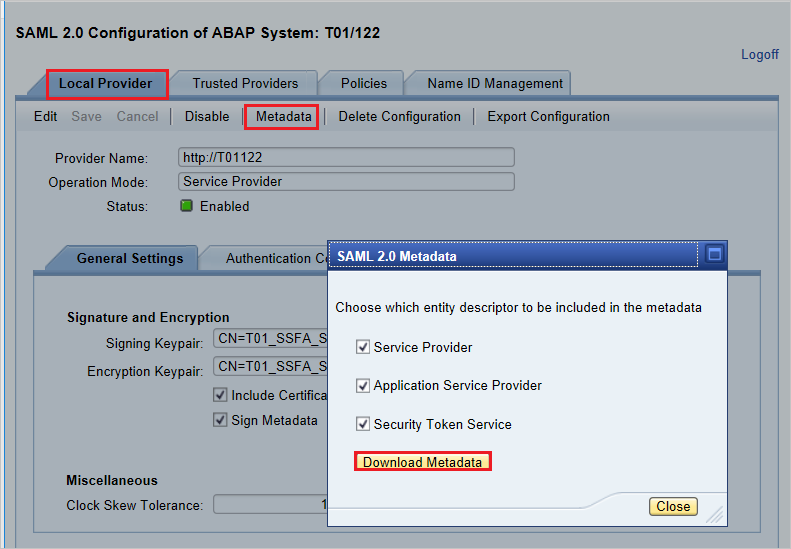
Go to Local Provider tab.
Click on Metadata.
Save the generated Metadata XML file on your computer and upload it in Basic SAML Configuration section to autopopulate the Identifier and Reply URL values in Azure portal.
Follow these steps to enable Microsoft Entra SSO.
Sign in to the Microsoft Entra admin center as at least a Cloud Application Administrator.
Browse to Identity > Applications > Enterprise applications > SAP NetWeaver application integration page, find the Manage section and select Single sign-on.
On the Select a Single sign-on method page, select SAML.
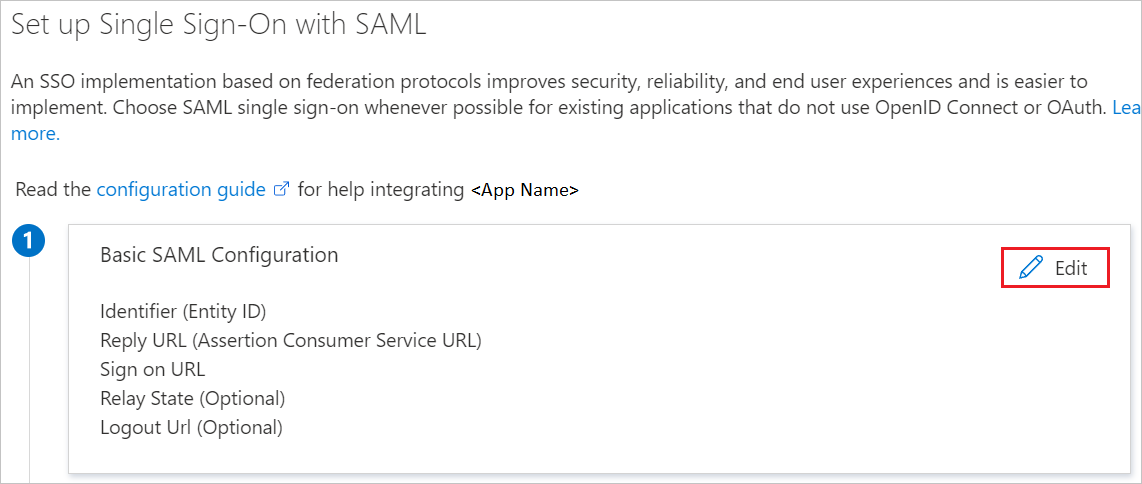
On the Set up Single Sign-On with SAML page, click the pencil icon for Basic SAML Configuration to edit the settings.
On the Basic SAML Configuration section, if you wish to configure the application in IDP initiated mode, perform the following step:
Click Upload metadata file to upload the Service Provider metadata file, which you have obtained earlier.
Click on folder logo to select the metadata file and click Upload.
After the metadata file is successfully uploaded, the Identifier and Reply URL values get auto populated in Basic SAML Configuration section textbox as shown below:
In the Sign-on URL text box, type a URL using the following pattern:
https://<your company instance of SAP NetWeaver>
Note
Some customers have encountered an error of an incorrect Reply URL configured for their instance. If you receive any such error, use these PowerShell commands. First update the Reply URLs in the application object with the Reply URL, then update the service principal. Use the Get-MgServicePrincipal to get the Service Principal ID value.
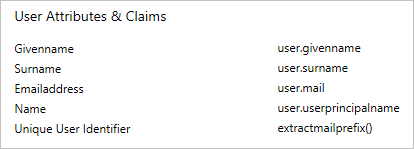
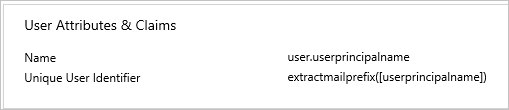
$params = @{
   web = @{
      redirectUris = "<Your Correct Reply URL>"
   }
}
Update-MgApplication -ApplicationId "<Application ID>" -BodyParameter $params
Update-MgServicePrincipal -ServicePrincipalId "<Service Principal ID>" -ReplyUrls "<Your Correct Reply URL>"
SAP NetWeaver application expects the SAML assertions in a specific format, which requires you to add custom attribute mappings to your SAML token attributes configuration. The following screenshot shows the list of default attributes. Click Edit icon to open User Attributes dialog.
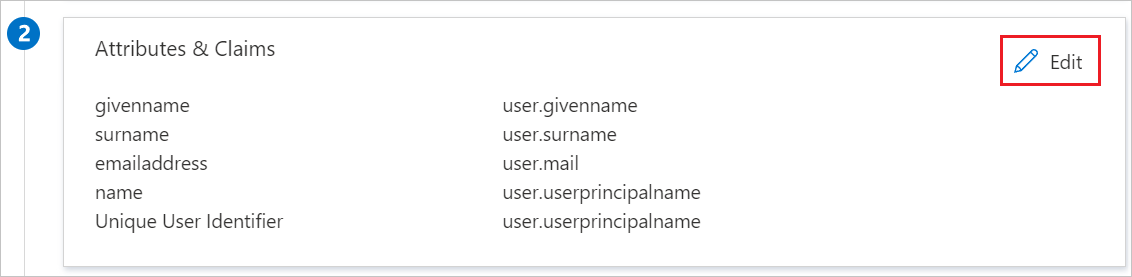
In the User Claims section on the User Attributes dialog, configure SAML token attribute as shown in the image above and perform the following steps:
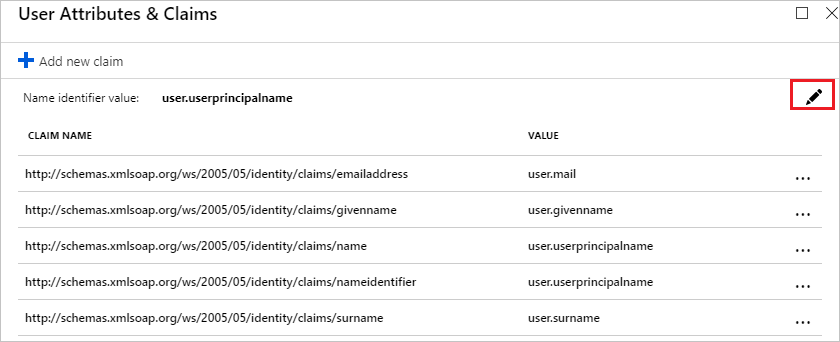
Click Edit icon to open the Manage user claims dialog.
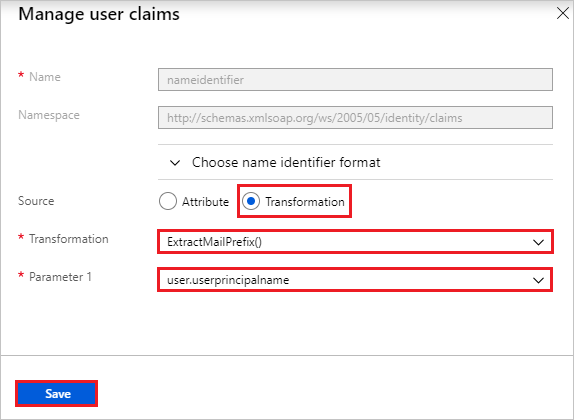
From the Transformation list, select ExtractMailPrefix().
From the Parameter 1 list, select user.userprincipalname.
Click Save.
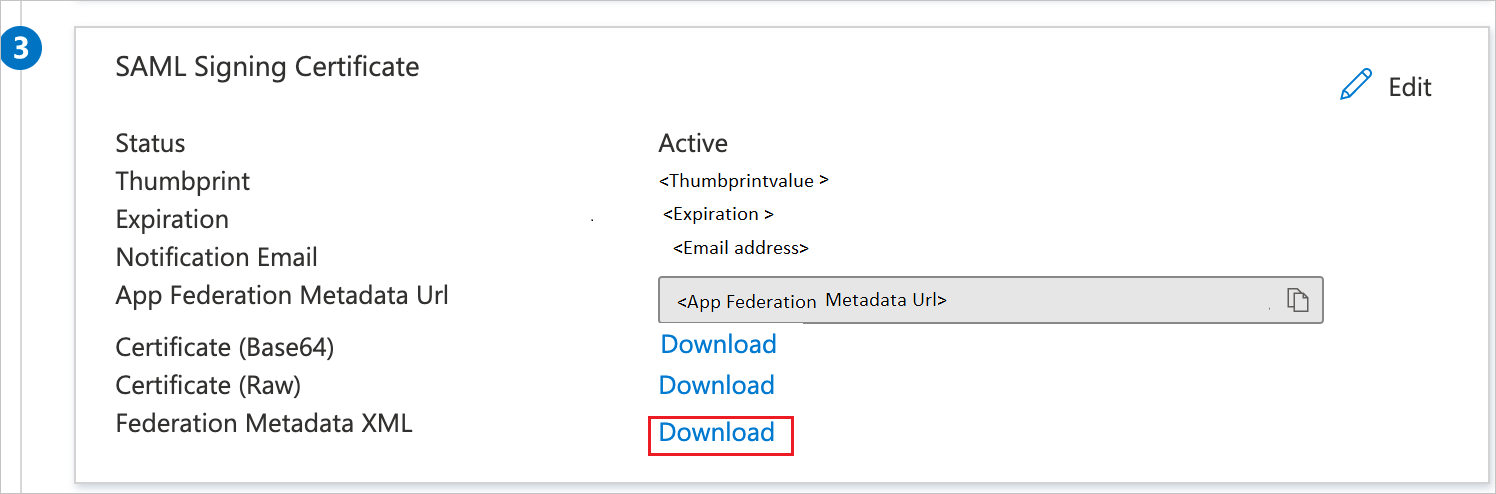
On the Set up Single Sign-On with SAML page, in the SAML Signing Certificate section, find Federation Metadata XML and select Download to download the certificate and save it on your computer.
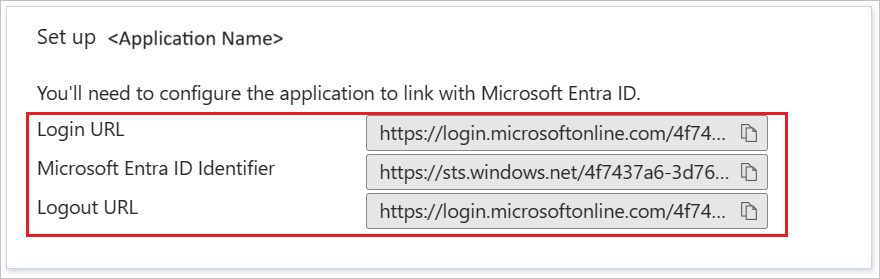
On the Set up SAP NetWeaver section, copy the appropriate URL(s) based on your requirement.
Create a Microsoft Entra test user
In this section, you'll create a test user called B.Simon.
- Sign in to the Microsoft Entra admin center as at least a User Administrator.
- Browse to Identity > Users > All users.
- Select New user > Create new user, at the top of the screen.
- In the User properties, follow these steps:
- In the Display name field, enter
B.Simon. - In the User principal name field, enter the username@companydomain.extension. For example,
B.Simon@contoso.com. - Select the Show password check box, and then write down the value that's displayed in the Password box.
- Select Review + create.
- In the Display name field, enter
- Select Create.
Assign the Microsoft Entra test user
In this section, you'll enable B.Simon to use single sign-on by granting access to SAP NetWeaver.
- Sign in to the Microsoft Entra admin center as at least a Cloud Application Administrator.
- Browse to Identity > Applications > Enterprise applications > SAP NetWeaver.
- In the app's overview page, find the Manage section and select Users and groups.
- Select Add user, then select Users and groups in the Add Assignment dialog.
- In the Users and groups dialog, select B.Simon from the Users list, then click the Select button at the bottom of the screen. If you are expecting a role to be assigned to the users, you can select it from the Select a role dropdown. If no role has been set up for this app, you see "Default Access" role selected.
- In the Add Assignment dialog, click the Assign button.
Configure SAP NetWeaver using SAML
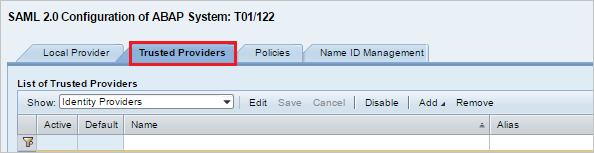
Sign in to SAP system and go to transaction code SAML2. It opens new browser window with SAML configuration screen.
For configuring End points for trusted Identity provider (Microsoft Entra ID) go to Trusted Providers tab.
Press Add and select Upload Metadata File from the context menu.
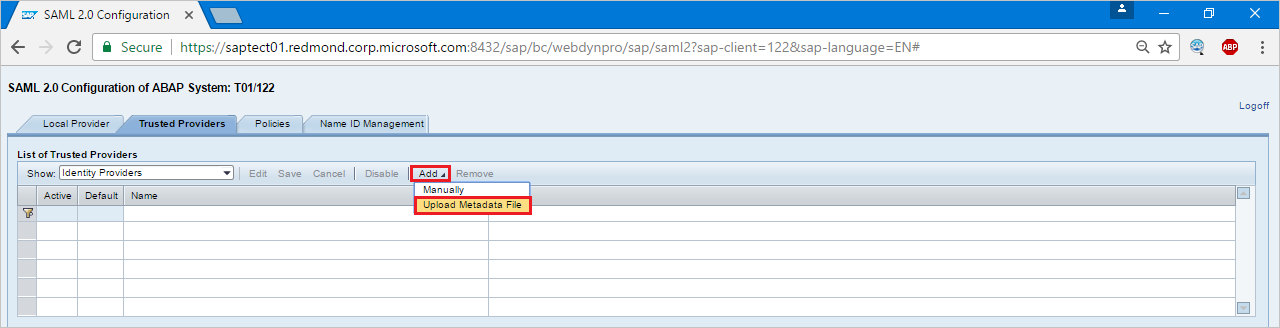
Upload metadata file, which you have downloaded.
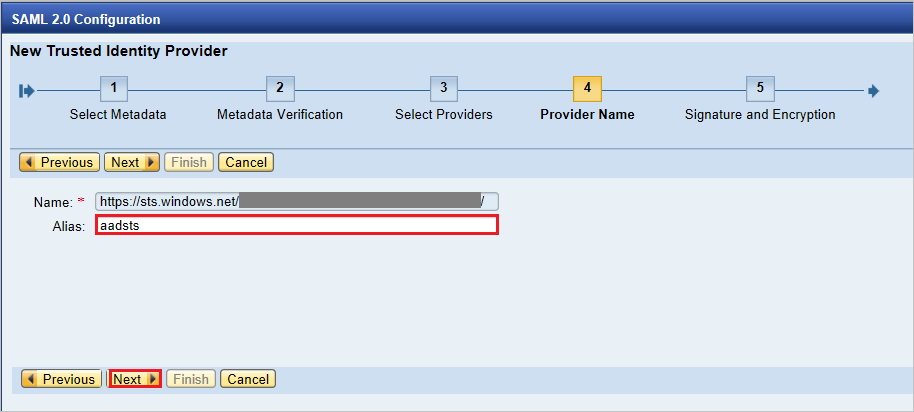
In the next screen type the Alias name. For example, aadsts and press Next to continue.
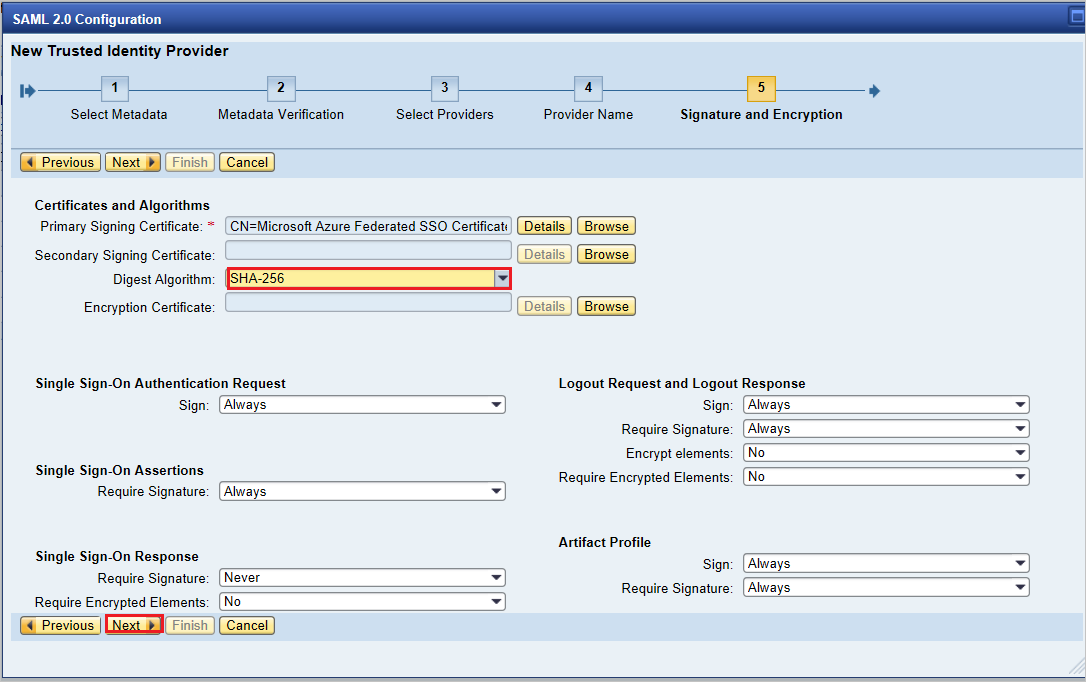
Make sure that your Digest Algorithm should be SHA-256 and don’t require any changes and press Next.
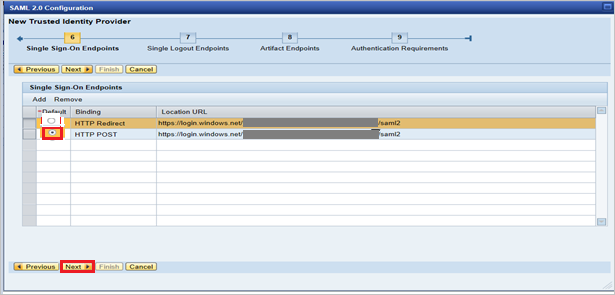
On Single Sign-On Endpoints, use HTTP POST and click Next to continue.
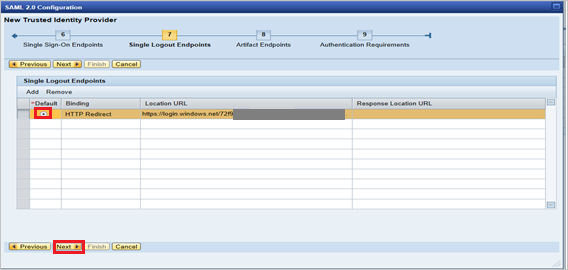
On Single Logout Endpoints select HTTPRedirect and click Next to continue.
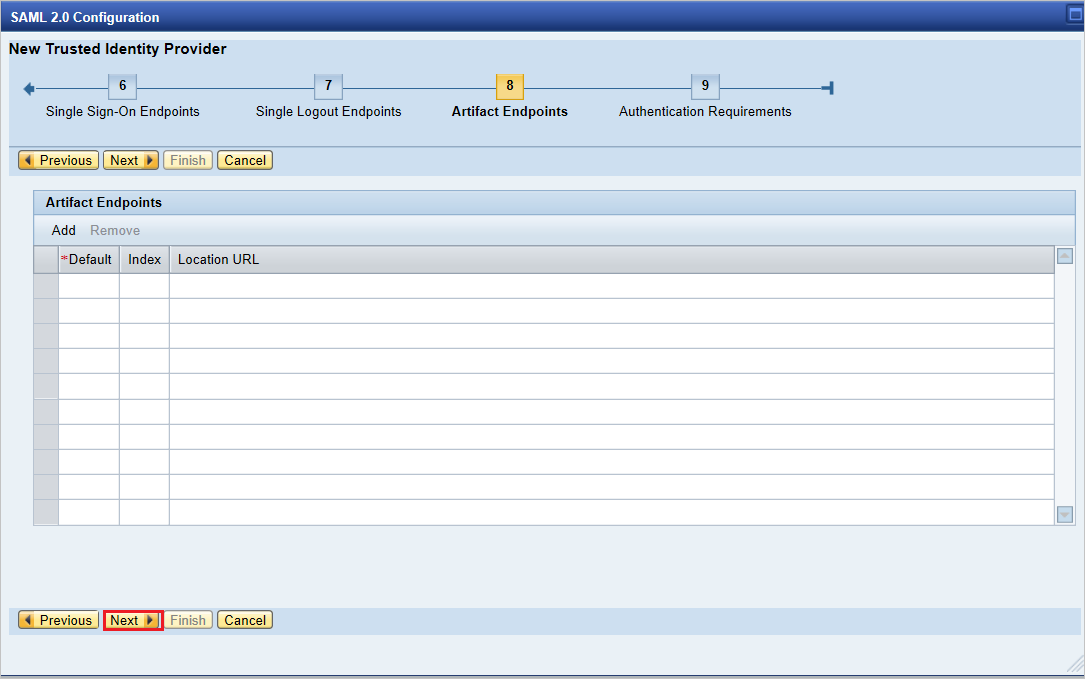
On Artifact Endpoints, press Next to continue.
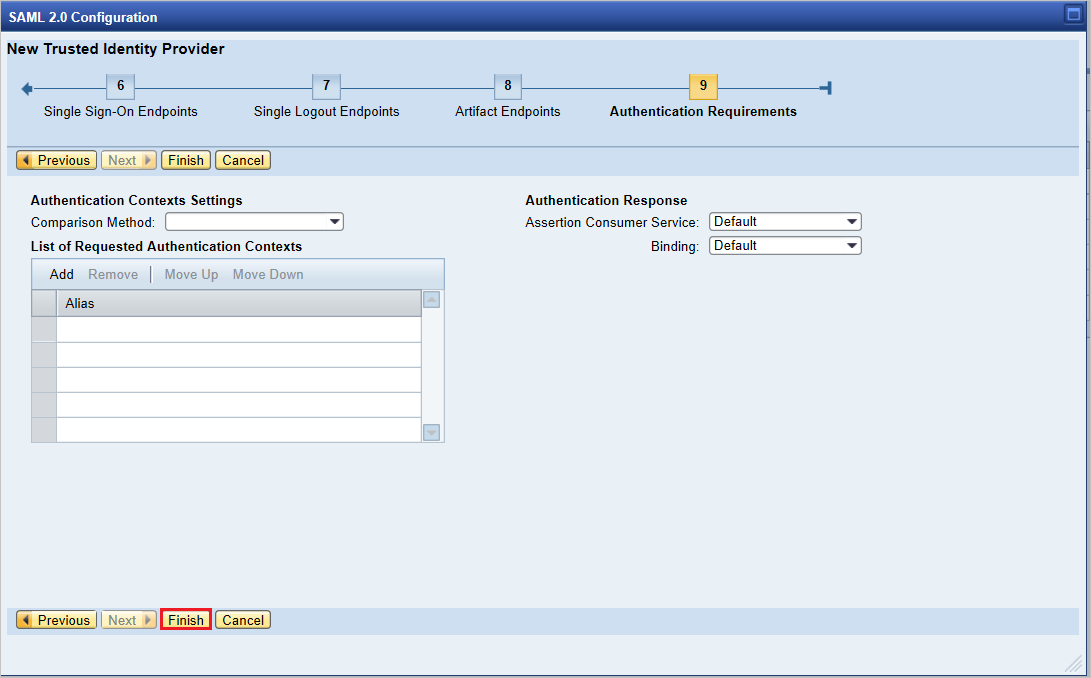
On Authentication Requirements, click Finish.
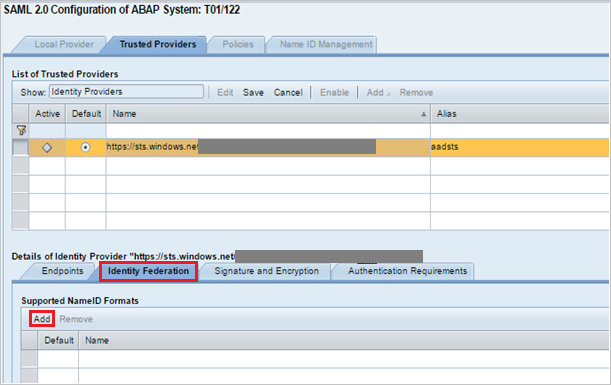
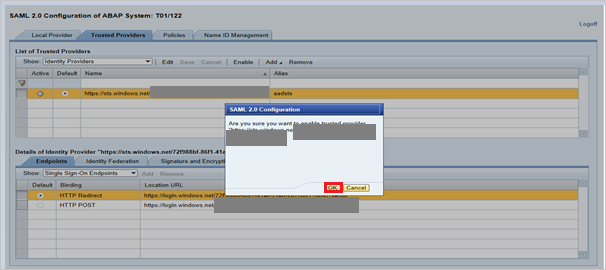
Go to tab Trusted Provider > Identity Federation (from bottom of the screen). Click Edit.
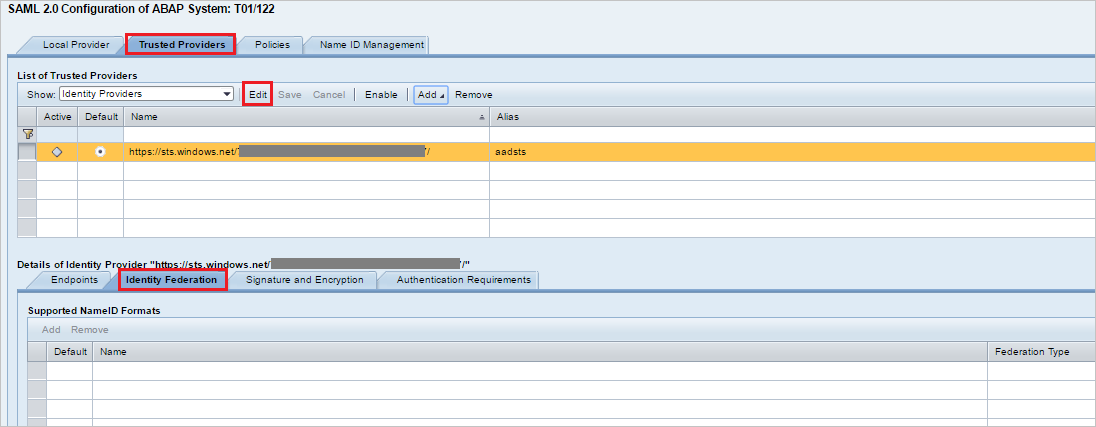
Click Add under the Identity Federation tab (bottom window).
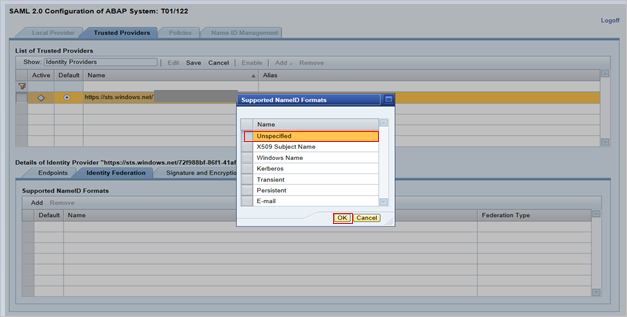
From the pop-up window, select Unspecified from the Supported NameID formats and click OK.
Give the User ID Source value as Assertion Attribute, User ID mapping mode value as Email and Assertion Attribute Name as
http://schemas.xmlsoap.org/ws/2005/05/identity/claims/name.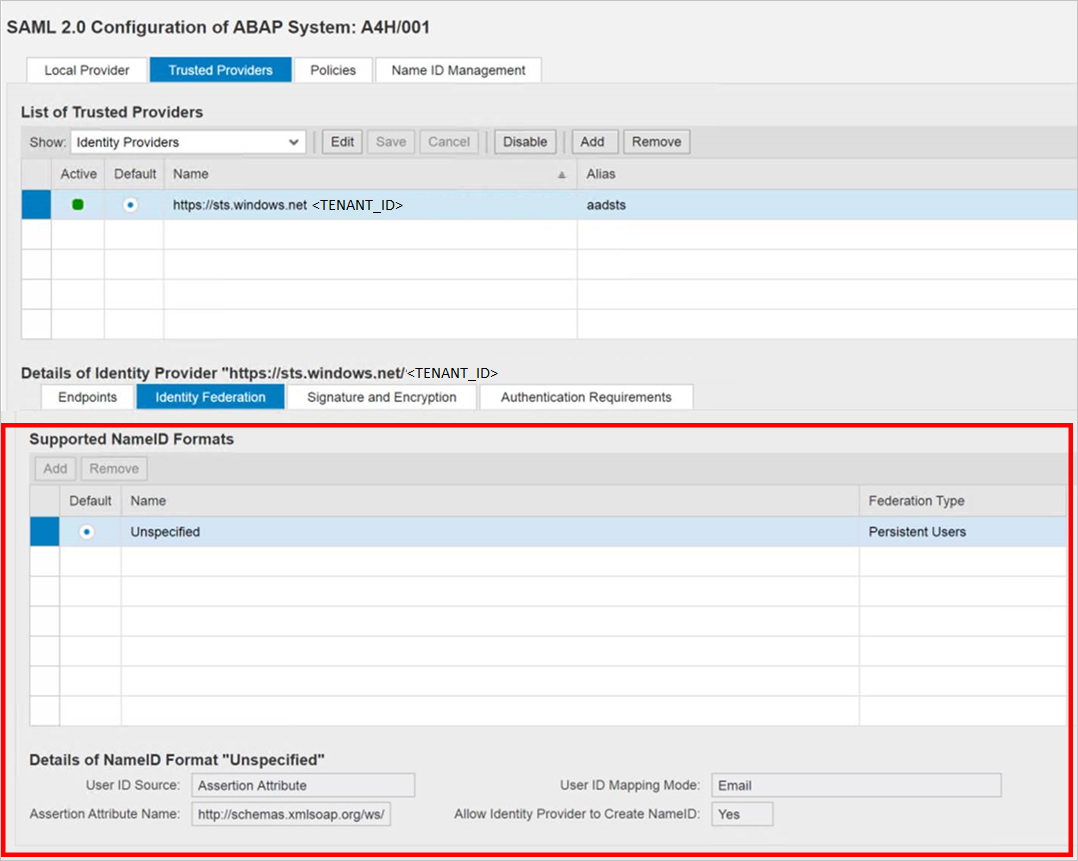
Note that User ID Source and User ID mapping mode values determine the link between SAP user and Microsoft Entra claim.
Scenario: SAP User to Microsoft Entra user mapping.
NameID details screenshot from SAP.

Screenshot mentioning Required claims from Microsoft Entra ID.
Scenario: Select SAP user ID based on configured email address in SU01. In this case email ID should be configured in su01 for each user who requires SSO.
NameID details screenshot from SAP.

screenshot mentioning Required claims from Microsoft Entra ID.
Click Save and then click Enable to enable identity provider.

Click OK once prompted.
Create SAP NetWeaver test user
In this section, you create a user called B.simon in SAP NetWeaver. Please work your in house SAP expert team or work with your organization SAP partner to add the users in the SAP NetWeaver platform.
Test SSO
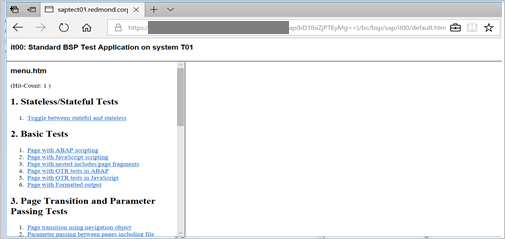
Once the identity provider Microsoft Entra ID was activated, try accessing below URL to check SSO (there will no prompt for username & password)
https://<sapurl>/sap/bc/bsp/sap/it00/default.htm(or) use the URL below
https://<sapurl>/sap/bc/bsp/sap/it00/default.htmNote
Replace sapurl with actual SAP hostname.
The above URL should take you to below mentioned screen. If you are able to reach up to the below page, Microsoft Entra SSO setup is successfully done.
If username & password prompt occurs, please diagnose the issue by enable the trace using below URL
https://<sapurl>/sap/bc/webdynpro/sap/sec_diag_tool?sap-client=122&sap-language=EN#
Configure SAP NetWeaver for OAuth
SAP Documented process is available at the location: NetWeaver Gateway Service Enabling and OAuth 2.0 Scope Creation
Go to SPRO and find Activate and Maintain services.
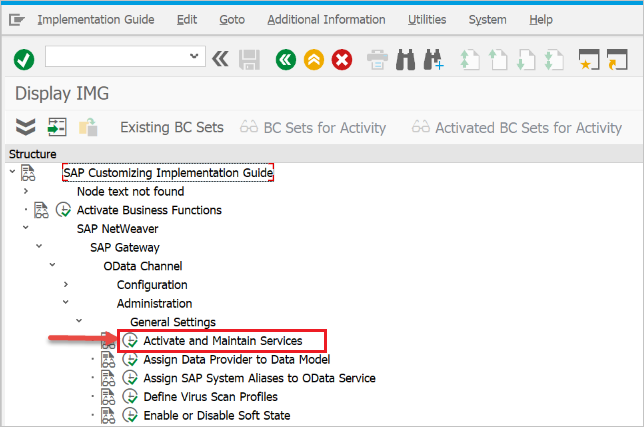
In this example we want to connect the OData service:
DAAG_MNGGRPwith OAuth to Microsoft Entra SSO. Use the technical service name search for the serviceDAAG_MNGGRPand activate if not yet active, already (look forgreenstatus under ICF nodes tab). Ensure if system alias (the connected backend system, where the service actually running) is correct.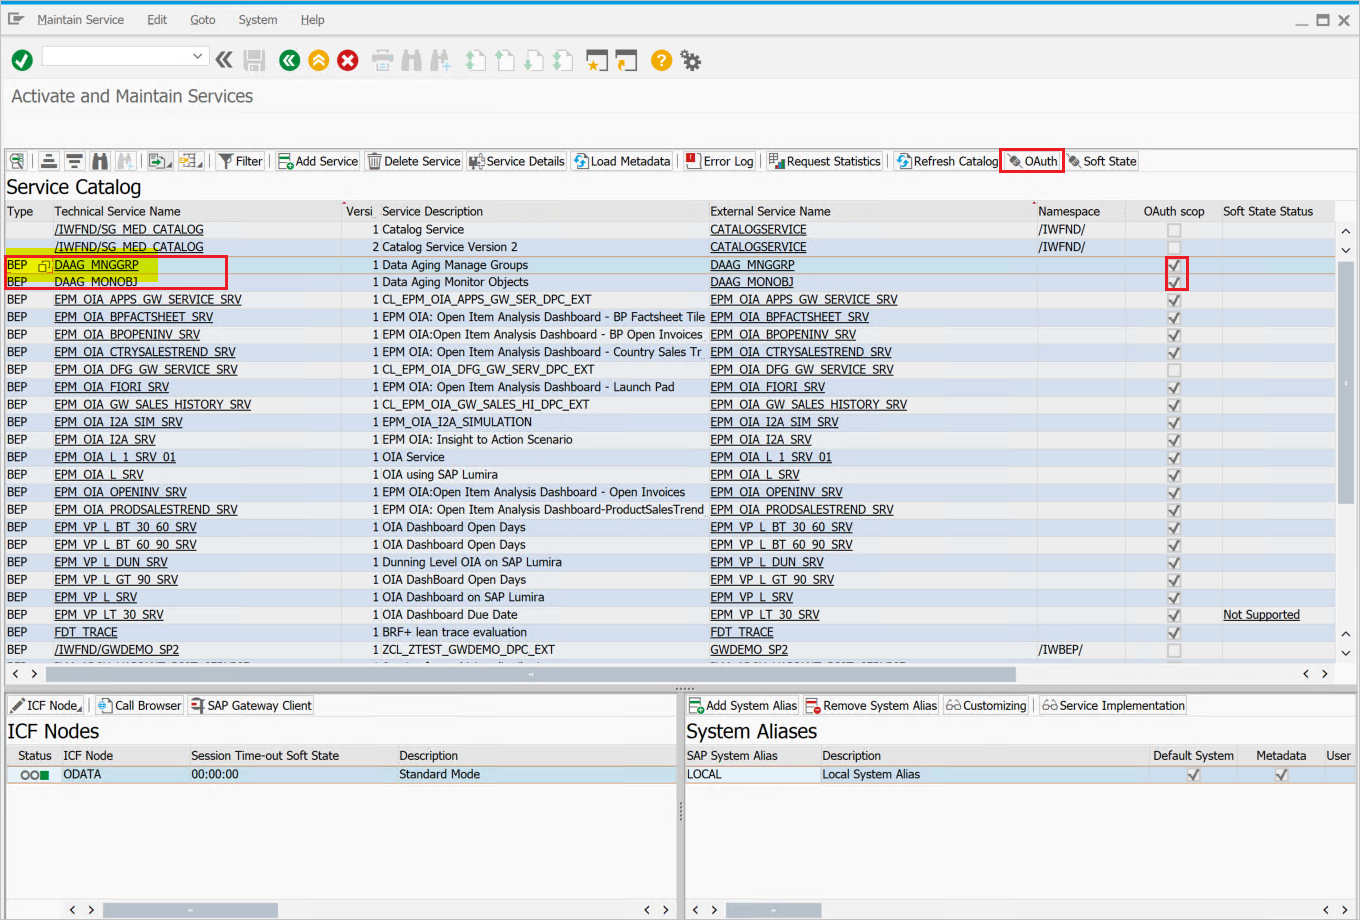
- Then click pushbutton OAuth on the top button bar and assign
scope(keep default name as offered).
- Then click pushbutton OAuth on the top button bar and assign
For our example the scope is
DAAG_MNGGRP_001, it is generated from the service name by automatically adding a number. Report/IWFND/R_OAUTH_SCOPEScan be used to change name of scope or create manually.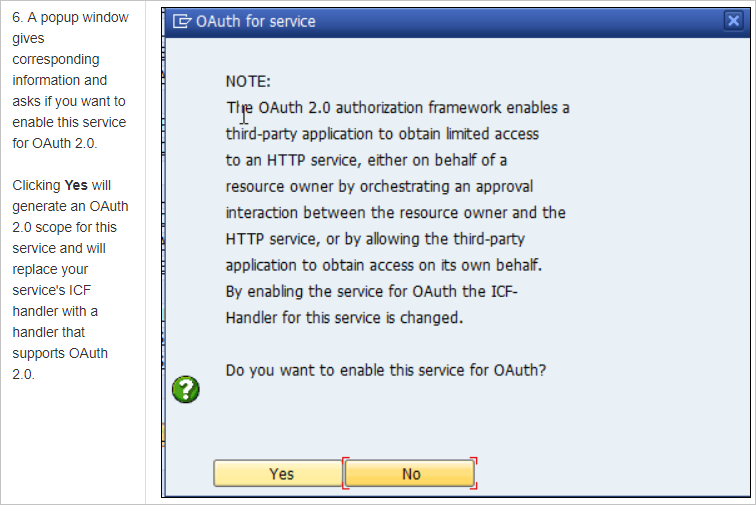
Note
Message
soft state status is not supported– can be ignored, as no problem.
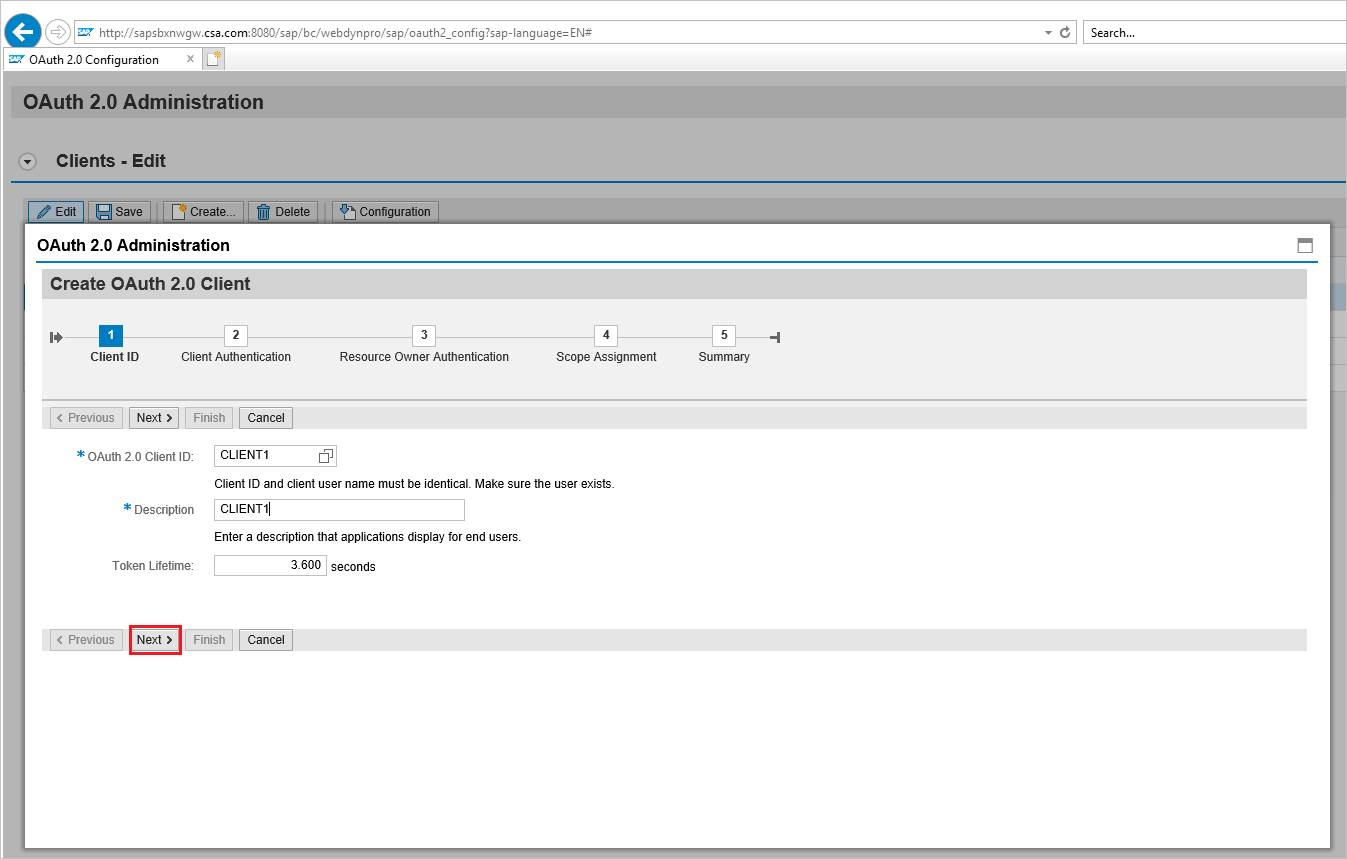
Create a service user for the OAuth 2.0 Client
OAuth2 uses a
service IDto get the access token for the end-user on its behalf. Important restriction by OAuth design: theOAuth 2.0 Client IDmust be identical with theusernamethe OAuth 2.0 client uses for login when requesting an Access Token. Therefore, for our example, we are going to register an OAuth 2.0 client with name CLIENT1, and as a prerequisite a user with the same name (CLIENT1) must exist in the SAP system and that user we will configure to be used by the referred application.When registering an OAuth Client we use the
SAML Bearer Grant type.Note
For more details, refer OAuth 2.0 Client Registration for the SAML Bearer Grant Type here.
tcod: SU01 / create user CLIENT1 as
System typeand assign password, save it as need to provide the credential to the API programmer, who should burn it with the username to the calling code. No profile or role should be assigned.
Register the new OAuth 2.0 Client ID with the creation wizard
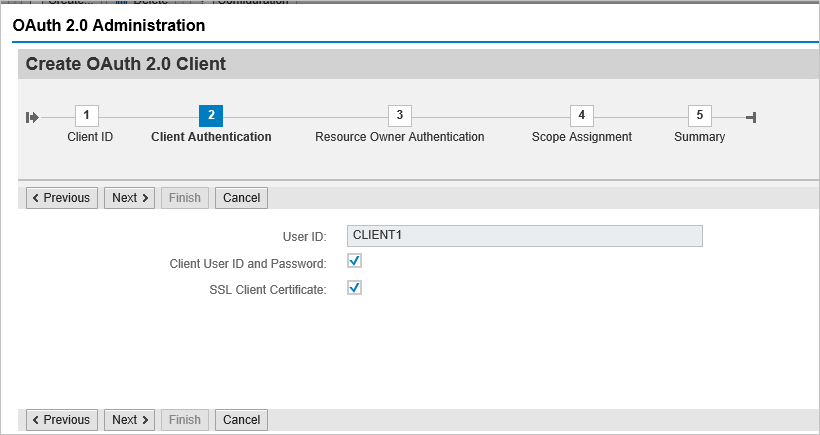
To register a new OAuth 2.0 client start transaction SOAUTH2. The transaction will display an overview about the OAuth 2.0 clients that were already registered. Choose Create to start the wizard for the new OAuth client named as CLIENT1in this example.
Go to T-Code: SOAUTH2 and Provide the description then click next.
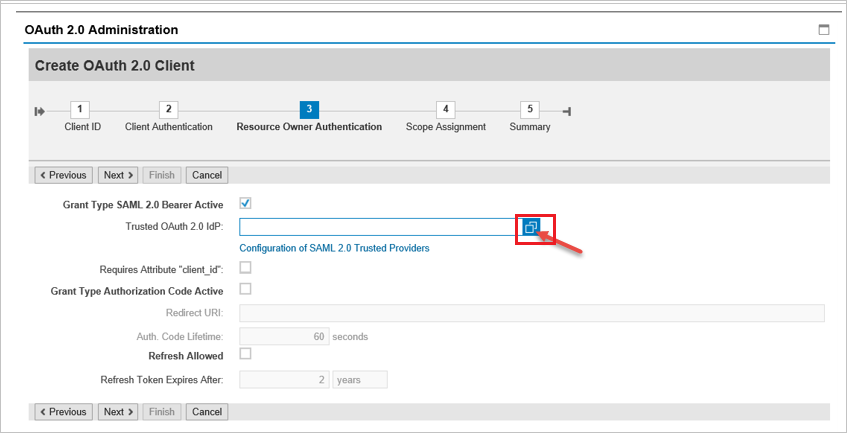
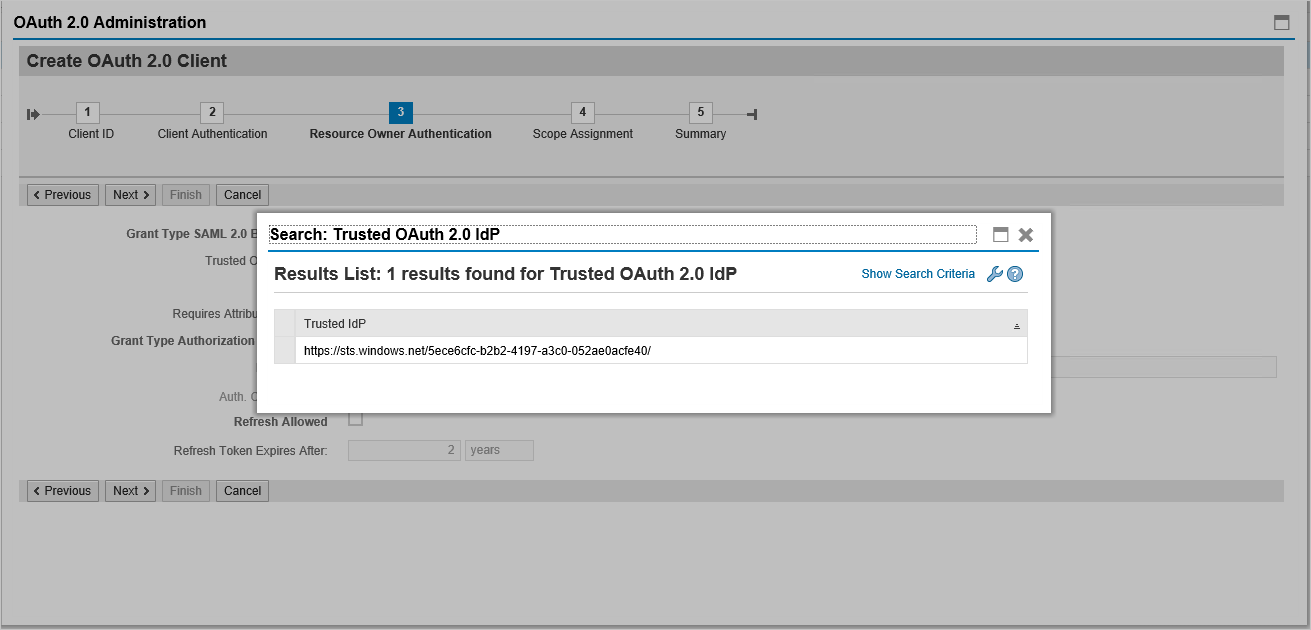
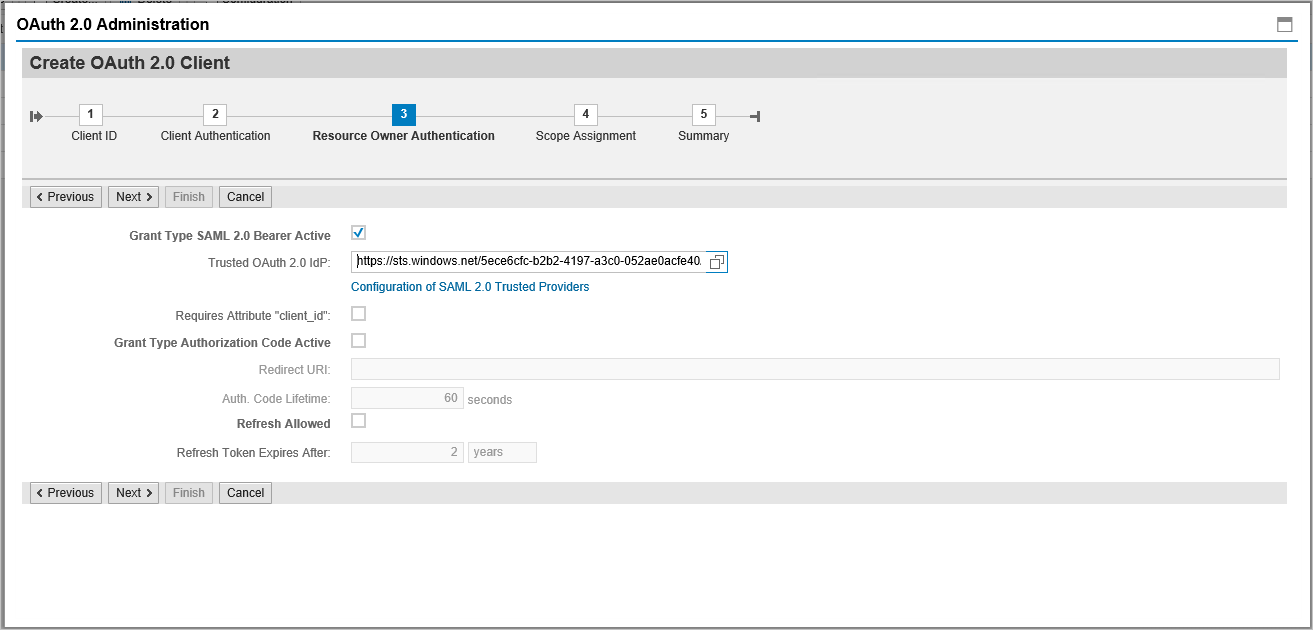
Select the already added SAML2 IdP – Microsoft Entra ID from the dropdown list and save.
Click on Add under scope assignment to add the previously created scope:
DAAG_MNGGRP_001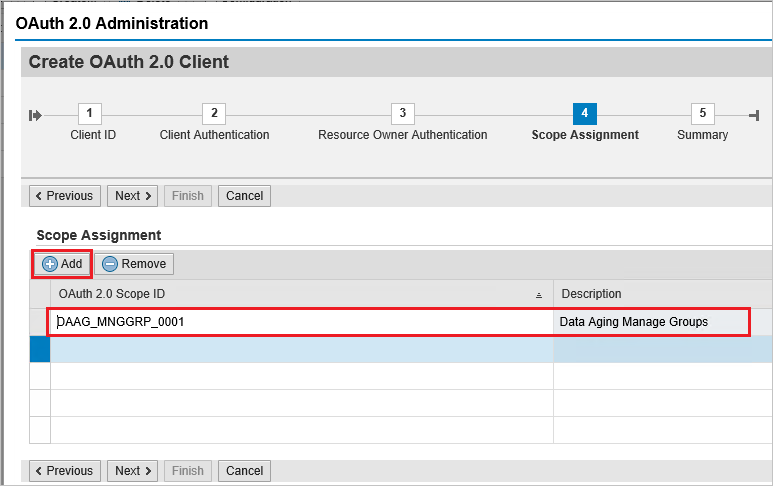
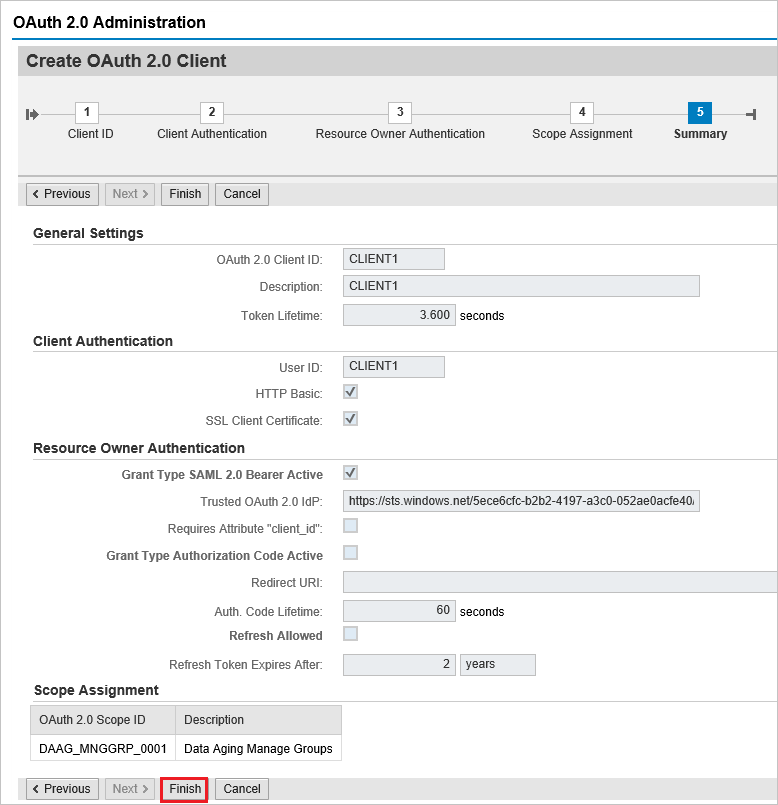
Click finish.
Next Steps
Once you configure Microsoft Entra SAP NetWeaver you can enforce Session Control, which protects exfiltration and infiltration of your organization’s sensitive data in real time. Session Control extends from Conditional Access. Learn how to enforce session control with Microsoft Defender for Cloud Apps.
Feedback
Coming soon: Throughout 2024 we will be phasing out GitHub Issues as the feedback mechanism for content and replacing it with a new feedback system. For more information see: https://aka.ms/ContentUserFeedback.
Submit and view feedback for