Add push notifications to your Xamarin.Android app
Overview
In this tutorial, you add push notifications to the Xamarin.Android quickstart project so that a push notification is sent to the device every time a record is inserted.
If you do not use the downloaded quickstart server project, you will need the push notification extension package. For more information, see the Work with the .NET backend server SDK for Azure Mobile Apps guide.
Prerequisites
This tutorial requires the setup:
- An active Google account. You can sign up for a Google account at accounts.google.com.
- Google Cloud Messaging Client Component.
Configure a Notification Hub
The Mobile Apps feature of Azure App Service uses Azure Notification Hubs to send pushes, so you will be configuring a notification hub for your mobile app.
In the Azure portal, go to App Services, and then select your app back end. Under Settings, select Push.
To add a notification hub resource to the app, select Connect. You can either create a hub or connect to an existing one.
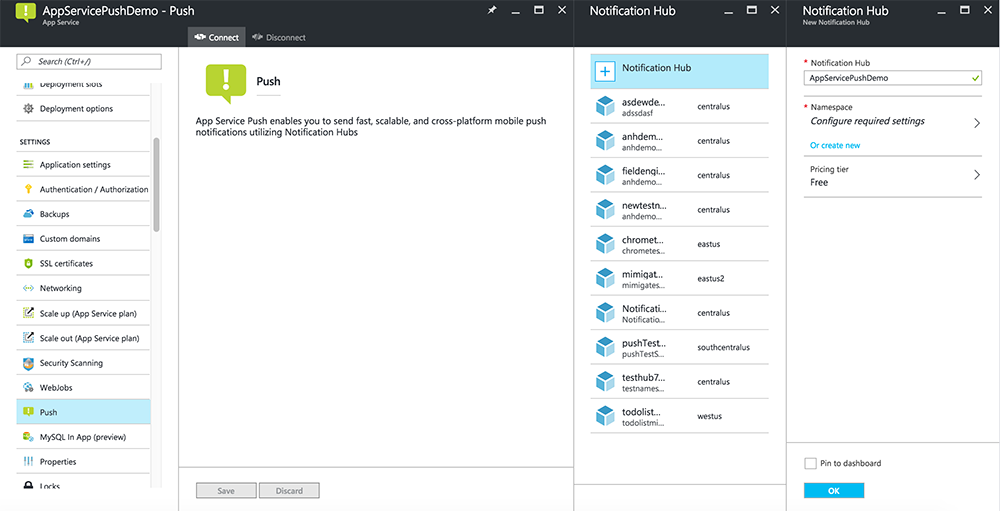
Now you have connected a notification hub to your Mobile Apps back-end project. Later you configure this notification hub to connect to a platform notification system (PNS) to push to devices.
Enable Firebase Cloud Messaging
Sign in to the Firebase console. Create a new Firebase project if you don't already have one.
After you create your project, select Add Firebase to your Android app.

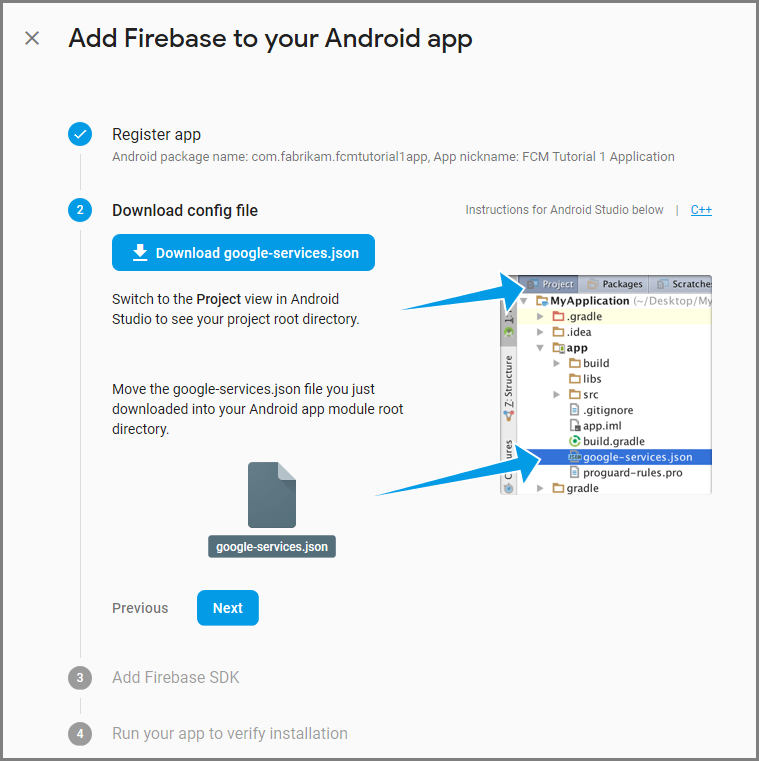
On the Add Firebase to your Android app page, take the following steps:
For Android package name, copy the value of your applicationId in your application's build.gradle file. In this example, it's
com.fabrikam.fcmtutorial1app.
Select Register app.
Select Download google-services.json, save the file into the app folder of your project, and then select Next.
Make the following configuration changes to your project in Android Studio.
In your project-level build.gradle file (<project>/build.gradle), add the following statement to the dependencies section.
classpath 'com.google.gms:google-services:4.0.1'In your app-level build.gradle file (<project>/<app-module>/build.gradle), add the following statements to the dependencies section.
implementation 'com.google.firebase:firebase-core:16.0.8'
implementation 'com.google.firebase:firebase-messaging:17.3.4'
Add the following line to the end of the app-level build.gradle file after the dependencies section.
apply plugin: 'com.google.gms.google-services'Select Sync now on the toolbar.
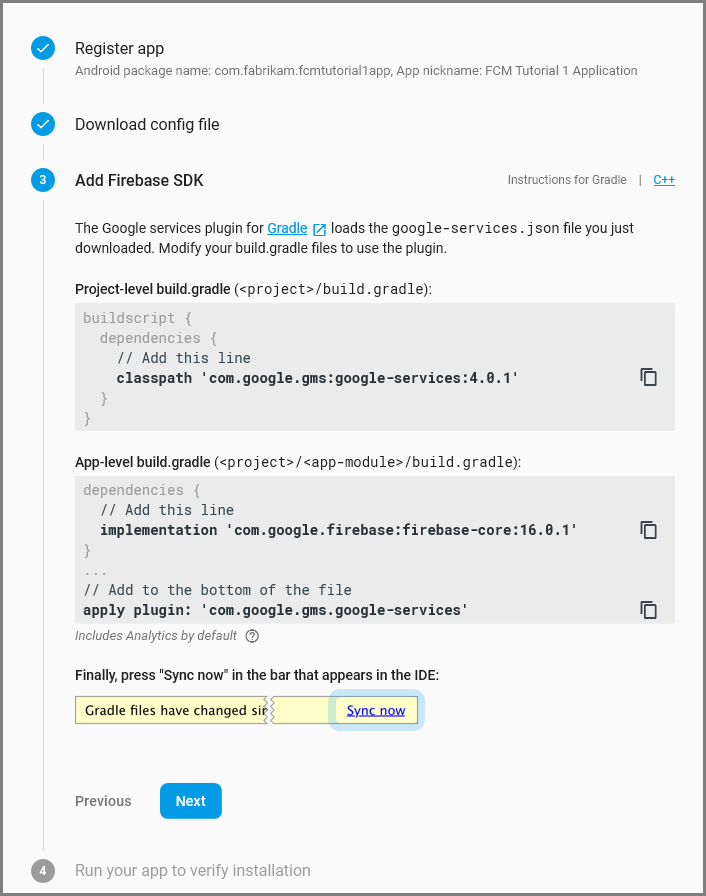
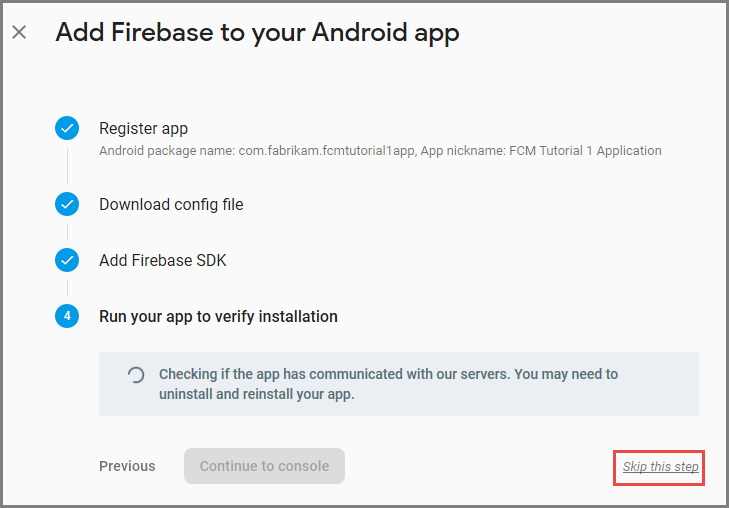
Select Next.
Select Skip this step.
In the Firebase console, select the cog for your project. Then select Project Settings.

If you haven't downloaded the google-services.json file into the app folder of your Android Studio project, you can do so on this page.
Switch to the Cloud Messaging tab at the top.
Copy and save the Server key for later use. You use this value to configure your hub.
Configure Azure to send push requests
In the Azure portal, click Browse All > App Services, and then click your Mobile Apps back end. Under Settings, click App Service Push, and then click your notification hub name.
Go to Google (GCM), enter the Server Key value that you obtained from Firebase in the previous procedure, and then click Save.

The Mobile Apps back end is now configured to use Firebase Cloud Messaging. This enables you to send push notifications to your app running on an Android device, by using the notification hub.
Update the server project to send push notifications
In this section, you update code in your existing Mobile Apps back-end project to send a push notification every time a new item is added. This process is powered by the template feature of Azure Notification Hubs, which enables cross-platform pushes. The various clients are registered for push notifications using templates, and a single universal push can get to all client platforms.
Choose one of the following procedures that matches your back-end project type—either .NET back end or Node.js back end.
.NET back-end project
In Visual Studio, right-click the server project. Then select Manage NuGet Packages. Search for
Microsoft.Azure.NotificationHubs, and then select Install. This process installs the Notification Hubs library for sending notifications from the back end.In the server project, open Controllers > TodoItemController.cs. Then add the following using statements:
using System.Collections.Generic;
using Microsoft.Azure.NotificationHubs;
using Microsoft.Azure.Mobile.Server.Config;
In the PostTodoItem method, add the following code after the call to InsertAsync:
// Get the settings for the server project.
HttpConfiguration config = this.Configuration;
MobileAppSettingsDictionary settings =
    this.Configuration.GetMobileAppSettingsProvider().GetMobileAppSettings();

// Get the Notification Hubs credentials for the mobile app.
string notificationHubName = settings.NotificationHubName;
string notificationHubConnection = settings
    .Connections[MobileAppSettingsKeys.NotificationHubConnectionString].ConnectionString;

// Create a new Notification Hub client.
NotificationHubClient hub = NotificationHubClient
.CreateClientFromConnectionString(notificationHubConnection, notificationHubName);

// Send the message so that all template registrations that contain "messageParam"
// receive the notifications. This includes APNS, GCM, WNS, and MPNS template registrations.
Dictionary<string,string> templateParams = new Dictionary<string,string>();
templateParams["messageParam"] = item.Text + " was added to the list.";

try
{
    // Send the push notification and log the results.
    var result = await hub.SendTemplateNotificationAsync(templateParams);

    // Write the success result to the logs.
    config.Services.GetTraceWriter().Info(result.State.ToString());
}
catch (System.Exception ex)
{
    // Write the failure result to the logs.
    config.Services.GetTraceWriter()
        .Error(ex.Message, null, "Push.SendAsync Error");
}
This process sends a template notification that contains the item.Text when a new item is inserted.
Republish the server project.
Node.js back-end project
Set up your backend project.
Replace the existing code in todoitem.js with the following code:
var azureMobileApps = require('azure-mobile-apps'),
promises = require('azure-mobile-apps/src/utilities/promises'),
logger = require('azure-mobile-apps/src/logger');

var table = azureMobileApps.table();

table.insert(function (context) {
// For more information about the Notification Hubs JavaScript SDK,
// see https://aka.ms/nodejshubs.
logger.info('Running TodoItem.insert');

// Define the template payload.
var payload = '{"messageParam": "' + context.item.text + '" }';

// Execute the insert. The insert returns the results as a promise.
// Do the push as a post-execute action within the promise flow.
return context.execute()
    .then(function (results) {
        // Only do the push if configured.
        if (context.push) {
            // Send a template notification.
            context.push.send(null, payload, function (error) {
                if (error) {
                    logger.error('Error while sending push notification: ', error);
                } else {
                    logger.info('Push notification sent successfully!');
                }
            });
        }
        // Don't forget to return the results from the context.execute().
        return results;
    })
    .catch(function (error) {
        logger.error('Error while running context.execute: ', error);
    });
});

module.exports = table;
This process sends a template notification that contains the item.text when a new item is inserted.
When you edit the file on your local computer, republish the server project.
Configure the client project for push notifications
In the Solution view (or Solution Explorer in Visual Studio), right-click the Components folder, click Get More Components..., search for the Google Cloud Messaging Client component and add it to the project.
Open the ToDoActivity.cs project file and add the following using statement to the class:
using Gcm.Client;In the ToDoActivity class, add the following new code:
// Create a new instance field for this activity.
static ToDoActivity instance = new ToDoActivity();

// Return the current activity instance.
public static ToDoActivity CurrentActivity
{
    get
    {
        return instance;
    }
}
// Return the Mobile Services client.
public MobileServiceClient CurrentClient
{
    get
    {
        return client;
    }
}
This enables you to access the mobile client instance from the push handler service process.
Add the following code to the OnCreate method, after the MobileServiceClient is created:
// Set the current instance of TodoActivity.
instance = this;

// Make sure the GCM client is set up correctly.
GcmClient.CheckDevice(this);
GcmClient.CheckManifest(this);

// Register the app for push notifications.
GcmClient.Register(this, ToDoBroadcastReceiver.senderIDs);
Your ToDoActivity is now prepared for adding push notifications.
Add push notifications code to your app
Create a new class in the project called
ToDoBroadcastReceiver.Add the following using statements to ToDoBroadcastReceiver class:
using Gcm.Client;
using Microsoft.WindowsAzure.MobileServices;
using Newtonsoft.Json.Linq;
Add the following permission requests between the using statements and the namespace declaration:
[assembly: Permission(Name = "@PACKAGE_NAME@.permission.C2D_MESSAGE")]
[assembly: UsesPermission(Name = "@PACKAGE_NAME@.permission.C2D_MESSAGE")]
[assembly: UsesPermission(Name = "com.google.android.c2dm.permission.RECEIVE")]
//GET_ACCOUNTS is only needed for android versions 4.0.3 and below
[assembly: UsesPermission(Name = "android.permission.GET_ACCOUNTS")]
[assembly: UsesPermission(Name = "android.permission.INTERNET")]
[assembly: UsesPermission(Name = "android.permission.WAKE_LOCK")]
Replace the existing ToDoBroadcastReceiver class definition with the following:
[BroadcastReceiver(Permission = Gcm.Client.Constants.PERMISSION_GCM_INTENTS)]
[IntentFilter(new string[] { Gcm.Client.Constants.INTENT_FROM_GCM_MESSAGE },
    Categories = new string[] { "@PACKAGE_NAME@" })]
[IntentFilter(new string[] { Gcm.Client.Constants.INTENT_FROM_GCM_REGISTRATION_CALLBACK },
    Categories = new string[] { "@PACKAGE_NAME@" })]
[IntentFilter(new string[] { Gcm.Client.Constants.INTENT_FROM_GCM_LIBRARY_RETRY },
Categories = new string[] { "@PACKAGE_NAME@" })]
public class ToDoBroadcastReceiver : GcmBroadcastReceiverBase<PushHandlerService>
{
    // Set the Google app ID.
    public static string[] senderIDs = new string[] { "<PROJECT_NUMBER>" };
}
In the above code, you must replace
<PROJECT_NUMBER>with the project number assigned by Google when you provisioned your app in the Google developer portal.In the ToDoBroadcastReceiver.cs project file, add the following code that defines the PushHandlerService class:
// The ServiceAttribute must be applied to the class.
[Service]
public class PushHandlerService : GcmServiceBase
{
    public static string RegistrationID { get; private set; }
    public PushHandlerService() : base(ToDoBroadcastReceiver.senderIDs) { }
}
Note that this class derives from GcmServiceBase and that the Service attribute must be applied to this class.
Note
The GcmServiceBase class implements the OnRegistered(), OnUnRegistered(), OnMessage() and OnError() methods. You must override these methods in the PushHandlerService class.
Add the following code to the PushHandlerService class that overrides the OnRegistered event handler.
protected override void OnRegistered(Context context, string registrationId)
{
    System.Diagnostics.Debug.WriteLine("The device has been registered with GCM.", "Success!");

    // Get the MobileServiceClient from the current activity instance.
    MobileServiceClient client = ToDoActivity.CurrentActivity.CurrentClient;
    var push = client.GetPush();

    // Define a message body for GCM.
    const string templateBodyGCM = "{\"data\":{\"message\":\"$(messageParam)\"}}";

    // Define the template registration as JSON.
    JObject templates = new JObject();
    templates["genericMessage"] = new JObject
    {
        {"body", templateBodyGCM }
    };

    try
    {
        // Make sure we run the registration on the same thread as the activity,
        // to avoid threading errors.
        ToDoActivity.CurrentActivity.RunOnUiThread(

            // Register the template with Notification Hubs.
            async () => await push.RegisterAsync(registrationId, templates));

        System.Diagnostics.Debug.WriteLine(
            string.Format("Push Installation Id", push.InstallationId.ToString()));
    }
    catch (Exception ex)
    {
        System.Diagnostics.Debug.WriteLine(
            string.Format("Error with Azure push registration: {0}", ex.Message));
    }
}
This method uses the returned GCM registration ID to register with Azure for push notifications. Tags can only be added to the registration after it is created. For more information, see How to: Add tags to a device installation to enable push-to-tags.
Override the OnMessage method in PushHandlerService with the following code:
protected override void OnMessage(Context context, Intent intent)
{
    string message = string.Empty;

    // Extract the push notification message from the intent.
    if (intent.Extras.ContainsKey("message"))
    {
        message = intent.Extras.Get("message").ToString();
        var title = "New item added:";

        // Create a notification manager to send the notification.
        var notificationManager =
            GetSystemService(Context.NotificationService) as NotificationManager;

        // Create a new intent to show the notification in the UI.
        PendingIntent contentIntent =
            PendingIntent.GetActivity(context, 0,
            new Intent(this, typeof(ToDoActivity)), 0);

        // Create the notification using the builder.
        var builder = new Notification.Builder(context);
        builder.SetAutoCancel(true);
        builder.SetContentTitle(title);
        builder.SetContentText(message);
        builder.SetSmallIcon(Resource.Drawable.ic_launcher);
        builder.SetContentIntent(contentIntent);
        var notification = builder.Build();

        // Display the notification in the Notifications Area.
        notificationManager.Notify(1, notification);

    }
}
Override the OnUnRegistered() and OnError() methods with the following code.
protected override void OnUnRegistered(Context context, string registrationId)
{
    throw new NotImplementedException();
}

protected override void OnError(Context context, string errorId)
{
    System.Diagnostics.Debug.WriteLine(
        string.Format("Error occurred in the notification: {0}.", errorId));
}
Test push notifications in your app
You can test the app by using a virtual device in the emulator. There are additional configuration steps required when running on an emulator.
The virtual device must have Google APIs set as the target in the Android Virtual Device (AVD) manager.

Add a Google account to the Android device by clicking Apps > Settings > Add account, then follow the prompts.

Run the todolist app as before and insert a new todo item. This time, a notification icon is displayed in the notification area. You can open the notification drawer to view the full text of the notification.
