Tutorial: Connect to SQL Database from .NET App Service without secrets using a managed identity
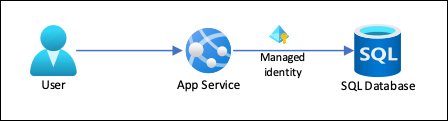
App Service provides a highly scalable, self-patching web hosting service in Azure. It also provides a managed identity for your app, which is a turn-key solution for securing access to Azure SQL Database and other Azure services. Managed identities in App Service make your app more secure by eliminating secrets from your app, such as credentials in the connection strings. In this tutorial, you add managed identity to the sample web app you built in one of the following tutorials:
- Tutorial: Build an ASP.NET app in Azure with Azure SQL Database
- Tutorial: Build an ASP.NET Core and Azure SQL Database app in Azure App Service
When you're finished, your sample app will connect to SQL Database securely without the need of username and passwords.
Note
The steps covered in this tutorial support the following versions:
- .NET Framework 4.8 and above
- .NET 6.0 and above
For guidance for Azure Database for MySQL or Azure Database for PostgreSQL in other language frameworks (Node.js, Python, and Java), see Tutorial: Connect to Azure databases from App Service without secrets using a managed identity.
What you will learn:
- Enable managed identities
- Grant SQL Database access to the managed identity
- Configure Entity Framework to use Microsoft Entra authentication with SQL Database
- Connect to SQL Database from Visual Studio using Microsoft Entra authentication
Note
Microsoft Entra authentication is different from Integrated Windows authentication in on-premises Active Directory (AD DS). AD DS and Microsoft Entra ID use completely different authentication protocols. For more information, see Microsoft Entra Domain Services documentation.
If you don't have an Azure subscription, create an Azure free account before you begin.
Prerequisites
This article continues where you left off in either one of the following tutorials:
- Tutorial: Build an ASP.NET app in Azure with SQL Database
- Tutorial: Build an ASP.NET Core and SQL Database app in Azure App Service.
If you haven't already, follow one of the two tutorials first. Alternatively, you can adapt the steps for your own .NET app with SQL Database.
To debug your app using SQL Database as the back end, make sure that you've allowed client connection from your computer. If not, add the client IP by following the steps at Manage server-level IP firewall rules using the Azure portal.
Prepare your environment for the Azure CLI.
Use the Bash environment in Azure Cloud Shell. For more information, see Quickstart for Bash in Azure Cloud Shell.

If you prefer to run CLI reference commands locally, install the Azure CLI. If you're running on Windows or macOS, consider running Azure CLI in a Docker container. For more information, see How to run the Azure CLI in a Docker container.
If you're using a local installation, sign in to the Azure CLI by using the az login command. To finish the authentication process, follow the steps displayed in your terminal. For other sign-in options, see Sign in with the Azure CLI.
When you're prompted, install the Azure CLI extension on first use. For more information about extensions, see Use extensions with the Azure CLI.
Run az version to find the version and dependent libraries that are installed. To upgrade to the latest version, run az upgrade.
1. Grant database access to Microsoft Entra user
First, enable Microsoft Entra authentication to SQL Database by assigning a Microsoft Entra user as the admin of the server. This user is different from the Microsoft account you used to sign up for your Azure subscription. It must be a user that you created, imported, synced, or invited into Microsoft Entra ID. For more information on allowed Microsoft Entra users, see Microsoft Entra features and limitations in SQL Database.
If your Microsoft Entra tenant doesn't have a user yet, create one by following the steps at Add or delete users using Microsoft Entra ID.
Find the object ID of the Microsoft Entra user using the
az ad user listand replace <user-principal-name>. The result is saved to a variable.$azureaduser=(az ad user list --filter "userPrincipalName eq '<user-principal-name>'" --query '[].id' --output tsv)Tip
To see the list of all user principal names in Microsoft Entra ID, run
az ad user list --query '[].userPrincipalName'.Add this Microsoft Entra user as an Active Directory admin using
az sql server ad-admin createcommand in the Cloud Shell. In the following command, replace <server-name> with the server name (without the.database.windows.netsuffix).az sql server ad-admin create --resource-group myResourceGroup --server-name <server-name> --display-name ADMIN --object-id $azureaduser
For more information on adding an Active Directory admin, see Provision a Microsoft Entra administrator for your server
2. Set up your dev environment
Visual Studio for Windows is integrated with Microsoft Entra authentication. To enable development and debugging in Visual Studio, add your Microsoft Entra user in Visual Studio by selecting File > Account Settings from the menu, and select Sign in or Add.
To set the Microsoft Entra user for Azure service authentication, select Tools > Options from the menu, then select Azure Service Authentication > Account Selection. Select the Microsoft Entra user you added and select OK.
For more information about setting up your dev environment for Microsoft Entra authentication, see Azure Identity client library for .NET.
You're now ready to develop and debug your app with the SQL Database as the back end, using Microsoft Entra authentication.
3. Modify your project
Note
Microsoft.Azure.Services.AppAuthentication is no longer recommended to use with new Azure SDK.
It is replaced with new Azure Identity client library available for .NET, Java, TypeScript and Python and should be used for all new development.
Information about how to migrate to Azure Identitycan be found here: AppAuthentication to Azure.Identity Migration Guidance.
The steps you follow for your project depends on whether you're using Entity Framework Core (default for ASP.NET Core) or Entity Framework (default for ASP.NET).
In Visual Studio, open the Package Manager Console and add the NuGet package Microsoft.Data.SqlClient:
Install-Package Microsoft.Data.SqlClient -Version 5.1.0In the ASP.NET Core and SQL Database tutorial, the
MyDbConnectionconnection string in appsettings.json isn't used at all yet. The local environment and the Azure environment both get connection strings from their respective environment variables in order to keep connection secrets out of the source file. But now with Active Directory authentication, there are no more secrets. In appsettings.json, replace the value of theMyDbConnectionconnection string with:"Server=tcp:<server-name>.database.windows.net;Authentication=Active Directory Default; Database=<database-name>;"Note
The Active Directory Default authentication type can be used both on your local machine and in Azure App Service. The driver attempts to acquire a token from Microsoft Entra ID using various means. If the app is deployed, it gets a token from the app's system-assigned managed identity. It can also authenticate with a user-assigned managed identity if you include:
User Id=<client-id-of-user-assigned-managed-identity>;in your connection string. If the app is running locally, it tries to get a token from Visual Studio, Visual Studio Code, and Azure CLI.That's everything you need to connect to SQL Database. When you debug in Visual Studio, your code uses the Microsoft Entra user you configured in 2. Set up your dev environment. You'll set up SQL Database later to allow connection from the managed identity of your App Service app. The
DefaultAzureCredentialclass caches the token in memory and retrieves it from Microsoft Entra ID just before expiration. You don't need any custom code to refresh the token.Type
Ctrl+F5to run the app again. The same CRUD app in your browser is now connecting to the Azure SQL Database directly, using Microsoft Entra authentication. This setup lets you run database migrations from Visual Studio.
4. Use managed identity connectivity
Next, you configure your App Service app to connect to SQL Database with a system-assigned managed identity.
Note
While the instructions in this section are for a system-assigned identity, a user-assigned identity can just as easily be used. To do this. you would need the change the az webapp identity assign command to assign the desired user-assigned identity. Then, when creating the SQL user, make sure to use the name of the user-assigned identity resource rather than the site name.
Enable managed identity on app
To enable a managed identity for your Azure app, use the az webapp identity assign command in the Cloud Shell. In the following command, replace <app-name>.
az webapp identity assign --resource-group myResourceGroup --name <app-name>
Note
To enable managed identity for a deployment slot, add --slot <slot-name> and use the name of the slot in <slot-name>.
Here's an example of the output:
{
  "additionalProperties": {},
  "principalId": "21dfa71c-9e6f-4d17-9e90-1d28801c9735",
  "tenantId": "72f988bf-86f1-41af-91ab-2d7cd011db47",
  "type": "SystemAssigned"
}
Grant permissions to managed identity
Note
If you want, you can add the identity to an Microsoft Entra group, then grant SQL Database access to the Microsoft Entra group instead of the identity. For example, the following commands add the managed identity from the previous step to a new group called myAzureSQLDBAccessGroup:
$groupid=(az ad group create --display-name myAzureSQLDBAccessGroup --mail-nickname myAzureSQLDBAccessGroup --query objectId --output tsv)
$msiobjectid=(az webapp identity show --resource-group myResourceGroup --name <app-name> --query principalId --output tsv)
az ad group member add --group $groupid --member-id $msiobjectid
az ad group member list -g $groupid
In the Cloud Shell, sign in to SQL Database by using the SQLCMD command. Replace <server-name> with your server name, <db-name> with the database name your app uses, and <aad-user-name> and <aad-password> with your Microsoft Entra user's credentials.
sqlcmd -S <server-name>.database.windows.net -d <db-name> -U <aad-user-name> -P "<aad-password>" -G -l 30In the SQL prompt for the database you want, run the following commands to grant the minimum permissions your app needs. For example,
CREATE USER [<identity-name>] FROM EXTERNAL PROVIDER;
ALTER ROLE db_datareader ADD MEMBER [<identity-name>];
ALTER ROLE db_datawriter ADD MEMBER [<identity-name>];
ALTER ROLE db_ddladmin ADD MEMBER [<identity-name>];
GO
<identity-name> is the name of the managed identity in Microsoft Entra ID. If the identity is system-assigned, the name is always the same as the name of your App Service app. For a deployment slot, the name of its system-assigned identity is <app-name>/slots/<slot-name>. To grant permissions for a Microsoft Entra group, use the group's display name instead (for example, myAzureSQLDBAccessGroup).
Type
EXITto return to the Cloud Shell prompt.Note
The back-end services of managed identities also maintains a token cache that updates the token for a target resource only when it expires. If you make a mistake configuring your SQL Database permissions and try to modify the permissions after trying to get a token with your app, you don't actually get a new token with the updated permissions until the cached token expires.
Note
Microsoft Entra ID and managed identities are not supported for on-premises SQL Server.
Modify connection string
Remember that the same changes you made in Web.config or appsettings.json works with the managed identity, so the only thing to do is to remove the existing connection string in App Service, which Visual Studio created deploying your app the first time. Use the following command, but replace <app-name> with the name of your app.
az webapp config connection-string delete --resource-group myResourceGroup --name <app-name> --setting-names MyDbConnection
5. Publish your changes
All that's left now is to publish your changes to Azure.
If you came from Tutorial: Build an ASP.NET app in Azure with SQL Database, publish your changes in Visual Studio. In the Solution Explorer, right-click your DotNetAppSqlDb project and select Publish.

In the publish page, select Publish.
Important
Ensure that your app service name doesn't match with any existing App Registrations. This will lead to Principal ID conflicts.
When the new webpage shows your to-do list, your app is connecting to the database using the managed identity.
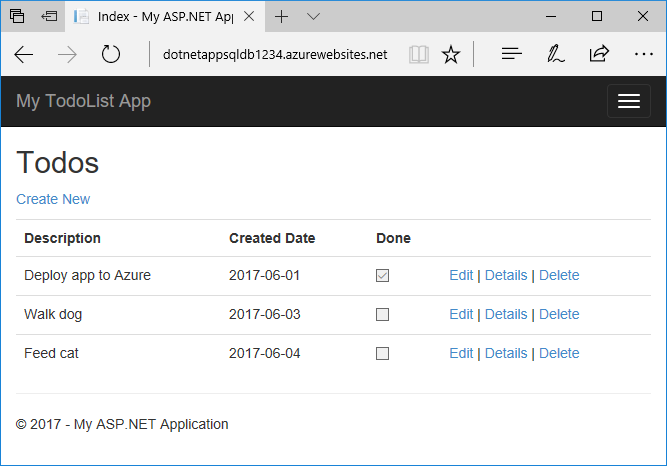
You should now be able to edit the to-do list as before.
Clean up resources
In the preceding steps, you created Azure resources in a resource group. If you don't expect to need these resources in the future, delete the resource group by running the following command in the Cloud Shell:
az group delete --name myResourceGroup
This command may take a minute to run.
Next steps
What you learned:
- Enable managed identities
- Grant SQL Database access to the managed identity
- Configure Entity Framework to use Microsoft Entra authentication with SQL Database
- Connect to SQL Database from Visual Studio using Microsoft Entra authentication
Feedback
Coming soon: Throughout 2024 we will be phasing out GitHub Issues as the feedback mechanism for content and replacing it with a new feedback system. For more information see: https://aka.ms/ContentUserFeedback.
Submit and view feedback for