Tutorial: Access Azure services from a .NET web app
Learn how to access Azure services, such as Azure Storage, from a web app (not a signed-in user) running on Azure App Service by using managed identities. This tutorial demonstrates connecting to Azure Storage as an example.
Any service that supports managed identity (B in the following image) can be securely accessed using this tutorial:
- Azure Storage
- Azure SQL Database
- Azure Key Vault

You want to add secure access to Azure services (Azure Storage, Azure SQL Database, Azure Key Vault, or other services) from your web app. You could use a shared key, but then you have to worry about operational security of who can create, deploy, and manage the secret. It's also possible that the key could be checked into GitHub, which hackers know how to scan for. A safer way to give your web app access to data is to use managed identities.
A managed identity from Microsoft Entra ID allows App Service to access resources through role-based access control (RBAC), without requiring app credentials. After assigning a managed identity to your web app, Azure takes care of the creation and distribution of a certificate. People don't have to worry about managing secrets or app credentials.
In this tutorial, you learn how to:
- Create a system-assigned managed identity on a web app.
- Create a storage account and an Azure Blob Storage container.
- Access storage from a web app by using managed identities.
If you don't have an Azure subscription, create an Azure free account before you begin.
Prerequisites
- A web application running on Azure App Service:
Enable managed identity on an app
If you create and publish your web app through Visual Studio, the managed identity was enabled on your app for you. In your app service, select Identity in the left pane, and then select System assigned. Verify that the Status is set to On. If not, select On and then Save. Select Yes in the confirmation dialog to enable the system-assigned managed identity. When the managed identity is enabled, the status is set to On and the object ID is available.
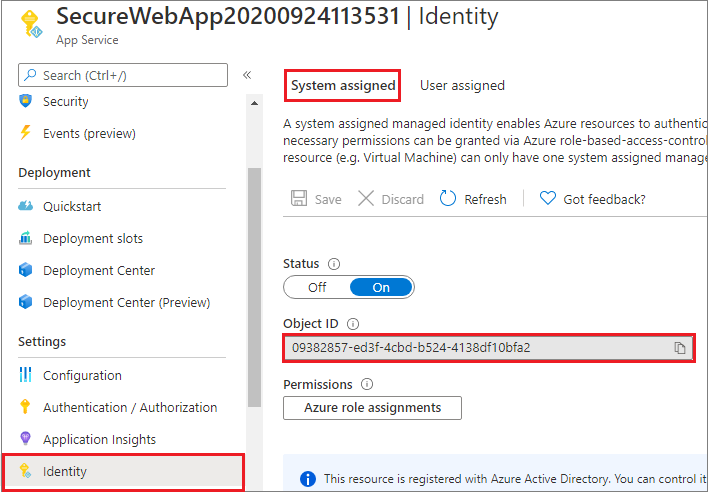
This step creates a new object ID, different than the app ID created in the Authentication/Authorization pane. Copy the object ID of the system-assigned managed identity. You'll need it later.
Create a storage account and Blob Storage container
Now you're ready to create a storage account and Blob Storage container.
Every storage account must belong to an Azure resource group. A resource group is a logical container for grouping your Azure services. When you create a storage account, you have the option to either create a new resource group or use an existing resource group. This article shows how to create a new resource group.
A general-purpose v2 storage account provides access to all of the Azure Storage services: blobs, files, queues, tables, and disks. The steps outlined here create a general-purpose v2 storage account, but the steps to create any type of storage account are similar.
Blobs in Azure Storage are organized into containers. Before you can upload a blob later in this tutorial, you must first create a container.
To create a general-purpose v2 storage account in the Azure portal, follow these steps.
On the Azure portal menu, select All services. In the list of resources, enter Storage Accounts. As you begin typing, the list filters based on your input. Select Storage Accounts.
In the Storage Accounts window that appears, select Create.
Select the subscription in which to create the storage account.
Under the Resource group field, select the resource group that contains your web app from the drop-down menu.
Next, enter a name for your storage account. The name you choose must be unique across Azure. The name also must be between 3 and 24 characters in length and can include numbers and lowercase letters only.
Select a location (region) for your storage account, or use the default value.
Leave these fields set to their default values:
Field Value Deployment model Resource Manager Performance Standard Account kind StorageV2 (general-purpose v2) Replication Read-access geo-redundant storage (RA-GRS) Access tier Hot Select Review + Create to review your storage account settings and create the account.
Select Create.
To create a Blob Storage container in Azure Storage, follow these steps.
Go to your new storage account in the Azure portal.
In the left menu for the storage account, scroll to the Data storage section, and then select Containers.
Select the + Container button.
Type a name for your new container. The container name must be lowercase, must start with a letter or number, and can include only letters, numbers, and the dash (-) character.
Set the level of public access to the container. The default level is Private (no anonymous access).
Select OK to create the container.
Grant access to the storage account
You need to grant your web app access to the storage account before you can create, read, or delete blobs. In a previous step, you configured the web app running on App Service with a managed identity. Using Azure RBAC, you can give the managed identity access to another resource, just like any security principal. The Storage Blob Data Contributor role gives the web app (represented by the system-assigned managed identity) read, write, and delete access to the blob container and data.
Note
Some operations on private blob containers are not supported by Azure RBAC, such as viewing blobs or copying blobs between accounts. A blob container with private access level requires a SAS token for any operation that is not authorized by Azure RBAC. For more information, see When to use a shared access signature.
In the Azure portal, go into your storage account to grant your web app access. Select Access control (IAM) in the left pane, and then select Role assignments. You'll see a list of who has access to the storage account. Now you want to add a role assignment to a robot, the app service that needs access to the storage account. Select Add > Add role assignment to open the Add role assignment page.
Assign the Storage Blob Data Contributor role to the App Service at subscription scope. For detailed steps, see Assign Azure roles using the Azure portal.
Your web app now has access to your storage account.
Access Blob Storage
The DefaultAzureCredential class is used to get a token credential for your code to authorize requests to Azure Storage. Create an instance of the DefaultAzureCredential class, which uses the managed identity to fetch tokens and attach them to the service client. The following code example gets the authenticated token credential and uses it to create a service client object, which uploads a new blob.
To see this code as part of a sample application, see the sample on GitHub.
Install client library packages
Install the Blob Storage NuGet package to work with Blob Storage and the Azure Identity client library for .NET NuGet package to authenticate with Microsoft Entra credentials. Install the client libraries by using the .NET Core command-line interface or the Package Manager Console in Visual Studio.
.NET Core command-line
Open a command line, and switch to the directory that contains your project file.
Run the install commands.
dotnet add package Azure.Storage.Blobs

dotnet add package Azure.Identity
Package Manager Console
Open the project or solution in Visual Studio, and open the console by using the Tools > NuGet Package Manager > Package Manager Console command.
Run the install commands.
Install-Package Azure.Storage.Blobs

Install-Package Azure.Identity
.NET example
using System;
using Azure.Storage.Blobs;
using Azure.Storage.Blobs.Models;
using System.Collections.Generic;
using System.Threading.Tasks;
using System.Text;
using System.IO;
using Azure.Identity;

// Some code omitted for brevity.

static public async Task UploadBlob(string accountName, string containerName, string blobName, string blobContents)
{
    // Construct the blob container endpoint from the arguments.
    string containerEndpoint = string.Format("https://{0}.blob.core.windows.net/{1}",
                                                accountName,
                                                containerName);

    // Get a credential and create a client object for the blob container.
    BlobContainerClient containerClient = new BlobContainerClient(new Uri(containerEndpoint),
                                                                    new DefaultAzureCredential());

    try
    {
        // Create the container if it does not exist.
        await containerClient.CreateIfNotExistsAsync();

        // Upload text to a new block blob.
        byte[] byteArray = Encoding.ASCII.GetBytes(blobContents);

        using (MemoryStream stream = new MemoryStream(byteArray))
        {
            await containerClient.UploadBlobAsync(blobName, stream);
        }
    }
    catch (Exception e)
    {
        throw e;
    }
}
Clean up resources
If you're finished with this tutorial and no longer need the web app or associated resources, clean up the resources you created.
Delete the resource group
In the Azure portal, select Resource groups from the portal menu and select the resource group that contains your app service and app service plan.
Select Delete resource group to delete the resource group and all the resources.

This command might take several minutes to run.
Next steps
In this tutorial, you learned how to:
- Create a system-assigned managed identity.
- Create a storage account and Blob Storage container.
- Access storage from a web app by using managed identities.
Feedback
Coming soon: Throughout 2024 we will be phasing out GitHub Issues as the feedback mechanism for content and replacing it with a new feedback system. For more information see: https://aka.ms/ContentUserFeedback.
Submit and view feedback for