Configure an application gateway with an internal load balancer (ILB) endpoint
Azure Application Gateway Standard v2 can be configured with an Internet-facing VIP or with an internal endpoint that isn't exposed to the Internet. An internal endpoint uses a private IP address for the frontend, which is also known as an internal load balancer (ILB) endpoint.
Configuring the gateway using a frontend private IP address is useful for internal line-of-business applications that aren't exposed to the Internet. It's also useful for services and tiers within a multi-tier application that are in a security boundary that isn't exposed to the Internet but:
- still require round-robin load distribution
- session stickiness
- or Transport Layer Security (TLS) termination (previously known as Secure Sockets Layer (SSL)).
This article guides you through the steps to configure a Standard v2 Application Gateway with an ILB using the Azure portal.
Note
We recommend that you use the Azure Az PowerShell module to interact with Azure. See Install Azure PowerShell to get started. To learn how to migrate to the Az PowerShell module, see Migrate Azure PowerShell from AzureRM to Az.
Sign in to Azure
Sign in to the Azure portal.
Create an application gateway
For Azure to communicate between the resources that you create, it needs a virtual network. Either create a new virtual network or use an existing one.
In this example, you create a new virtual network. You can create a virtual network at the same time that you create the application gateway. Application Gateway instances are created in separate subnets. There are two subnets in this example: one for the application gateway, and another for the backend servers.
Expand the portal menu and select Create a resource.
Select Networking and then select Application Gateway in the Featured list.
Enter myAppGateway for the name of the application gateway and myResourceGroupAG for the new resource group.
For Region, select Central US.
For Tier, select Standard V2.
Under Configure virtual network select Create new, and then enter these values for the virtual network:
- myVNet - for the name of the virtual network.
- 10.0.0.0/16 - for the virtual network address space.
- myAGSubnet - for the subnet name.
- 10.0.0.0/24 - for the subnet address space.
- myBackendSubnet - for the backend subnet name.
- 10.0.1.0/24 - for the backend subnet address space.
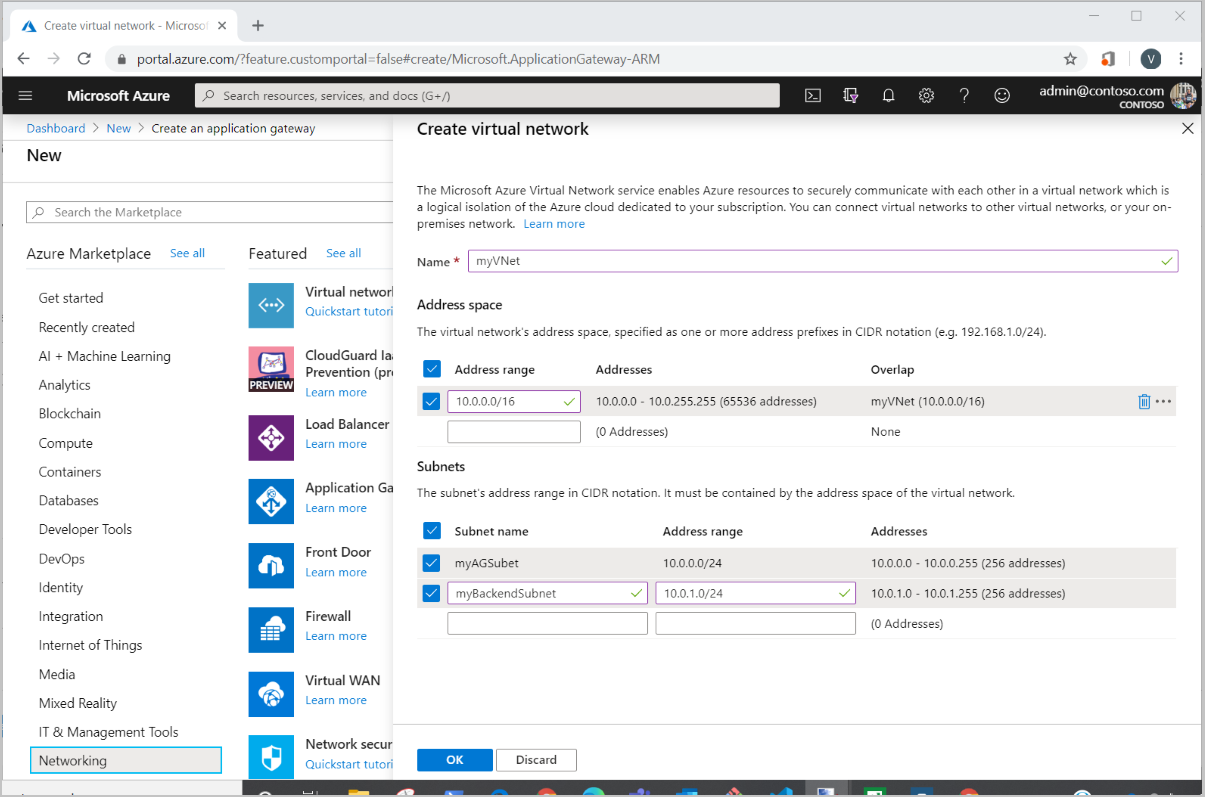
Select OK to create the virtual network and subnets.
Select Next : Frontends.
For Frontend IP address type, select Private.
By default, it's a dynamic IP address assignment. The first available address of the configured subnet is assigned as the frontend IP address.
Note
Once allocated, the IP address type (static or dynamic) cannot be changed later.
Select Next:Backends.
Select Add a backend pool.
For Name, type appGatewayBackendPool.
For Add backend pool without targets, select Yes. You'll add the targets later.
Select Add.
Select Next:Configuration.
Under Routing rules, select Add a routing rule.
For Rule name, type Rrule-01.
For Listener name, type Listener-01.
For Frontend IP, select Private.
Accept the remaining defaults and select the Backend targets tab.
For Target type, select Backend pool, and then select appGatewayBackendPool.
For HTTP setting, select Add new.
For HTTP setting name, type http-setting-01.
For Backend protocol, select HTTP.
For Backend port, type 80.
Accept the remaining defaults, and select Add.
On the Add a routing rule page, select Add.
Select Next: Tags.
Select Next: Review + create.
Review the settings on the summary page, and then select Create to create the network resources and the application gateway. It may take several minutes to create the application gateway. Wait until the deployment finishes successfully before moving on to the next section.
Add backend pool
The backend pool is used to route requests to the backend servers that serve the request. The backend can be composed of NICs, virtual machine scale sets, public IP addresses, internal IP addresses, fully qualified domain names (FQDN), and multi-tenant backends like Azure App Service. In this example, you use virtual machines as the target backend. You can either use existing virtual machines or create new ones. In this example, you create two virtual machines that Azure uses as backend servers for the application gateway.
To do this, you:
- Create two new virtual machines, myVM and myVM2, used as backend servers.
- Install IIS on the virtual machines to verify that the application gateway was created successfully.
- Add the backend servers to the backend pool.
Create a virtual machine
- Select Create a resource.
- Select Compute and then select Virtual machine.
- Enter these values for the virtual machine:
- Select your subscription.
- Select myResourceGroupAG for Resource group.
- Type myVM for Virtual machine name.
- Select Windows Server 2019 Datacenter for Image.
- Type a valid Username.
- Type a valid Password.
- Accept the remaining defaults and select Next: Disks.
- Accept the defaults and select Next : Networking.
- Ensure that myVNet is selected for the virtual network and the subnet is myBackendSubnet.
- Accept the remaining defaults, and select Next : Management.
- Select Disable to disable boot diagnostics.
- Select Review + create.
- Review the settings on the summary page, and then select Create. It may take several minutes to create the VM. Wait until the deployment finishes successfully before moving on to the next section.
Install IIS
Open the Cloud Shell and ensure that it's set to PowerShell.
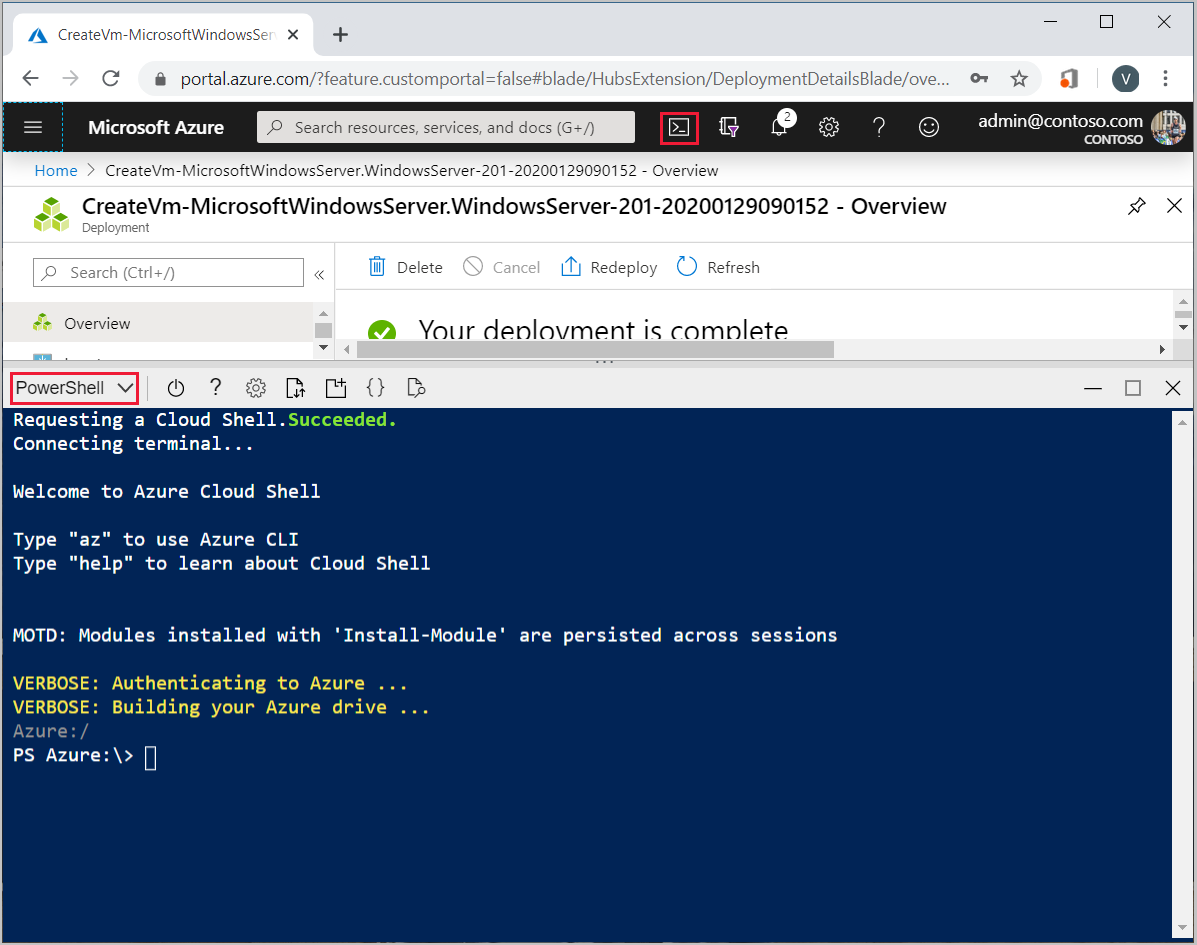
Run the following command to install IIS on the virtual machine:
Set-AzVMExtension `
     -ResourceGroupName myResourceGroupAG `
     -ExtensionName IIS `
     -VMName myVM `
     -Publisher Microsoft.Compute `
     -ExtensionType CustomScriptExtension `
     -TypeHandlerVersion 1.4 `
     -SettingString '{"commandToExecute":"powershell Add-WindowsFeature Web-Server; powershell Add-Content -Path \"C:\\inetpub\\wwwroot\\Default.htm\" -Value $($env:computername)"}' `
      -Location CentralUS
Create a second virtual machine and install IIS using the steps that you just finished. Use myVM2 for the virtual machine name and for
VMNameinSet-AzVMExtension.
Add backend servers to backend pool
- Select All resources, and then select myAppGateway.
- Select Backend pools, and then select appGatewayBackendPool.
- Under Target type select Virtual machine and under Target, select the vNIC associated with myVM.
- Repeat to add MyVM2.

- Select Save.
Create a client virtual machine
The client virtual machine is used to connect to the application gateway backend pool.
- Create a third virtual machine using the previous steps. Use myVM3 for the virtual machine name.
Test the application gateway
- On the myAppGateway page, select Frontend IP Configurations to note the frontend private IP address.

- Copy the private IP address, and then paste it into the browser address bar on myVM3 to access the application gateway backend pool.
Next steps
If you want to monitor the health of your backend pool, see Backend health and diagnostic logs for Application Gateway.
Feedback
Coming soon: Throughout 2024 we will be phasing out GitHub Issues as the feedback mechanism for content and replacing it with a new feedback system. For more information see: https://aka.ms/ContentUserFeedback.
Submit and view feedback for