It can be challenging to create a reliable continuous integration/continuous delivery (CI/CD) process for a microservices architecture. Individual teams must be able to release services quickly and reliably, without disrupting other teams or destabilizing the application as a whole.
This article describes an example CI/CD pipeline for deploying microservices to Azure Kubernetes Service (AKS). Every team and project is different, so don't take this article as a set of hard-and-fast rules. Instead, it's meant to be a starting point for designing your own CI/CD process.
The goals of a CI/CD pipeline for Kubernetes hosted microservices can be summarized as follows:
- Teams can build and deploy their services independently.
- Code changes that pass the CI process are automatically deployed to a production-like environment.
- Quality gates are enforced at each stage of the pipeline.
- A new version of a service can be deployed side by side with the previous version.
For more background, see CI/CD for microservices architectures.
Assumptions
For purposes of this example, here are some assumptions about the development team and the code base:
- The code repository is a monorepo, with folders organized by microservice.
- The team's branching strategy is based on trunk-based development.
- The team uses release branches to manage releases. Separate releases are created for each microservice.
- The CI/CD process uses Azure Pipelines to build, test, and deploy the microservices to AKS.
- The container images for each microservice are stored in Azure Container Registry.
- The team uses Helm charts to package each microservice.
- A push deployment model is used, where Azure Pipelines and associated agents perform deployments by connecting directly to the AKS cluster.
These assumptions drive many of the specific details of the CI/CD pipeline. However, the basic approach described here be adapted for other processes, tools, and services, such as Jenkins or Docker Hub.
Alternatives
The following are common alternatives customers might use when choosing a CI/CD strategy with Azure Kubernetes Service:
- As an alternative to using Helm as a package management and deployment tool, Kustomize is a Kubernetes native configuration management tool that introduces a template-free way to customize and parameterize application configuration.
- As an alternative to using Azure DevOps for Git repositories and pipelines, GitHub Repositories can be used for private and public Git repositories, and GitHub Actions can be used for CI/CD pipelines.
- As an alternative to using a push deployment model, managing Kubernetes configuration at large scale can be done using GitOps (pull deployment model), where an in-cluster Kubernetes operator synchronizes cluster state, based on the configuration that's stored in a Git repository.
Validation builds
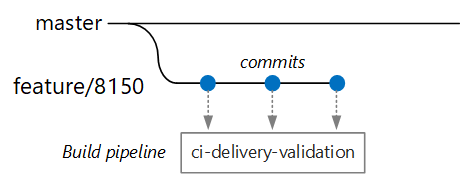
Suppose that a developer is working on a microservice called the Delivery Service. While developing a new feature, the developer checks code into a feature branch. By convention, feature branches are named feature/*.
The build definition file includes a trigger that filters by the branch name and the source path:
trigger:
  batch: true
  branches:
    include:
    # for new release to production: release flow strategy
    - release/delivery/v*
    - refs/release/delivery/v*
    - master
    - feature/delivery/*
    - topic/delivery/*
  paths:
    include:
    - /src/shipping/delivery/
Using this approach, each team can have its own build pipeline. Only code that is checked into the /src/shipping/delivery folder triggers a build of the Delivery Service. Pushing commits to a branch that matches the filter triggers a CI build. At this point in the workflow, the CI build runs some minimal code verification:
- Build the code.
- Run unit tests.
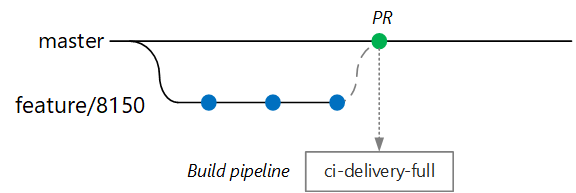
The goal is to keep build times short so that the developer can get quick feedback. Once the feature is ready to merge into master, the developer opens a PR. This operation triggers another CI build that performs some additional checks:
- Build the code.
- Run unit tests.
- Build the runtime container image.
- Run vulnerability scans on the image.
Note
In Azure DevOps Repos, you can define policies to protect branches. For example, the policy could require a successful CI build plus a sign-off from an approver in order to merge into master.
Full CI/CD build
At some point, the team is ready to deploy a new version of the Delivery service. The release manager creates a branch from the main branch with this naming pattern: release/<microservice name>/<semver>. For example, release/delivery/v1.0.2.
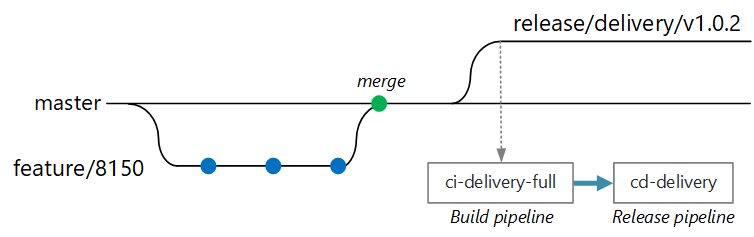
The creation of this branch triggers a full CI build that runs all of the previous steps plus:
- Push the container image to Azure Container Registry. The image is tagged with the version number taken from the branch name.
- Run
helm packageto package the Helm chart for the service. The chart is also tagged with a version number. - Push the Helm package to Container Registry.
Assuming this build succeeds, it triggers a deployment (CD) process using an Azure Pipelines release pipeline. This pipeline has the following steps:
- Deploy the Helm chart to a QA environment.
- An approver signs off before the package moves to production. See Release deployment control using approvals.
- Retag the Docker image for the production namespace in Azure Container Registry. For example, if the current tag is
myrepo.azurecr.io/delivery:v1.0.2, the production tag ismyrepo.azurecr.io/prod/delivery:v1.0.2. - Deploy the Helm chart to the production environment.
Even in a monorepo, these tasks can be scoped to individual microservices so that teams can deploy with high velocity. The process has some manual steps: Approving PRs, creating release branches, and approving deployments into the production cluster. These steps are manual; they could be automated if the organization prefers.
Isolation of environments
You will have multiple environments where you deploy services, including environments for development, smoke testing, integration testing, load testing, and finally, production. These environments need some level of isolation. In Kubernetes, you have a choice between physical isolation and logical isolation. Physical isolation means deploying to separate clusters. Logical isolation uses namespaces and policies, as described earlier.
Our recommendation is to create a dedicated production cluster along with a separate cluster for your dev/test environments. Use logical isolation to separate environments within the dev/test cluster. Services deployed to the dev/test cluster should never have access to data stores that hold business data.
Build process
When possible, package your build process into a Docker container. This configuration allows you to build code artifacts using Docker and without configuring a build environment on each build machine. A containerized build process makes it easy to scale out the CI pipeline by adding new build agents. Also, any developer on the team can build the code simply by running the build container.
By using multi-stage builds in Docker, you can define the build environment and the runtime image in a single Dockerfile. For example, here's a Dockerfile that builds a .NET application:
FROM mcr.microsoft.com/dotnet/core/runtime:3.1 AS base
WORKDIR /app

FROM mcr.microsoft.com/dotnet/core/sdk:3.1 AS build
WORKDIR /src/Fabrikam.Workflow.Service

COPY Fabrikam.Workflow.Service/Fabrikam.Workflow.Service.csproj .
RUN dotnet restore Fabrikam.Workflow.Service.csproj

COPY Fabrikam.Workflow.Service/. .
RUN dotnet build Fabrikam.Workflow.Service.csproj -c release -o /app --no-restore

FROM build AS testrunner
WORKDIR /src/tests

COPY Fabrikam.Workflow.Service.Tests/*.csproj .
RUN dotnet restore Fabrikam.Workflow.Service.Tests.csproj

COPY Fabrikam.Workflow.Service.Tests/. .
ENTRYPOINT ["dotnet", "test", "--logger:trx"]

FROM build AS publish
RUN dotnet publish Fabrikam.Workflow.Service.csproj -c Release -o /app

FROM base AS final
WORKDIR /app
COPY --from=publish /app .
ENTRYPOINT ["dotnet", "Fabrikam.Workflow.Service.dll"]
This Dockerfile defines several build stages. Notice that the stage named base uses the .NET runtime, while the stage named build uses the full .NET SDK. The build stage is used to build the .NET project. But the final runtime container is built from base, which contains just the runtime and is significantly smaller than the full SDK image.
Building a test runner
Another good practice is to run unit tests in the container. For example, here is part of a Docker file that builds a test runner:
FROM build AS testrunner
WORKDIR /src/tests

COPY Fabrikam.Workflow.Service.Tests/*.csproj .
RUN dotnet restore Fabrikam.Workflow.Service.Tests.csproj

COPY Fabrikam.Workflow.Service.Tests/. .
ENTRYPOINT ["dotnet", "test", "--logger:trx"]
A developer can use this Docker file to run the tests locally:
docker build . -t delivery-test:1 --target=testrunner
docker run delivery-test:1
The CI pipeline should also run the tests as part of the build verification step.
Note that this file uses the Docker ENTRYPOINT command to run the tests, not the Docker RUN command.
- If you use the
RUNcommand, the tests run every time you build the image. By usingENTRYPOINT, the tests are opt-in. They run only when you explicitly target thetestrunnerstage. - A failing test doesn't cause the Docker
buildcommand to fail. That way, you can distinguish container build failures from test failures. - Test results can be saved to a mounted volume.
Container best practices
Here are some other best practices to consider for containers:
Define organization-wide conventions for container tags, versioning, and naming conventions for resources deployed to the cluster (pods, services, and so on). That can make it easier to diagnose deployment issues.
During the development and test cycle, the CI/CD process will build many container images. Only some of those images are candidates for release, and then only some of those release candidates will get promoted to production. Have a clear versioning strategy so that you know which images are currently deployed to production and to help roll back to a previous version if necessary.
Always deploy specific container version tags, not
latest.Use namespaces in Azure Container Registry to isolate images that are approved for production from images that are still being tested. Don't move an image into the production namespace until you're ready to deploy it into production. If you combine this practice with semantic versioning of container images, it can reduce the chance of accidentally deploying a version that wasn't approved for release.
Follow the principle of least privilege by running containers as a nonprivileged user. In Kubernetes, you can create a pod security policy that prevents containers from running as root.
Helm charts
Consider using Helm to manage building and deploying services. Here are some of the features of Helm that help with CI/CD:
- Often, a single microservice is defined by multiple Kubernetes objects. Helm allows these objects to be packaged into a single Helm chart.
- A chart can be deployed with a single Helm command rather than a series of kubectl commands.
- Charts are explicitly versioned. Use Helm to release a version, view releases, and roll back to a previous version. Tracking updates and revisions, using semantic versioning, along with the ability to roll back to a previous version.
- Helm charts use templates to avoid duplicating information, such as labels and selectors, across many files.
- Helm can manage dependencies between charts.
- Charts can be stored in a Helm repository, such as Azure Container Registry, and integrated into the build pipeline.
For more information about using Container Registry as a Helm repository, see Use Azure Container Registry as a Helm repository for your application charts.
A single microservice may involve multiple Kubernetes configuration files. Updating a service can mean touching all of these files to update selectors, labels, and image tags. Helm treats these as a single package called a chart and allows you to easily update the YAML files by using variables. Helm uses a template language (based on Go templates) to let you write parameterized YAML configuration files.
For example, here's part of a YAML file that defines a deployment:
apiVersion: apps/v1
kind: Deployment
metadata:
  name: {{ include "package.fullname" . | replace "." "" }}
  labels:
    app.kubernetes.io/name: {{ include "package.name" . }}
    app.kubernetes.io/instance: {{ .Release.Name }}
  annotations:
    kubernetes.io/change-cause: {{ .Values.reason }}

...

  spec:
      containers:
      - name: &package-container_name fabrikam-package
        image: {{ .Values.dockerregistry }}/{{ .Values.image.repository }}:{{ .Values.image.tag }}
        imagePullPolicy: {{ .Values.image.pullPolicy }}
        env:
        - name: LOG_LEVEL
          value: {{ .Values.log.level }}
You can see that the deployment name, labels, and container spec all use template parameters, which are provided at deployment time. For example, from the command line:
helm install $HELM_CHARTS/package/ \
     --set image.tag=0.1.0 \
     --set image.repository=package \
     --set dockerregistry=$ACR_SERVER \
     --namespace backend \
     --name package-v0.1.0
Although your CI/CD pipeline could install a chart directly to Kubernetes, we recommend creating a chart archive (.tgz file) and pushing the chart to a Helm repository such as Azure Container Registry. For more information, see Package Docker-based apps in Helm charts in Azure Pipelines.
Revisions
Helm charts always have a version number, which must use semantic versioning. A chart can also have an appVersion. This field is optional and doesn't have to be related to the chart version. Some teams might want to application versions separately from updates to the charts. But a simpler approach is to use one version number, so there's a 1:1 relation between chart version and application version. That way, you can store one chart per release and easily deploy the desired release:
helm install <package-chart-name> --version <desiredVersion>
Another good practice is to provide a change-cause annotation in the deployment template:
apiVersion: apps/v1
kind: Deployment
metadata:
  name: {{ include "delivery.fullname" . | replace "." "" }}
  labels:
     ...
  annotations:
    kubernetes.io/change-cause: {{ .Values.reason }}
This lets you view the change-cause field for each revision, using the kubectl rollout history command. In the previous example, the change-cause is provided as a Helm chart parameter.
kubectl rollout history deployments/delivery-v010 -n backend
deployment.extensions/delivery-v010
REVISION  CHANGE-CAUSE
1         Initial deployment
You can also use the helm list command to view the revision history:
helm list
NAME            REVISION    UPDATED                     STATUS        CHART            APP VERSION     NAMESPACE
delivery-v0.1.0 1           Sun Apr  7 00:25:30 2020    DEPLOYED      delivery-v0.1.0  v0.1.0          backend
Azure DevOps Pipeline
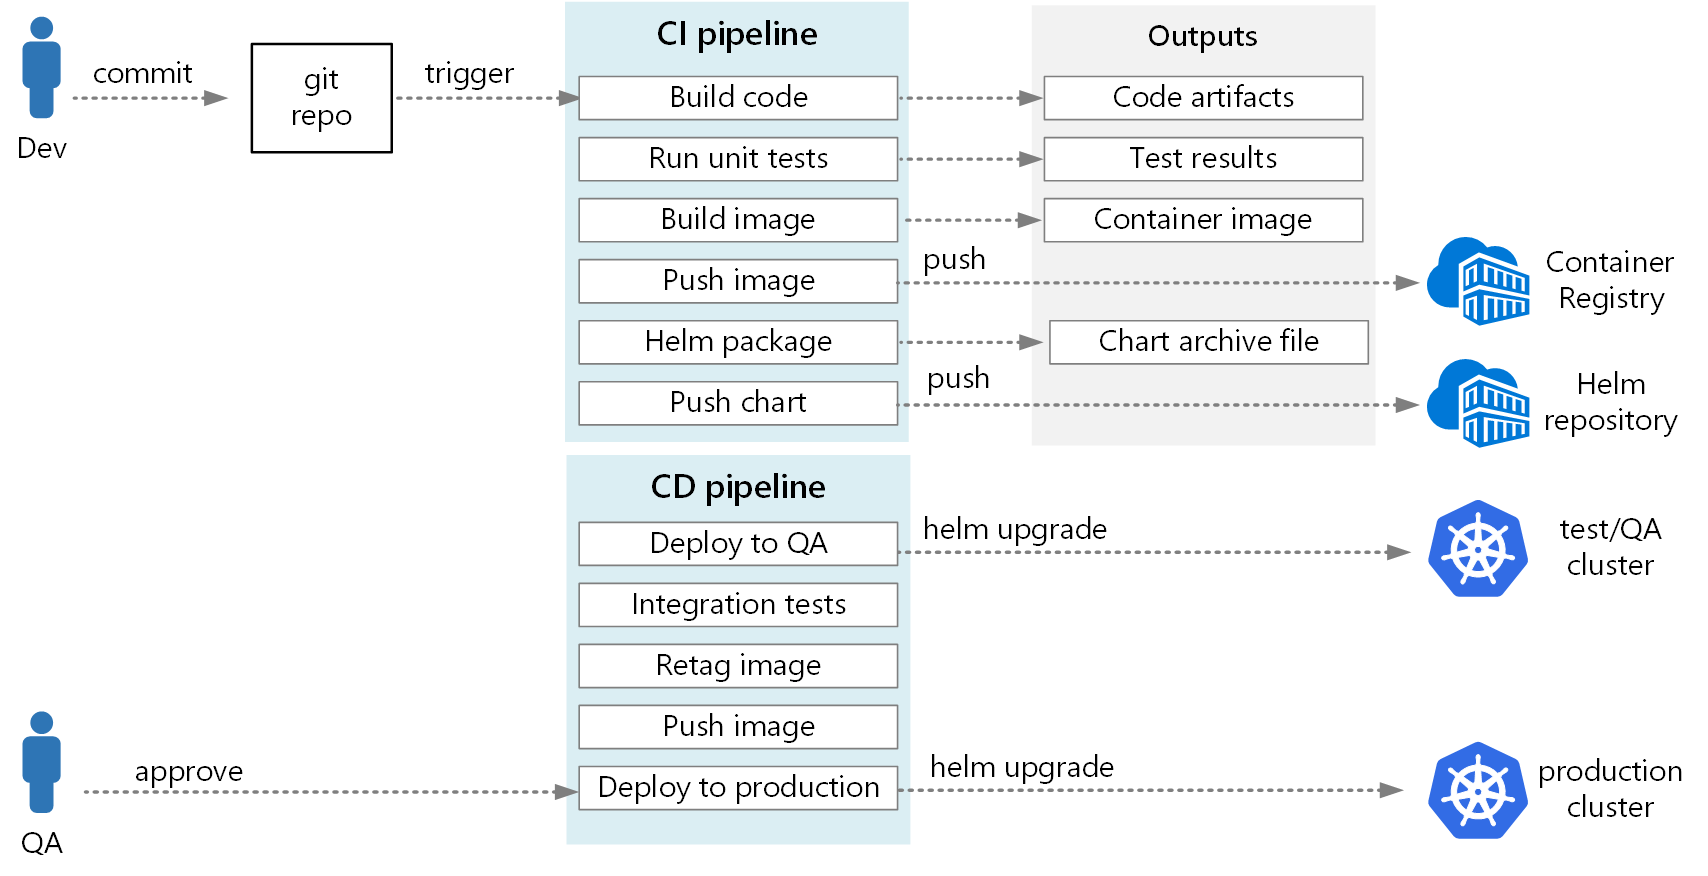
In Azure Pipelines, pipelines are divided into build pipelines and release pipelines. The build pipeline runs the CI process and creates build artifacts. For a microservices architecture on Kubernetes, these artifacts are the container images and Helm charts that define each microservice. The release pipeline runs that CD process that deploys a microservice into a cluster.
Based on the CI flow described earlier in this article, a build pipeline might consist of the following tasks:
Build the test runner container.
- task: Docker@1
  inputs:
    azureSubscriptionEndpoint: $(AzureSubscription)
    azureContainerRegistry: $(AzureContainerRegistry)
    arguments: '--pull --target testrunner'
    dockerFile: $(System.DefaultWorkingDirectory)/$(dockerFileName)
    imageName: '$(imageName)-test'
Run the tests, by invoking docker run against the test runner container.
- task: Docker@1
  inputs:
    azureSubscriptionEndpoint: $(AzureSubscription)
    azureContainerRegistry: $(AzureContainerRegistry)
    command: 'run'
    containerName: testrunner
    volumes: '$(System.DefaultWorkingDirectory)/TestResults:/app/tests/TestResults'
    imageName: '$(imageName)-test'
    runInBackground: false
Publish the test results. See Build an image.
- task: PublishTestResults@2
  inputs:
    testResultsFormat: 'VSTest'
    testResultsFiles: 'TestResults/*.trx'
    searchFolder: '$(System.DefaultWorkingDirectory)'
    publishRunAttachments: true
Build the runtime container.
- task: Docker@1
  inputs:
    azureSubscriptionEndpoint: $(AzureSubscription)
    azureContainerRegistry: $(AzureContainerRegistry)
    dockerFile: $(System.DefaultWorkingDirectory)/$(dockerFileName)
    includeLatestTag: false
    imageName: '$(imageName)'
Push the container image to Azure Container Registry (or other container registry).
- task: Docker@1
  inputs:
    azureSubscriptionEndpoint: $(AzureSubscription)
    azureContainerRegistry: $(AzureContainerRegistry)
    command: 'Push an image'
    imageName: '$(imageName)'
    includeSourceTags: false
Package the Helm chart.
- task: HelmDeploy@0
  inputs:
    command: package
    chartPath: $(chartPath)
    chartVersion: $(Build.SourceBranchName)
    arguments: '--app-version $(Build.SourceBranchName)'
Push the Helm package to Azure Container Registry (or other Helm repository).
task: AzureCLI@1
  inputs:
    azureSubscription: $(AzureSubscription)
    scriptLocation: inlineScript
    inlineScript: |
    az acr helm push $(System.ArtifactsDirectory)/$(repositoryName)-$(Build.SourceBranchName).tgz --name $(AzureContainerRegistry);
The output from the CI pipeline is a production-ready container image and an updated Helm chart for the microservice. At this point, the release pipeline can take over. There will be a unique release pipeline for each microservice. The release pipeline will be configured to have a trigger source set to the CI pipeline that published the artifact. This pipeline allows you to have independent deployments of each microservice. The release pipeline performs the following steps:
- Deploy the Helm chart to dev/QA/staging environments. The
Helm upgradecommand can be used with the--installflag to support the first install and subsequent upgrades. - Wait for an approver to approve or reject the deployment.
- Retag the container image for release
- Push the release tag to the container registry.
- Deploy the Helm chart in the production cluster.
For more information about creating a release pipeline, see Release pipelines, draft releases, and release options.
The following diagram shows the end-to-end CI/CD process described in this article:
Contributors
This article is maintained by Microsoft. It was originally written by the following contributors.
Principal author:
- John Poole | Senior Cloud Solutions Architect
To see non-public LinkedIn profiles, sign in to LinkedIn.
Next steps
- Adopt a Git branching strategy
- What is Azure Pipelines?
- Release pipelines, draft releases, and release options
- Release deployment control using approvals
- Introduction to Container registries in Azure