Events
Mar 17, 11 PM - Mar 21, 11 PM
Join the meetup series to build scalable AI solutions based on real-world use cases with fellow developers and experts.
Register nowThis browser is no longer supported.
Upgrade to Microsoft Edge to take advantage of the latest features, security updates, and technical support.
Azure Functions lets you use Visual Studio to create local C# function projects and then easily publish this project to run in a scalable serverless environment in Azure. If you prefer to develop your C# apps locally using Visual Studio Code, you should instead consider the Visual Studio Code-based version of this article.
By default, this article shows you how to create C# functions that run on .NET 8 in an isolated worker process. Function apps that run in an isolated worker process are supported on all versions of .NET that are supported by Functions. For more information, see Supported versions.
In this article, you learn how to:
Completing this quickstart incurs a small cost of a few USD cents or less in your Azure account.
This video shows you how to create a C# function in Azure.
The steps in the video are also described in the following sections.
Visual Studio 2022. Make sure to select the Azure development workload during installation.
Azure subscription. If you don't already have an account, create a free one before you begin.
The Azure Functions project template in Visual Studio creates a C# class library project that you can publish to a function app in Azure. You can use a function app to group functions as a logical unit for easier management, deployment, scaling, and sharing of resources.
From the Visual Studio menu, select File > New > Project.
In Create a new project, enter functions in the search box, choose the Azure Functions template, and then select Next.
In Configure your new project, enter a Project name for your project, and then select Next. The function app name must be valid as a C# namespace, so don't use underscores, hyphens, or any other nonalphanumeric characters.
For the remaining Additional information settings,
| Setting | Value | Description |
|---|---|---|
| Functions worker | .NET 8.0 Isolated (Long Term Support) | Your functions run on .NET 8 in an isolated worker process. |
| Function | HTTP trigger | This value creates a function triggered by an HTTP request. |
| Use Azurite for runtime storage account (AzureWebJobsStorage) | Enable | Because a function app in Azure requires a storage account, one is assigned or created when you publish your project to Azure. An HTTP trigger doesn't use an Azure Storage account connection string; all other trigger types require a valid Azure Storage account connection string. When you select this option, the Azurite emulator is used. |
| Authorization level | Anonymous | The created function can be triggered by any client without providing a key. This authorization setting makes it easy to test your new function. For more information, see Authorization level. |
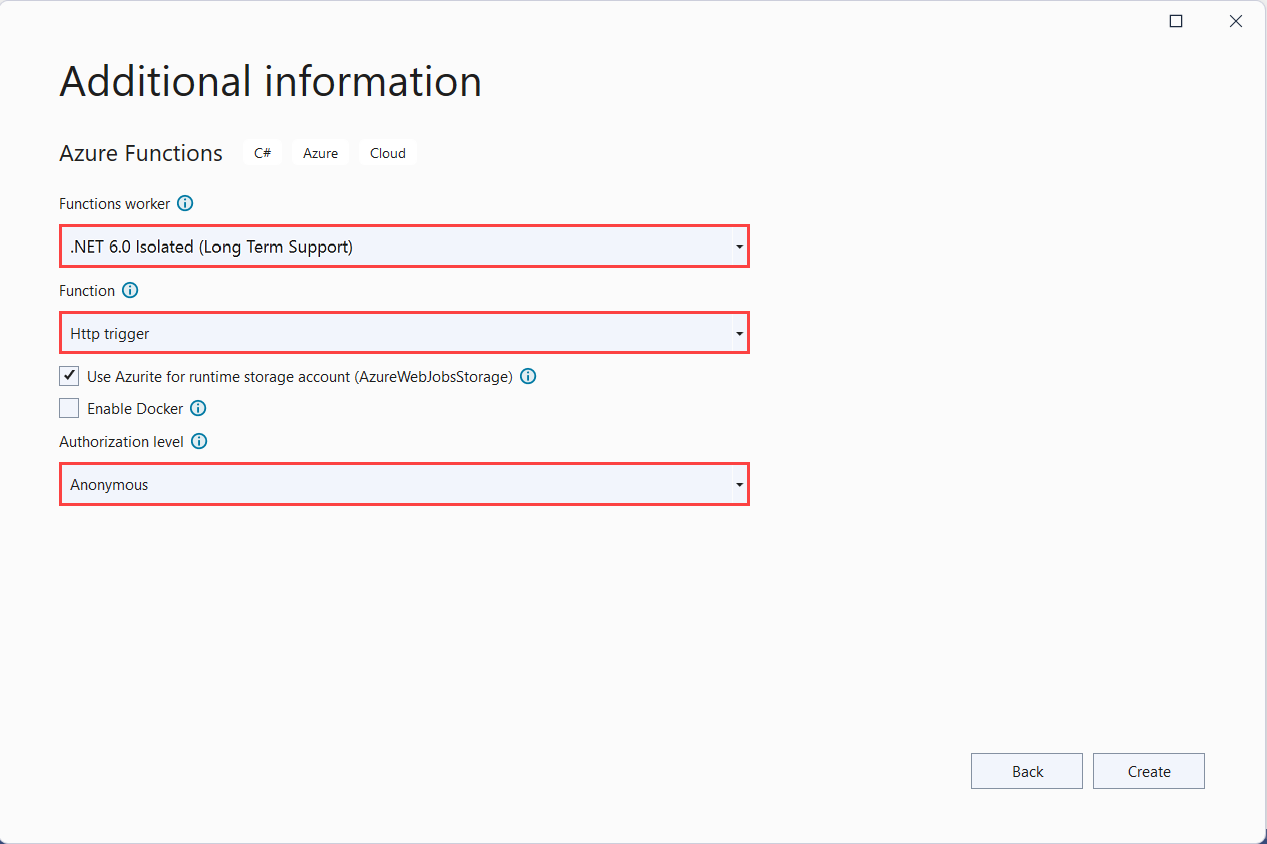
Make sure you set the Authorization level to Anonymous. If you choose the default level of Function, you're required to present the function key in requests to access your function endpoint in Azure.
Select Create to create the function project and HTTP trigger function.
Visual Studio creates a project and class that contains boilerplate code for the HTTP trigger function type. The boilerplate code sends an HTTP response that includes a value from the request body or query string. The HttpTrigger attribute specifies that the function is triggered by an HTTP request.
The Function method attribute sets the name of the function, which by default is generated as Function1. Since the tooling doesn't let you override the default function name when you create your project, take a minute to create a better name for the function class, file, and metadata.
In File Explorer, right-click the Function1.cs file and rename it to HttpExample.cs.
In the code, rename the Function1 class to HttpExample.
In the method named Run, rename the Function method attribute to HttpExample.
Your function definition should now look like the following code:
[Function("HttpExample")]
public IActionResult Run([HttpTrigger(AuthorizationLevel.AuthLevelValue, "get", "post")] HttpRequest req)
{
    return new OkObjectResult("Welcome to Azure Functions!");
}
Now that you've renamed the function, you can test it on your local computer.
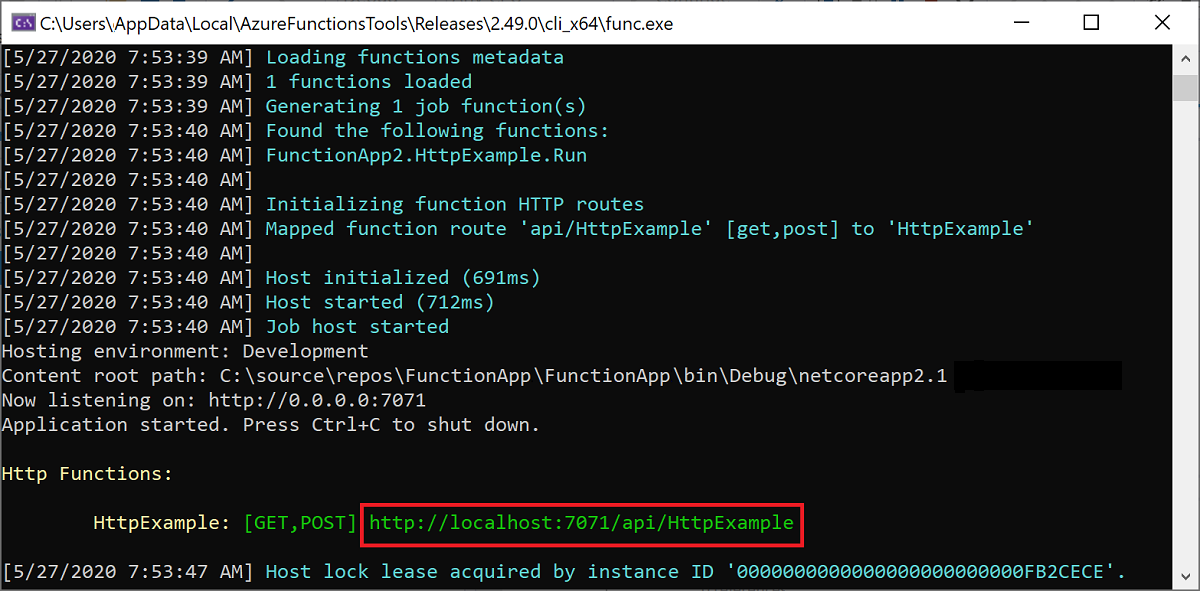
Visual Studio integrates with Azure Functions Core Tools so that you can test your functions locally using the full Azure Functions runtime.
To run your function, press F5 in Visual Studio. You might need to enable a firewall exception so that the tools can handle HTTP requests. Authorization levels are never enforced when you run a function locally.
Copy the URL of your function from the Azure Functions runtime output.
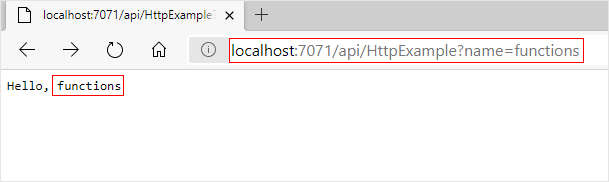
Paste the URL for the HTTP request into your browser's address bar and run the request. The following image shows the response in the browser to the local GET request returned by the function:
To stop debugging, press Shift+F5 in Visual Studio.
After you've verified that the function runs correctly on your local computer, it's time to publish the project to Azure.
Visual Studio can publish your local project to Azure. Before you can publish your project, you must have a function app in your Azure subscription. If you don't already have a function app in Azure, Visual Studio publishing creates one for you the first time you publish your project. In this article, you create a function app and related Azure resources.
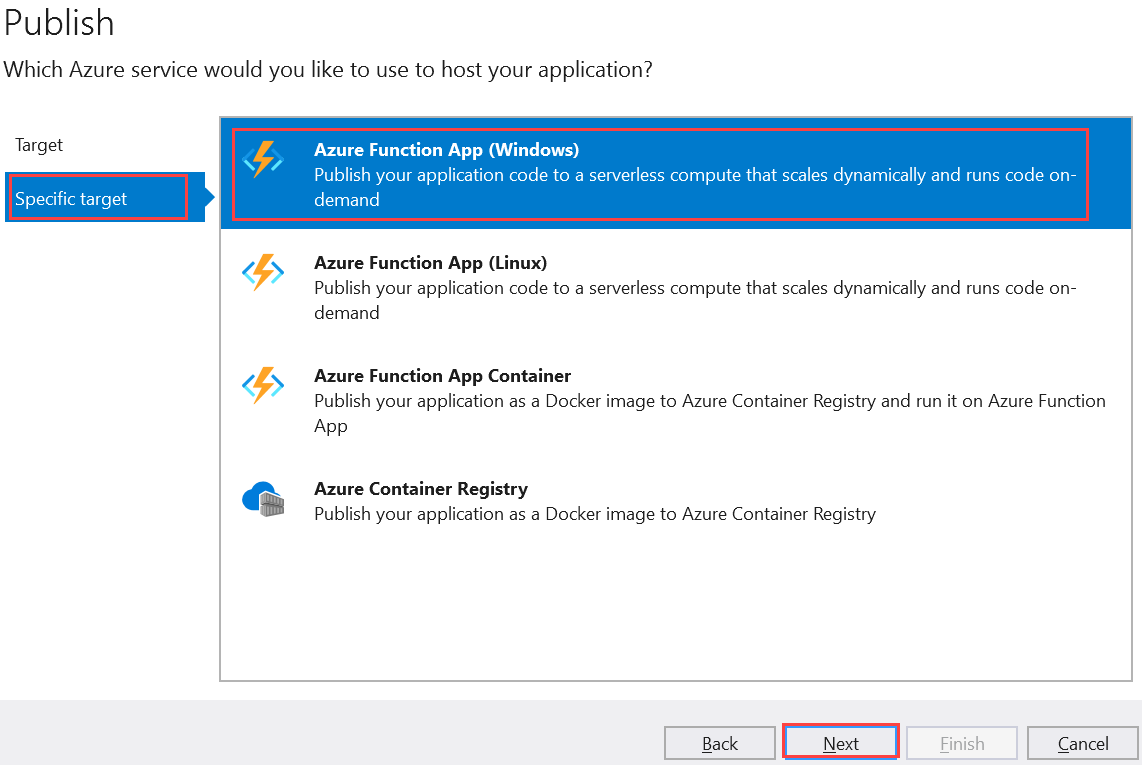
In Solution Explorer, right-click the project and select Publish. In Target, select Azure, and then select Next.
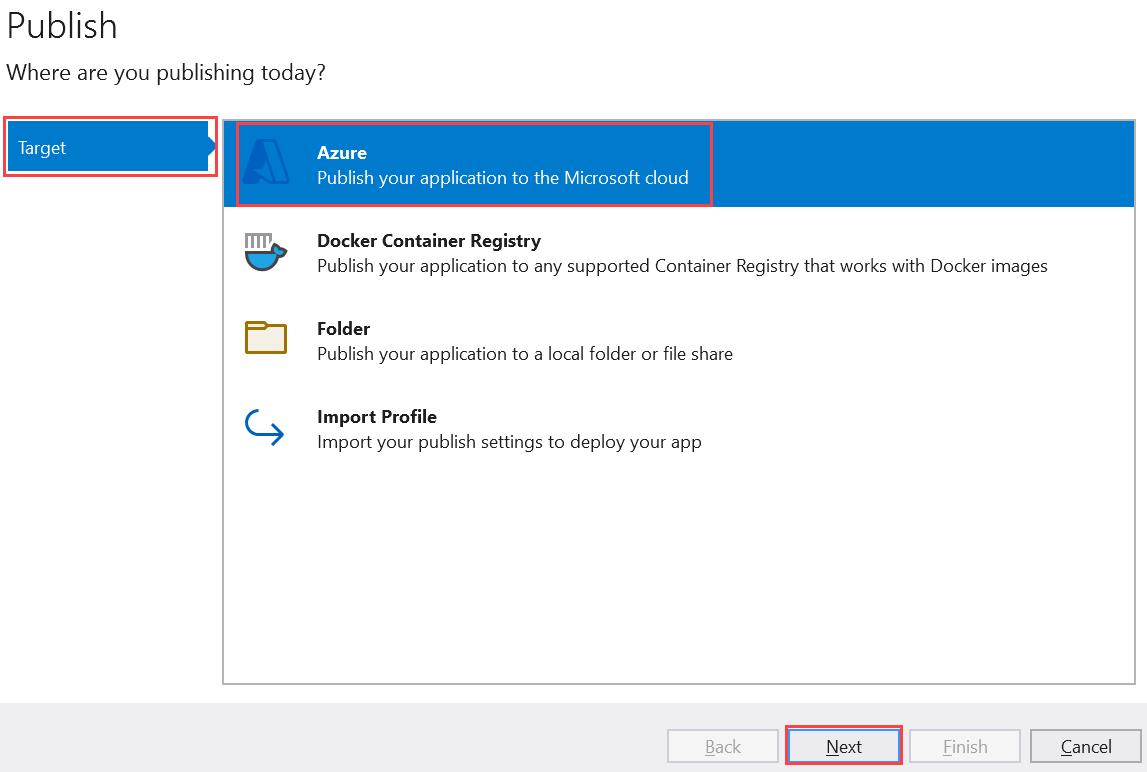
On Specific target, select Azure Function App (Windows). A function app that runs on Windows is created. Select Next.
On Functions instance, select Create a new Azure Function.
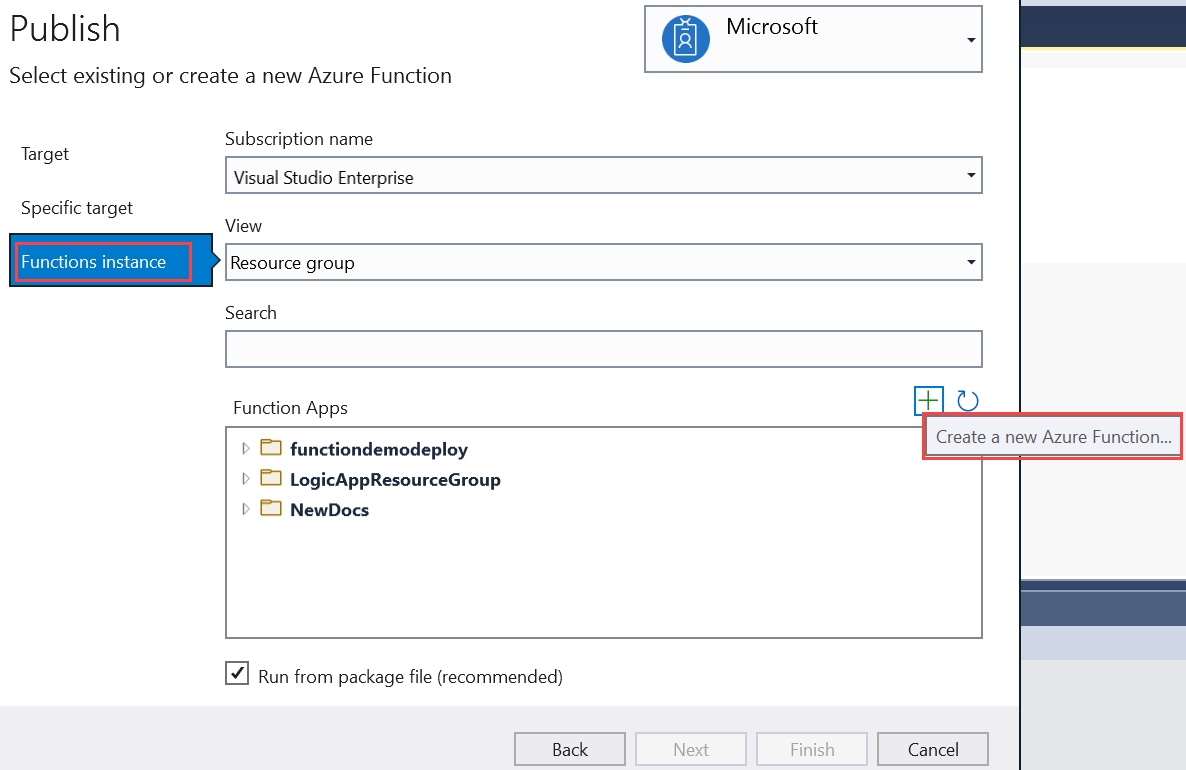
Create a new instance by using the values specified in the following table:
| Setting | Value | Description |
|---|---|---|
| Name | Globally unique name | Name that uniquely identifies your new function app. Accept this name or enter a new name. Valid characters are: a-z, 0-9, and -. |
| Subscription | Your subscription | The Azure subscription to use. Accept this subscription or select a new one from the dropdown list. |
| Resource group | Name of your resource group | The resource group in which you want to create your function app. Select New to create a new resource group. You can also choose to use an existing resource group from the dropdown list. |
| Plan Type | Consumption | When you publish your project to a function app that runs in a Consumption plan, you pay only for executions of your functions app. Other hosting plans incur higher costs. |
| Location | Location of the app service | Select a Location in an Azure region near you or other services your functions access. |
| Azure Storage | General-purpose storage account | An Azure storage account is required by the Functions runtime. Select New to configure a general-purpose storage account. You can also choose to use an existing account that meets the storage account requirements. |
| Application Insights | Application Insights instance | You should enable Azure Application Insights integration for your function app. Select New to create a new instance, either in a new or in an existing Log Analytics workspace. You can also choose to use an existing instance. |

Select Create to create a function app and its related resources in Azure. The status of resource creation is shown in the lower-left corner of the window.
On Functions instance, make sure that the Run from package file checkbox is selected. Your function app is deployed by using Zip Deploy with Run-From-Package mode enabled. Zip Deploy is the recommended deployment method for your functions project for better performance.
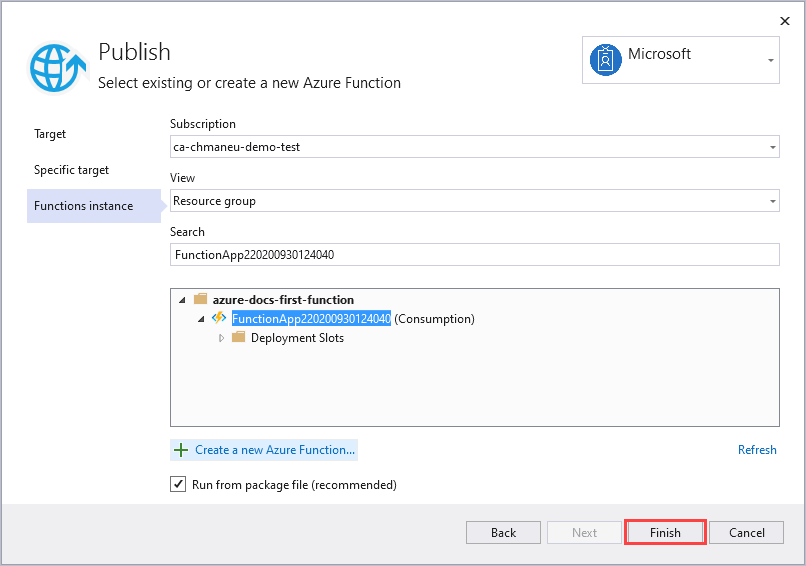
Select Finish, and on the Publish pane, select Publish to deploy the package that contains your project files to your new function app in Azure.
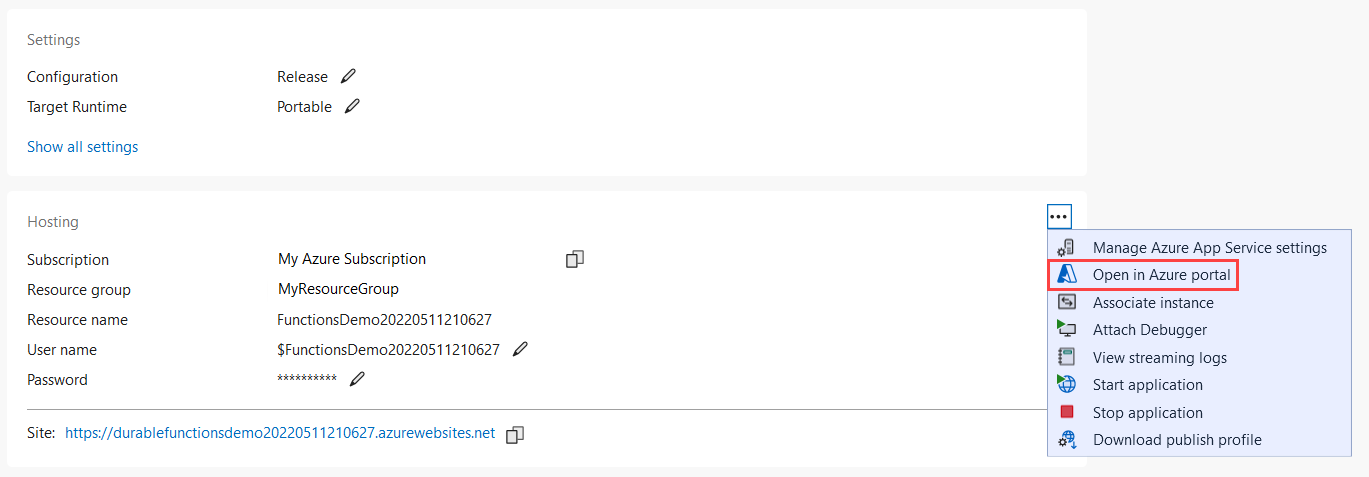
When deployment is completed, the root URL of the function app in Azure is shown on the Publish tab.
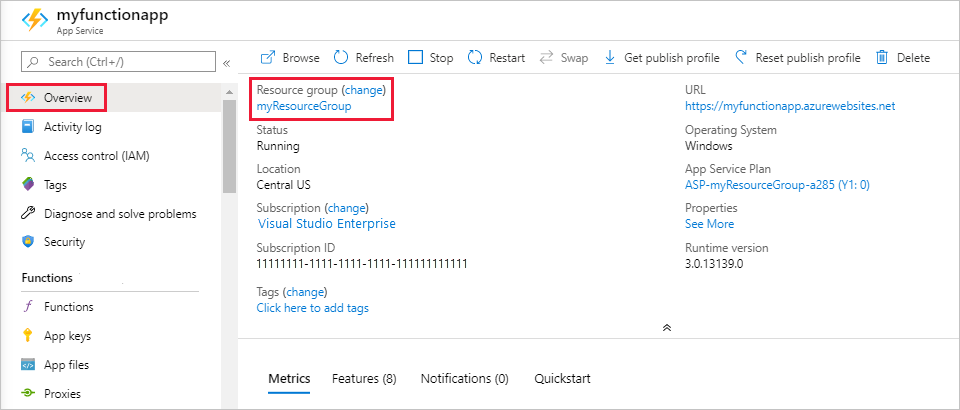
On the Publish tab, in the Hosting section, select Open in Azure portal. The new function app Azure resource opens in the Azure portal.
In the Azure portal, you should be in the Overview page for your new functions app.
Under Functions, select your new function named HttpExample, then in the function page select Get function URL and then the Copy to clipboard icon.
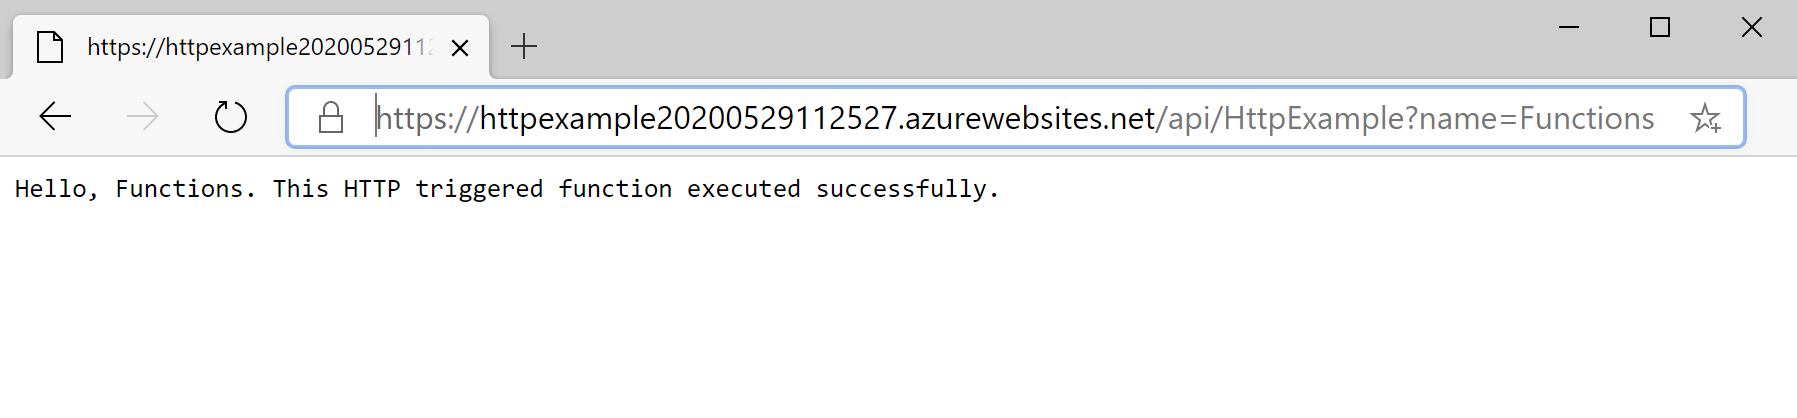
In the address bar in your browser, paste the URL you just copied and run the request.
The URL that calls your HTTP trigger function is in the following format:
https://<APP_NAME>.azurewebsites.net/api/HttpExample?name=Functions
Go to this URL and you see a response in the browser to the remote GET request returned by the function, which looks like the following example:
Resources in Azure refer to function apps, functions, storage accounts, and so forth. They're grouped into resource groups, and you can delete everything in a group by deleting the group.
You created Azure resources to complete this quickstart. You may be billed for these resources, depending on your account status and service pricing. Other quickstarts in this collection build upon this quickstart. If you plan to work with subsequent quickstarts, tutorials, or with any of the services you've created in this quickstart, don't clean up the resources.
Use the following steps to delete the function app and its related resources to avoid incurring any further costs.
In the Visual Studio Publish dialogue, in the Hosting section, select Open in Azure portal.
In the function app page, select the Overview tab and then select the link under Resource group.
In the Resource group page, review the list of included resources, and verify that they're the ones you want to delete.
Select Delete resource group, and follow the instructions.
Deletion may take a couple of minutes. When it's done, a notification appears for a few seconds. You can also select the bell icon at the top of the page to view the notification.
In this quickstart, you used Visual Studio to create and publish a C# function app in Azure with a simple HTTP trigger function.
To learn more about working with C# functions that run in an isolated worker process, see the Guide for running C# Azure Functions in an isolated worker process. Check out .NET supported versions to see other versions of supported .NET versions in an isolated worker process.
Advance to the next article to learn how to add an Azure Storage queue binding to your function:
Events
Mar 17, 11 PM - Mar 21, 11 PM
Join the meetup series to build scalable AI solutions based on real-world use cases with fellow developers and experts.
Register nowTraining
Module
Develop, test, and deploy an Azure Function with Visual Studio - Training
Use Visual Studio together with a test framework to create, deploy, and test an Azure Function.
Certification
Microsoft Certified: Azure Developer Associate - Certifications
Build end-to-end solutions in Microsoft Azure to create Azure Functions, implement and manage web apps, develop solutions utilizing Azure storage, and more.
Documentation
Create a C# function using Visual Studio Code - Azure Functions
Learn how to create a C# function, then publish the local project to serverless hosting in Azure Functions using the Azure Functions extension in Visual Studio Code.
Create a C# function from the command line - Azure Functions
Learn how to create a C# function from the command line, then publish the local project to serverless hosting in Azure Functions.
Connect functions to Azure Storage using Visual Studio
Learn how to add an output binding to connect your C# class library functions to an Azure Storage queue using Visual Studio.