Tutorial: Trigger Azure Functions on blob containers using an event subscription
If you're using earlier versions of the Blob Storage trigger with Azure Functions, you often get delayed executions because the trigger polls the blob container for updates. You can reduce latency by triggering your function using an event subscription to the same container. The event subscription uses Event Grid infrastructure to forward changes in the container as they occur. You can implement this capability using the latest Azure Functions extensions.
This article shows how to create a function that runs based on events raised when a blob is added to a container. You'll use Visual Studio Code for local development and to check that the function works locally before deploying your project to Azure.
- Create a general storage v2 account in Azure Storage.
- Create a container in blob storage.
- Create an event-driven Blob Storage triggered function.
- Create an event subscription to a blob container.
- Debug locally using ngrok by uploading files.
- Deploy to Azure and create a filtered event subscription.
Important
This article uses tabs to support multiple versions of the Node.js programming model. The v4 model is generally available and is designed to have a more flexible and intuitive experience for JavaScript and TypeScript developers. For more details about how the v4 model works, refer to the Azure Functions Node.js developer guide. To learn more about the differences between v3 and v4, refer to the migration guide.
Prerequisites
An Azure account with an active subscription. Create an account for free.
.NET 6.0 SDK, and optionally .NET 7.0 SDK when targeting .NET 7.0.
Visual Studio Code on one of the supported platforms.
C# extension for Visual Studio Code.
Azure Functions extension for Visual Studio Code.
An Azure account with an active subscription. Create an account for free.
Node.js 14.x or above. Use the
node --versioncommand to check your version.Visual Studio Code on one of the supported platforms.
The Azure Functions extension for Visual Studio Code. This extension installs Azure Functions Core Tools for you the first time you locally run your functions.
An Azure account with an active subscription. Create an account for free.
Visual Studio Code on one of the supported platforms.
The Azure Functions extension for Visual Studio Code.
An Azure account with an active subscription. Create an account for free.
Python versions that are supported by Azure Functions. For more information, see How to install Python.
Visual Studio Code on one of the supported platforms.
The Python extension for Visual Studio Code.
The Azure Functions extension for Visual Studio Code.
An Azure account with an active subscription. Create an account for free.
The Java Development Kit, version 8, 11, 17 or 21(Linux).
Apache Maven, version 3.0 or above.
Visual Studio Code on one of the supported platforms.
The Azure Functions extension for Visual Studio Code.
The ngrok utility, which provides a way for Azure to call into your locally running function.
Azure Storage extension for Visual Studio Code, minimally version 5.x.
Note
The Azure Storage extension for Visual Studio Code is currently in preview.
Create a storage account
To use an event subscription with Azure Storage, you'll need a general-purpose v2 storage account. By default, you can create this storage account from your Visual Studio Code project when you have the Azure Storage extension installed.
In Visual Studio Code, open the command palette (press F1), enter
Azure Storage: Create Storage Account.... At the prompts, provide the following information:Prompt Action Enter the name of the new storage account Provide a globally unique name. Storage account names must have 3 to 24 characters in length with only lowercase letters and numbers. For easier identification, we'll use the same name for the resource group and the function app name. Select a location for new resources For better performance, choose a region near you. The extension creates a general-purpose v2 storage account with the name you provided. The same name is also used for the resource group that contains the storage account.
After you create the storage account, open the command palette (press F1), and enter
Azure Storage: Create Blob Container.... At the prompts, provide the following information:Prompt Action Select a resource Select the storage account that you created. Enter a name for the new blob container Enter samples-workitems, which is the container name referenced in your code project.
Now that you created the blob container, you can create both the function that triggers on this container and the event subscription that delivers events to your function.
Create a Blob triggered function
When you create a Blob Storage-triggered function using Visual Studio Code, you also create a new project. You'll need to edit the function to consume an event subscription as the source, rather than use the regular polled container.
In Visual Studio Code, open your function app.
Open the command palette (press F1), enter
Azure Functions: Create Function..., and select Create new project.For your project workspace, select the directory location. Make sure that you either create a new folder or choose an empty folder for the project workspace.
Don't choose a project folder that's already part of a workspace.
At the prompts, provide the following information:
Prompt Action Select a language Select C#.Select a .NET runtime Select .NET 6.0 Isolated LTSfor running in an isolated worker process or.NET 6.0 LTSfor in-process.Select a template for your project's first function Select Azure Blob Storage trigger.Provide a function name Enter BlobTriggerEventGrid.Provide a namespace Enter My.Functions.Select setting from "local.settings.json" Select Create new local app setting.Select a storage account Select the storage account you created from the list. This is the path within your storage account that the trigger will monitor Accept the default value samples-workitems.Select how you would like to open your project Select Open in current window.Prompt Action Select a language Select Python.Select a Python interpreter to create a virtual environment Select your preferred Python interpreter. If an option isn't shown, enter the full path to your Python binary. Select a template for your project's first function Select Azure Blob Storage trigger.Provide a function name Enter BlobTriggerEventGrid.Select setting from "local.settings.json" Select Create new local app setting.Select a storage account Select the storage account you created from the list. This is the path within your storage account that the trigger will monitor Accept the default value samples-workitems.Select how you would like to open your project Select Open in current window.Prompt Action Select a language Select Java.Select a version of Java Select Java 11orJava 8, the Java version on which your functions run in Azure and that you've locally verified.Provide a group ID Select com.function.Provide an artifact ID Select BlobTriggerEventGrid.Provide a version Select 1.0-SNAPSHOT.Provide a package name Select com.function.Provide an app name Accept the generated name starting with BlobTriggerEventGrid.Select the build tool for Java project Select Maven.Select how you would like to open your project Select Open in current window.Prompt Action Select a language for your function project Select TypeScript.Select a TypeScript programming model Select Model V4.Select a template for your project's first function Select Azure Blob Storage trigger.Provide a function name Enter BlobTriggerEventGrid.Select setting from "local.settings.json" Select Create new local app setting.Select a storage account Select the storage account you created. This is the path within your storage account that the trigger will monitor Accept the default value samples-workitems.Select how you would like to open your project Select Open in current window.Prompt Action Select a language for your function project Select JavaScript.Select a JavaScript programming model Select Model V4.Select a template for your project's first function Select Azure Blob Storage trigger.Provide a function name Enter BlobTriggerEventGrid.Select setting from "local.settings.json" Select Create new local app setting.Select a storage account Select the storage account you created. This is the path within your storage account that the trigger will monitor Accept the default value samples-workitems.Select how you would like to open your project Select Open in current window.Prompt Action Select a language for your function project Select PowerShell.Select a template for your project's first function Select Azure Blob Storage trigger.Provide a function name Enter BlobTriggerEventGrid.Select setting from "local.settings.json" Select Create new local app setting.Select a storage account Select the storage account you created. This is the path within your storage account that the trigger will monitor Accept the default value samples-workitems.Select how you would like to open your project Select Open in current window.After the prompt appears, select Select storage account > Add to workspace.
For simplicity, this tutorial reuses the same storage account with your function app. However, in production, you might want to use a separate storage account with your function app. For more information, see Storage considerations for Azure Functions.
Upgrade the Storage extension
To use the Event Grid-based Blob Storage trigger, your function requires at least version 5.x for the Storage extension.
To upgrade your project with the required extension version, in the Terminal window, run the following command: dotnet add package
dotnet add package Microsoft.Azure.Functions.Worker.Extensions.Storage.Blobs --version 6.1.0
Open the host.json project file, and inspect the
extensionBundleelement.If
extensionBundle.versionisn't at least3.3.0, replaceextensionBundlewith the latest:"extensionBundle": { "id": "Microsoft.Azure.Functions.ExtensionBundle", "version": "[4.0.0, 5.0.0)" }
Update the function to use events
In the BlobTriggerEventGrid.cs file, add Source = BlobTriggerSource.EventGrid to the parameters for the Blob trigger attribute, for example:
[Function("BlobTriggerCSharp")]
public async Task Run([BlobTrigger("samples-workitems/{name}", Source = BlobTriggerSource.EventGrid, Connection = "<NAMED_STORAGE_CONNECTION>")] Stream myBlob, string name, FunctionContext executionContext)
{
    var logger = executionContext.GetLogger("BlobTriggerCSharp");
    logger.LogInformation($"C# Blob trigger function Processed blob\n Name: {name} \n Size: {myBlob.Length} Bytes");
}
After you create the function, in the function.json configuration file, add "source": "EventGrid" to the myBlob binding, for example:
{
  "scriptFile": "__init__.py",
  "bindings": [
    {
      "name": "myblob",
      "type": "blobTrigger",
      "direction": "in",
      "path": "samples-workitems/{name}",
      "source": "EventGrid",
      "connection": "<NAMED_STORAGE_CONNECTION>"
    }
  ]
}
In the generated
Function.javafile, replace contents with the following code, and rename the file toBlobTriggerEventGrid.java:package com.function; import com.microsoft.azure.functions.annotation.*; import com.microsoft.azure.functions.*; /** * Azure Functions with Azure Blob trigger. */ public class BlobTriggerEventGrid { /** * This function will be invoked when a new or updated blob is detected at the specified path. The blob contents are provided as input to this function. */ @FunctionName("BlobTriggerEventGrid") @StorageAccount("glengatesteventgridblob_STORAGE") public void run( @BlobTrigger(name = "content", path = "samples-workitems/{name}", dataType = "binary", source = "EventGrid" ) byte[] content, @BindingName("name") String name, final ExecutionContext context ) { context.getLogger().info("Java Blob trigger function processed a blob. Name: " + name + "\n Size: " + content.length + " Bytes"); } }Remove the associated unit test file, which no longer applies to the new trigger type.
After you create the function, add source: "EventGrid" to the options object in your TypeScript file, for example:
import { app, InvocationContext } from '@azure/functions';

export async function storageBlobTrigger1(blob: Buffer, context: InvocationContext): Promise<void> {
    context.log(
        `Storage blob function processed blob "${context.triggerMetadata.name}" with size ${blob.length} bytes`
    );
}

app.storageBlob('storageBlobTrigger1', {
    path: 'samples-workitems/{name}',
    connection: 'MyStorageAccountAppSetting',
    source: 'EventGrid',
    handler: storageBlobTrigger1,
});
After you create the function, add source: "EventGrid" to the options object in your JavaScript file, for example:
const { app } = require('@azure/functions');
app.storageBlob('storageBlobTrigger1', {
path: 'samples-workitems/{name}',
connection: 'MyStorageAccountAppSetting',
source: 'EventGrid',
handler: (blob, context) => {
context.log(
`Storage blob function processed blob "${context.triggerMetadata.name}" with size ${blob.length} bytes`
);
},
});
After you create the function, in the function.json configuration file, add "source": "EventGrid" to the myBlob binding, for example:
{
    "bindings": [
        {
            "name": "myblob",
            "type": "blobTrigger",
            "direction": "in",
            "path": "samples-workitems/{name}",
            "source": "EventGrid",
            "connection": "<NAMED_STORAGE_CONNECTION>"
        }
    ]
}
Start local debugging
Event Grid validates the endpoint URL when you create an event subscription in the Azure portal. This validation means that before you can create an event subscription for local debugging, your function must be running locally with remote access enabled by the ngrok utility. If your local function code isn't running and accessible to Azure, you won't be able to create the event subscription.
Determine the blob trigger endpoint
When your function runs locally, the default endpoint used for an event-driven blob storage trigger looks like the following URL:
http://localhost:7071/runtime/webhooks/blobs?functionName=Host.Functions.BlobTriggerEventGrid
http://localhost:7071/runtime/webhooks/blobs?functionName=Host.Functions.BlobTriggerEventGrid
Save this path, which you'll use later to create endpoint URLs for event subscriptions. If you used a different name for your Blob Storage triggered function, you need to change the functionName value in the query string.
Note
Because the endpoint is handling events for a Blob Storage trigger, the endpoint path includes blobs. The endpoint URL for an Event Grid trigger would instead have eventgrid in the path.
Run ngrok
To break into a function being debugged on your machine, you must provide a way for Azure Event Grid to communicate with functions running on your local computer.
The ngrok utility forwards external requests to a randomly generated proxy server address to a specific address and port on your local computer. through to call the webhook endpoint of the function running on your machine.
Start ngrok using the following command:
ngrok.exe http http://localhost:7071As the utility starts, the command window should look similar to the following screenshot:
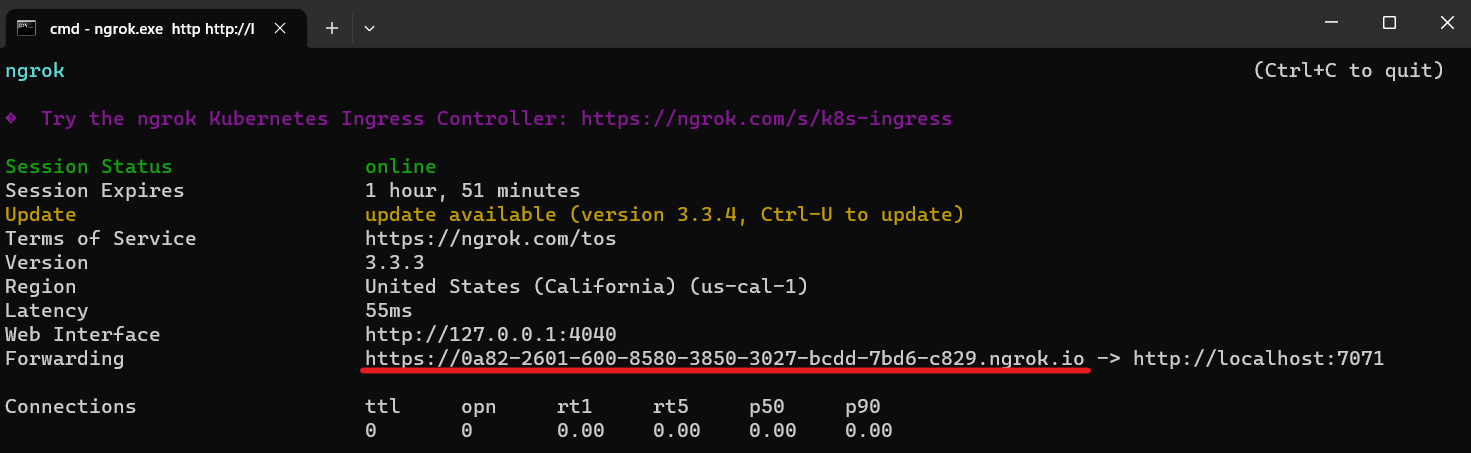
Copy the HTTPS URL generated when ngrok is run. This value is used to determine the webhook endpoint on your computer exposed using ngrok.
Important
At this point, don't stop ngrok. Every time you start ngrok, the HTTPS URL is regenerated with a different value. Because the endpoint of an event subscription can't be modified, you have to create a new event subscription every time you run ngrok.
Unless you create an ngrok account, the maximum ngrok session time is limited to two hours.
Build the endpoint URL
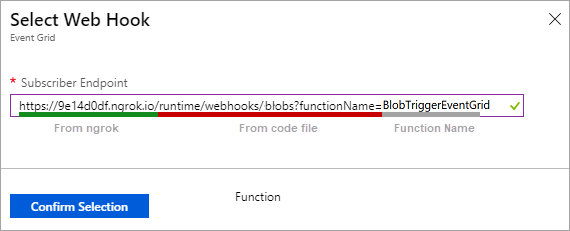
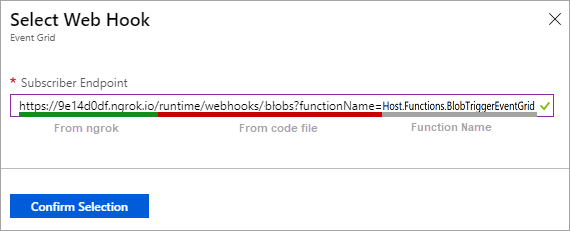
The endpoint used in the event subscription is made up of three different parts, a prefixed server name, a path, and a query string. The following table describes these parts:
| URL part | Description |
|---|---|
| Prefix and server name | When your function runs locally, the server name with an https:// prefix comes from the Forwarding URL generated by ngrok. In the localhost URL, the ngrok URL replaces http://localhost:7071. When running in Azure, you'll instead use the published function app server, which is usually in the form https://<FUNCTION_APP_NAME>.azurewebsites.net. |
| Path | The path portion of the endpoint URL comes from the localhost URL copied earlier, and looks like /runtime/webhooks/blobs for a Blob Storage trigger. The path for an Event Grid trigger would be /runtime/webhooks/EventGrid |
| Query string | For all languages including .NET Isolated the functionName=Host.Functions.BlobTriggerEventGrid parameter, except for .NET In-process which should be functionName=BlobTriggerEventGrid in the query string sets the name of the function that handles the event. If you used a different name for your function, you'll need to change this value. An access key isn't required when running locally. When running in Azure, you'll also need to include a code= parameter in the URL, which contains a key that you can get from the portal. |
The following screenshot shows an example of how the final endpoint URL should look when using a Blob Storage trigger named BlobTriggerEventGrid:
Start debugging
With ngrok already running, start your local project as follows:
Set a breakpoint in your function on the line that handles logging.
Start a debugging session.
Open a new terminal and run the following
mvncommand to start the debugging session.mvn azure-functions:run -DenableDebugPress F5 to start a debugging session.
With your code running and ngrok forwarding requests, it's time to create an event subscription to the blob container.
Create the event subscription
An event subscription, powered by Azure Event Grid, raises events based on changes in the linked blob container. This event is then sent to the webhook endpoint on your function's trigger. After an event subscription is created, the endpoint URL can't be changed. This means that after you're done with local debugging (or if you restart ngrok), you'll need to delete and recreate the event subscription.
In Visual Studio Code, choose the Azure icon in the Activity bar. In Resources, expand your subscription, expand Storage accounts, right-click the storage account you created earlier, and select Open in portal.
Sign in to the Azure portal and make a note of the Resource group for your storage account. You'll create your other resources in the same group to make it easier to clean up resources when you're done.
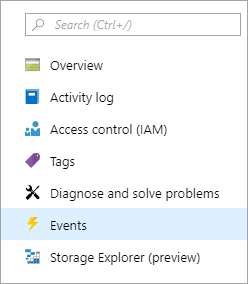
select the Events option from the left menu.
In the Events window, select the + Event Subscription button, and provide values from the following table into the Basic tab:
Setting Suggested value Description Name myBlobLocalNgrokEventSub Name that identifies the event subscription. You can use the name to quickly find the event subscription. Event Schema Event Grid Schema Use the default schema for events. System Topic Name samples-workitems-blobs Name for the topic, which represents the container. The topic is created with the first subscription, and you'll use it for future event subscriptions. Filter to Event Types Blob Created Endpoint Type Web Hook The blob storage trigger uses a web hook endpoint. You would use Azure Functions for an Event Grid trigger. Endpoint Your ngrok-based URL endpoint Use the ngrok-based URL endpoint that you determined earlier. Select Confirm selection to validate the endpoint URL.
Select Create to create the event subscription.
Upload a file to the container
With the event subscription in place and your code project and ngrok still running, you can now upload a file to your storage container to trigger your function. You can upload a file from your computer to your blob storage container using Visual Studio Code.
In Visual Studio Code, open the command palette (press F1) and type
Azure Storage: Upload Files....In the Open dialog box, choose a file, preferably a binary image file that's not too large, select Upload .
Provide the following information at the prompts:
Setting Suggested value Description Select a resource Storage account name Choose the name of the storage account you created in a previous step. Select a resource type Blob Containers You're uploading to a blob container. Select Blob Container samples-workitems This value is the name of the container you created in a previous step. Enter the destination directory of this upload default Just accept the default value of /, which is the container root.
This command uploads a file from your computer to the storage container in Azure. At this point, your running ngrok instance should report that a request was forwarded. You'll also see in the func.exe output for your debugging session that your function has been started. Hopefully, at this point, your debug session is waiting for you where you set the breakpoint.
Publish the project to Azure
Now that you've successfully validated your function code locally, it's time to publish the project to a new function app in Azure.
Create the function app
The following steps create the resources you need in Azure and deploy your project files.
In the command pallet, enter Azure Functions: Create function app in Azure...(Advanced).
Following the prompts, provide this information:
Prompt Selection Enter a globally unique name for the new function app. Type a globally unique name that identifies your new function app and then select Enter. Valid characters for a function app name are a-z,0-9, and-. Write down this name; you'll need it later when building the new endpoint URL.Select a runtime stack. Choose the language version on which you've been running locally. Select an OS. Choose either Linux or Windows. Python apps must run on Linux. Select a resource group for new resources. Choose the name of the resource group you created with your storage account, which you previously noted in the portal. Select a location for new resources. Select a location in a region near you or near other services that your functions access. Select a hosting plan. Choose Consumption for serverless Consumption plan hosting, where you're only charged when your functions run. Select a storage account. Choose the name of the existing storage account that you've been using. Select an Application Insights resource for your app. Choose Create new Application Insights resource and at the prompt, type a name for the instance used to store runtime data from your functions. A notification appears after your function app is created and the deployment package is applied. Select View Output in this notification to view the creation and deployment results, including the Azure resources that you created.
Deploy the function code
Important
Deploying to an existing function app always overwrites the contents of that app in Azure.
In the Resources area of the Azure activity, locate the function app resource you just created, right-click the resource, and select Deploy to function app....
When prompted about overwriting previous deployments, select Deploy to deploy your function code to the new function app resource.
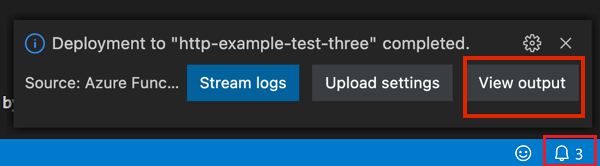
After deployment completes, select View Output to view the creation and deployment results, including the Azure resources that you created. If you miss the notification, select the bell icon in the lower right corner to see it again.
Publish application settings
Because the local settings from local.settings.json aren't automatically published, you must upload them now so that your function run correctly in Azure.
In the command pallet, enter Azure Functions: Upload Local Settings..., and in the Select a resource. prompt choose the name of your function app.
Recreate the event subscription
Now that the function app is running in Azure, you need to create a new event subscription. This new event subscription uses the endpoint of your function in Azure. You'll also add a filter to the event subscription so that the function is only triggered when JPEG (.jpg) files are added to the container. In Azure, the endpoint URL also contains an access key, which helps to block actors other than Event Grid from accessing the endpoint.
Get the blob extension key
In Visual Studio Code, choose the Azure icon in the Activity bar. In Resources, expand your subscription, expand Function App, right-click the function app you created, and select Open in portal.
Under Functions in the left menu, select App keys.
Under System keys select the key named blobs_extension, and copy the key Value.
You'll include this value in the query string of new endpoint URL.
Build the endpoint URL
Create a new endpoint URL for the Blob Storage trigger based on the following example:
https://<FUNCTION_APP_NAME>.azurewebsites.net/runtime/webhooks/blobs?functionName=Host.Functions.BlobTriggerEventGrid&code=<BLOB_EXTENSION_KEY>
https://<FUNCTION_APP_NAME>.azurewebsites.net/runtime/webhooks/blobs?functionName=Host.Functions.BlobTriggerEventGrid&code=<BLOB_EXTENSION_KEY>
In this example, replace <FUNCTION_APP_NAME> with the name of your function app and replace <BLOB_EXTENSION_KEY> with the value you got from the portal. If you used a different name for your function, you'll also need to change the functionName query string as needed.
Create a filtered event subscription
Because the endpoint URL of an event subscription can't be changed, you must create a new event subscription. You should also delete the old event subscription at this time, since it can't be reused.
This time, you'll include the filter on the event subscription so that only JPEG files (*.jpg) trigger the function.
In Visual Studio Code, choose the Azure icon in the Activity bar. In Resources, expand your subscription, expand Storage accounts, right-click the storage account you created earlier, and select Open in portal.
In the Azure portal, select the Events option from the left menu.
In the Events window, select your old ngrok-based event subscription, select Delete > Save. This action removes the old event subscription.
Select the + Event Subscription button, and provide values from the following table into the Basic tab:
Setting Suggested value Description Name myBlobAzureEventSub Name that identifies the event subscription. You can use the name to quickly find the event subscription. Event Schema Event Grid Schema Use the default schema for events. Filter to Event Types Blob Created Endpoint Type Web Hook The blob storage trigger uses a web hook endpoint. You would use Azure Functions for an Event Grid trigger. Endpoint Your new Azure-based URL endpoint Use the URL endpoint that you built, which includes the key value. Select Confirm selection to validate the endpoint URL.
Select the Filters tab, under Subject filters check Enable subject filtering, type
.jpgin Subject ends with. This filters events to only JPEG files.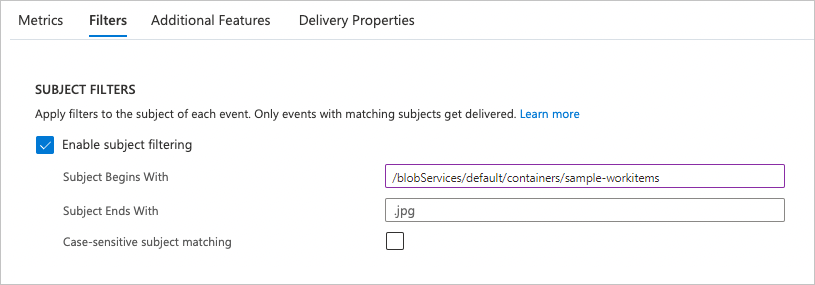
Select Create to create the event subscription.
Verify the function in Azure
With the entire topology now running Azure, it's time to verify that everything is working correctly. Since you're already in the portal, it's easiest to just upload a file from there.
In your storage account page in the portal, select Containers and select your samples-workitems container.
Select the Upload button to open the upload page on the right, browse your local file system to find a
.jpgfile to upload, and then select the Upload button to upload the blob. Now, you can verify that your function ran based on the container upload event.In your storage account, return to the Events page, select Event Subscriptions, and you should see that an event was delivered.
Back in your function app page in the portal, under Functions select Functions, choose your function and you should see a Total Execution Count of at least one.
Under Developer, select Monitor, and you should see traces written from your successful function executions. There might be up a five-minute delay as events are processed by Application Insights.
Clean up resources
When you continue to the next step and add an Azure Storage queue binding to your function, you'll need to keep all your resources in place to build on what you've already done.
Otherwise, you can use the following steps to delete the function app and its related resources to avoid incurring any further costs.
In Visual Studio Code, press F1 to open the command palette. In the command palette, search for and select
Azure: Open in portal.Choose your function app and press Enter. The function app page opens in the Azure portal.
In the Overview tab, select the named link next to Resource group.
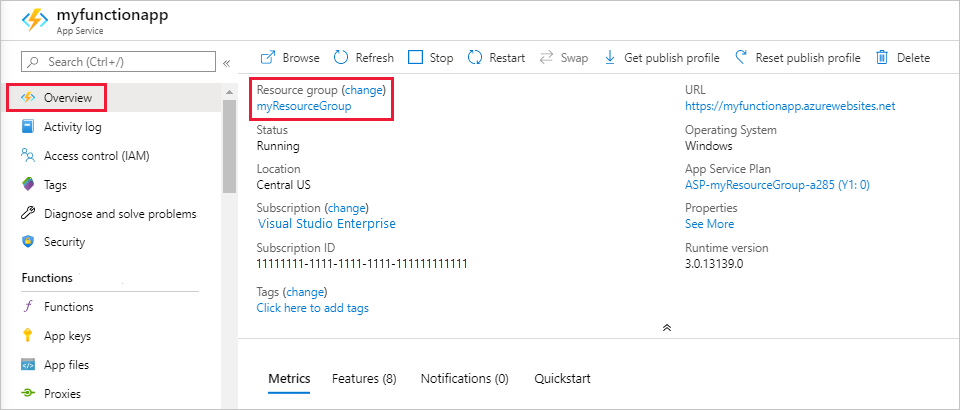
On the Resource group page, review the list of included resources, and verify that they're the ones you want to delete.
Select Delete resource group, and follow the instructions.
Deletion may take a couple of minutes. When it's done, a notification appears for a few seconds. You can also select the bell icon at the top of the page to view the notification.
For more information about Functions costs, see Estimating Consumption plan costs.
Next steps
Feedback
Coming soon: Throughout 2024 we will be phasing out GitHub Issues as the feedback mechanism for content and replacing it with a new feedback system. For more information see: https://aka.ms/ContentUserFeedback.
Submit and view feedback for