Tutorial: Create a function to integrate with Azure Logic Apps
Azure Functions integrates with Azure Logic Apps in the Logic Apps Designer. This integration allows you use the computing power of Functions in orchestrations with other Azure and third-party services.
This tutorial shows you how to create a workflow to analyze Twitter activity. As tweets are evaluated, the workflow sends notifications when positive sentiments are detected.
In this tutorial, you learn to:
- Create an Azure AI services API Resource.
- Create a function that categorizes tweet sentiment.
- Create a logic app that connects to Twitter.
- Add sentiment detection to the logic app.
- Connect the logic app to the function.
- Send an email based on the response from the function.
Prerequisites
- An active Twitter account.
- An Outlook.com account (for sending notifications).
Note
If you want to use the Gmail connector, only G-Suite business accounts can use this connector without restrictions in logic apps. If you have a Gmail consumer account, you can use the Gmail connector with only specific Google-approved apps and services, or you can create a Google client app to use for authentication in your Gmail connector.
For more information, see Data security and privacy policies for Google connectors in Azure Logic Apps.
Create Text Analytics resource
The Azure AI services APIs are available in Azure as individual resources. Use the Text Analytics API to detect the sentiment of posted tweets.
Sign in to the Azure portal.
Select Create a resource in the upper left-hand corner of the Azure portal.
Under Categories, select AI + Machine Learning
Under Text Analytics, select Create.
Enter the following values in the Create Text Analytics screen.
Setting Value Remarks Subscription Your Azure subscription name Resource group Create a new resource group named tweet-sentiment-tutorial Later, you delete this resource group to remove all the resources created during this tutorial. Region Select the region closest to you Name TweetSentimentApp Pricing tier Select Free F0 Select Review + create.
Select Create.
Once the deployment is complete, select Go to Resource.
Get Text Analytics settings
With the Text Analytics resource created, you'll copy a few settings and set them aside for later use.
Select Keys and Endpoint.
Copy Key 1 by clicking on the icon at the end of the input box.
Paste the value into a text editor.
Copy the Endpoint by clicking on the icon at the end of the input box.
Paste the value into a text editor.
Create the function app
From the top search box, search for and select Function app.
Select Create.
Enter the following values.
Setting Suggested Value Remarks Subscription Your Azure subscription name Resource group tweet-sentiment-tutorial Use the same resource group name throughout this tutorial. Function App name TweetSentimentAPI + a unique suffix Function application names are globally unique. Valid characters are a-z(case insensitive),0-9, and-.Publish Code Runtime stack .NET The function code provided for you is in C#. Version Select the latest version number Region Select the region closest to you Select Review + create.
Select Create.
Once the deployment is complete, select Go to Resource.
Create an HTTP-triggered function
From the left menu of the Functions window, select Functions.
Select Add from the top menu and enter the following values.
Setting Value Remarks Development environment Develop in portal Template HTTP Trigger New Function TweetSentimentFunction This is the name of your function. Authorization level Function Select the Add button.
Select the Code + Test button.
Paste the following code in the code editor window.
#r "Newtonsoft.Json"

using System;
using System.Net;
using Microsoft.AspNetCore.Mvc;
using Microsoft.Extensions.Logging;
using Microsoft.Extensions.Primitives;
using Newtonsoft.Json;

public static async Task<IActionResult> Run(HttpRequest req, ILogger log)
{

    string requestBody = String.Empty;
    using (StreamReader streamReader =  new  StreamReader(req.Body))
    {
        requestBody = await streamReader.ReadToEndAsync();
    }

    dynamic score = JsonConvert.DeserializeObject(requestBody);
    string value = "Positive";

    if(score < .3)
    {
        value = "Negative";
    }
    else if (score < .6)
    {
        value = "Neutral";
    }

    return requestBody != null
        ? (ActionResult)new OkObjectResult(value)
       : new BadRequestObjectResult("Pass a sentiment score in the request body.");
}
A sentiment score is passed into the function, which returns a category name for the value.
Select the Save button on the toolbar to save your changes.
Note
To test the function, select Test/Run from the top menu. On the Input tab, enter a value of
0.9in the Body input box, and then select Run. Verify that a value of Positive is returned in the HTTP response content box in the Output section.
Next, create a logic app that integrates with Azure Functions, Twitter, and the Azure AI services API.
Create a logic app
From the top search box, search for and select Logic Apps.
Select Add.
Select Consumption and enter the following values.
Setting Suggested Value Subscription Your Azure subscription name Resource group tweet-sentiment-tutorial Logic app name TweetSentimentApp Region Select the region closest to you, preferably the same region you selected in previous steps. Accept default values for all other settings.
Select Review + create.
Select Create.
Once the deployment is complete, select Go to Resource.
Select the Blank Logic App button.

Select the Save button on the toolbar to save your progress.
You can now use the Logic Apps Designer to add services and triggers to your application.
Connect to Twitter
Create a connection to Twitter so your app can poll for new tweets.
Search for Twitter in the top search box.
Select the Twitter icon.
Select the When a new tweet is posted trigger.
Enter the following values to set up the connection.
Setting Value Connection name MyTwitterConnection Authentication Type Use default shared application Select Sign in.
Follow the prompts in the pop-up window to complete signing in to Twitter.
Next, enter the following values in the When a new tweet is posted box.
Setting Value Search text #my-twitter-tutorial How often do you want to check for items? 1 in the textbox, and
Hour in the dropdown. You may enter different values but be sure to review the current limitations of the Twitter connector.Select the Save button on the toolbar to save your progress.
Next, connect to text analytics to detect the sentiment of collected tweets.
Add Text Analytics sentiment detection
Select New step.
Search for Text Analytics in the search box.
Select the Text Analytics icon.
Select Detect Sentiment and enter the following values.
Setting Value Connection name TextAnalyticsConnection Account Key Paste in the Text Analytics account key you set aside earlier. Site URL Paste in the Text Analytics endpoint you set aside earlier. Select Create.
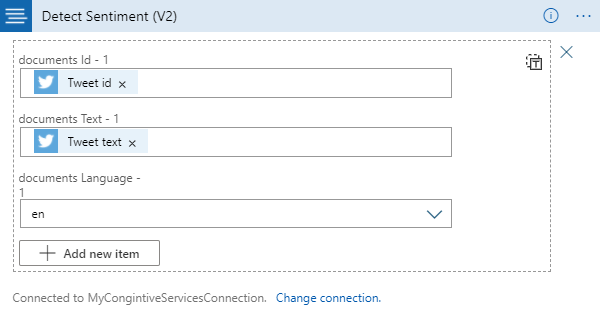
Click inside the Add new parameter box, and check the box next to documents that appears in the pop-up.
Click inside the documents Id - 1 textbox to open the dynamic content pop-up.
In the dynamic content search box, search for id, and click on Tweet id.
Click inside the documents Text - 1 textbox to open the dynamic content pop-up.
In the dynamic content search box, search for text, and click on Tweet text.
In Choose an action, type Text Analytics, and then click the Detect sentiment action.
Select the Save button on the toolbar to save your progress.
The Detect Sentiment box should look like the following screenshot.
Connect sentiment output to function endpoint
Select New step.
Search for Azure Functions in the search box.
Select the Azure Functions icon.
Search for your function name in the search box. If you followed the guidance above, your function name begins with TweetSentimentAPI.
Select the function icon.
Select the TweetSentimentFunction item.
Click inside the Request Body box, and select the Detect Sentiment score item from the pop-up window.
Select the Save button on the toolbar to save your progress.
Add conditional step
Select the Add an action button.
Click inside the Control box, and search for and select Control in the pop-up window.
Select Condition.
Click inside the Choose a value box, and select the TweetSentimentFunction Body item from the pop-up window.
Enter Positive in the Choose a value box.
Select the Save button on the toolbar to save your progress.
Add email notifications
Under the True box, select the Add an action button.
Search for and select Office 365 Outlook in the text box.
Search for send and select Send an email in the text box.
Select the Sign in button.
Follow the prompts in the pop-up window to complete signing in to Office 365 Outlook.
Enter your email address in the To box.
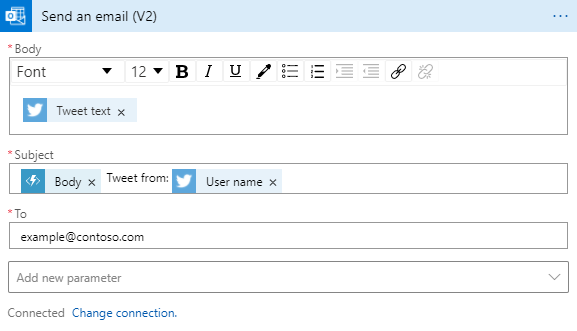
Click inside the Subject box and click on the Body item under TweetSentimentFunction. If the Body item isn't shown in the list, click the See more link to expand the options list.
After the Body item in the Subject, enter the text Tweet from:.
After the Tweet from: text, click on the box again and select User name from the When a new tweet is posted options list.
Click inside the Body box and select Tweet text under the When a new tweet is posted options list. If the Tweet text item isn't shown in the list, click the See more link to expand the options list.
Select the Save button on the toolbar to save your progress.
The email box should now look like this screenshot.
Run the workflow
From your Twitter account, tweet the following text: I'm enjoying #my-twitter-tutorial.
Return to the Logic Apps Designer and select the Run button.
Check your email for a message from the workflow.
Clean up resources
To clean up all the Azure services and accounts created during this tutorial, delete the resource group.
Search for Resource groups in the top search box.
Select the tweet-sentiment-tutorial.
Select Delete resource group
Enter tweet-sentiment-tutorial in the text box.
Select the Delete button.
Optionally, you may want to return to your Twitter account and delete any test tweets from your feed.
Next steps
Feedback
Coming soon: Throughout 2024 we will be phasing out GitHub Issues as the feedback mechanism for content and replacing it with a new feedback system. For more information see: https://aka.ms/ContentUserFeedback.
Submit and view feedback for