Create custom styles for indoor maps (preview)
When you create an indoor map using Azure Maps Creator, default styles are applied. This article discusses how to customize these styling elements.
Prerequisites
- Understanding of Creator concepts.
- An Azure Maps Creator tileset. If you have never used Azure Maps Creator to create an indoor map, you might find the Use Creator to create indoor maps tutorial helpful.
Create custom styles using Creators visual editor
While it's possible to modify your indoor maps styles using Creators Rest API, Creator also offers a visual style editor to create custom styles that doesn't require coding. This article focuses exclusively on creating custom styles using this style editor.
Open style
When an indoor map is created in your Azure Maps Creator service, default styles are automatically created for you. In order to customize the styling elements of your indoor map, open that default style.
Open the style editor and select the Open toolbar button.

The Open Style dialog box opens.
Enter your subscription key in the Enter your Azure Maps subscription key field.
Next, select the geography associated with your subscription key in the drop-down list.
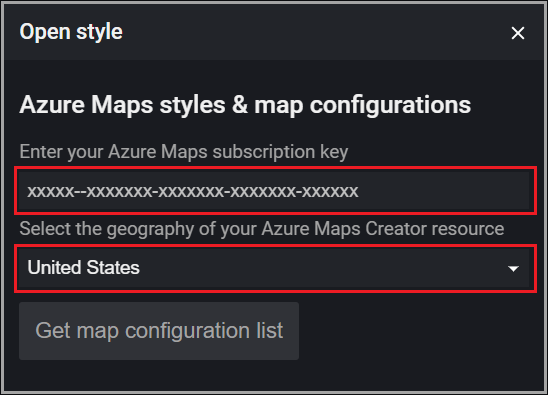
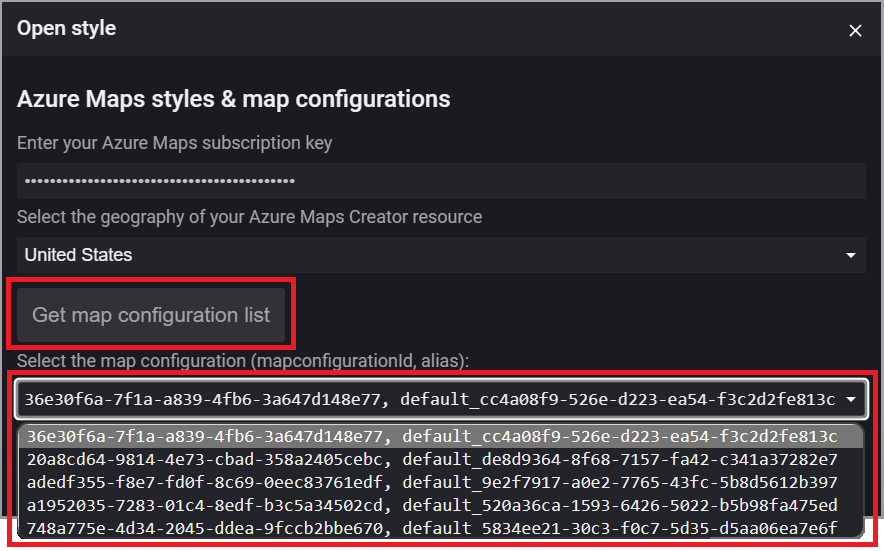
Select the Get map configuration list button to get a list of every map configuration associated with the active Creator resource.
Note
If the map configuration was created as part of a custom style and has a user provided alias, that alias appears in the map configuration drop-down list, otherwise just the mapConfigurationId appears. The default map configuration ID for any given tileset can be found by using the tileset get HTTP request and passing in the tileset ID:
https://{geography}.atlas.microsoft.com/tilesets/{tilesetId}?2023-03-01-preview
The mapConfigurationId is returned in the body of the response, for example:
"defaultMapConfigurationId": "68d74ad9-4f84-99ce-06bb-19f487e8e692"
Once the desired map configuration is selected, the drop-down list of styles appears.
Once you've selected the desired style, select the Load selected style button.
About the open style dialog
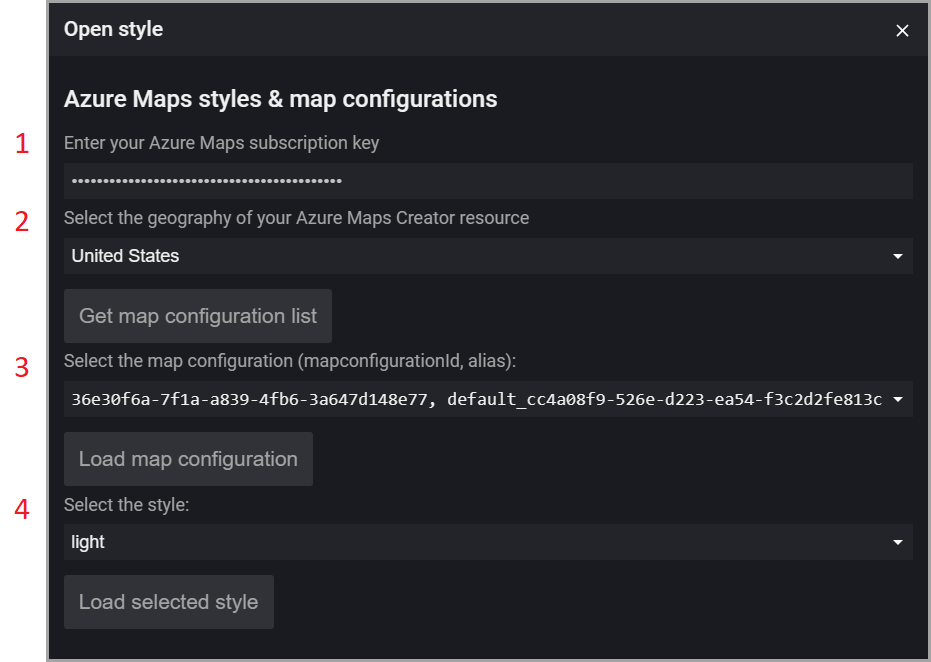
| # | Description |
|---|---|
| 1 | Your Azure Maps account subscription key |
| 2 | Select the geography of the Azure Maps account. |
| 3 | A list of map configuration IDs and aliases. |
| 4 | A list of styles associated with the selected map configuration. |
Modify style
Once your style is open in the visual editor, you can begin to modify the various elements of your indoor map such as changing the background colors of conference rooms, offices or restrooms. You can also change the font size for labels such as office numbers and define what appears at different zoom levels.
Change background color
To change the background color for all units in the specified layer, put your mouse pointer over the desired unit and select it using the left mouse button. You’re presented with a popup menu showing the layers that are associated with the categories the unit is associated with. Once you select the layer that you wish to update the style properties on, that layer is ready to be updated in the left pane.

Open the color palette and select the color you wish to change the selected unit to.

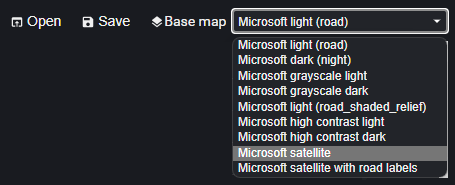
Base map
The base map drop-down list on the visual editor toolbar presents a list of base map styles that affect the style attributes of the base map that your indoor map is part of. It doesn't affect the style elements of your indoor map but enables you to see how your indoor map looks with the various base maps.
Save custom styles
Once you have made the desired changes to your styles, save the changes to your Creator resource. You can overwrite your style with the changes or create a new style.
To save your changes, select the Save button on the toolbar.

This brings up the Upload style & map configuration dialog box:
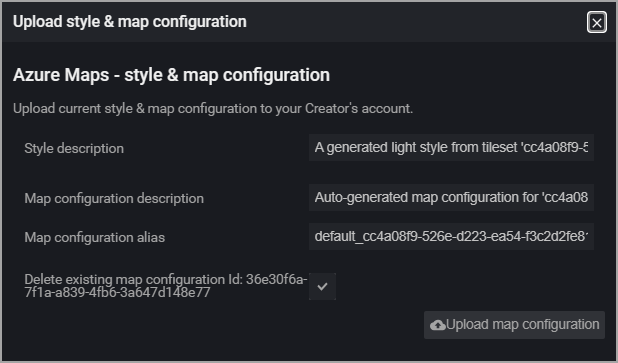
The following table describes the four fields you're presented with.
| Property | Description |
|---|---|
| Style description | A user-defined description for this style. |
| Map configuration description | A user-defined description for this map configuration. |
| Map configuration alias | An alias used to reference this map configuration. When referencing programmatically, the map configuration is referenced by the map configuration ID if no alias is provided. |
Some important things to know about aliases:
- Can be named using alphanumeric characters (0-9, a-z, A-Z), hyphens (-) and underscores (_).
- Can be used to reference the underlying map configuration, in place of that object's ID. This is especially important since the map configuration can't be updated, meaning every time any changes are saved, a new ID is generated, but the alias can remain the same, making referencing it less error prone after it has been modified multiple times.
Warning
Duplicate aliases are not allowed. If the alias of an existing map configuration is used, the map configuration that alias points to will be overwritten and the existing map configuration will be deleted and references to that ID will result in errors. For more information, see map configuration in the concepts article.
Once you have entered values into each required field, select the Upload map configuration button to save the style and map configuration data to your Creator resource.
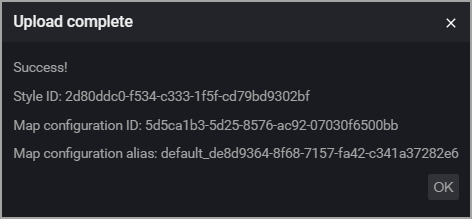
Once you have successfully uploaded your custom styles you'll see the Upload complete dialog showing you the values for Style ID, Map configuration ID and the map configuration alias. For more information, see custom styling and map configuration.
Tip
Make a note of the map configuration alias value, it will be required when you Instantiate the Indoor Manager of a Map object when developing applications in Azure Maps. Also, make a note of the Style ID, it can be reused for other tilesets.
Custom categories
Azure Maps Creator has defined a list of categories. When you create your manifest, you associate each unit in your facility to one of these categories in the unitProperties object.
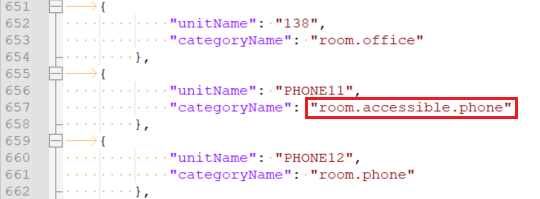
There may be times when you want to create a new category. For example, you may want the ability to apply different styling attributes to all rooms with special accommodations for people with disabilities like a phone room with phones that have screens showing what the caller is saying for people with hearing impairments.
To do this, enter the desired value in the categoryName for the desired unitName in the manifest JSON before uploading your drawing package.
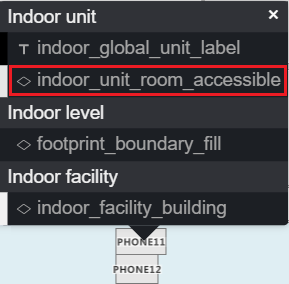
The category name isn't associated with any layer when viewed in a visual editor and has no default styling. In order to apply styling to it, create a new layer and add the new category to it.

To create a new layer, select the duplicate button on an existing layer. This creates a copy of the selected layer that you can modify as needed. Next, rename the layer by typing a new name into the ID field. For this example, we entered indoor_unit_room_accessible.

Once you've created a new layer, you need to associate your new category name with it. This is done by editing the copied layer to remove the existing categories and add the new one.
For example, the JSON might look something like this:
{
  "id": "indoor_unit_room_accessible",
  "type": "fill",
  "filter": [
    "all",
    ["has", "floor0"],
    [
      "any",
      [
        "case",
        [
          "==",
          [
            "typeof",
            ["get", "categoryName"]
          ],
          "string"
        ],
        [
          "==",
          ["get", "categoryName"],
          "room.accessible.phone"
        ],
        false
      ]
    ]
  ],
  "layout": {"visibility": "visible"},
  "metadata": {
    "microsoft.maps:layerGroup": "unit"
  },
  "minzoom": 16,
  "paint": {
    "fill-antialias": true,
    "fill-color": [
      "string",
      ["feature-state", "color"],
      "rgba(230, 230, 230, 1)"
    ],
    "fill-opacity": 1,
    "fill-outline-color": "rgba(120, 120, 120, 1)"
  },
  "source-layer": "Indoor unit",
  "source": "{tilesetId}"
}
Only features that match the filter are displayed on the map. You need to edit the filter to remove any categories that you don't want to appear on the map and add the new category.
For example, the filter JSON might look something like this:
[
  "all",
  ["has", "floor0"],
  [
    "any",
    [
      "case",
      [
        "==",
        [
          "typeof",
          ["get", "categoryName"]
        ],
        "string"
      ],
      [
        "==",
        ["get", "categoryName"],
        "room.accessible.phone"
      ],
      false
    ]
  ]
]
Now when you select that unit in the map, the pop-up menu has the new layer ID, which if following this example would be indoor_unit_room_accessible. Once selected you can make style edits.
Next steps
Feedback
Coming soon: Throughout 2024 we will be phasing out GitHub Issues as the feedback mechanism for content and replacing it with a new feedback system. For more information see: https://aka.ms/ContentUserFeedback.
Submit and view feedback for