Tutorial: Migrate an Android app from Google Maps
The Azure Maps Android SDK has an API interface that is similar to the Web SDK. If you've developed with one of these SDKs, many of the same concepts, best practices, and architectures apply. This tutorial demonstrates how to:
Note
Azure Maps Android SDK retirement
The Azure Maps Native SDK for Android is now deprecated and will be retired on 3/31/25. To avoid service disruptions, migrate to the Azure Maps Web SDK by 3/31/25. For more information, see The Azure Maps Android SDK migration guide.
- Load a map
- Localize a map
- Add markers, polylines, and polygons.
- Overlay a tile layer
- Show traffic data
All examples are provided in Java; however, you can use Kotlin with the Azure Maps Android SDK.
For more information on developing with the Android SDK by Azure Maps, see the How-to guides for the Azure Maps Android SDK.
Prerequisites
If you don't have an Azure subscription, create a free account before you begin.
Note
For more information on authentication in Azure Maps, see manage authentication in Azure Maps.
Load a map
Loading a map in an Android app using Google or Azure Maps consists of similar steps. When using either SDK, you must:
- Get an API or subscription key to access either platform.
- Add some XML to an Activity to specify where the map should be rendered and how it should be laid out.
- Override all the life-cycle methods from the Activity containing the map view to the corresponding methods in the map class. In particular, you must override the following methods:
onCreate(Bundle)onStart()onResume()onPause()onStop()onDestroy()onSaveInstanceState(Bundle)onLowMemory()
- Wait for the map to be ready before trying to access and program it.
Before: Google Maps
To display a map using the Google Maps SDK for Android, the following steps would be done:
Ensure Google Play services is installed.
Add a dependency for the Google Maps service to the module's gradle.build file:
implementation 'com.google.android.gms:play-services-maps:17.0.0'Add a Google Maps API key inside the application section of the google_maps_api.xml file:
<meta-data android:name="com.google.android.geo.API_KEY" android:value="YOUR_GOOGLE_MAPS_KEY"/>Add a map fragment to the main activity:
<com.google.android.gms.maps.MapView
        android:id="@+id/myMap"
        android:layout_width="match_parent"
        android:layout_height="match_parent"/>
In the MainActivity.java file, import the Google Maps SDK. Forward all the life-cycle methods from the activity containing the map view to the corresponding ones in map class. Retrieve a
MapViewinstance from the map fragment using thegetMapAsync(OnMapReadyCallback)method. TheMapViewautomatically initializes the maps system and the view. Edit the MainActivity.java file as follows:import com.google.android.gms.maps.GoogleMap; import com.google.android.gms.maps.MapView; import com.google.android.gms.maps.OnMapReadyCallback; import android.support.v7.app.AppCompatActivity; import android.os.Bundle; public class MainActivity extends AppCompatActivity implements OnMapReadyCallback { MapView mapView; @Override protected void onCreate(Bundle savedInstanceState) { super.onCreate(savedInstanceState); setContentView(R.layout.activity_main); mapView = findViewById(R.id.myMap); mapView.onCreate(savedInstanceState); mapView.getMapAsync(this); } @Override public void onMapReady(GoogleMap map) { //Add your post map load code here. } @Override public void onResume() { super.onResume(); mapView.onResume(); } @Override protected void onStart(){ super.onStart(); mapView.onStart(); } @Override public void onPause() { super.onPause(); mapView.onPause(); } @Override public void onStop() { super.onStop(); mapView.onStop(); } @Override public void onLowMemory() { super.onLowMemory(); mapView.onLowMemory(); } @Override protected void onDestroy() { super.onDestroy(); mapView.onDestroy(); } @Override protected void onSaveInstanceState(Bundle outState) { super.onSaveInstanceState(outState); mapView.onSaveInstanceState(outState); } }
In the MainActivity.kt file, import the Google Maps SDK. Forward all the life-cycle methods from the activity containing the map view to the corresponding ones in map class. Retrieve a
MapViewinstance from the map fragment using thegetMapAsync(OnMapReadyCallback)method. TheMapViewautomatically initializes the maps system and the view. Edit the MainActivity.kt file as follows:import com.google.android.gms.maps.GoogleMap; import com.google.android.gms.maps.MapView; import com.google.android.gms.maps.OnMapReadyCallback; import androidx.appcompat.app.AppCompatActivity import android.os.Bundle class MainActivity : AppCompatActivity() implements OnMapReadyCallback { var mapView: MapView? = null override fun onCreate(savedInstanceState: Bundle?) { super.onCreate(savedInstanceState) setContentView(R.layout.activity_main) mapView = findViewById(R.id.myMap) mapView?.onCreate(savedInstanceState) mapView?.getMapAsync(this) } public fun onMapReady(GoogleMap map) { //Add your post map load code here. } public override fun onStart() { super.onStart() mapView?.onStart() } public override fun onResume() { super.onResume() mapView?.onResume() } public override fun onPause() { mapView?.onPause() super.onPause() } public override fun onStop() { mapView?.onStop() super.onStop() } override fun onLowMemory() { mapView?.onLowMemory() super.onLowMemory() } override fun onDestroy() { mapView?.onDestroy() super.onDestroy() } override fun onSaveInstanceState(outState: Bundle) { super.onSaveInstanceState(outState) mapView?.onSaveInstanceState(outState) } }
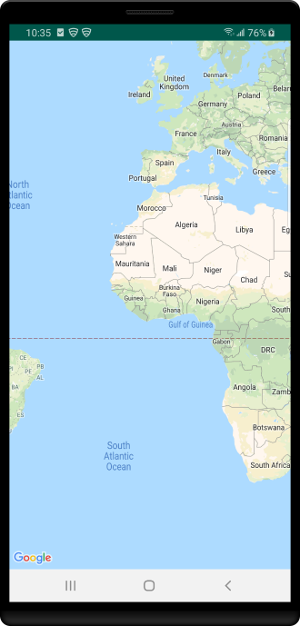
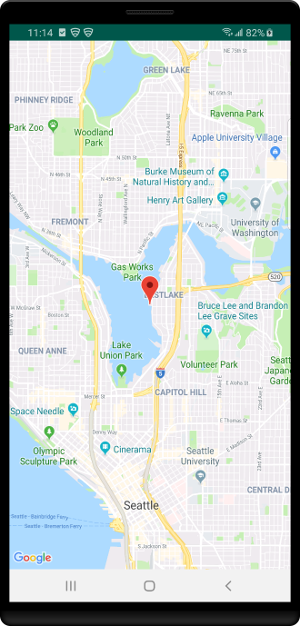
When you run an application, the map control loads as in the following image.
After: Azure Maps
To display a map using the Azure Maps SDK for Android, the following steps need to be done:
Open the top-level build.gradle file and add the following code to the all projects block section:
maven {
    url "https://atlas.microsoft.com/sdk/android"
}
Update your app/build.gradle and add the following code to it:
Make sure that your project's minSdkVersion is at API 21 or higher.
Add the following code to the Android section:
compileOptions {
    sourceCompatibility JavaVersion.VERSION_1_8
    targetCompatibility JavaVersion.VERSION_1_8
}
Update your dependencies block. Add a new implementation dependency line for the latest Azure Maps Android SDK:
implementation "com.azure.android:azure-maps-control:1.0.0"Note
You can set the version number to "0+" to have your code always point to the latest version.
Go to File in the toolbar and then select Sync Project with Gradle Files.
Add a map fragment to the main activity (resources pwd> layout > activity_main.xml):
<?xml version="1.0" encoding="utf-8"?>
<FrameLayout
    xmlns:android="http://schemas.android.com/apk/res/android"
    xmlns:app="http://schemas.android.com/apk/res-auto"
    android:layout_width="match_parent"
    android:layout_height="match_parent"
    >

    <com.azure.android.maps.control.MapControl
        android:id="@+id/mapcontrol"
        android:layout_width="match_parent"
        android:layout_height="match_parent"
        />
</FrameLayout>
In the MainActivity.java file:
- Imports the Azure Maps SDK
- Set your Azure Maps authentication information
- Get the map control instance in the onCreate method
Set the authentication information in the
AzureMapsclass using thesetSubscriptionKeyorsetAadPropertiesmethods. This global update, ensure that you add your authentication information to every view.The map control contains its own lifecycle methods for managing Android's OpenGL lifecycle. These methods must be called directly from the contained Activity. To correctly call the map control's lifecycle methods, you must override the following lifecycle methods in the Activity that contains the map control. Call the respective map control method.
onCreate(Bundle)onStart()onResume()onPause()onStop()onDestroy()onSaveInstanceState(Bundle)onLowMemory()
Edit the MainActivity.java file as follows:
package com.example.myapplication;

import androidx.appcompat.app.AppCompatActivity;
import com.azure.android.maps.control.AzureMaps;
import com.azure.android.maps.control.MapControl;
import com.azure.android.maps.control.layer.SymbolLayer;
import com.azure.android.maps.control.options.MapStyle;
import com.azure.android.maps.control.source.DataSource;

public class MainActivity extends AppCompatActivity {

static {
    AzureMaps.setSubscriptionKey("<Your Azure Maps subscription key>");

    //Alternatively use Azure Active Directory authenticate.
    //AzureMaps.setAadProperties("<Your aad clientId>", "<Your aad AppId>", "<Your aad Tenant>");
}

MapControl mapControl;

@Override
protected void onCreate(Bundle savedInstanceState) {
    super.onCreate(savedInstanceState);
    setContentView(R.layout.activity_main);

    mapControl = findViewById(R.id.mapcontrol);

    mapControl.onCreate(savedInstanceState);

    //Wait until the map resources are ready.
    mapControl.onReady(map -> {
        //Add your post map load code here.

    });
}

@Override
public void onResume() {
    super.onResume();
    mapControl.onResume();
}

@Override
protected void onStart(){
    super.onStart();
    mapControl.onStart();
}

@Override
public void onPause() {
    super.onPause();
    mapControl.onPause();
}

@Override
public void onStop() {
    super.onStop();
    mapControl.onStop();
}

@Override
public void onLowMemory() {
    super.onLowMemory();
    mapControl.onLowMemory();
}

@Override
protected void onDestroy() {
    super.onDestroy();
    mapControl.onDestroy();
}

@Override
protected void onSaveInstanceState(Bundle outState) {
    super.onSaveInstanceState(outState);
    mapControl.onSaveInstanceState(outState);
}}
In the MainActivity.kt file:
- Imports the Azure Maps SDK
- Set your Azure Maps authentication information
- Get the map control instance in the onCreate method
Set the authentication information in the
AzureMapsclass using thesetSubscriptionKeyorsetAadPropertiesmethods. This global update, ensure that you add your authentication information to every view.The map control contains its own lifecycle methods for managing Android's OpenGL lifecycle. These methods must be called directly from the contained Activity. To correctly call the map control's lifecycle methods, you must override the following lifecycle methods in the Activity that contains the map control. Call the respective map control method.
onCreate(Bundle)onStart()onResume()onPause()onStop()onDestroy()onSaveInstanceState(Bundle)onLowMemory()
Edit the MainActivity.kt file as follows:
package com.example.myapplication;

import androidx.appcompat.app.AppCompatActivity
import android.os.Bundle
import com.azure.android.maps.control.AzureMap
import com.azure.android.maps.control.AzureMaps
import com.azure.android.maps.control.MapControl
import com.azure.android.maps.control.events.OnReady

class MainActivity : AppCompatActivity() {

    companion object {
        init {
            AzureMaps.setSubscriptionKey("<Your Azure Maps subscription key>");

            //Alternatively use Azure Active Directory authenticate.
            //AzureMaps.setAadProperties("<Your aad clientId>", "<Your aad AppId>", "<Your aad Tenant>");
        }
    }

    var mapControl: MapControl? = null

    override fun onCreate(savedInstanceState: Bundle?) {
        super.onCreate(savedInstanceState)
        setContentView(R.layout.activity_main)

        mapControl = findViewById(R.id.mapcontrol)

        mapControl?.onCreate(savedInstanceState)

        //Wait until the map resources are ready.
        mapControl?.onReady(OnReady { map: AzureMap -> })
    }

    public override fun onStart() {
        super.onStart()
        mapControl?.onStart()
    }

    public override fun onResume() {
        super.onResume()
        mapControl?.onResume()
    }

    public override fun onPause() {
        mapControl?.onPause()
        super.onPause()
    }

    public override fun onStop() {
        mapControl?.onStop()
        super.onStop()
    }

    override fun onLowMemory() {
        mapControl?.onLowMemory()
        super.onLowMemory()
    }

    override fun onDestroy() {
        mapControl?.onDestroy()
        super.onDestroy()
    }

    override fun onSaveInstanceState(outState: Bundle) {
        super.onSaveInstanceState(outState)
        mapControl?.onSaveInstanceState(outState)
    }
}
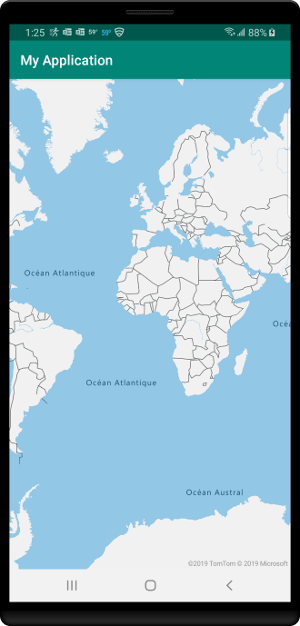
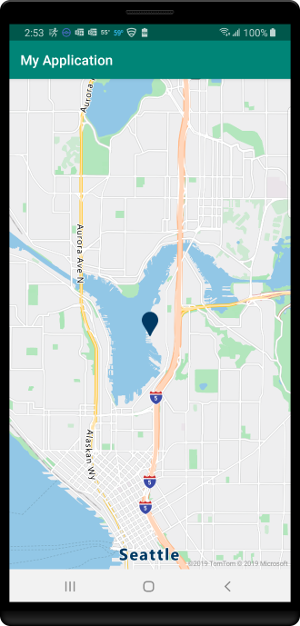
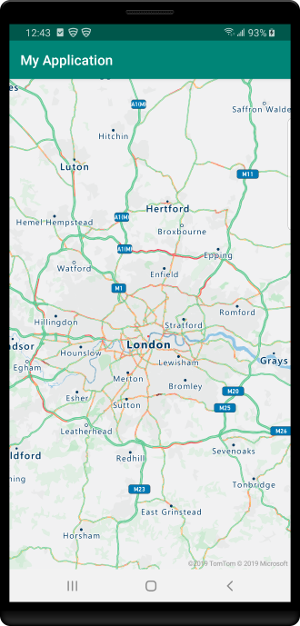
If you run your application, the map control loads as in the following image.

Notice that the Azure Maps control supports zooming out more and provides more of a world view.
Tip
If you are using an Android emulator on a Windows machine, the map may not render due to conflicts with OpenGL and software accelerated graphics rendering. The following has worked, for some people, to resolve this issue. Open the AVD Manager and select the virtual device to edit. Scroll down in the Verify Configuration panel. In the Emulated Performance section, set the Graphics option to Hardware.
Localizing the map
Localization is important if your audience is spread across multiple countries/regions or speak different languages.
Before: Google Maps
Add the following code to the onCreate method to set the language of the map. The code must be added before setting the context view of the map. The "fr" language code limits the language to French.
String languageToLoad = "fr";
Locale locale = new Locale(languageToLoad);
Locale.setDefault(locale);

Configuration config = new Configuration();
config.locale = locale;

getBaseContext().getResources().updateConfiguration(config,
        getBaseContext().getResources().getDisplayMetrics());
val languageToLoad = "fr"
val locale = Locale(languageToLoad)
Locale.setDefault(locale)

val config = Configuration()
config.locale = locale

baseContext.resources.updateConfiguration(
    config,
    baseContext.resources.displayMetrics
)
Here's an example of Google Maps with the language set to "fr".

After: Azure Maps
Azure Maps provides three different ways to set the language and the regional view of the map. The first option is to pass the language and regional view information to the AzureMaps class. This option uses the static setLanguage and setView methods globally. Meaning, the default language and regional view are set across all Azure Maps controls loaded in your app. This example sets French using the "fr-FR" language code.
static {
    //Set your Azure Maps Key.
    AzureMaps.setSubscriptionKey("<Your Azure Maps Key>");

    //Set the language to be used by Azure Maps.
    AzureMaps.setLanguage("fr-FR");

    //Set the regional view to be used by Azure Maps.
    AzureMaps.setView("Auto");
}
companion object {
    init {
            //Set your Azure Maps Key.
        AzureMaps.setSubscriptionKey("<Your Azure Maps Key>");

        //Set the language to be used by Azure Maps.
        AzureMaps.setLanguage("fr-FR");

        //Set the regional view to be used by Azure Maps.
        AzureMaps.setView("Auto");
    }
}
The second option is to pass the language and view information to the map control XML code.
<com.azure.android.maps.control.MapControl
    android:id="@+id/myMap"
    android:layout_width="match_parent"
    android:layout_height="match_parent"
    app:azure_maps_language="fr-FR"
    app:azure_maps_view="Auto"
    />
The third option is to program the language and regional map view using the maps setStyle method. This option updates the language and regional view anytime the code executes.
mapControl.onReady(map -> {
    map.setStyle(
        language("fr-FR"),
        view("Auto")
    );
});
mapControl!!.onReady { map: AzureMap ->
    map.setStyle(
        language("fr-FR"),
        view("Auto")
    )
}
Here's an example of Azure Maps with the language set to "fr-FR".
Review the complete list of Supported languages.
Setting the map view
Dynamic maps in both Azure Maps and Google Maps can be programmatically moved to new geographic locations by calling the appropriate methods. Let's make the map display satellite aerial imagery, center the map over a location with coordinates, and change the zoom level. For this example, use latitude: 35.0272, longitude: -111.0225, and zoom level of 15.
Before: Google Maps
The camera of Google Maps map control can be programmatically moved using the moveCamera method. The moveCamera method allows you to specify the center of the map and a zoom level. The setMapType method changes the type of map to displayed.
@Override
public void onMapReady(GoogleMap googleMap) {
    mapView = googleMap;

    mapView.moveCamera(CameraUpdateFactory.newLatLngZoom(new LatLng(35.0272, -111.0225), 15));
    mapView.setMapType(GoogleMap.MAP_TYPE_SATELLITE);
}
public override fun onMapReady(googleMap: GoogleMap) {
    mapView = googleMap

    mapView.moveCamera(CameraUpdateFactory.newLatLngZoom(LatLng(35.0272, -111.0225), 15))
    mapView.setMapType(GoogleMap.MAP_TYPE_SATELLITE)
}
Note
Google Maps uses tiles that are 256 pixels in dimensions while Azure Maps uses a larger 512 pixel tile. This reduces the number of network requests needed by Azure Maps to load the same map area as Google Maps. To achieve that same viewable area as a map in Google Maps, you need to subtract the zoom level used in Google Maps by one when using Azure Maps.
After: Azure Maps
As noted previously, to achieve the same viewable area in Azure Maps subtract the zoom level used in Google Maps by one. In this case, use a zoom level of 14.
The initial map view can be set in XML attributes on the map control.
<com.azure.android.maps.control.MapControl
    android:id="@+id/myMap"
    android:layout_width="match_parent"
    android:layout_height="match_parent"
    app:azure_maps_cameraLat="35.0272"
    app:azure_maps_cameraLng="-111.0225"
    app:azure_maps_zoom="14"
    app:azure_maps_style="satellite"
    />
The map view can be programmed using the maps setCamera
and setStyle methods.
mapControl.onReady(map -> {
    //Set the camera of the map.
    map.setCamera(center(Point.fromLngLat(-111.0225, 35.0272)), zoom(14));

    //Set the style of the map.
    map.setStyle(style(MapStyle.SATELLITE));
});
mapControl!!.onReady { map: AzureMap ->
    //Set the camera of the map.
    map.setCamera(center(Point.fromLngLat(-111.0225, 35.0272)), zoom(14))

    //Set the style of the map.
    map.setStyle(style(MapStyle.SATELLITE))
}
Additional resources:
Adding a marker
Point data is often rendered using an image on the map. These images are referred to as markers, pushpins, pins, or symbols. The following examples render point data as markers on the map at latitude: 51.5, longitude: -0.2.
Before: Google Maps
With Google Maps, markers are added using the maps addMarker method.
@Override
public void onMapReady(GoogleMap googleMap) {
    mapView = googleMap;

    mapView.addMarker(new MarkerOptions().position(new LatLng(47.64, -122.33)));
}
public override fun onMapReady(googleMap: GoogleMap) {
    mapView = googleMap

    mapView.addMarker(MarkerOptions().position(LatLng(47.64, -122.33)))
}
After: Azure Maps
In Azure Maps, render point data on the map by first adding the data to a data source. Then, connecting that data source to a symbol layer. The data source optimizes the management of spatial data in the map control. The symbol layer specifies how to render point data using as an image or text.
mapControl.onReady(map -> {
    //Create a data source and add it to the map.
    DataSource source = new DataSource();
    map.sources.add(source);

    //Create a point feature and add it to the data source.
    source.add(Feature.fromGeometry(Point.fromLngLat(-122.33, 47.64)));

    //Create a symbol layer and add it to the map.
    map.layers.add(new SymbolLayer(source));
});
mapControl!!.onReady { map: AzureMap ->
    //Create a data source and add it to the map.
    val source = new DataSource()
    map.sources.add(source)

    //Create a point feature and add it to the data source.
    source.add(Feature.fromGeometry(Point.fromLngLat(-122.33, 47.64)))

    //Create a symbol layer and add it to the map.
    map.layers.add(SymbolLayer(source))
}
Adding a custom marker
Custom images can be used to represent points on a map. The map in the following examples use a custom image to display a point on the map. The point is at latitude: 51.5 and longitude: -0.2. The anchor offsets the position of the marker, so that the point of the pushpin icon aligns with the correct position on the map.

yellow-pushpin.png
In both examples, the above image is added to the drawable folder of the apps resources.
Before: Google Maps
With Google Maps, custom images can be used for markers. Load custom images using the marker's icon option. To align the point of the image to the coordinate, use the anchor option. The anchor is relative to the dimensions of the image. In this case, the anchor is 0.2 units wide, and one unit high.
@Override
public void onMapReady(GoogleMap googleMap) {
    mapView = googleMap;

    mapView.addMarker(new MarkerOptions().position(new LatLng(47.64, -122.33))
    .icon(BitmapDescriptorFactory.fromResource(R.drawable.yellow-pushpin))
    .anchor(0.2f, 1f));
}
public override fun onMapReady(googleMap: GoogleMap) {
    mapView = googleMap;

    mapView.addMarker(MarkerOptions().position(LatLng(47.64, -122.33))
    .icon(BitmapDescriptorFactory.fromResource(R.drawable.yellow-pushpin))
    .anchor(0.2f, 1f))
}

After: Azure Maps
Symbol layers in Azure Maps support custom images, but first, the image needs to be loaded to the map resources and assigned a unique ID. Then, the symbol layer needs to reference this ID. Offset the symbol to align to the correct point on the image using the iconOffset option. The icon offset is in pixels. By default, the offset is relative to the bottom-center of the image, but this offset value can be adjusted using the iconAnchor option. This example sets the iconAnchor option to "center". It uses an icon offset to move the image five pixels to the right and 15 pixels up to align with the point of the pushpin image.
mapControl.onReady(map -> {
    //Create a data source and add it to the map.
    DataSource source = new DataSource();
    map.sources.add(source);

    //Create a point feature and add it to the data source.
    source.add(Feature.fromGeometry(Point.fromLngLat(-122.33, 47.64)));

    //Load the custom image icon into the map resources.
    map.images.add("my-yellow-pin", R.drawable.yellow_pushpin);

    //Create a symbol that uses the custom image icon and add it to the map.
    map.layers.add(new SymbolLayer(source,
        iconImage("my-yellow-pin"),
        iconAnchor(AnchorType.CENTER),
        iconOffset(new Float[]{5f, -15f})));
});
mapControl!!.onReady { map: AzureMap ->
    //Create a data source and add it to the map.
    val source = DataSource()
    map.sources.add(source)

    //Create a point feature and add it to the data source.
    source.add(Feature.fromGeometry(Point.fromLngLat(-122.33, 47.64)))

    //Load the custom image icon into the map resources.
    map.images.add("my-yellow-pin", R.drawable.yellow_pushpin)

    //Create a symbol that uses the custom image icon and add it to the map.
    map.layers.add(SymbolLayer(source,
        iconImage("my-yellow-pin"),
        iconAnchor(AnchorType.CENTER),
        iconOffset(arrayOf(0f, -1.5f))))
}

Adding a polyline
Polylines are used to represent a line or path on the map. The following examples show how to create a dashed polyline on the map.
Before: Google Maps
With Google Maps, render a polyline using the PolylineOptions class. Add the polyline to the map using the addPolyline method. Set the stroke color using the color option. Set the stroke width using the width option. Add a stroke dash array using the pattern option.
@Override
public void onMapReady(GoogleMap googleMap) {
    mapView = googleMap;

    //Create the options for the polyline.
    PolylineOptions lineOptions = new PolylineOptions()
        .add(new LatLng(46, -123))
        .add(new LatLng(49, -122))
        .add(new LatLng(46, -121))
        .color(Color.RED)
        .width(10f)
        .pattern(Arrays.<PatternItem>asList(
                new Dash(30f), new Gap(30f)));

    //Add the polyline to the map.
    Polyline polyline = mapView.addPolyline(lineOptions);
}
public override fun onMapReady(googleMap: GoogleMap) {
    mapView = googleMap

    //Create the options for the polyline.
    val lineOptions = new PolylineOptions()
        .add(new LatLng(46, -123))
        .add(new LatLng(49, -122))
        .add(new LatLng(46, -121))
        .color(Color.RED)
        .width(10f)
        .pattern(Arrays.<PatternItem>asList(
                new Dash(30f), new Gap(30f)))

    //Add the polyline to the map.
    val polyline = mapView.addPolyline(lineOptions)
}
After: Azure Maps
In Azure Maps, polylines are called LineString or MultiLineString objects. Add these objects to a data source and render them using a line layer. Set the stroke width using the strokeWidth option. Add a stroke dash array using the strokeDashArray option.
The stroke width and the dash array "pixel" units in the Azure Maps Web SDK is the same as in the Google Maps service. Both accept the same values to produce the same results.
mapControl.onReady(map -> {
    //Create a data source and add it to the map.
    DataSource source = new DataSource();
    map.sources.add(source);

    //Create an array of points.
    List<Point> points = Arrays.asList(
        Point.fromLngLat(-123, 46),
        Point.fromLngLat(-122, 49),
        Point.fromLngLat(-121, 46));

    //Create a LineString feature and add it to the data source.
    source.add(Feature.fromGeometry(LineString.fromLngLats(points)));

    //Create a line layer and add it to the map.
    map.layers.add(new LineLayer(source,
        strokeColor("red"),
        strokeWidth(4f),
        strokeDashArray(new Float[]{3f, 3f})));
});
mapControl!!.onReady { map: AzureMap ->
    //Create a data source and add it to the map.
    val source = DataSource()
    map.sources.add(source)

    //Create an array of points.
    val points = Arrays.asList(
        Point.fromLngLat(-123, 46),
        Point.fromLngLat(-122, 49),
        Point.fromLngLat(-121, 46))

    //Create a LineString feature and add it to the data source.
    source.add(Feature.fromGeometry(LineString.fromLngLats(points)))

    //Create a line layer and add it to the map.
    map.layers.add(LineLayer(source,
        strokeColor("red"),
        strokeWidth(4f),
        strokeDashArray(new Float[]{3f, 3f})))
}
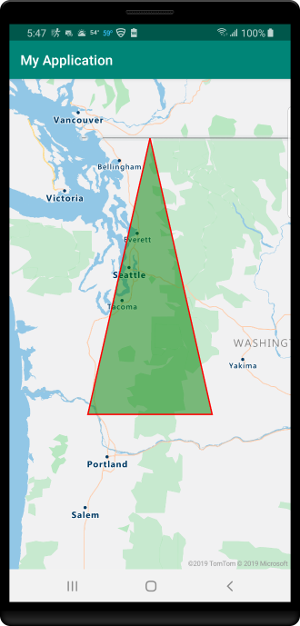
Adding a polygon
Polygons are used to represent an area on the map. The next examples show you how to create a polygon. This polygon forms a triangle based on the center coordinate of the map.
Before: Google Maps
With Google Maps, render a polygon using the PolygonOptions class. Add the polygon to the map using the addPolygon method. Set the fill and stroke colors using the fillColor and strokeColor options, respectively. Set the stroke width using the strokeWidth option.
@Override
public void onMapReady(GoogleMap googleMap) {
    mapView = googleMap;

    //Create the options for the polygon.
    PolygonOptions polygonOptions = new PolygonOptions()
            .add(new LatLng(46, -123))
            .add(new LatLng(49, -122))
            .add(new LatLng(46, -121))
            .add(new LatLng(46, -123))  //Close the polygon.
            .fillColor(Color.argb(128, 0, 128, 0))
            .strokeColor(Color.RED)
            .strokeWidth(5f);

    //Add the polygon to the map.
    Polygon polygon = mapView.addPolygon(polygonOptions);
}
public override fun onMapReady(googleMap: GoogleMap) {
    mapView = googleMap;

    //Create the options for the polygon.
    val polygonOptions = PolygonOptions()
        .add(new LatLng(46, -123))
        .add(new LatLng(49, -122))
        .add(new LatLng(46, -121))
        .add(new LatLng(46, -123))  //Close the polygon.
        .fillColor(Color.argb(128, 0, 128, 0))
        .strokeColor(Color.RED)
        .strokeWidth(5f)

    //valAdd the polygon to the map.
    Polygon polygon = mapView.addPolygon(polygonOptions)
}

After: Azure Maps
In Azure Maps, add Polygon and MultiPolygon objects to a data source and render them on the map using layers. Render the area of a polygon in a polygon layer. Render the outline of a polygon using a line layer. Set the stroke color and width using the strokeColor and strokeWidth options.
The stroke width and dash array "pixel" units in Azure Maps Web SDK align with the respective units in Google Maps. Both accept the same values and produce the same results.
mapControl.onReady(map -> {
    //Create a data source and add it to the map.
    DataSource source = new DataSource();
    map.sources.add(source);

    //Create an array of point arrays to create polygon rings.
    List<List<Point>> rings = Arrays.asList(Arrays.asList(
        Point.fromLngLat(-123, 46),
        Point.fromLngLat(-122, 49),
        Point.fromLngLat(-121, 46),
        Point.fromLngLat(-123, 46)));

    //Create a Polygon feature and add it to the data source.
    source.add(Feature.fromGeometry(Polygon.fromLngLats(rings)));

    //Add a polygon layer for rendering the polygon area.
    map.layers.add(new PolygonLayer(source,
        fillColor("green"),
        fillOpacity(0.5f)));

    //Add a line layer for rendering the polygon outline.
    map.layers.add(new LineLayer(source,
        strokeColor("red"),
        strokeWidth(2f)));
});
mapControl!!.onReady { map: AzureMap ->
    //Create a data source and add it to the map.
    val source = DataSource()
    map.sources.add(source)

    //Create an array of point arrays to create polygon rings.
    val rings = Arrays.asList(Arrays.asList(
        Point.fromLngLat(-123, 46),
        Point.fromLngLat(-122, 49),
        Point.fromLngLat(-121, 46),
        Point.fromLngLat(-123, 46)))

    //Create a Polygon feature and add it to the data source.
    source.add(Feature.fromGeometry(Polygon.fromLngLats(rings)))

    //Add a polygon layer for rendering the polygon area.
    map.layers.add(PolygonLayer(source,
        fillColor("green"),
        fillOpacity(0.5f)))

    //Add a line layer for rendering the polygon outline.
    map.layers.add(LineLayer(source,
        strokeColor("red"),
        strokeWidth(2f)))
}
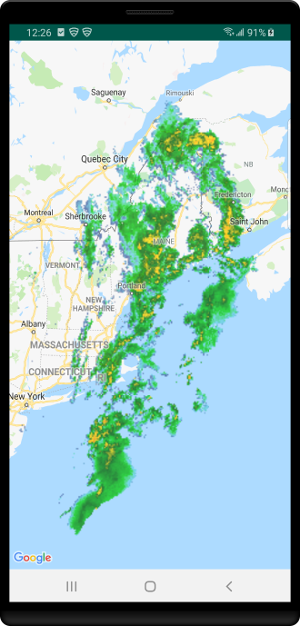
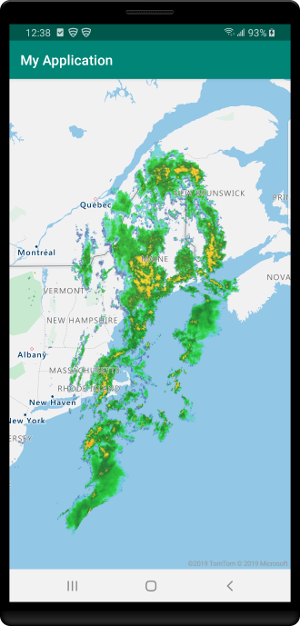
Overlay a tile layer
Use Tile layers to overlay layer images that have been broken up into smaller tiled images, which align with the maps tiling system. This approach is a common way of overlaying layer images or large data sets. Tile layers are known as Image overlays in Google Maps.
The following examples overlay a weather radar tile layer from Iowa Environmental Mesonet of Iowa State University. The tiles are 256 pixels in size.
Before: Google Maps
With Google Maps, a tile layer can be overlaid on top of the map. Use the TileOverlayOptions class. Add the tile layer to the map using the addTileLayer method. To make the tiles semi-transparent, the transparency option is set to 0.2, or 20% transparent.
@Override
public void onMapReady(GoogleMap googleMap) {
    mapView = googleMap;

    //Create the options for the tile layer.
    TileOverlayOptions tileLayer = new TileOverlayOptions()
        .tileProvider(new UrlTileProvider(256, 256) {
            @Override
            public URL getTileUrl(int x, int y, int zoom) {

                try {
                    //Define the URL pattern for the tile images.
                    return new URL(String.format("https://mesonet.agron.iastate.edu/cache/tile.py/1.0.0/nexrad-n0q-900913/%d/%d/%d.png", zoom, x, y));
                }catch (MalformedURLException e) {
                    throw new AssertionError(e);
                }
            }
        }).transparency(0.2f);

    //Add the tile layer to the map.
    mapView.addTileOverlay(tileLayer);
}
public override fun onMapReady(googleMap: GoogleMap) {
    mapView = googleMap
    //Create the options for the tile layer.
    val tileLayer: TileOverlayOptions = TileOverlayOptions()
        .tileProvider(object : UrlTileProvider(256, 256) {
            fun getTileUrl(x: Int, y: Int, zoom: Int): URL? {
                return try { //Define the URL pattern for the tile images.
                    URL(
                        String.format(
                            "https://mesonet.agron.iastate.edu/cache/tile.py/1.0.0/nexrad-n0q-900913/%d/%d/%d.png",
                            zoom,
                            x,
                            y
                        )
                    )
                } catch (e: MalformedURLException) {
                    throw AssertionError(e)
                }
            }
        }).transparency(0.2f)
    //Add the tile layer to the map.
    mapView.addTileOverlay(tileLayer)
}
After: Azure Maps
A tile layer can be added to the map in a similar way as any other layer. A formatted URL that has x, y, and zoom placeholders; {x}, {y}, {z} respectively is used to tell the layer where to access the tiles. Also, tile layers in Azure Maps support {quadkey}, {bbox-epsg-3857}, and {subdomain} placeholders. To make the tile layer semi-transparent, an opacity value of 0.8 is used. Opacity and transparency, although similar, use inverted values. To convert between both options, subtract their value from the number one.
Tip
In Azure Maps, it's convenient to render layers below other layers, including base map layers. Also, it's often desirable to render tile layers below the map labels so that they are easy to read. The map.layers.add method takes a second parameter which is the id of the layer in which to insert the new layer below. Use the following code to insert a tile layer below the map labels:
map.layers.add(myTileLayer, "labels");
mapControl.onReady(map -> {
    //Add a tile layer to the map, below the map labels.
    map.layers.add(new TileLayer(
        tileUrl("https://mesonet.agron.iastate.edu/cache/tile.py/1.0.0/nexrad-n0q-900913/{z}/{x}/{y}.png"),
        opacity(0.8f),
        tileSize(256)
    ), "labels");
});
mapControl!!.onReady { map: AzureMap ->
    //Add a tile layer to the map, below the map labels.
    map.layers.add(TileLayer(
        tileUrl("https://mesonet.agron.iastate.edu/cache/tile.py/1.0.0/nexrad-n0q-900913/{z}/{x}/{y}.png"),
        opacity(0.8f),
        tileSize(256)
    ), "labels")
}
Show traffic
Both Azure Maps and Google maps have options to overlay traffic data.
Before: Google Maps
With Google Maps, traffic flow data can be overlaid on top of the map by passing true to the map's setTrafficEnabled method.
@Override
public void onMapReady(GoogleMap googleMap) {
    mapView = googleMap;

    mapView.setTrafficEnabled(true);
}
public override fun onMapReady(googleMap: GoogleMap) {
    mapView = googleMap

    mapView.setTrafficEnabled(true)
}
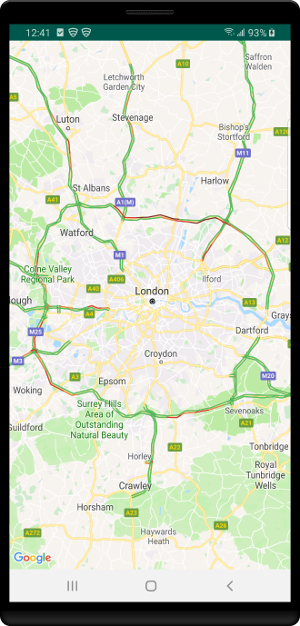
After: Azure Maps
Azure Maps provides several different options for displaying traffic. Traffic incidents, such as road closures and accidents can be displayed as icons on the map. Traffic flow and color coded roads can be overlaid on the map. The colors can be modified to appear relative to the posted speed limit, relative to the normal expected delay, or the absolute delay. Incident data in Azure Maps is updated every minute, and flow data is updated every two minutes.
mapControl.onReady(map -> {
    map.setTraffic(
        incidents(true),
        flow(TrafficFlow.RELATIVE));
});
mapControl!!.onReady { map: AzureMap ->
    map.setTraffic(
        incidents(true),
        flow(TrafficFlow.RELATIVE))
}
Clean up resources
No resources to be cleaned up.
Next steps
Learn more about the Azure Maps Android SDK:
Feedback
Coming soon: Throughout 2024 we will be phasing out GitHub Issues as the feedback mechanism for content and replacing it with a new feedback system. For more information see: https://aka.ms/ContentUserFeedback.
Submit and view feedback for