Tutorial: Integrate Azure Key Vault in your ARM template deployment
Learn how to retrieve secrets from an Azure key vault and pass the secrets as parameters when you deploy an Azure Resource Manager template (ARM template). The parameter value is never exposed, because you reference only its key vault ID. You can reference the key vault secret by using a static ID or a dynamic ID. This tutorial uses a static ID. With the static ID approach, you reference the key vault in the template parameter file, not the template file. For more information about both approaches, see Use Azure Key Vault to pass secure parameter value during deployment.
In the Set resource deployment order tutorial, you create a virtual machine (VM). You need to provide the VM administrator username and password. Instead of providing the password, you can pre-store the password in an Azure key vault and then customize the template to retrieve the password from the key vault during the deployment.

This tutorial covers the following tasks:
- Prepare a key vault
- Open a quickstart template
- Edit the parameters file
- Deploy the template
- Validate the deployment
- Clean up resources
If you don't have an Azure subscription, create a free account before you begin.
For a Learn module that uses a secure value from a key vault, see Manage complex cloud deployments by using advanced ARM template features.
Prerequisites
To complete this article, you need:
Visual Studio Code with Resource Manager Tools extension. See Quickstart: Create ARM templates with Visual Studio Code.
To increase security, use a generated password for the VM administrator account. You can use Azure Cloud Shell to run the following command in PowerShell or Bash:
openssl rand -base64 32To learn more, run
man openssl randto open the manual page.Verify that the generated password meets the VM password requirements. Each Azure service has specific password requirements. For the VM password requirements, see What are the password requirements when you create a VM?.
Prepare a key vault
In this section, you create a key vault and add a secret to it, so that you can retrieve the secret when you deploy your template. There are many ways to create a key vault. In this tutorial, you use Azure PowerShell to deploy an ARM template. This template does two things:
- Creates a key vault with the
enabledForTemplateDeploymentproperty enabled. This property must be true before the template deployment process can access the secrets that are defined in the key vault. - Adds a secret to the key vault. The secret stores the VM administrator password.
Note
As the user who's deploying the virtual machine template, if you're not the Owner of or a Contributor to the key vault, the Owner or a Contributor must grant you access to the Microsoft.KeyVault/vaults/deploy/action permission for the key vault. For more information, see Use Azure Key Vault to pass a secure parameter value during deployment.
To run the following Azure PowerShell script, select Try it to open Cloud Shell. To paste the script, right-click the shell pane, and then select Paste.
$projectName = Read-Host -Prompt "Enter a project name that is used for generating resource names"
$location = Read-Host -Prompt "Enter the location (i.e. centralus)"
$upn = Read-Host -Prompt "Enter your user principal name (email address) used to sign in to Azure"
$secretValue = Read-Host -Prompt "Enter the virtual machine administrator password" -AsSecureString

$resourceGroupName = "${projectName}rg"
$keyVaultName = $projectName
$adUserId = (Get-AzADUser -UserPrincipalName $upn).Id
$templateUri = "https://raw.githubusercontent.com/Azure/azure-docs-json-samples/master/tutorials-use-key-vault/CreateKeyVault.json"

New-AzResourceGroup -Name $resourceGroupName -Location $location
New-AzResourceGroupDeployment -ResourceGroupName $resourceGroupName -TemplateUri $templateUri -keyVaultName $keyVaultName -adUserId $adUserId -secretValue $secretValue

Write-Host "Press [ENTER] to continue ..."
Important
- The resource group name is the project name, but with rg appended to it. To make it easier to clean up the resources that you created in this tutorial, use the same project name and resource group name when you deploy the next template.
- The default name for the secret is vmAdminPassword. It's hardcoded in the template.
- To enable the template to retrieve the secret, you must enable an access policy called Enable access to Azure Resource Manager for template deployment for the key vault. This policy is enabled in the template. For more information about the access policy, see Deploy key vaults and secrets.
The template has one output value, called keyVaultId. You will use this ID along with the secret name to retrieve the secret value later in the tutorial. The resource ID format is:
/subscriptions/<SubscriptionID>/resourceGroups/mykeyvaultdeploymentrg/providers/Microsoft.KeyVault/vaults/<KeyVaultName>
When you copy and paste the ID, it might be broken into multiple lines. Merge the lines and trim the extra spaces.
To validate the deployment, run the following PowerShell command in the same shell pane to retrieve the secret in clear text. The command works only in the same shell session, because it uses the variable $keyVaultName, which is defined in the preceding PowerShell script.
$secret = Get-AzKeyVaultSecret -VaultName $keyVaultName -Name "vmAdminPassword"
$ssPtr = [System.Runtime.InteropServices.Marshal]::SecureStringToBSTR($secret.SecretValue)
try {
   $secretValueText = [System.Runtime.InteropServices.Marshal]::PtrToStringBSTR($ssPtr)
} finally {
   [System.Runtime.InteropServices.Marshal]::ZeroFreeBSTR($ssPtr)
}
Write-Output $secretValueText
Now you've prepared a key vault and a secret. The following sections show you how to customize an existing template to retrieve the secret during the deployment.
Open a quickstart template
Azure Quickstart Templates is a repository for ARM templates. Instead of creating a template from scratch, you can find a sample template and customize it. The template that's used in this tutorial is called Deploy a simple Windows VM.
In Visual Studio Code, select File > Open File.
In the File name box, paste the following URL:
https://raw.githubusercontent.com/Azure/azure-quickstart-templates/master/quickstarts/microsoft.compute/vm-simple-windows/azuredeploy.jsonSelect Open to open the file. The scenario is the same as the one that's used in Tutorial: Create ARM templates with dependent resources. The template defines six resources:
- Microsoft.Storage/storageAccounts.
- Microsoft.Network/publicIPAddresses.
- Microsoft.Network/networkSecurityGroups.
- Microsoft.Network/virtualNetworks.
- Microsoft.Network/networkInterfaces.
- Microsoft.Compute/virtualMachines.
It's helpful to have some basic understanding of the template before you customize it.
Select File > Save As, and then save a copy of the file to your local computer with the name azuredeploy.json.
Repeat steps 1-3 to open the following URL, and then save the file as azuredeploy.parameters.json.
https://raw.githubusercontent.com/Azure/azure-quickstart-templates/master/quickstarts/microsoft.compute/vm-simple-windows/azuredeploy.parameters.json
Edit the parameters file
By using the static ID method, you don't need to make any changes to the template file. Retrieving the secret value is done by configuring the template parameter file.
In Visual Studio Code, open azuredeploy.parameters.json if it's not already open.
Update the
adminPasswordparameter to:"adminPassword": { "reference": { "keyVault": { "id": "/subscriptions/<SubscriptionID>/resourceGroups/mykeyvaultdeploymentrg/providers/Microsoft.KeyVault/vaults/<KeyVaultName>" }, "secretName": "vmAdminPassword" } },Important
Replace the value for
idwith the resource ID of the key vault that you created in the previous procedure. ThesecretNameis hardcoded as vmAdminPassword. See Prepare a key vault.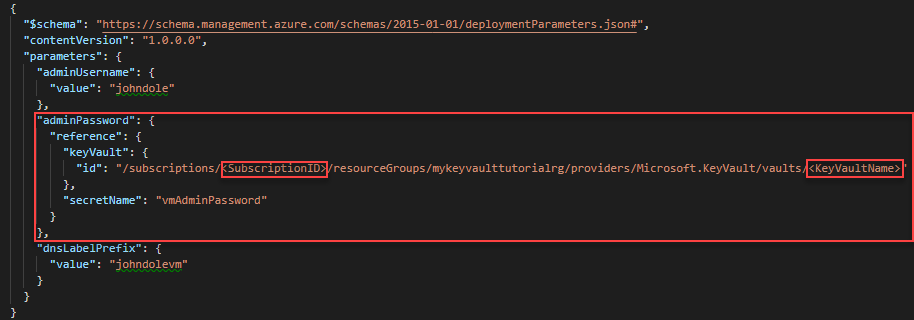
Update the following values:
adminUsername: The name of the virtual machine administrator account.dnsLabelPrefix: Name thednsLabelPrefixvalue.
For examples of names, see the preceding image.
Save the changes.
Deploy the template
Sign in to Cloud Shell.
Choose your preferred environment by selecting either PowerShell or Bash (for CLI) on the upper left corner. Restarting the shell is required when you switch.
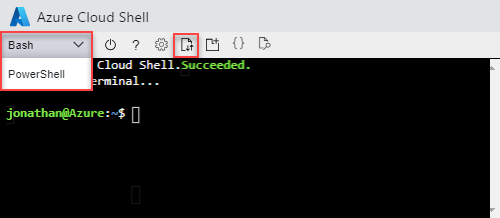
Select Upload/download files, and then select Upload. Upload both azuredeploy.json and azuredeploy.parameters.json to Cloud Shell. After uploading the file, you can use the
lscommand and thecatcommand to verify the file is uploaded successfully.Run the following PowerShell script to deploy the template.
$projectName = Read-Host -Prompt "Enter the same project name that is used for creating the key vault"
$location = Read-Host -Prompt "Enter the same location that is used for creating the key vault (i.e. centralus)"
$resourceGroupName = "${projectName}rg"

New-AzResourceGroupDeployment `
    -ResourceGroupName $resourceGroupName `
    -TemplateFile "$HOME/azuredeploy.json" `
    -TemplateParameterFile "$HOME/azuredeploy.parameters.json"

Write-Host "Press [ENTER] to continue ..."
When you deploy the template, use the same resource group that you used in the key vault. This approach makes it easier for you to clean up the resources, because you need to delete only one resource group instead of two.
Validate the deployment
After you've successfully deployed the virtual machine, test the sign-in credentials by using the password that's stored in the key vault.
Open the Azure portal.
Select Resource groups > <YourResourceGroupName> > simpleWinVM.
Select Connect at the top.
Select Download RDP File, and then follow the instructions to sign in to the virtual machine by using the password that's stored in the key vault.
Clean up resources
When you no longer need your Azure resources, clean up the resources that you deployed by deleting the resource group.
$projectName = Read-Host -Prompt "Enter the same project name that is used for creating the key vault"
$resourceGroupName = "${projectName}rg"

Remove-AzResourceGroup -Name $resourceGroupName

Write-Host "Press [ENTER] to continue ..."
Next steps
In this tutorial, you retrieved a secret from your Azure key vault. You then used the secret in your template deployment. To learn how to use virtual machine extensions to perform post deployment tasks, see:
Feedback
Coming soon: Throughout 2024 we will be phasing out GitHub Issues as the feedback mechanism for content and replacing it with a new feedback system. For more information see: https://aka.ms/ContentUserFeedback.
Submit and view feedback for