Authorize requests to Azure SignalR Service resources with Microsoft Entra managed identities
Azure SignalR Service supports Microsoft Entra ID for authorizing requests from Microsoft Entra managed identities.
This article shows how to configure your Azure SignalR Service resource and code to authorize requests to the resource from a managed identity.
Configure managed identities
The first step is to configure managed identities.
This example shows you how to configure a system-assigned managed identity on a virtual machine (VM) by using the Azure portal:
In the Azure portal, search for and select a VM.
Under Settings, select Identity.
On the System assigned tab, switch Status to On.
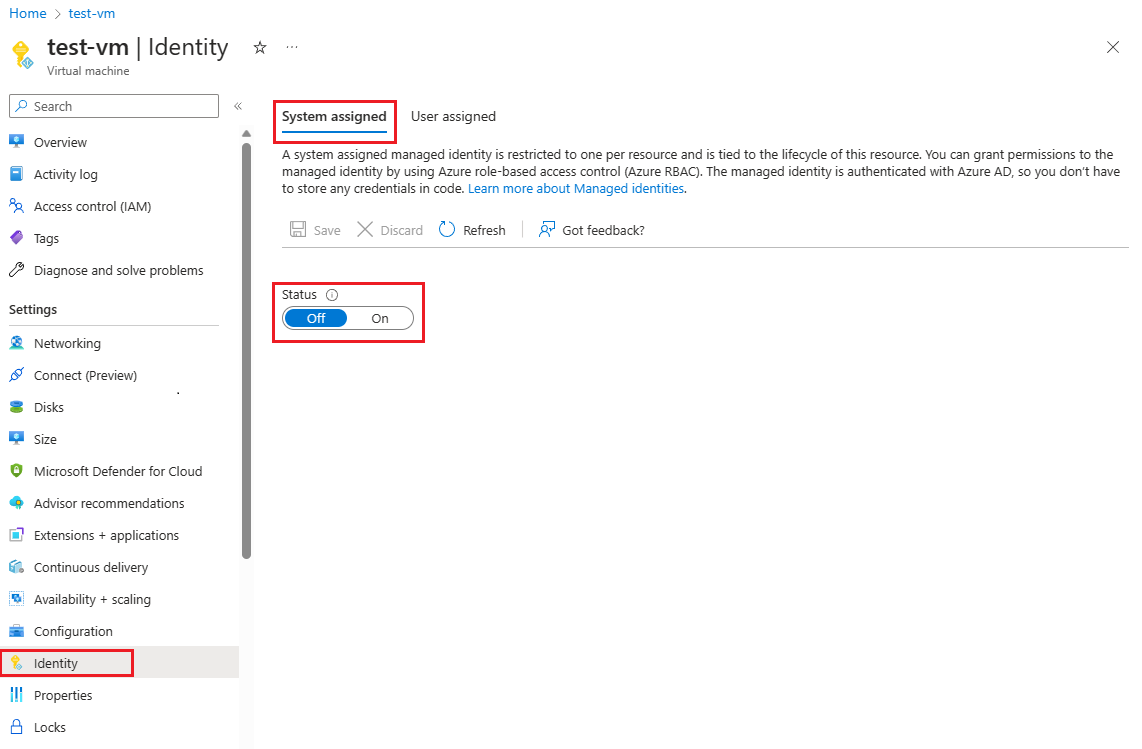
Select the Save button to confirm the change.
To learn how to create user-assigned managed identities, see Create a user-assigned managed identity.
To learn more about configuring managed identities, see one of these articles:
- Configure managed identities for Azure resources on a VM using the Azure portal
- Configure managed identities for Azure resources on an Azure VM using PowerShell
- Configure managed identities for Azure resources on an Azure VM using the Azure CLI
- Configure managed identities for Azure resources on an Azure VM using templates
- Configure a VM with managed identities for Azure resources using an Azure SDK
To learn how to configure managed identities for Azure App Service and Azure Functions, see How to use managed identities for App Service and Azure Functions.
Add role assignments in the Azure portal
The following steps describe how to assign a SignalR App Server role to a system-assigned identity over an Azure SignalR Service resource. For detailed steps, see Assign Azure roles using the Azure portal.
Note
A role can be assigned to any scope, including management group, subscription, resource group, or single resource. To learn more about scope, see Understand scope for Azure RBAC.
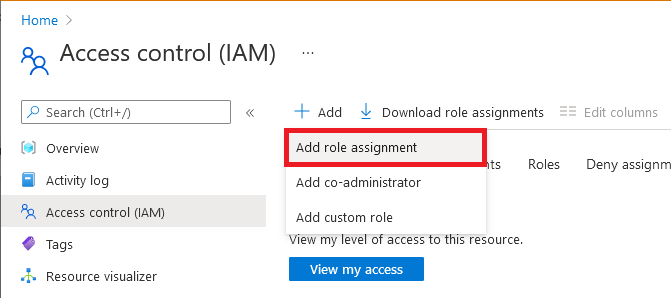
In the Azure portal, go to your Azure SignalR Service resource.
Select Access control (IAM).
Select Add > Add role assignment.
On the Role tab, select SignalR App Server.
On the Members tab, select Managed identity, and then choose Select members.
Select your Azure subscription.
Select System-assigned managed identity, search for a virtual machine to which you want to assign the role, and then select it.
On the Review + assign tab, select Review + assign to assign the role.
Important
Azure role assignments might take up to 30 minutes to propagate.
To learn more about how to assign and manage Azure roles, see these articles:
- Assign Azure roles using the Azure portal
- Assign Azure roles using the REST API
- Assign Azure roles using Azure PowerShell
- Assign Azure roles using the Azure CLI
- Assign Azure roles using Azure Resource Manager templates
Configure your app
App server
Use a system-assigned identity
You can use either DefaultAzureCredential or ManagedIdentityCredential to configure your Azure SignalR Service endpoints. The best practice is to use ManagedIdentityCredential directly.
The system-assigned managed identity is used by default, but make sure that you don't configure any environment variables that EnvironmentCredential preserved if you use DefaultAzureCredential. Otherwise, Azure SignalR Service falls back to use EnvironmentCredential to make the request, which usually results in an Unauthorized response.
services.AddSignalR().AddAzureSignalR(option =>
{
    option.Endpoints = new ServiceEndpoint[]
    {
        new ServiceEndpoint(new Uri("https://<resource1>.service.signalr.net"), new ManagedIdentityCredential()),
    };
});
Use a user-assigned identity
Provide ClientId while creating the ManagedIdentityCredential object.
Important
Use the client ID, not the object (principal) ID, even if they're both GUIDs.
services.AddSignalR().AddAzureSignalR(option =>
{
    option.Endpoints = new ServiceEndpoint[]
    {
        var clientId = "<your identity client id>";
        new ServiceEndpoint(new Uri("https://<resource1>.service.signalr.net"), new ManagedIdentityCredential(clientId)),
    };
Azure SignalR Service bindings in Azure Functions
Azure SignalR Service bindings in Azure Functions use application settings in the portal or local.settings.json locally to configure a managed identity to access your Azure SignalR Service resources.
You might need a group of key/value pairs to configure an identity. The keys of all the key/value pairs must start with a connection name prefix (which defaults to AzureSignalRConnectionString) and a separator. The separator is an underscore (__) in the portal and a colon (:) locally. You can customize the prefix by using the binding property ConnectionStringSetting.
Use a system-assigned identity
If you configure only the service URI, you use the DefaultAzureCredential class. This class is useful when you want to share the same configuration on Azure and local development environments. To learn how it works, see DefaultAzureCredential.
In the Azure portal, use the following example to configure DefaultAzureCredential. If you don't configure any of these environment variables, the system-assigned identity is used for authentication.
<CONNECTION_NAME_PREFIX>__serviceUri=https://<SIGNALR_RESOURCE_NAME>.service.signalr.net
Here's a configuration sample of DefaultAzureCredential in the local.settings.json file. At the local scope, there's no managed identity. Authentication via Visual Studio, the Azure CLI, and Azure PowerShell accounts is attempted in order.
{
  "Values": {
    "<CONNECTION_NAME_PREFIX>:serviceUri": "https://<SIGNALR_RESOURCE_NAME>.service.signalr.net"
  }
}
If you want to use a system-assigned identity independently and without the influence of other environment variables, set the credential key with the connection name prefix to managedidentity. Here's a sample for application settings:
<CONNECTION_NAME_PREFIX>__serviceUri = https://<SIGNALR_RESOURCE_NAME>.service.signalr.net
<CONNECTION_NAME_PREFIX>__credential = managedidentity
Use a user-assigned identity
If you want to use a user-assigned identity, you need to assign clientId in addition to serviceUri and credential keys with the connection name prefix. Here's a sample for application settings:
<CONNECTION_NAME_PREFIX>__serviceUri = https://<SIGNALR_RESOURCE_NAME>.service.signalr.net
<CONNECTION_NAME_PREFIX>__credential = managedidentity
<CONNECTION_NAME_PREFIX>__clientId = <CLIENT_ID>
Next steps
See the following related articles:
Feedback
Coming soon: Throughout 2024 we will be phasing out GitHub Issues as the feedback mechanism for content and replacing it with a new feedback system. For more information see: https://aka.ms/ContentUserFeedback.
Submit and view feedback for