Assign role to enable Microsoft Entra-only authentication
In order to enable or disable Microsoft Entra-only authentication, selected built-in roles are required for the Microsoft Entra users executing these operations in this tutorial. We're going to assign the SQL Security Manager role to the user in this tutorial.
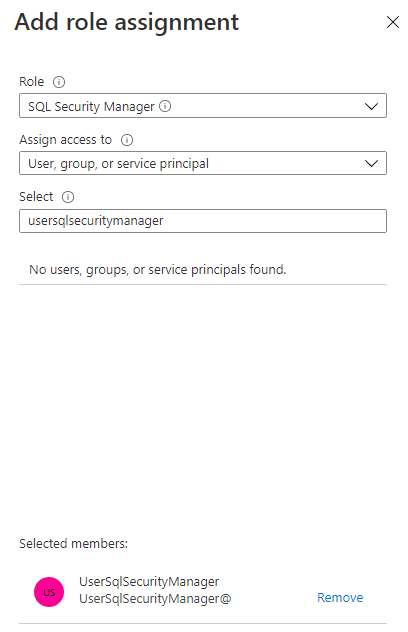
In our example, we'll assign the SQL Security Manager role to the user UserSqlSecurityManager@contoso.onmicrosoft.com. Using privileged user that can assign Microsoft Entra roles, sign into the Azure portal.
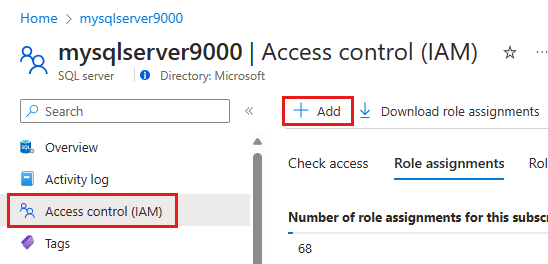
Go to your SQL server resource, and select Access control (IAM) in the menu. Select the Add button and then Add role assignment in the drop-down menu.
In the Add role assignment pane, select the Role SQL Security Manager, and select the user that you want to have the ability to enable or disable Microsoft Entra-only authentication.
Go to your SQL managed instance resource, and select Microsoft Entra admin under the Settings menu.
If you haven't added an Microsoft Entra admin, you'll need to set this before you can enable Microsoft Entra-only authentication.
Select the Support only Microsoft Entra authentication for this managed instance checkbox.
The Enable Microsoft Entra-only authentication popup will show. Select Yes to enable the feature and Save the setting.
Enable in SQL Database using Azure CLI
To enable Microsoft Entra-only authentication in Azure SQL Database using Azure CLI, see the commands below. Install the latest version of Azure CLI. You must have Azure CLI version 2.14.2 or higher. For more information on these commands, see az sql server ad-only-auth.
The Microsoft Entra admin must be set for the server before enabling Microsoft Entra-only authentication. Otherwise, the Azure CLI command will fail.
For permissions and actions required of the user performing these commands to enable Microsoft Entra-only authentication, see the Microsoft Entra-only authentication article.
Run the following command, replacing <myserver> with your SQL server name, and <myresource> with your Azure Resource that holds the SQL server.
az sql server ad-only-auth enable --resource-group <myresource> --name <myserver>
Enable in SQL Managed Instance using Azure CLI
To enable Microsoft Entra-only authentication in Azure SQL Managed Instance using Azure CLI, see the commands below. Install the latest version of Azure CLI.
Run the following command, replacing <myserver> with your SQL server name, and <myresource> with your Azure Resource that holds the SQL server.
az sql mi ad-only-auth enable --resource-group <myresource> --name <myserver>
Enable in SQL Database using PowerShell
To enable Microsoft Entra-only authentication in Azure SQL Database using PowerShell, see the commands below. Az.Sql 2.10.0 module or higher is required to execute these commands. For more information on these commands, see Enable-AzSqlInstanceActiveDirectoryOnlyAuthentication.
The Microsoft Entra admin must be set for the server before enabling Microsoft Entra-only authentication. Otherwise, the PowerShell command will fail.
For permissions and actions required of the user performing these commands to enable Microsoft Entra-only authentication, see the Microsoft Entra-only authentication article. If the user has insufficient permissions, you will get the following error:
Enable-AzSqlServerActiveDirectoryOnlyAuthentication : The client
'UserSqlServerContributor@contoso.onmicrosoft.com' with object id
'<guid>' does not have authorization to perform
action 'Microsoft.Sql/servers/azureADOnlyAuthentications/write' over scope
'/subscriptions/<guid>...'
To enable Microsoft Entra-only authentication in Azure SQL Managed Instance using PowerShell, see the commands below. Az.Sql 2.10.0 module or higher is required to execute these commands.
Run the following command, replacing <myinstance> with your SQL Managed Instance name, and <myresource> with your Azure Resource that holds the SQL managed instance.
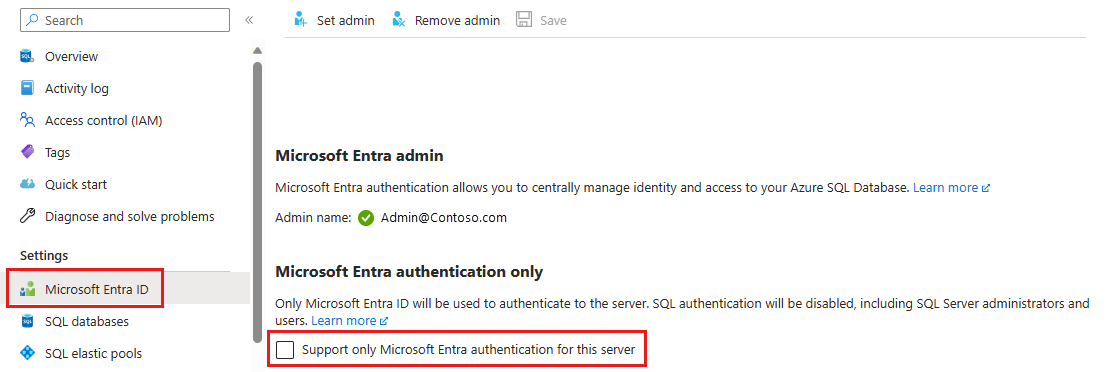
Go to your SQL server resource in the Azure portal. Select Microsoft Entra ID under the Settings menu.
Check status in SQL Managed Instance
Go to your SQL managed instance resource in the Azure portal. Select Microsoft Entra admin under the Settings menu.
These commands can be used to check whether Microsoft Entra-only authentication is enabled for your logical server for Azure SQL Database, or SQL Managed Instance. Members of the SQL Server Contributor and SQL Managed Instance Contributor roles can use these commands to check the status of Microsoft Entra-only authentication, but can't enable or disable the feature.
These commands can be used to check whether Microsoft Entra-only authentication is enabled for your logical server for Azure SQL Database, or SQL Managed Instance. Members of the SQL Server Contributor and SQL Managed Instance Contributor roles can use these commands to check the status of Microsoft Entra-only authentication, but can't enable or disable the feature.
The status will return True if the feature is enabled, and False if disabled.
Run the following command, replacing <myinstance> with your SQL Managed Instance name, and <myresource> with your Azure Resource that holds the SQL managed instance.
You should see a login failed message similar to the following output:
Cannot connect to <myserver>.database.windows.net.
Additional information:
  Login failed for user 'username'. Reason: Azure Active Directory only authentication is enabled.
  Please contact your system administrator. (Microsoft SQL Server, Error: 18456)
Disable Microsoft Entra-only authentication
By disabling the Microsoft Entra-only authentication feature, you allow both SQL authentication and Microsoft Entra authentication for Azure SQL.
Go to your SQL server resource, and select Microsoft Entra ID under the Settings menu.
To disable the Microsoft Entra-only authentication feature, uncheck the Support only Microsoft Entra authentication for this server checkbox and Save the setting.
Disable in SQL Managed Instance using Azure portal
Go to your SQL managed instance resource, and select Active Directory admin under the Settings menu.
To disable the Microsoft Entra-only authentication feature, uncheck the Support only Microsoft Entra authentication for this managed instance checkbox and Save the setting.
Disable in SQL Database using Azure CLI
To disable Microsoft Entra-only authentication in Azure SQL Database using Azure CLI, see the commands below.
Run the following command, replacing <myinstance> with your SQL Managed Instance name, and <myresource> with your Azure Resource that holds the managed instance.
After disabling Microsoft Entra-only authentication, test connecting using a SQL authentication login. You should now be able to connect to your server or instance.
Coming soon: Throughout 2024 we will be phasing out GitHub Issues as the feedback mechanism for content and replacing it with a new feedback system. For more information see: https://aka.ms/ContentUserFeedback.