Migrate an availability group to SQL Server on Azure VM
This article teaches you to migrate your SQL Server Always On availability group to SQL Server on Azure VMs using the Azure Migrate: Server Migration tool. Using the migration tool, you will be able to migrate each replica in the availability group to an Azure VM hosting SQL Server, as well as the cluster metadata, availability group metadata and other necessary high availability components.
In this article, you learn how to:
- Prepare Azure and source environment for migration.
- Start replicating servers.
- Monitor replication.
- Run a full server migration.
- Reconfigure Always On availability group.
This guide uses the agent-based migration approach of Azure Migrate, which treats any server or virtual machine as a physical server. When migrating physical machines, Azure Migrate: Server Migration uses the same replication architecture as the agent-based disaster recovery in the Azure Site Recovery service, and some components share the same code base. Some content might link to Site Recovery documentation.
Prerequisites
Before you begin this tutorial, you should complete the following prerequisites:
- An Azure subscription. Create a free account, if necessary.
- Install the Azure PowerShell
Azmodule. - Download the PowerShell samples scripts from the GitHub repository.
Prepare Azure
Prepare Azure for migration with the Server Migration tool.
| Task | Details |
|---|---|
| Create an Azure Migrate project | Your Azure account needs Contributor or Owner permissions to create a new project. |
| Verify permissions for your Azure account | Your Azure account needs Contributor or Owner permissions on the Azure subscription, permissions to register apps in Microsoft Entra ID (formerly Azure Active Directory), and User Access Administrator permissions on the Azure subscription to create a Key Vault, to create a VM, and to write to an Azure managed disk. |
| Set up an Azure virtual network | Setup an Azure virtual network (VNet). When you replicate to Azure, Azure VMs are created and joined to the Azure VNet that you specify when you set up migration. |
To check you have proper permissions, follow these steps:
- In the Azure portal, open the subscription, and select Access control (IAM).
- In Check access, find the relevant account, and select it to view permissions.
- You should have Contributor or Owner permissions.
- If you just created a free Azure account, you're the owner of your subscription.
- If you're not the subscription owner, work with the owner to assign the role.
If you need to assign permissions, follow the steps in Prepare for an Azure user account.
Prepare for migration
To prepare for server migration, verify the physical server settings, and prepare to deploy a replication appliance.
Check machine requirements
Ensure source machines comply with requirements to migrate to Azure. Follow these steps:
- Verify server requirements.
- Verify that source machines that you replicate to Azure comply with Azure VM requirements.
- Some Windows sources require a few additional changes. Migrating the source before making these changes could prevent the VM from booting in Azure. For some operating systems, Azure Migrate makes these changes automatically.
Prepare for replication
Azure Migrate: Server Migration uses a replication appliance to replicate machines to Azure. The replication appliance runs the following components:
- Configuration server: The configuration server coordinates communications between on-premises and Azure, and manages data replication.
- Process server: The process server acts as a replication gateway. It receives replication data; optimizes it with caching, compression, and encryption, and sends it to a cache storage account in Azure.
Prepare for appliance deployment as follows:
- Create a Windows Server 2016 machine to host the replication appliance. Review the machine requirements.
- The replication appliance uses MySQL. Review the options for installing MySQL on the appliance.
- Review the Azure URLs required for the replication appliance to access public and government clouds.
- Review port access requirements for the replication appliance.
Note
The replication appliance should be installed on a machine other than the source machine you are replicating or migrating, and not on any machine that has had the Azure Migrate discovery and assessment appliance installed before.
Download replication appliance installer
To download the replication appliance installer, follow these steps:
In the Azure Migrate project > Servers, in Azure Migrate: Server Migration, select Discover.

In Discover machines > Are your machines virtualized?, select Physical or other (AWS, GCP, Xen, etc.).
In Target region, select the Azure region to which you want to migrate the machines.
Select Confirm that the target region for migration is region-name.
Select Create resources. This creates an Azure Site Recovery vault in the background.
- If you've already set up migration with Azure Migrate: Server Migration, the target option can't be configured, since resources were set up previously.
- You can't change the target region for this project after selecting this button.
- All subsequent migrations are to this region.
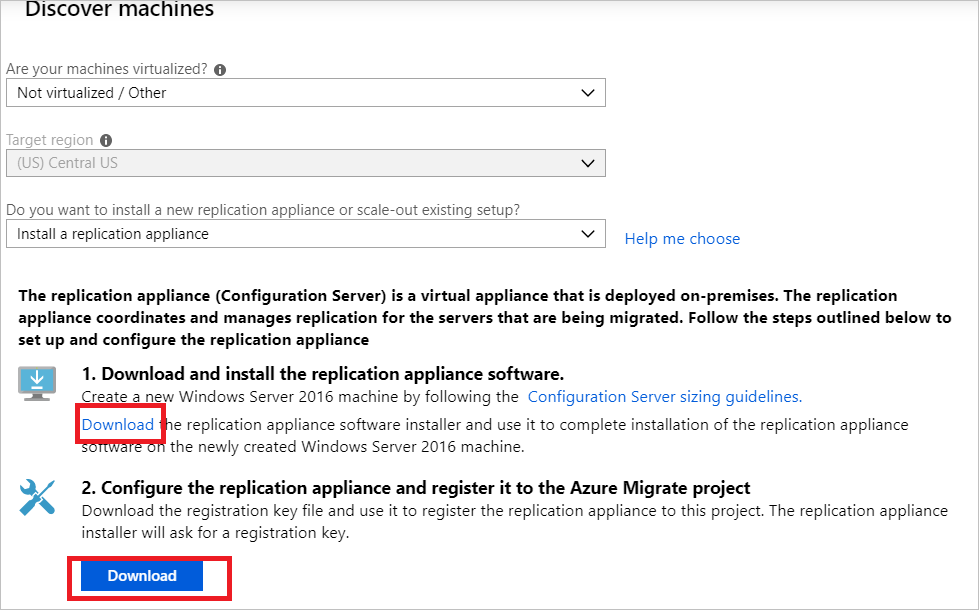
In Do you want to install a new replication appliance?, select Install a replication appliance.
In Download and install the replication appliance software, download the appliance installer, and the registration key. You need to the key in order to register the appliance. The key is valid for five days after it's downloaded.
Copy the appliance setup file and key file to the Windows Server 2016 machine you created for the appliance.
After the installation completes, the Appliance configuration wizard will launch automatically (You can also launch the wizard manually by using the cspsconfigtool shortcut that is created on the desktop of the appliance machine). Use the Manage Accounts tab of the wizard to create a dummy account with the following details:
- "guest" as the friendly name
- "username" as the username
- "password" as the password for the account.
You will use this dummy account in the Enable Replication stage.
After setup completes, and the appliance restarts, in Discover machines, select the new appliance in Select Configuration Server, and select Finalize registration. Finalize registration performs a couple of final tasks to prepare the replication appliance.

Install Mobility service
Install the Mobility service agent on the servers you want to migrate. The agent installers are available on the replication appliance. Find the right installer, and install the agent on each machine you want to migrate.
To install the Mobility service, follow these steps:
Sign in to the replication appliance.
Navigate to
%ProgramData%\ASR\home\svsystems\pushinstallsvc\repository.Find the installer for the machine operating system and version. Review supported operating systems.
Copy the installer file to the machine you want to migrate.
Make sure that you have the passphrase that was generated when you deployed the appliance.
- Store the file in a temporary text file on the machine.
- You can obtain the passphrase on the replication appliance. From the command line, run
C:\ProgramData\ASR\home\svsystems\bin\genpassphrase.exe -vto view the current passphrase. - Don't regenerate the passphrase. This will break connectivity and you will have to reregister the replication appliance.
- In the /Platform parameter, specify VMware for both VMware machines and physical machines.
Connect to the machine and extract the contents of the installer file to a local folder (such as c:\temp). Run this in an admin command prompt:
ren Microsoft-ASR_UA*Windows*release.exe MobilityServiceInstaller.exe
MobilityServiceInstaller.exe /q /x:C:\Temp\Extracted
cd C:\Temp\Extracted
Run the Mobility Service Installer:
UnifiedAgent.exe /Role "MS" /Platform "VmWare" /SilentRegister the agent with the replication appliance:
cd C:\Program Files (x86)\Microsoft Azure Site Recovery\agent
UnifiedAgentConfigurator.exe  /CSEndPoint <replication appliance IP address> /PassphraseFilePath <Passphrase File Path>
It may take some time after installation for discovered machines to appear in Azure Migrate: Server Migration. As VMs are discovered, the Discovered servers count rises.
Prepare source machines
To prepare source machines, run the Get-ClusterInfo.ps1 script on a cluster node to retrieve information on the cluster resources. The script will output the role name, resource name, IP, and probe port in the Cluster-Config.csv file.
./Get-ClusterInfo.ps1
Create load balancer
For the cluster and cluster roles to respond properly to requests, an Azure Load balancer is required. Without a load balancer, the other VMs are unable to reach the cluster IP address as it's not recognized as belonging to the network or the cluster.
To create the load balancer, follow these steps:
- Fill out the columns in the
Cluster-Config.csvfile:
| Column header | Description |
|---|---|
| NewIP | Specify the IP address in the Azure virtual network (or subnet) for each resource in the CSV file. |
| ServicePort | Specify the service port to be used by each resource in the CSV file. For the SQL clustered resource, use the same value for service port as the probe port in the CSV. For other cluster roles, the default values used are 1433 but you can continue to use the port numbers that are configured in your current setup. |
- Run the
Create-ClusterLoadBalancer.ps1script to create the load balancer using the following parameters:
| Parameter | Type | Description |
|---|---|---|
| ConfigFilePath | Mandatory | Specify the path for the Cluster-Config.csv file that you have filled out in the previous step. |
| ResourceGroupName | Mandatory | Specify the name of the resource group in which the load balancer is to be created. |
| VNetName | Mandatory | Specify the name of the Azure virtual network that the load balancer will be associated to. |
| SubnetName | Mandatory | Specify the name of the subnet in the Azure virtual network that the load balancer will be associated to. |
| VNetResourceGroupName | Mandatory | Specify the name of the resource group for the Azure virtual network that the load balancer will be associated to. |
| Location | Mandatory | Specify the location in which the load balancer should be created. |
| LoadBalancerName | Mandatory | Specify the name of the load balancer to be created. |
./Create-ClusterLoadBalancer.ps1 -ConfigFilePath ./cluster-config.csv -ResourceGroupName $resoucegroupname -VNetName $vnetname -subnetName $subnetname -VnetResourceGroupName $vnetresourcegroupname -Location "eastus" -LoadBalancerName $loadbalancername
Replicate machines
Now, select machines for migration. You can replicate up to 10 machines together. If you need to replicate more, then replicate them simultaneously in batches of 10.
To replicate machines, follow these steps:
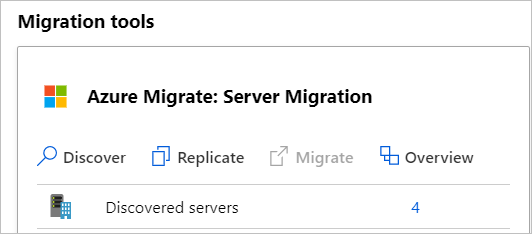
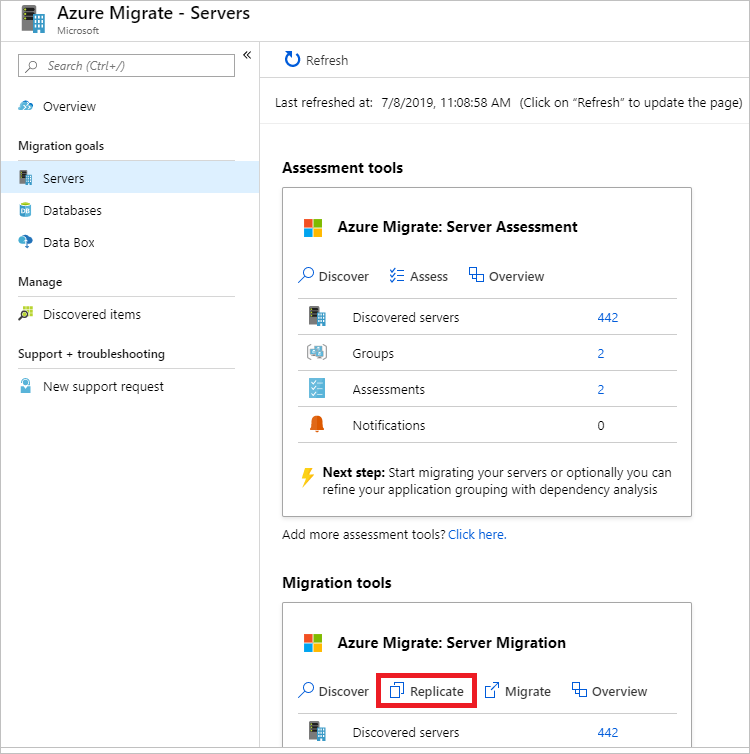
In the Azure Migrate project > Servers, Azure Migrate: Server Migration, select Replicate.
In Replicate, > Source settings > Are your machines virtualized?, select Physical or other (AWS, GCP, Xen, etc.).
In On-premises appliance, select the name of the Azure Migrate appliance that you set up.
In Process Server, select the name of the replication appliance.
In Guest credentials, select the dummy account created previously during the replication installer setup previously in this article. Then select Next: Virtual machines.

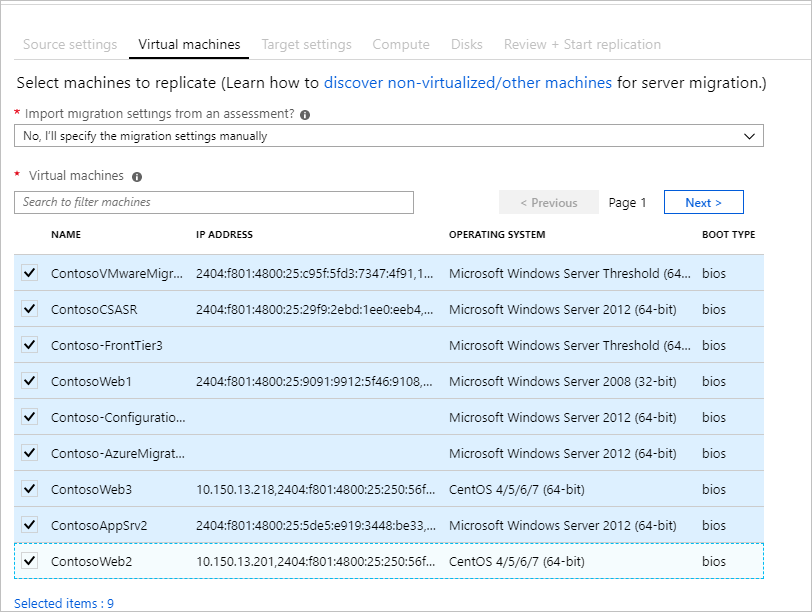
In Virtual Machines, in Import migration settings from an assessment?, leave the default setting No, I'll specify the migration settings manually.
Check each VM you want to migrate. Then select Next: Target settings.
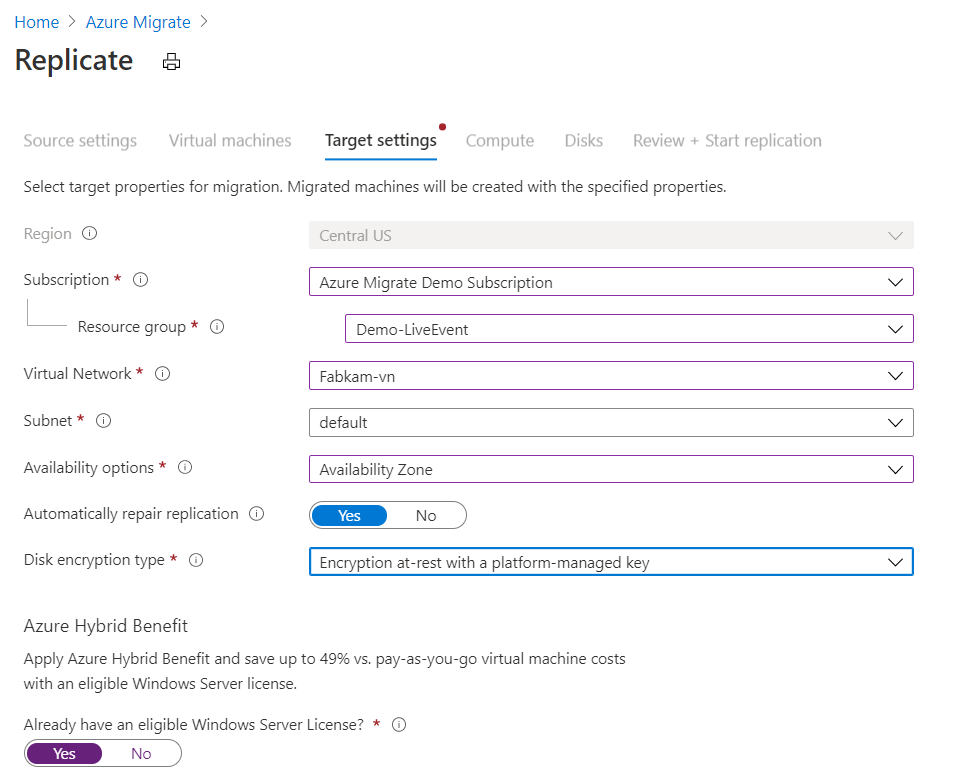
In Target settings, select the subscription, and target region to which you'll migrate, and specify the resource group in which the Azure VMs will reside after migration.
In Virtual Network, select the Azure VNet/subnet to which the Azure VMs will be joined after migration.
In Availability options, select:
- Availability Zone to pin the migrated machine to a specific Availability Zone in the region. Use this option to distribute servers that form a multi-node application tier across Availability Zones. If you select this option, you'll need to specify the Availability Zone to use for each of the selected machines in the Compute tab. This option is only available if the target region selected for the migration supports Availability Zones.
- Availability Set to place the migrated machine in an Availability Set. The target resource group that was selected must have one or more availability sets in order to use this option.
- No infrastructure redundancy required option if you don't need either of these availability configurations for the migrated machines.
In Disk encryption type, select:
- Encryption-at-rest with platform-managed key
- Encryption-at-rest with customer-managed key
- Double encryption with platform-managed and customer-managed keys
Note
To replicate VMs with CMK, you'll need to create a disk encryption set under the target Resource Group. A disk encryption set object maps Managed Disks to a Key Vault that contains the CMK to use for SSE.
In Azure Hybrid Benefit:
- Select No if you don't want to apply Azure Hybrid Benefit. Then select Next.
- Select Yes if you have Windows Server machines that are covered with active Software Assurance or Windows Server subscriptions, and you want to apply the benefit to the machines you're migrating. Then select Next.
In Compute, review the VM name, size, OS disk type, and availability configuration (if selected in the previous step). VMs must conform with Azure requirements.
- VM size: If you're using assessment recommendations, the VM size dropdown shows the recommended size. Otherwise Azure Migrate picks a size based on the closest match in the Azure subscription. Alternatively, pick a manual size in Azure VM size.
- OS disk: Specify the OS (boot) disk for the VM. The OS disk is the disk that has the operating system bootloader and installer.
- Availability Zone: Specify the Availability Zone to use.
- Availability Set: Specify the Availability Set to use.

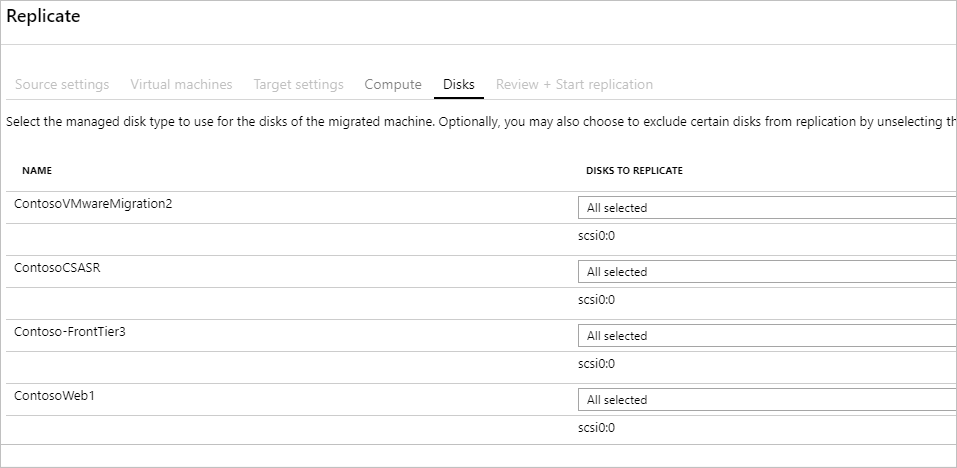
In Disks, specify whether the VM disks should be replicated to Azure, and select the disk type (standard SSD/HDD or premium managed disks) in Azure. Then select Next.
In Review and start replication, review the settings, and select Replicate to start the initial replication for the servers.
Note
You can update replication settings any time before replication starts, Manage > Replicating machines. Settings can't be changed after replication starts.
Track and monitor
Replication proceeds in the following sequence:
- When you select Replicate, a Start Replication job begins.
- When the Start Replication job finishes successfully, the machines begin their initial replication to Azure.
- After initial replication finishes, delta replication begins. Incremental changes to on-premises disks are periodically replicated to the replica disks in Azure.
You can track job status in the portal notifications.
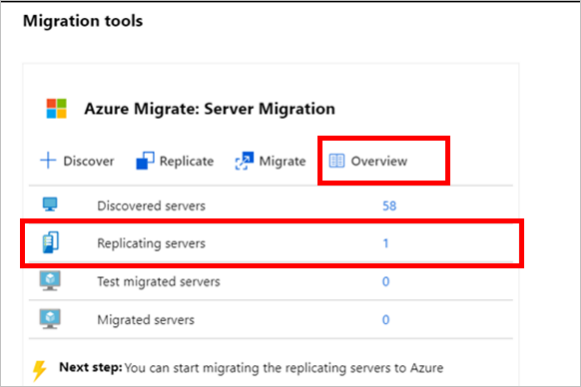
You can monitor replication status by selecting on Replicating servers in Azure Migrate: Server Migration.
Migrate VMs
After machines are replicated, they are ready for migration. To migrate your servers, follow these steps:
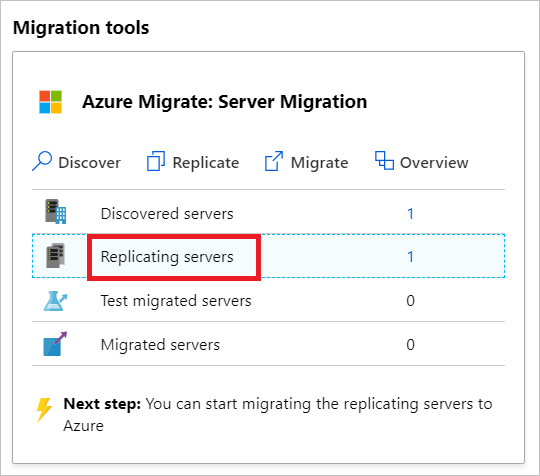
In the Azure Migrate project > Servers > Azure Migrate: Server Migration, select Replicating servers.
To ensure the migrated server is synchronized with the source server, stop the SQL Server service on every replica in the availability group, starting with secondary replicas (in SQL Server Configuration Manager > Services) while ensuring the disks hosting SQL data are online.
In Replicating machines > select server name > Overview, ensure that the last synchronized timestamp is after you have stopped the SQL Server service on the servers to be migrated before you move onto the next step. This should only take a few minutes.
In Replicating machines, right-click the VM > Migrate.
In Migrate > Shut down virtual machines and perform a planned migration with no data loss, select No > OK.
Note
For physical server migration, shut down of source machine is not supported automatically. The recommendation is to bring the application down as part of the migration window (don't let the applications accept any connections) and then initiate the migration (the server needs to be kept running, so remaining changes can be synchronized) before the migration is completed.
A migration job starts for the VM. Track the job in Azure notifications.
After the job finishes, you can view and manage the VM from the Virtual Machines page.
Reconfigure cluster
After your VMs have migrated, reconfigure the cluster. Follow these steps:
Shut down the migrated servers in Azure.
Add the migrated machines to the backend pool of the load balancer. Navigate to Load Balancer > Backend pools.
Select the backend pool, and add the migrated machines.
Start the migrated servers in Azure and sign in to any node.
Copy the
Cluster-Config.csvfile and run theUpdate-ClusterConfig.ps1script passing the CSV as a parameter. This ensures the cluster resources are updated with the new configuration for the cluster to work in Azure../Update-ClusterConfig.ps1 -ConfigFilePath $filepath
Your Always On availability group is ready.
Complete the migration
- After the migration is done, right-click the VM > Stop migration. This does the following:
- Stops replication for the on-premises machine.
- Removes the machine from the Replicating servers count in Azure Migrate: Server Migration.
- Cleans up replication state information for the machine.
- Install the Azure VM Windows agent on the migrated machines.
- Perform any post-migration app tweaks, such as updating database connection strings, and web server configurations.
- Perform final application and migration acceptance testing on the migrated application now running in Azure.
- Cut over traffic to the migrated Azure VM instance.
- Remove the on-premises VMs from your local VM inventory.
- Remove the on-premises VMs from local backups.
- Update any internal documentation to show the new location and IP address of the Azure VMs.
Post-migration best practices
- For SQL Server:
- Install SQL Server IaaS Agent extension to automate management and administration tasks.
- Optimize SQL Server performance on Azure VMs.
- Understand pricing for SQL Server on Azure.
- For increased resilience:
- Keep data secure by backing up Azure VMs using the Azure Backup service.
- Keep workloads running and continuously available by replicating Azure VMs to a secondary region with Site Recovery.
- For increased security:
- Lock down and limit inbound traffic access with Microsoft Defender for Cloud - Just in time administration.
- Restrict network traffic to management endpoints with Network Security Groups.
- Deploy Azure Disk Encryption to help secure disks, and keep data safe from theft and unauthorized access.
- Read more about securing IaaS resources, and visit the Microsoft Defender for Cloud.
- For monitoring and management:
- Consider deploying Azure Cost Management to monitor resource usage and spending.
Next steps
- Investigate the cloud migration journey in the Azure Cloud Adoption Framework.
Feedback
Coming soon: Throughout 2024 we will be phasing out GitHub Issues as the feedback mechanism for content and replacing it with a new feedback system. For more information see: https://aka.ms/ContentUserFeedback.
Submit and view feedback for