Tutorial: Configure an availability group in multiple subnets (SQL Server on Azure VMs)
Applies to: ![]() SQL Server on Azure VM
SQL Server on Azure VM
Tip
There are many methods to deploy an availability group. Simplify your deployment and eliminate the need for an Azure Load Balancer or distributed network name (DNN) for your Always On availability group by creating your SQL Server virtual machines (VMs) in multiple subnets within the same Azure virtual network. If you've already created your availability group in a single subnet, you can migrate it to a multi-subnet environment.
This tutorial shows how to create an Always On availability group for SQL Server on Azure Virtual Machines (VMs) within multiple subnets. The complete tutorial creates a Windows Server Failover Cluster, and an availability group with a two SQL Server replicas and a listener.
Time estimate: Assuming your prerequisites are complete, this tutorial should take about 30 minutes to complete.
Prerequisites
The following table lists the prerequisites that you need to complete before starting this tutorial:
| Requirement | Description |
|---|---|
 Two SQL Server instances
 |
- Each VM in two different Azure availability zones or the same availability set - In separate subnets within an Azure Virtual Network - With two secondary IPs assigned to each VM - In a single domain |
|
SQL Server service account |
A domain account used by the SQL Server service for each machine |
|
Open firewall ports |
- SQL Server: 1433 for default instance - Database mirroring endpoint: 5022 or any available port |
|
Domain installation account |
- Local administrator on each SQL Server - Member of SQL Server sysadmin fixed server role for each instance of SQL Server |
The tutorial assumes you have a basic understanding of SQL Server Always On availability groups.
Create the cluster
The Always On availability group lives on top of the Windows Server Failover Cluster infrastructure, so before deploying your availability group, you must first configure the Windows Server Failover Cluster, which includes adding the feature, creating the cluster, and setting the cluster IP address.
Add failover cluster feature
Add the failover cluster feature to both SQL Server VMs. To do so, follow these steps:
Connect to the SQL Server virtual machine through the Remote Desktop Protocol (RDP) using a domain account that has permissions to create objects in AD, such as the CORP\Install domain account created in the prerequisites article.
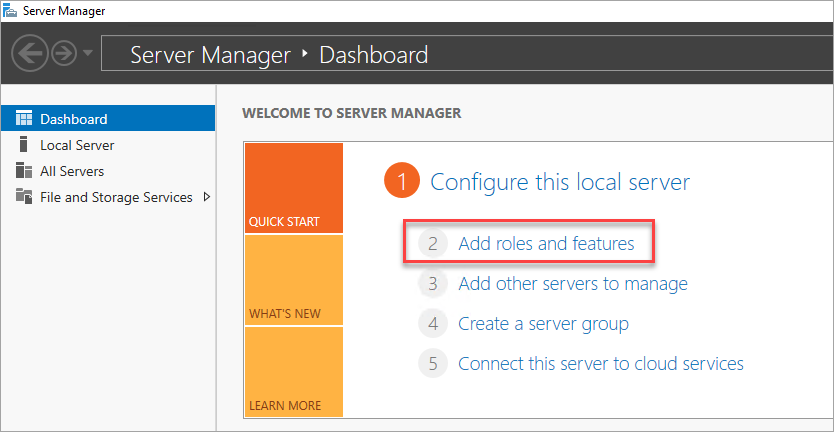
Open Server Manager Dashboard.
Select the Add roles and features link on the dashboard.
Select Next until you get to the Server Features section.
In Features, select Failover Clustering.
Add any additional required features.
Select Install to add the features.
Repeat the steps on the other SQL Server VM.
Create cluster
After the cluster feature has been added to each SQL Server VM, you're ready to create the Windows Server Failover Cluster.
To create the cluster, follow these steps:
Use Remote Desktop Protocol (RDP) to connect to the first SQL Server VM (such as SQL-VM-1) using a domain account that has permissions to create objects in AD, such as the CORP\Install domain account created in the prerequisites article.
In the Server Manager dashboard, select Tools, and then select Failover Cluster Manager.
In the left pane, right-click Failover Cluster Manager, and then select Create a Cluster.

In the Create Cluster Wizard, create a two-node cluster by stepping through the pages using the settings provided in the following table:
Page Settings Before You Begin Use defaults. Select Servers Type the first SQL Server name (such as SQL-VM-1) in Enter server name and select Add.
Type the second SQL Server name (such as SQL-VM-2) in Enter server name and select Add.Validation Warning Select Yes. When I click Next, run configuration validation tests, and then return to the process of creating the cluster. Before you Begin Select Next. Testing Options Choose Run only the tests I select. Test Selection Uncheck Storage. Ensure Inventory, Network and System Configuration are selected. Confirmation Select Next.
Wait for the validation to complete.
Select View Report to review the report. You can safely ignore the warning regarding VMs being reachable on only one network interface. Azure infrastructure has physical redundancy and therefore it is not required to add additional network interfaces.
Select Finish.Access Point for Administering the Cluster Type a cluster name, for example SQLAGCluster1 in Cluster Name. Confirmation Uncheck Add all eligible storage to the cluster and select Next. Summary Select Finish. Warning
If you do not uncheck Add all eligible storage to the cluster, Windows detaches the virtual disks during the clustering process. As a result, they don't appear in Disk Manager or Explorer until the storage is removed from the cluster and reattached using PowerShell.
Set the failover cluster IP address
Typically, the IP address assigned to the cluster is the same IP address assigned to the VM, which means that in Azure, the cluster IP address will be in a failed state, and cannot be brought online. Change the cluster IP address to bring the IP resource online.
During the prerequisites, you should have assigned secondary IP addresses to each SQL Server VM, as the example table below (your specific IP addresses may vary):
| VM Name | Subnet name | Subnet address range | Secondary IP name | Secondary IP address |
|---|---|---|---|---|
| SQL-VM-1 | SQL-subnet-1 | 10.38.1.0/24 | windows-cluster-ip | 10.38.1.10 |
| SQL-VM-2 | SQL-subnet-2 | 10.38.2.0/24 | windows-cluster-ip | 10.38.2.10 |
Assign these IP addresses as the cluster IP addresses for each relevant subnet.
Note
On Windows Server 2019, the cluster creates a Distributed Server Name instead of the Cluster Network Name, and the cluster name object (CNO) is automatically registered with the IP addresses for all of the nodes in the cluster, eliminating the need for a dedicated windows cluster IP address. If you're on Windows Server 2019, either skip this section, and any other steps that refer to the Cluster Core Resources or create a virtual network name (VNN)-based cluster using PowerShell. See the blog Failover Cluster: Cluster Network Object for more information.
To change the cluster IP address, follow these steps:
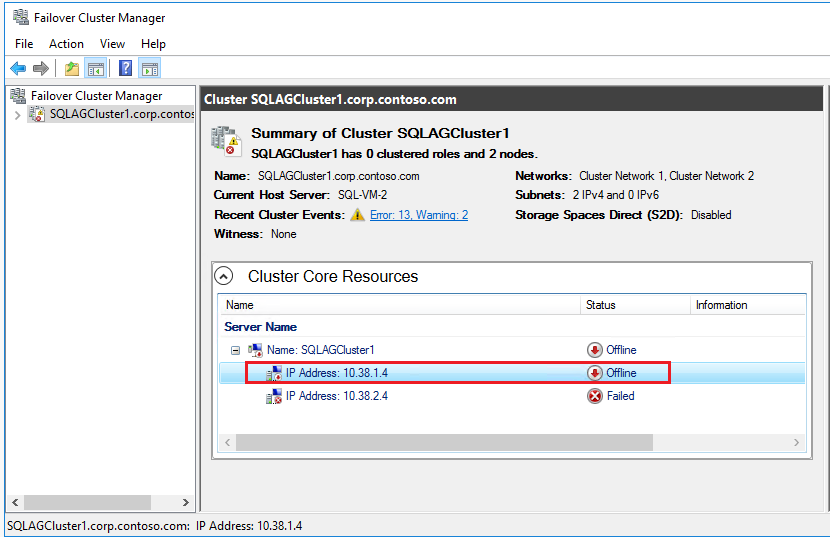
In Failover Cluster Manager, scroll down to Cluster Core Resources and expand the cluster details. You should see the Name and two IP Address resources from each subnet in the Failed state.
Right-click the first failed IP Address resource, and then select Properties.
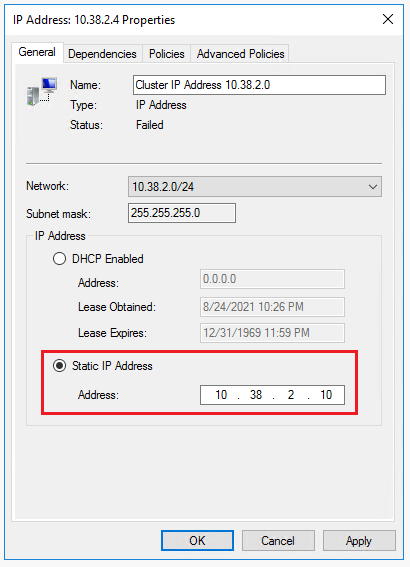
Select Static IP Address and update the IP address to the dedicated windows cluster IP address in the subnet you assigned to the first SQL Server VM (such as SQL-VM-1). Select OK.

Repeat the steps for the second failed IP Address resource, using the dedicated windows cluster IP address for the subnet of the second SQL Server VM (such as SQL-VM-2).
In the Cluster Core Resources section, right-click cluster name and select Bring Online. Wait until the name and one of the IP address resources are online.
Since the SQL Server VMs are in different subnets the cluster will have an OR dependency on the two dedicated windows cluster IP addresses. When the cluster name resource comes online, it updates the domain controller (DC) server with a new Active Directory (AD) computer account. If the cluster core resources move nodes, one IP address goes offline, while the other comes online, updating the DC server with the new IP address association.
Tip
When running the cluster on Azure VMs in a production environment, change the cluster settings to a more relaxed monitoring state to improve cluster stability and reliability in a cloud environment. To learn more, see SQL Server VM - HADR configuration best practices.
Configure quorum
On a two node cluster, a quorum device is necessary for cluster reliability and stability. On Azure VMs, the cloud witness is the recommended quorum configuration, though there are other options available. The steps in this section configure a cloud witness for quorum. Identify the access keys to the storage account and then configure the cloud witness.
Get access keys for storage account
When you create a Microsoft Azure Storage Account, it is associated with two Access Keys that are automatically generated - primary access key and secondary access key. Use the primary access key the first time you create the cloud witness, but subsequently there are no restrictions to which key to use for the cloud witness.
Use the Azure portal to view and copy storage access keys for the Azure Storage Account created in the prerequisites article.
To view and copy the storage access keys, follow these steps:
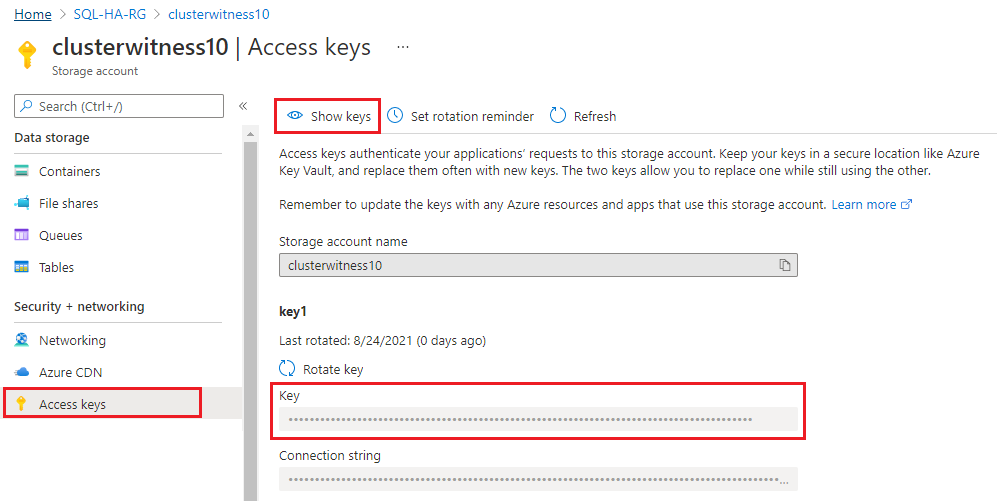
Go to your resource group in the Azure portal and select the storage account you created.
Select Access Keys under Security + networking.
Select Show Keys and copy the key.
Configure cloud witness
After you have the access key copied, create the cloud witness for the cluster quorum.
To create the cloud witness, follow these steps:
Connect to the first SQL Server VM SQL-VM-1 with remote desktop.
Open Windows PowerShell in Administrator mode.
Run the PowerShell script to set TLS (Transport Layer Security) value for the connection to 1.2:
[Net.ServicePointManager]::SecurityProtocol = [Net.SecurityProtocolType]::Tls12Use PowerShell to configure the cloud witness. Replace the values for storage account name and access key with your specific information:
Set-ClusterQuorum -CloudWitness -AccountName "Storage_Account_Name" -AccessKey "Storage_Account_Access_Key"The following example output indicates success:

The cluster core resources are configured with a cloud witness.
Enable AG feature
The Always On availability group feature is disabled by default. Use the SQL Server Configuration Manager to enable the feature on both SQL Server instances.
To enable the availability group feature, follow these steps:
Launch the RDP file to the first SQL Server VM (such as SQL-VM-1) with a domain account that is a member of sysadmin fixed server role, such as the CORP\Install domain account created in the prerequisites document
From the Start screen of one your SQL Server VMs, launch SQL Server Configuration Manager.
In the browser tree, highlight SQL Server Services, right-click the SQL Server (MSSQLSERVER) service and select Properties.
Select the Always On High Availability tab, then check the box to Enable Always On availability groups:
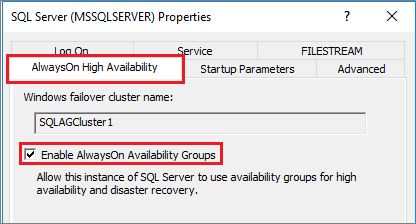
Select Apply. Select OK in the pop-up dialog.
Restart the SQL Server service.
Repeat these steps for the other SQL Server instance.
Enable FILESTREAM feature
If you're not using FILESTREAM for your database in the availability group, skip this step and move to the next step - Create Database.
If you plan on adding a database to your availability group that uses FILESTREAM, then FILESTREAM needs to be enabled as the feature is disabled by default. Use the SQL Server Configuration Manager to enable the feature on both SQL Server instances.
To enable the FILESTREAM feature, follow these steps:
Launch the RDP file to the first SQL Server VM (such as SQL-VM-1) with a domain account that is a member of sysadmin fixed server role, such as the CORP\Install domain account created in the prerequisites document
From the Start screen of one your SQL Server VMs, launch SQL Server Configuration Manager.
In the browser tree, highlight SQL Server Services, right-click the SQL Server (MSSQLSERVER) service and select Properties.
Select the FILESTREAM tab, then check the box to Enable FILESTREAM for Transact-SQL access:
Select Apply. Select OK in the pop-up dialog.
In SQL Server Management Studio, click New Query to display the Query Editor.
In Query Editor, enter the following Transact-SQL code:
EXEC sp_configure filestream_access_level, 2
RECONFIGURE
Click Execute.
Restart the SQL Server service.
Repeat these steps for the other SQL Server instance.
Create database
For your database, you can either follow the steps in this section to create a new database, or restore an AdventureWorks database. You also need to back up the database to initialize the log chain. Databases that have not been backed up do not meet the prerequisites for an availability group.
To create a database, follow these steps:
- Launch the RDP file to the first SQL Server VM (such as SQL-VM-1) with a domain account that is a member of the sysadmin fixed server role, such as the CORP\Install domain account created in the prerequisites document.
- Open SQL Server Management Studio and connect to the SQL Server instance.
- In Object Explorer, right-click Databases and select New Database.
- In Database name, type MyDB1.
- Select the Options page, and choose Full from the Recovery model drop-down, if it's not full by default. The database must be in the full recovery model to meet the prerequisites of participating in an availability group.
- Select OK to close the New Database page and create your new database.
To back up the database, follow these steps:
In Object Explorer, right-click the database, highlight Tasks, and then select Back Up....
Select OK to take a full backup of the database to the default backup location.
Create file share
Create a backup file share that both SQL Server VMs and their service accounts have access to.
To create the backup file share, follow these steps:
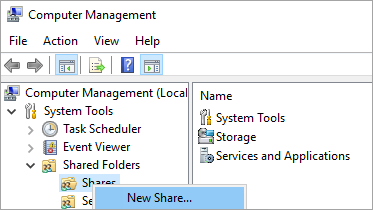
On the first SQL Server VM in Server Manager, select Tools. Open Computer Management.
Select Shared Folders.
Right-click Shares, and select New Share... and then use the Create a Shared Folder Wizard to create a share.
For Folder Path, select Browse and locate or create a path for the database backup shared folder, such as
C:\Backup. Select Next.In Name, Description, and Settings verify the share name and path. Select Next.
On Shared Folder Permissions set Customize permissions. Select Custom.
On Customize Permissions, select Add.
Check Full Control to grant full access to the share the SQL Server service account (
Corp\SQLSvc):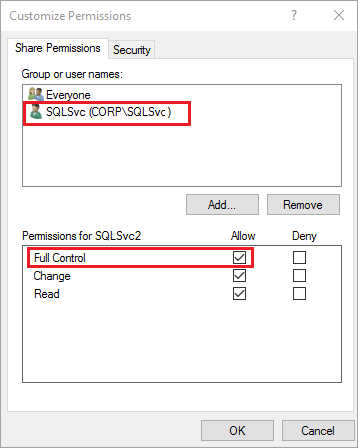
Select OK.
In Shared Folder Permissions, select Finish. Select Finish again.
Create availability group
After your database has been backed up, you are ready to create your availability group, which automatically takes a full backup and transaction log backup from the primary SQL Server replica and restores it on the secondary SQL Server instance with the NORECOVERY option.
To create your availability group, follow these steps.
In Object Explorer in SQL Server Management Studio (SSMS) on the first SQL Server VM (such as SQL-VM-1), right-click Always On High Availability and select New Availability Group Wizard.

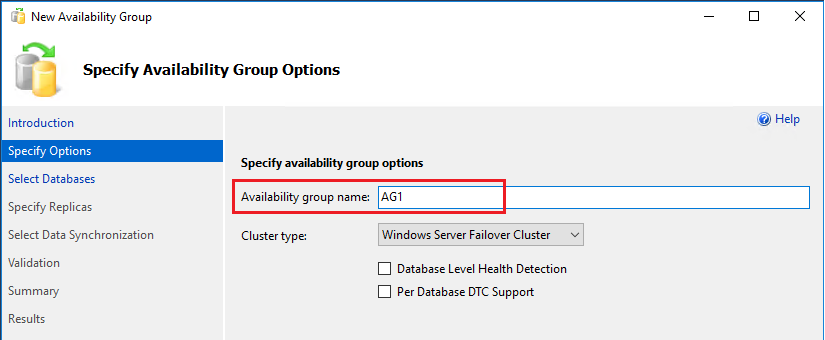
On the Introduction page, select Next. In the Specify availability group Name page, type a name for the availability group in Availability group name, such as AG1. Select Next.
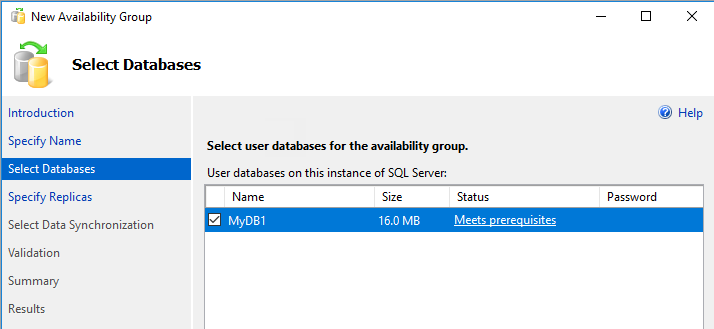
On the Select Databases page, select your database, and then select Next. If your database does not meet the prerequisites, make sure it's in the full recovery model, and take a backup:
On the Specify Replicas page, select Add Replica.
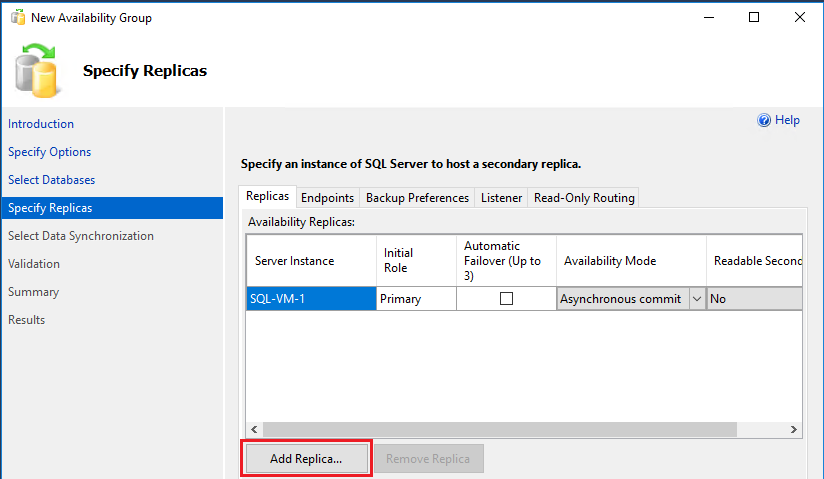
The Connect to Server dialog pops up. Type the name of the second server in Server name, such as SQL-VM-2. Select Connect.
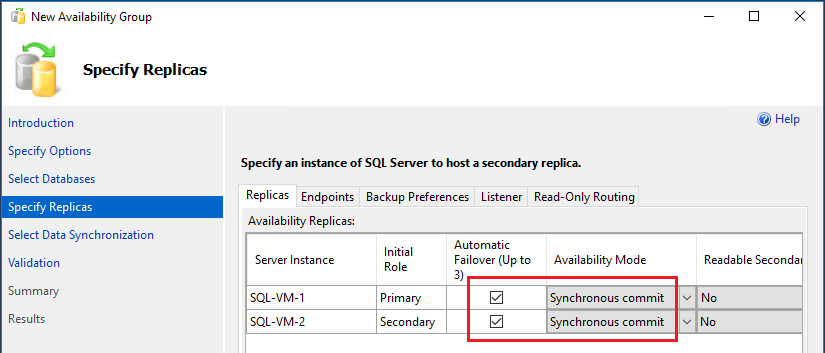
On the Specify Replicas page, check the boxes for Automatic Failover and choose Synchronous commit for the availability mode from the drop-down:
Select the Endpoints tab to confirm the ports used for the database mirroring endpoint are those you opened in the firewall:

Select the Listener tab and choose to Create an availability group listener using the following values for the listener:
Field Value Listener DNS Name: AG1-Listener Port Use the default SQL Server port. 1433 Network Mode: Static IP Select Add to provide the secondary dedicated IP address for the listener for both SQL Server VMs.
The following table shows the example IP addresses created for the listener from the prerequisites document (though your specific IP addresses may vary):
VM Name Subnet name Subnet address range Secondary IP name Secondary IP address SQL-VM-1 SQL-subnet-1 10.38.1.0/24 availability-group-listener 10.38.1.11 SQL-VM-2 SQL-subnet-2 10.38.2.0/24 availability-group-listener 10.38.2.11 Choose the first subnet (such as 10.38.1.0/24) from the drop-down on the Add IP address dialog box and then provide the secondary dedicated listener IPv4 address, such as
10.38.1.11. Select OK.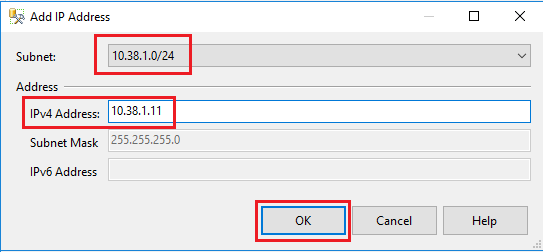
Repeat this step again, but choose the other subnet from the drop-down (such as 10.38.2.0/24), and provide the secondary dedicated listener IPv4 address from the other SQL Server VM, such as
10.38.2.11. Select OK.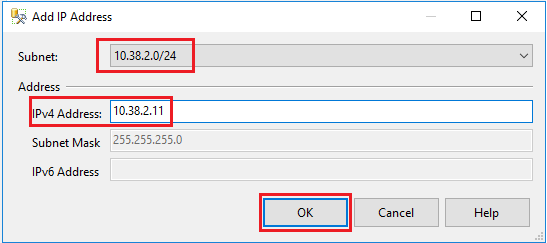
After reviewing the values on the Listener page, select Next:

On the Select Initial Data Synchronization page, choose Full database and log backup and provide the network share location you created previously, such as
\\SQL-VM-1\Backup.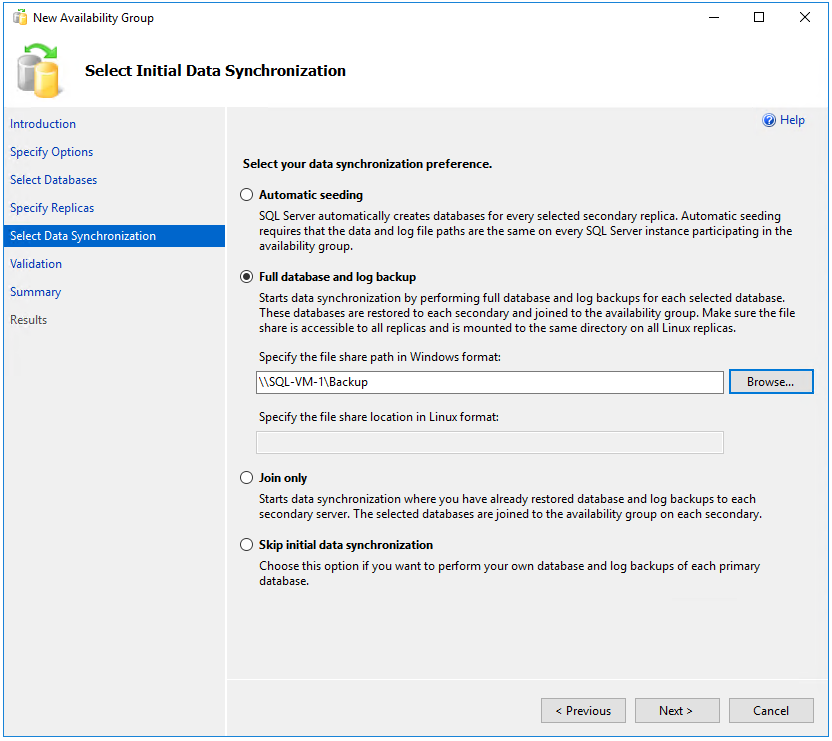
Note
Full synchronization takes a full backup of the database on the first instance of SQL Server and restores it to the second instance. For large databases, full synchronization is not recommended because it may take a long time. You can reduce this time by manually taking a backup of the database and restoring it with
NO RECOVERY. If the database is already restored withNO RECOVERYon the second SQL Server before configuring the availability group, choose Join only. If you want to take the backup after configuring the availability group, choose Skip initial data synchronization.On the Validation page, confirm that all validation checks have passed, and then choose Next:

On the Summary page, select Finish and wait for the wizard to configure your new availability group. Choose More details on the Progress page to view the detailed progress. When you see that the wizard completed successfully on the Results page, inspect the summary to verify the availability group and listener were created successfully.
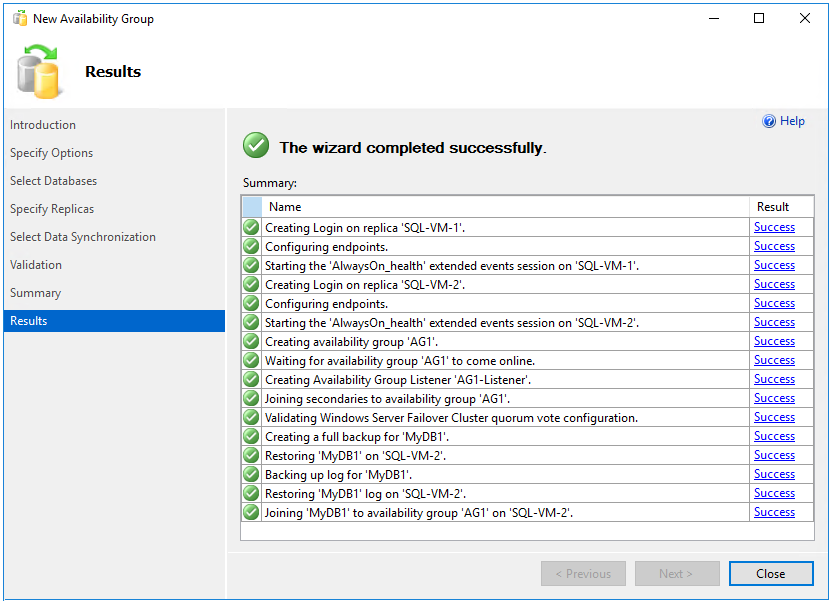
Select Close to exit the wizard.
Check availability group
You can check the health of the availability group by using SQL Server Management Studio, and the Failover Cluster Manager.
To check the status of the availability group, follow these steps:
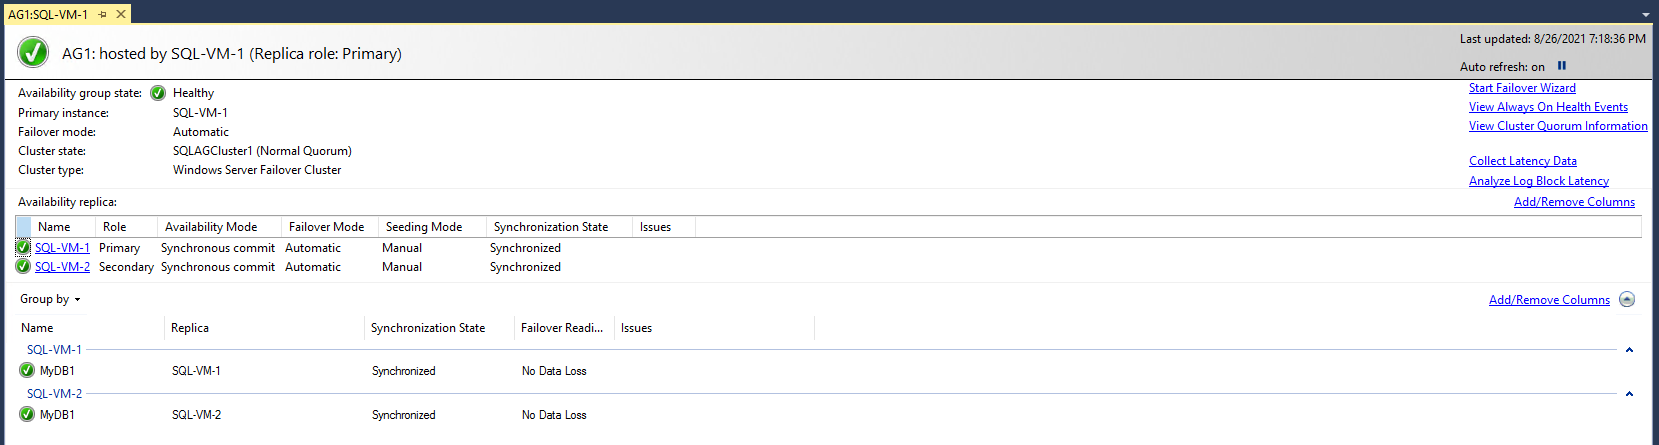
In Object Explorer, expand Always On High Availability, and then expand availability groups. You should now see the new availability group in this container. Right-click the availability group and select Show Dashboard.
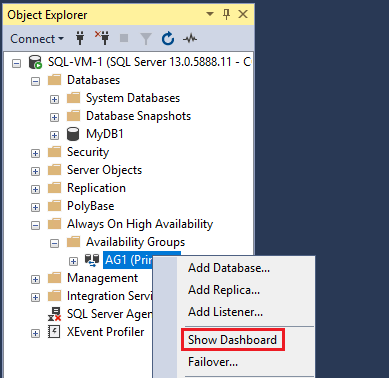
The availability group dashboard shows the replica, the failover mode of each replica, and the synchronization state, such as the following example:
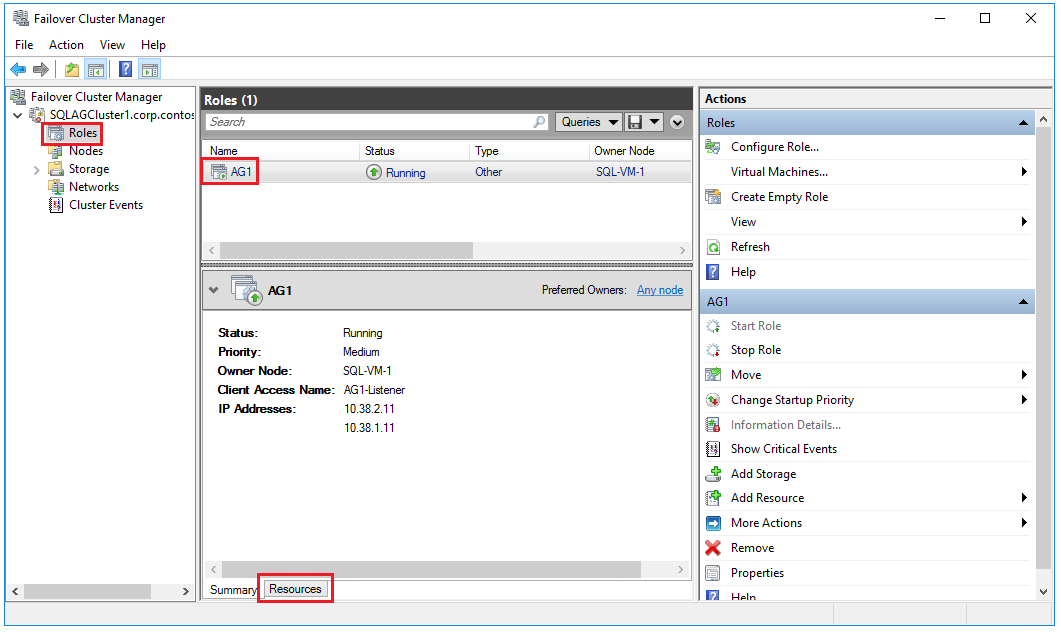
Open the Failover Cluster Manager, select your cluster, and choose Roles to view the availability group role you created within the cluster. Choose the role AG1 and select the Resources tab to view the listener and the associated IP addresses, such as the following example:
At this point, you have an availability group with replicas on two instances of SQL Server and a corresponding availability group listener as well. You can connect using the listener and you can move the availability group between instances using SQL Server Management Studio.
Warning
Do not try to fail over the availability group by using the Failover Cluster Manager. All failover operations should be performed from within SQL Server Management Studio, such as by using the Always On Dashboard or Transact-SQL (T-SQL). For more information, see Restrictions for using the Failover Cluster Manager with availability groups.
Test listener connection
After your availability group is ready, and your listener has been configured with the appropriate secondary IP addresses, test the connection to the listener.
To test the connection, follow these steps:
Use RDP to connect to a SQL Server that is in the same virtual network, but does not own the replica, such as the other SQL Server instance within the cluster, or any other VM with SQL Server Management Studio installed to it.
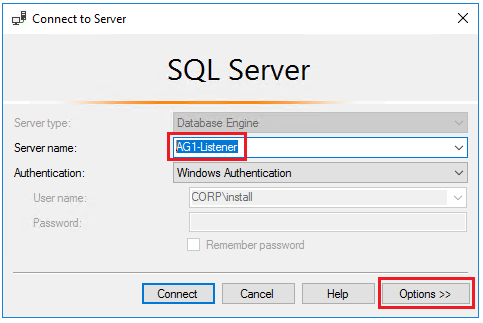
Open SQL Server Management Studio, and in the Connect to Server dialog box type the name of the listener (such as AG1-Listener) in Server name:, and then select Options:
Enter
MultiSubnetFailover=Truein the Additional Connection Parameters window and then choose Connect to automatically connect to whichever instance is hosting the primary SQL Server replica: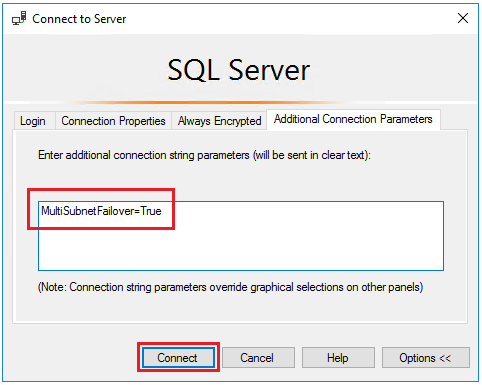
Note
- While connecting to availability group on different subnets, setting
MultiSubnetFailover=trueprovides faster detection of and connection to the current primary replica. See Connecting with MultiSubnetFailover
Next steps
Now that you've configured your multi-subnet availability group, if needed, you can extend this across multiple regions.
To learn more, see:
Feedback
Coming soon: Throughout 2024 we will be phasing out GitHub Issues as the feedback mechanism for content and replacing it with a new feedback system. For more information see: https://aka.ms/ContentUserFeedback.
Submit and view feedback for