Configure a DNS forwarder in the Azure portal
Important
For Azure VMware Solution private clouds created on or after July 1, 2021, you now have the ability to configure private DNS resolution. For private clouds created before July 1, 2021, that need private DNS resolution, open a support request and request Private DNS configuration.
By default, Azure VMware Solution management components such as vCenter Server can only resolve name records available through Public DNS. However, certain hybrid use cases require Azure VMware Solution management components to resolve name records from privately hosted DNS to properly function, including customer-managed systems such as vCenter Server and Active Directory.
Private DNS for Azure VMware Solution management components lets you define conditional forwarding rules for the desired domain name to a selected set of private DNS servers through the NSX-T Data Center DNS Service.
This capability uses the DNS Forwarder Service in NSX-T Data Center. A DNS service and default DNS zone are provided as part of your private cloud. To enable Azure VMware Solution management components to resolve records from your private DNS systems, you must define an FQDN zone and apply it to the NSX-T Data Center DNS Service. The DNS Service conditionally forwards DNS queries for each zone based on the external DNS servers defined in that zone.
Note
The DNS Service is associated with up to five FQDN zones. Each FQDN zone is associated with up to three DNS servers.
Tip
If desired, you can also use the conditional forwarding rules for workload segments by configuring virtual machines on those segments to use the NSX-T Data Center DNS Service IP address as their DNS server.
Architecture
The diagram shows that the NSX-T Data Center DNS Service can forward DNS queries to DNS systems hosted in Azure and on-premises environments.

Configure DNS forwarder
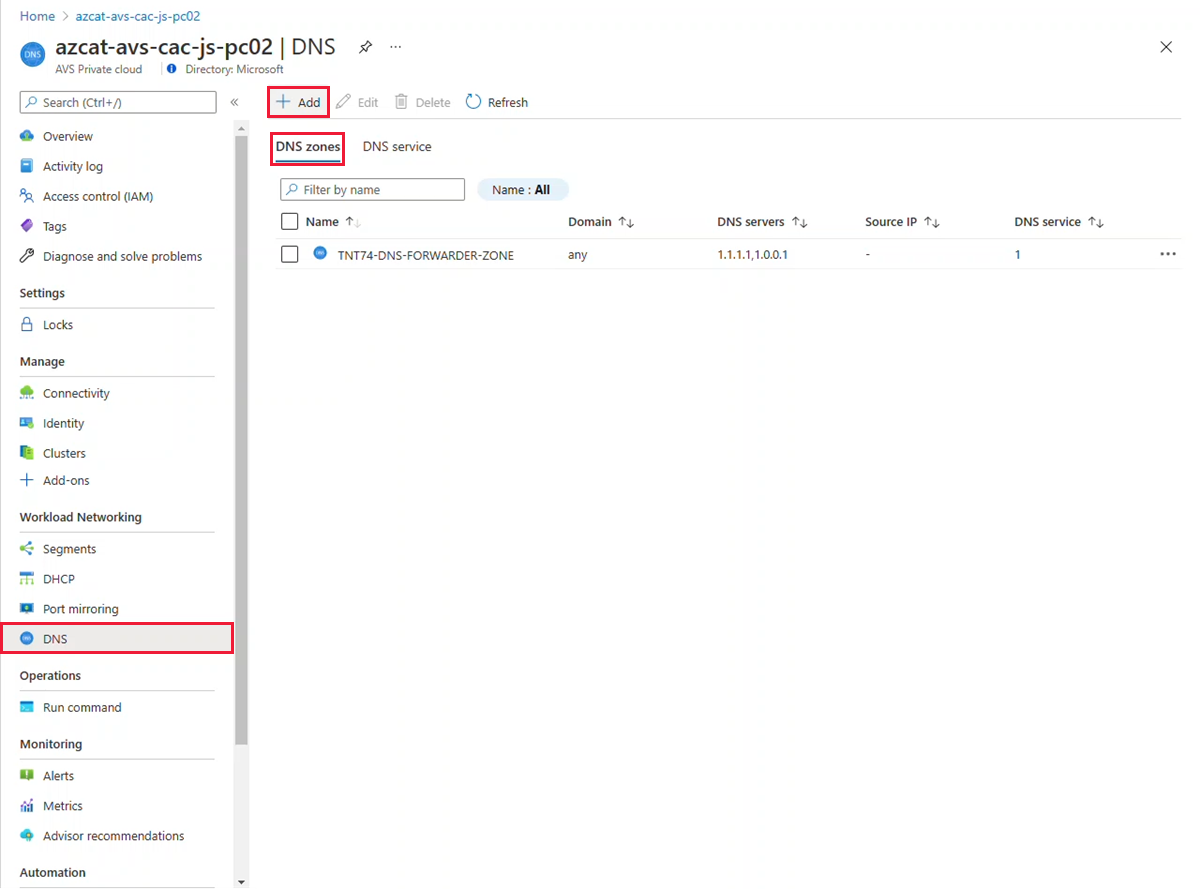
In your Azure VMware Solution private cloud, under Workload Networking, select DNS > DNS zones. Then select Add.
Note
For private clouds created on or after July 1, 2021, the default DNS zone is created for you during the private cloud creation.
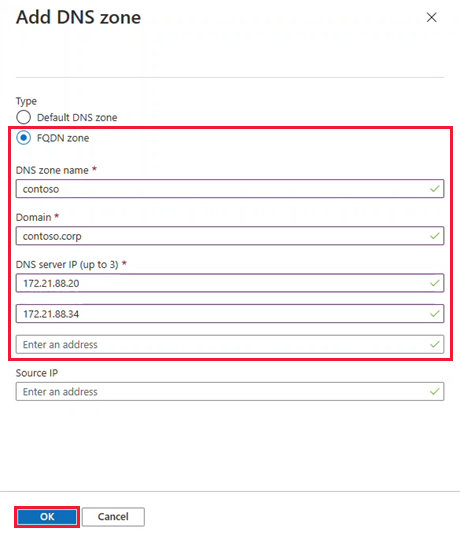
Select FQDN zone, provide a name and up to three DNS server IP addresses in the format of 10.0.0.53. Then select OK.
Important
While NSX-T Data Center allows spaces and other non-alphanumeric characters in a DNS zone name, certain NSX-T Data Center resources such as a DNS Zone are mapped to an Azure resource whose names don’t permit certain characters.
As a result, DNS zone names that would otherwise be valid in NSX-T Data Center may need adjustment to adhere to the Azure resource naming conventions.
It takes several minutes to complete, you can follow the progress from Notifications. You see a message in the Notifications when the DNS zone is created.
Ignore the message about a default DNS zone because one gets created for you as part of your private cloud.
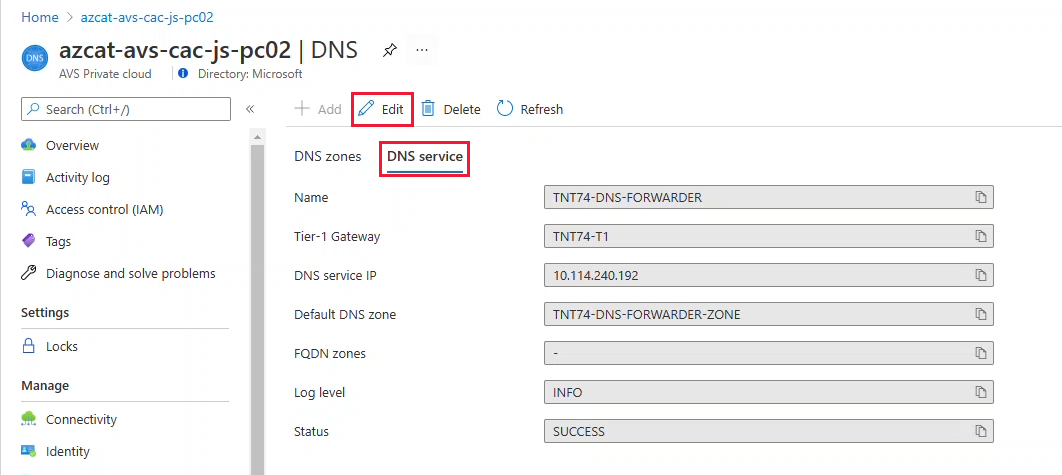
Select the DNS service tab and then select Edit.
Tip
For private clouds created on or after July 1, 2021, you can ignore the message about a default DNS zone as one is created for you during private cloud creation.
Important
While certain operations in your private cloud may be performed from NSX-T Manager, for private clouds created on or after July 1, 2021, you must edit the DNS service from the Simplified Networking experience in the Azure portal for any configuration changes made to the default Tier-1 Gateway.
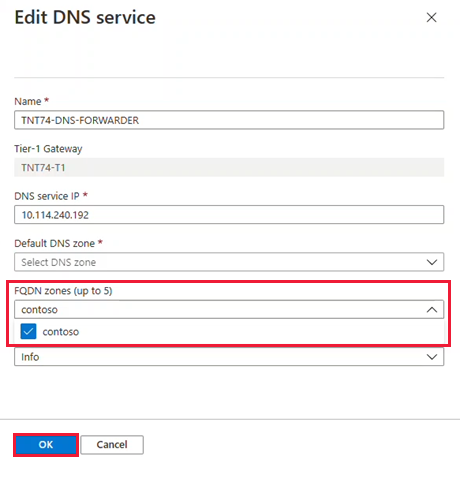
From the FQDN zones drop-down, select the newly created FQDN, and then select OK.
It takes several minutes to complete, and once finished, you see the Completed message from Notifications. At this point, management components in your private cloud should be able to resolve DNS entries from the FQDN zone provided to the NSX-T Data Center DNS Service.
Repeat the above steps for other FQDN zones, including any applicable reverse lookup zones.
Change Default T1 DNS Forwarder Zone
- In your Azure VMware Solution private cloud, under Workload Networking, select DNS > DNS zones > Check TNT##-DNS-FORWARDER-ZONE. Then select Edit.

- Change DNS server entries to valid reachable IP addresses. Then select OK

Important
A DNS endpoint that is unreachable by the NSX-T DNS server will result in an NSX-T alarm stating that the endpoint is unreachable. In cases of the default configuration provided with Azure VMware Solution, this is due to internet that is disabled by default. The alarm can be acknowledged and ignored, or the default configuration can be changed to a valid endpoint.
Verify name resolution operations
After you configure the DNS forwarder, you have some options available to verify name resolution operations.
VMware NSX-T Manager
NSX-T Manager provides the DNS Forwarder Service statistics at the global service level and on a per zone basis.
In NSX-T Manager, select Networking > DNS, and then expand your DNS Forwarder Service.
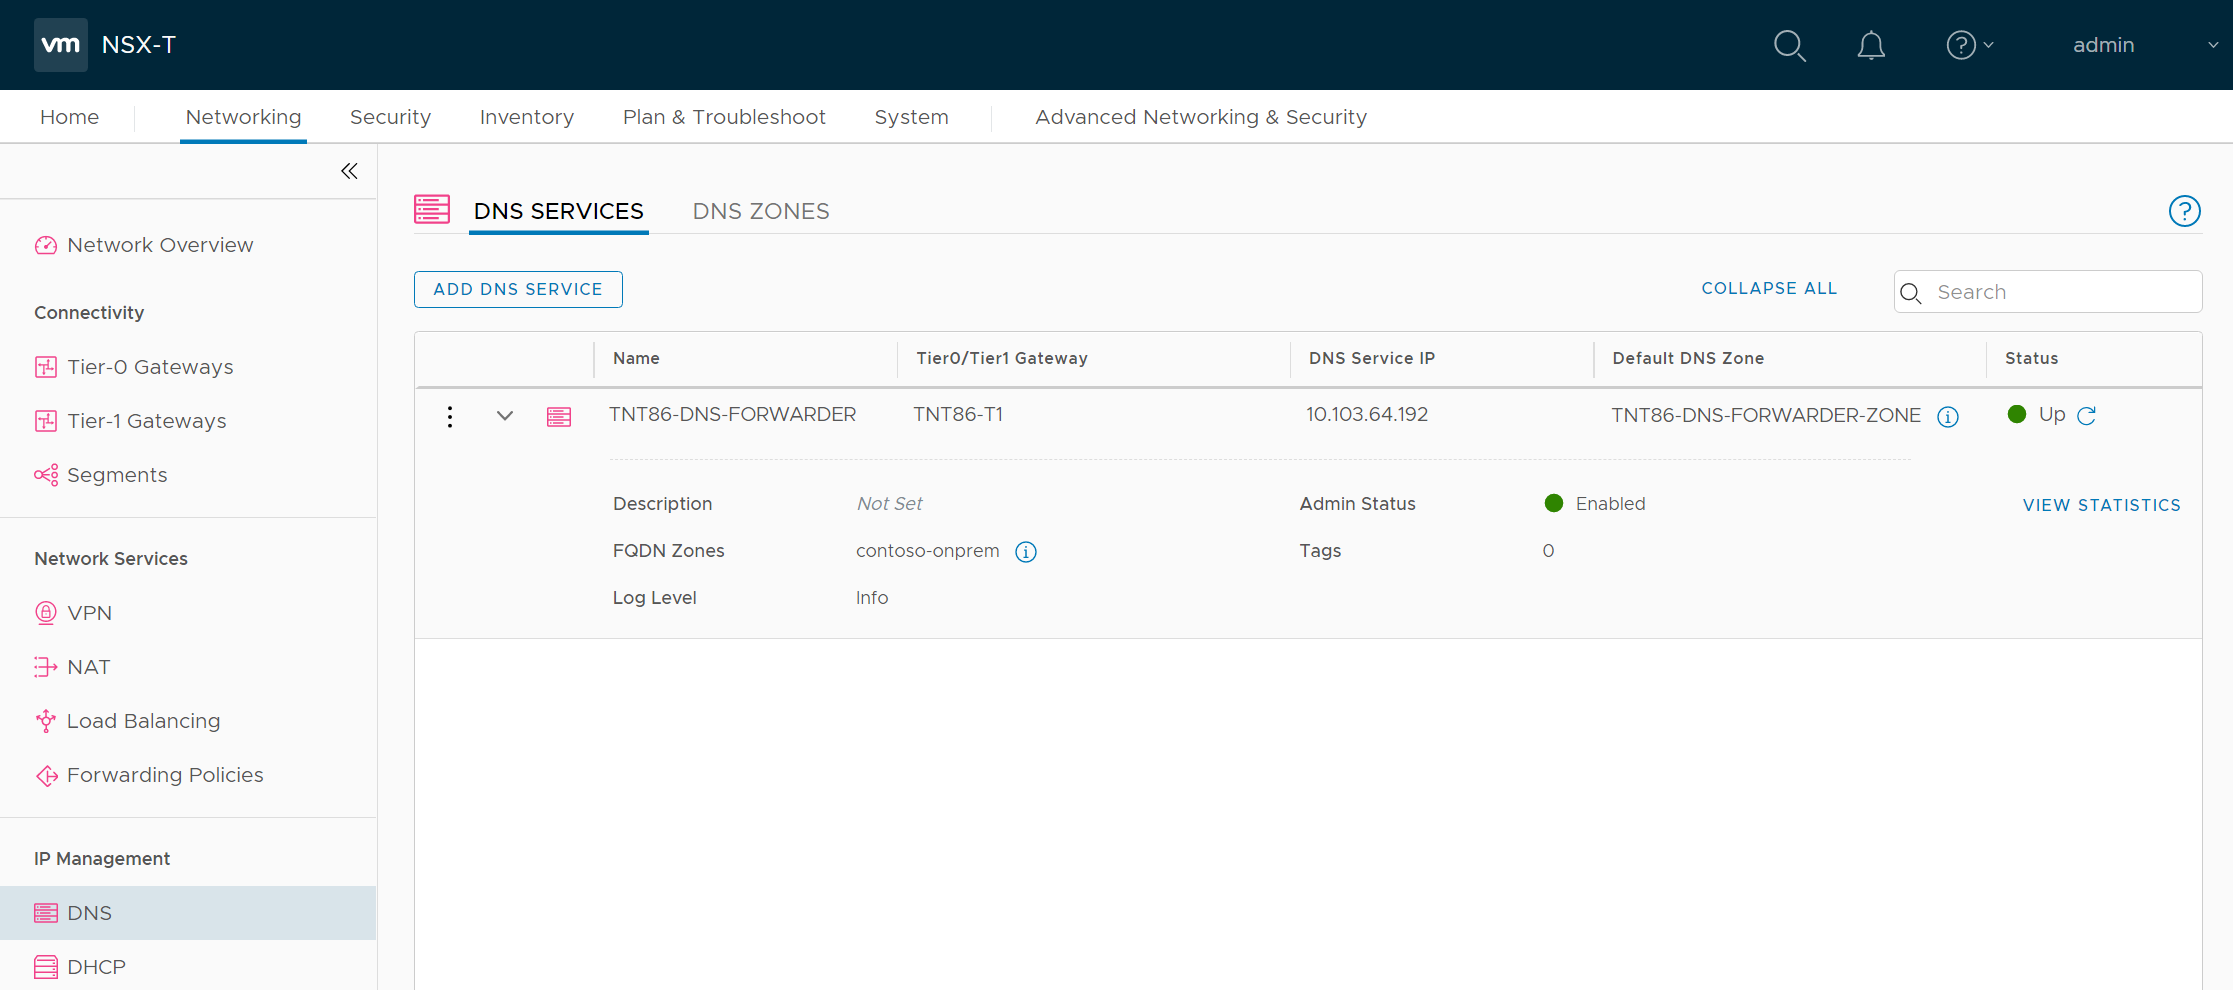
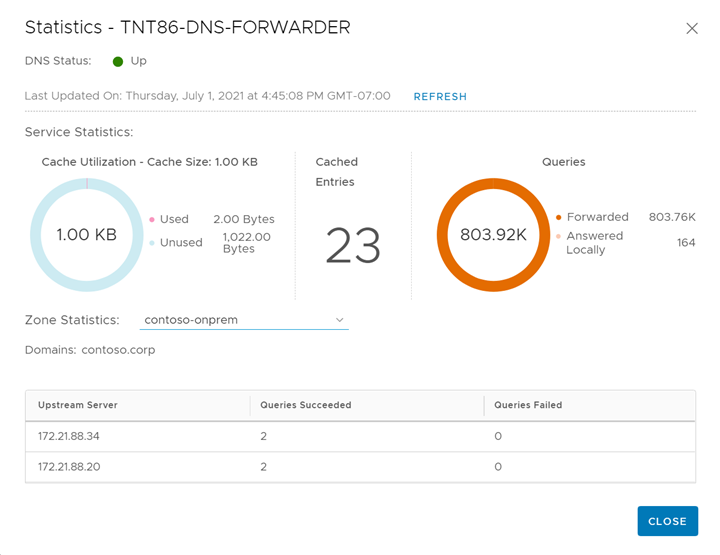
Select View Statistics, and then from the Zone Statistics drop-down, select your FQDN Zone.
The top half shows the statistics for the entire service, and the bottom half shows the statistics for your specified zone. In this example, you can see the forwarded queries to the DNS services specified during the configuration of the FQDN zone.
PowerCLI
The NSX-T Policy API lets you run nslookup commands from the NSX-T Data Center DNS Forwarder Service. The required cmdlets are part of the VMware.VimAutomation.Nsxt module in PowerCLI. The following example demonstrates output from version 12.3.0 of that module.
Connect to your NSX-T Manager cluster.
Tip
You can obtain the IP address of your NSX-T Manager cluster from the Azure portal under Manage > Identity.
Connect-NsxtServer -Server 10.103.64.3Obtain a proxy to the DNS Forwarder's nslookup service.
$nslookup = Get-NsxtPolicyService -Name com.vmware.nsx_policy.infra.tier_1s.dns_forwarder.nslookupPerform lookups from the DNS Forwarder Service.
$response = $nslookup.get('TNT86-T1', 'vc01.contoso.corp')
The first parameter in the command is the ID for your private cloud's T1 gateway, which you can obtain from the DNS service tab in the Azure portal.
Obtain a raw answer from the lookup using the following properties of the response.
$response.dns_answer_per_enforcement_point.raw_answer; (()) DiG 9.10.3-P4-Ubuntu (()) @10.103.64.192 -b 10.103.64.192 vc01.contoso.corp +timeout=5 +tries=3 +nosearch ; (1 server found) ;; global options: +cmd ;; Got answer: ;; -))HEADER((- opcode: QUERY, status: NOERROR, id: 10684 ;; flags: qr rd ra; QUERY: 1, ANSWER: 1, AUTHORITY: 0, ADDITIONAL: 1 ;; OPT PSEUDOSECTION: ; EDNS: version: 0, flags:; udp: 4096 ;; QUESTION SECTION: ;vc01.contoso.corp. IN A ;; ANSWER SECTION: vc01.contoso.corp. 3046 IN A 172.21.90.2 ;; Query time: 0 msec ;; SERVER: 10.103.64.192:53(10.103.64.192) ;; WHEN: Thu Jul 01 23:44:36 UTC 2021 ;; MSG SIZE rcvd: 62In this example, you can see an answer for the query of vc01.contoso.corp showing an A record with the address 172.21.90.2. Also, this example shows a cached response from the DNS Forwarder Service, so your output might vary slightly.
Feedback
Coming soon: Throughout 2024 we will be phasing out GitHub Issues as the feedback mechanism for content and replacing it with a new feedback system. For more information see: https://aka.ms/ContentUserFeedback.
Submit and view feedback for