Configure DHCP for Azure VMware Solution
Applications and workloads running in a private cloud environment require name resolution and DHCP services for lookup and IP address assignments. A proper DHCP and DNS infrastructure are required to provide these services. You can configure a virtual machine to provide these services in your private cloud environment.
Use the DHCP service built-in to NSX-T Data Center or use a local DHCP server in the private cloud instead of routing broadcast DHCP traffic over the WAN back to on-premises.
Important
If you advertise a default route to the Azure VMware Solution, then you must allow the DNS forwarder to reach the configured DNS servers and they must support public name resolution.
In this article, learn how to use NSX-T Manager to configure DHCP for Azure VMware Solution in one of the following ways:
Tip
If you want to configure DHCP using a simplified view of NSX-T Data Center operations, see Configure DHCP for Azure VMware Solution.
Important
For clouds created on or after July 1, 2021, the simplified view of NSX-T Data Center operations must be used to configure DHCP on the default Tier-1 Gateway in your environment.
DHCP does not work for virtual machines (VMs) on the VMware HCX L2 stretch network when the DHCP server is in the on-premises datacenter. NSX-T Data Center, by default, blocks all DHCP requests from traversing the L2 stretch. For the solution, see the Configure DHCP on L2 stretched VMware HCX networks procedure.
Use the Azure portal to create a DHCP server or relay
You can create a DHCP server or relay directly from Azure VMware Solution in the Azure portal. The DHCP server or relay connects to the Tier-1 gateway created when you deployed Azure VMware Solution. All the segments where you gave DHCP ranges are part of this DHCP. After you create a DHCP server or DHCP relay, you must define a subnet or range on segment level to consume it.
In your Azure VMware Solution private cloud, under Workload Networking, select DHCP > Add.
Select either DHCP Server or DHCP Relay and then provide a name for the server or relay and three IP addresses.
Note
For DHCP relay, you only require one IP address for a successful configuration.
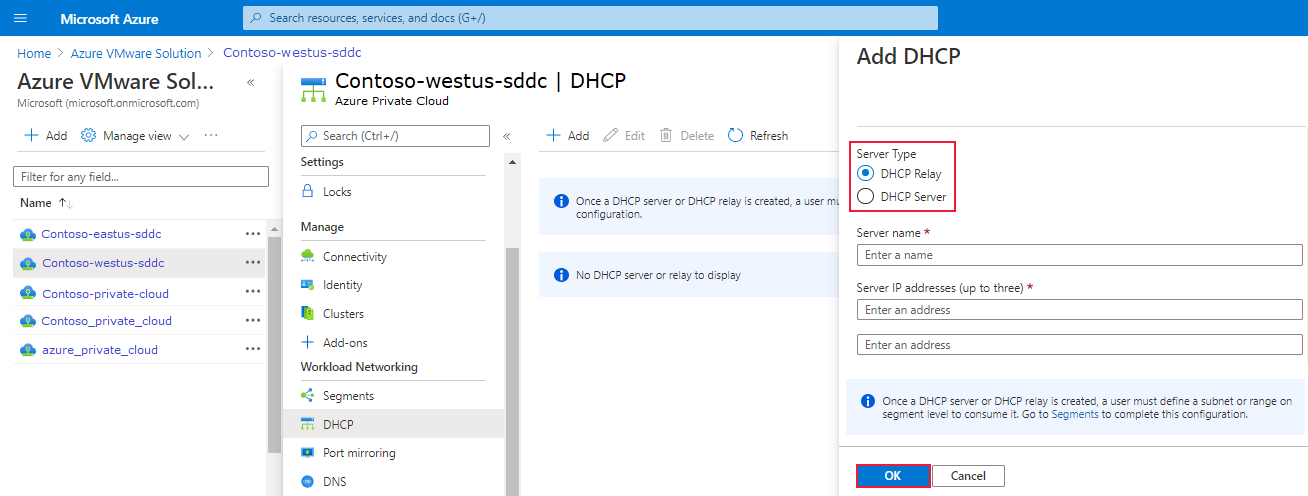
Complete the DHCP configuration by providing DHCP ranges on the logical segments and then select OK.
Use NSX-T Data Center to host your DHCP server
If you want to use NSX-T Data Center to host your DHCP server, create a DHCP server and a relay service. Next add a network segment and specify the DHCP IP address range.
Create a DHCP server
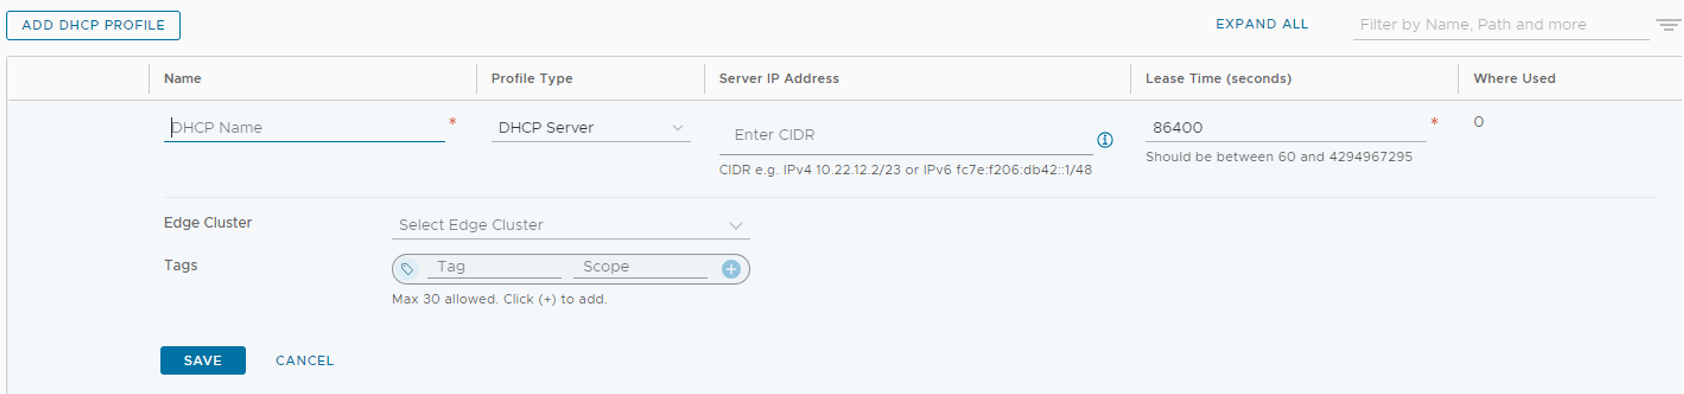
In NSX-T Manager, select Networking > DHCP, then select Add DHCP Profile.
Select Add DHCP Profile, enter a name, and select Save. NOTE: An IP address isn't required so if none is entered, NSX-T Manager sets one.
Under Networking > Tier-1 Gateways, select the gateway where the segments are connected that DHCP is required. Edit the Tier-1 Gateway by clicking on the three ellipses and choose Edit.
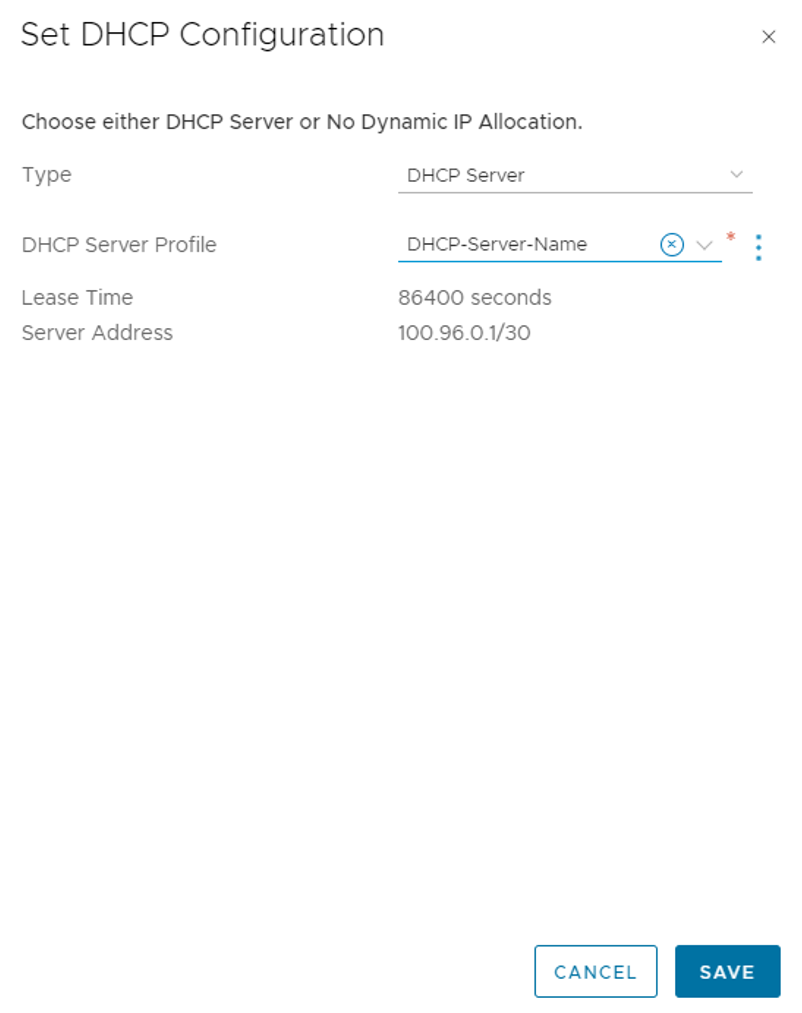
Select Set DHCP Configuration, select DHCP Server and then select the DHCP Server Profile created earlier. Select Save, then Close Editing.
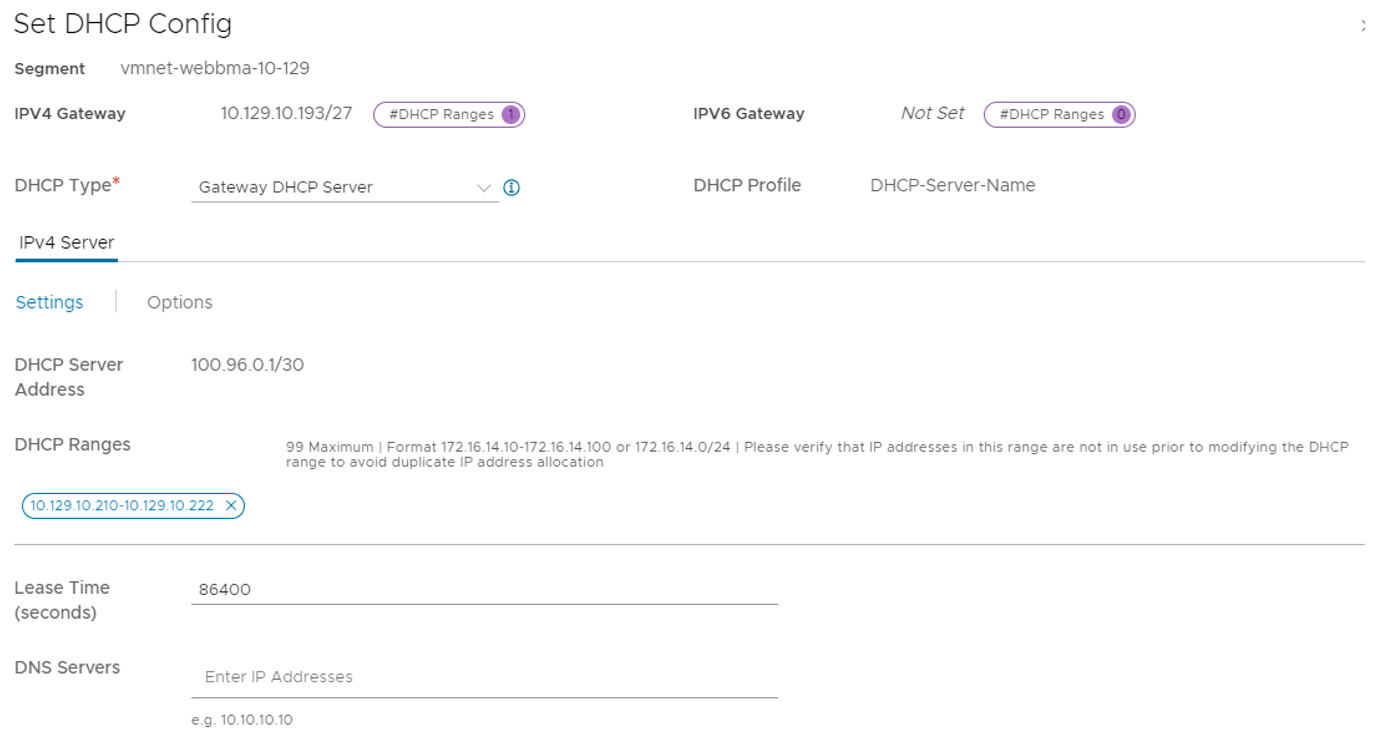
Navigate to Networking > Segments and find the segment where DHCP is required. Select on Edit then Set DHCP Config.
Select Gateway DHCP Server for DHCP Type, add a DHCP range, and select Apply.
Add a network segment
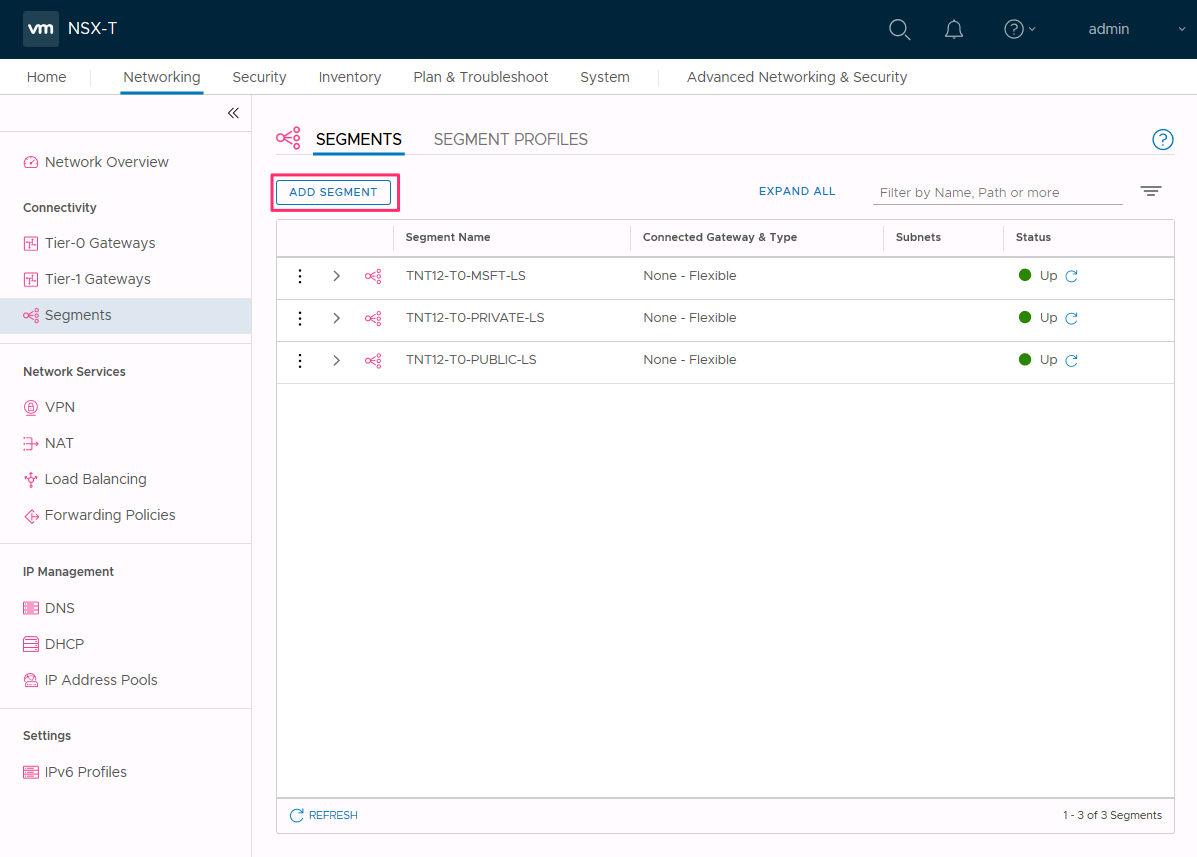
In NSX-T Manager, select Networking > Segments, and then select Add Segment.
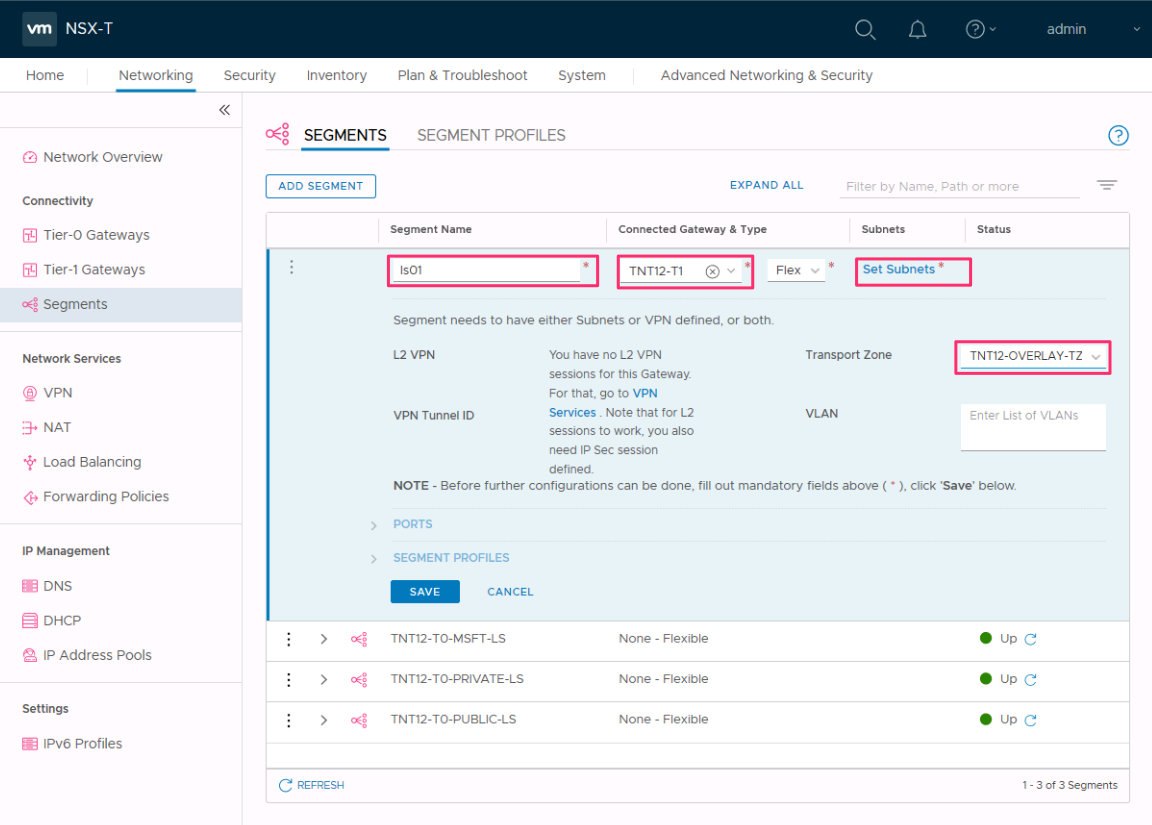
Enter a name for the segment.
Select the Tier-1 Gateway (TNTxx-T1) as the Connected Gateway and leave the Type as Flexible.
Select the preconfigured overlay Transport Zone (TNTxx-OVERLAY-TZ) and then select Set Subnets.
Enter the gateway IP address and then select Add.
Important
The IP address needs to be on a non-overlapping RFC1918 address block, which ensures connection to the VMs on the new segment.
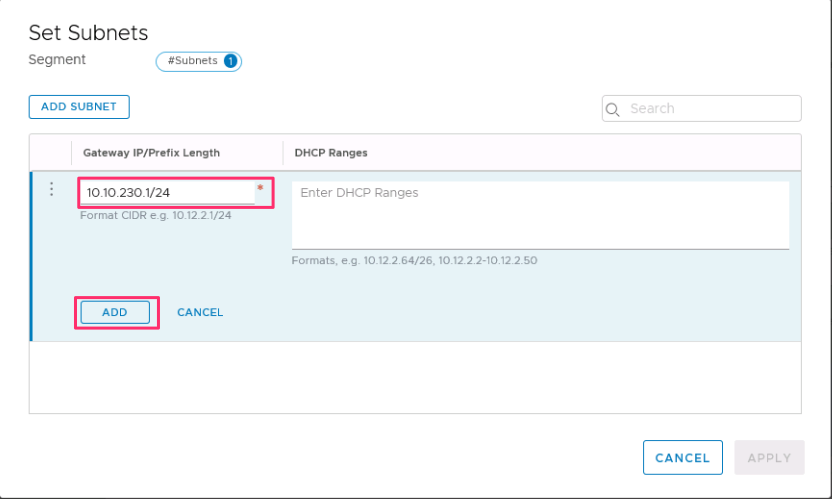
Select Apply and then Save.
Select No to decline the option to continue configuring the segment.
Specify the DHCP IP address range
When you create a relay to a DHCP server, you need to specify the DHCP IP address range.
Note
The IP address range shouldn't overlap with the IP range used in other virtual networks in your subscription and on-premises networks.
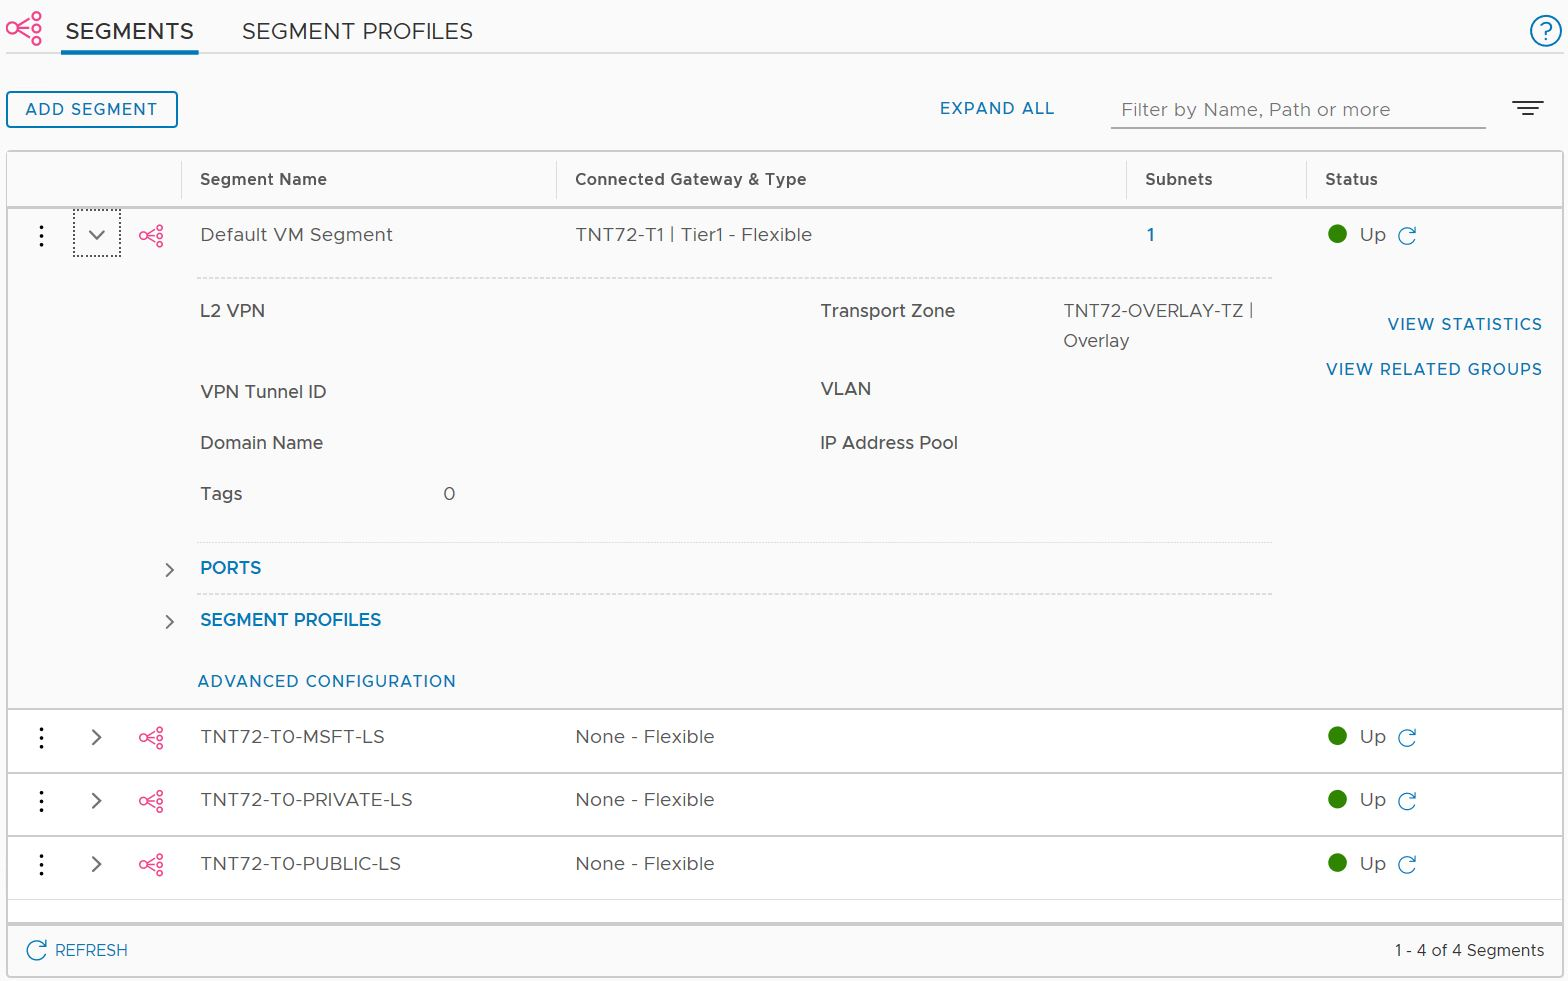
In NSX-T Manager, select Networking > Segments.
Select the vertical ellipsis on the segment name and select Edit.
Select Set Subnets to specify the DHCP IP address for the subnet.
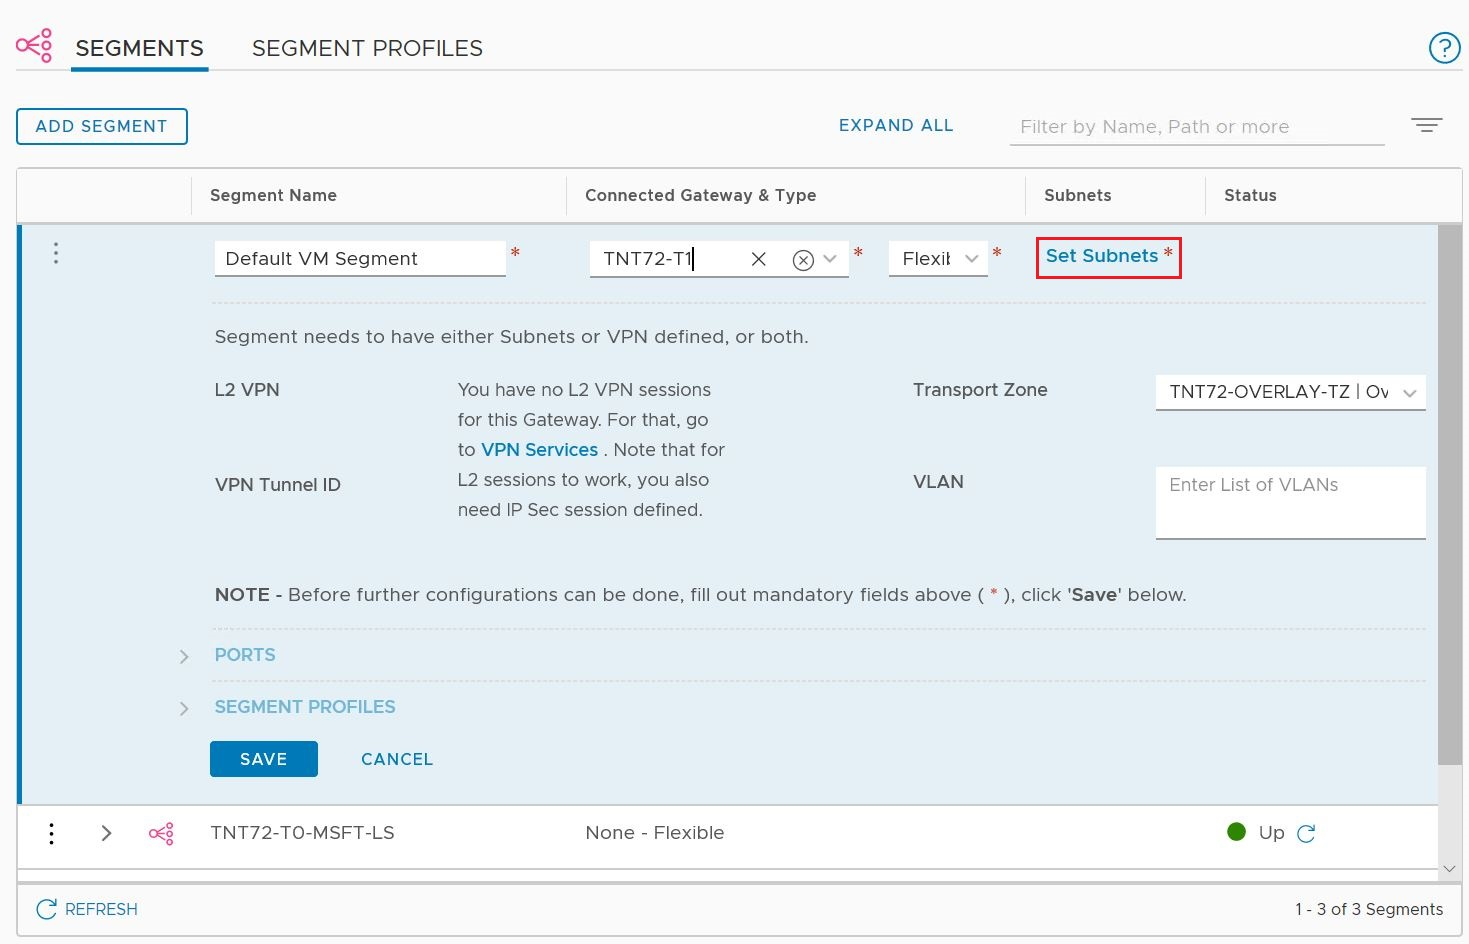
Modify the gateway IP address if needed, and enter the DHCP range IP.
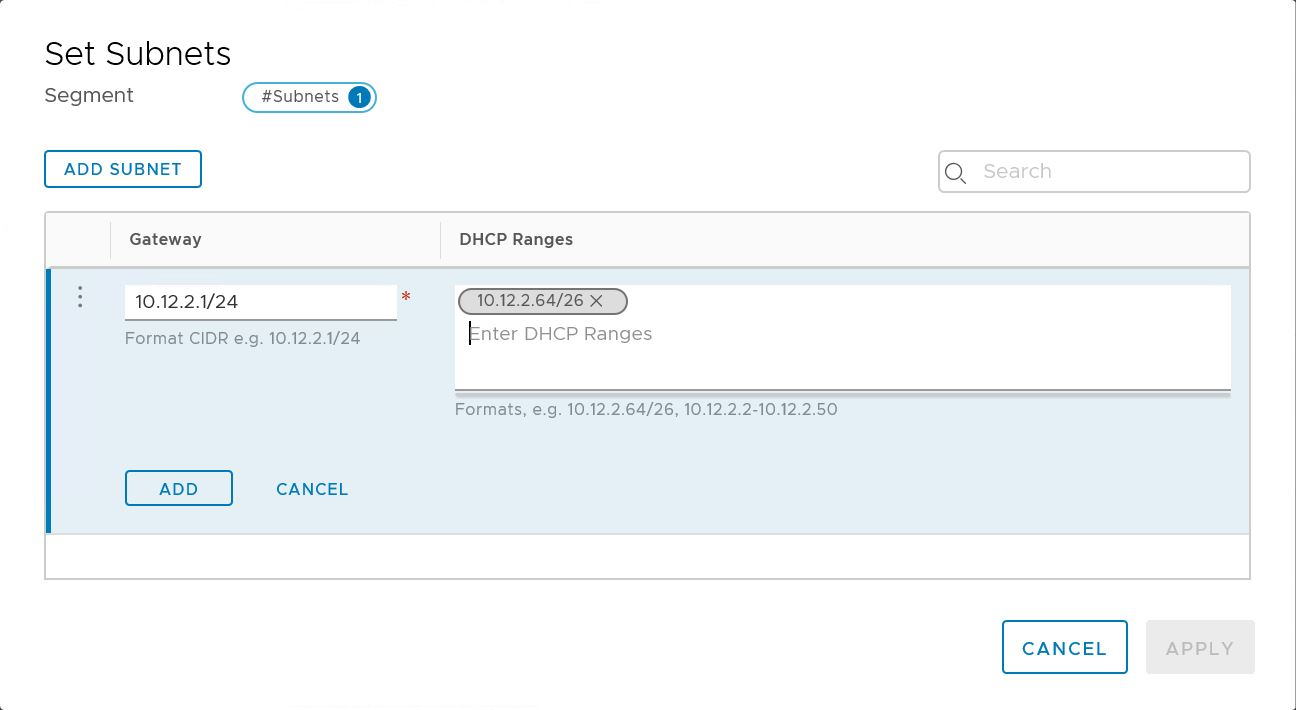
Select Apply, and then Save. The segment is assigned a DHCP server pool.
Use a third-party external DHCP server
If you want to use a third-party external DHCP server, create a DHCP relay service in NSX-T Manager. You need to specify the DHCP IP address range.
Important
For clouds created on or after July 1, 2021, the simplified view of NSX-T Data Center operations must be used to configure DHCP on the default Tier-1 Gateway in your environment.
Create DHCP relay service
Use a DHCP relay for any non-NSX-based DHCP service. For example, a VM running DHCP in Azure VMware Solution, Azure IaaS, or on-premises.
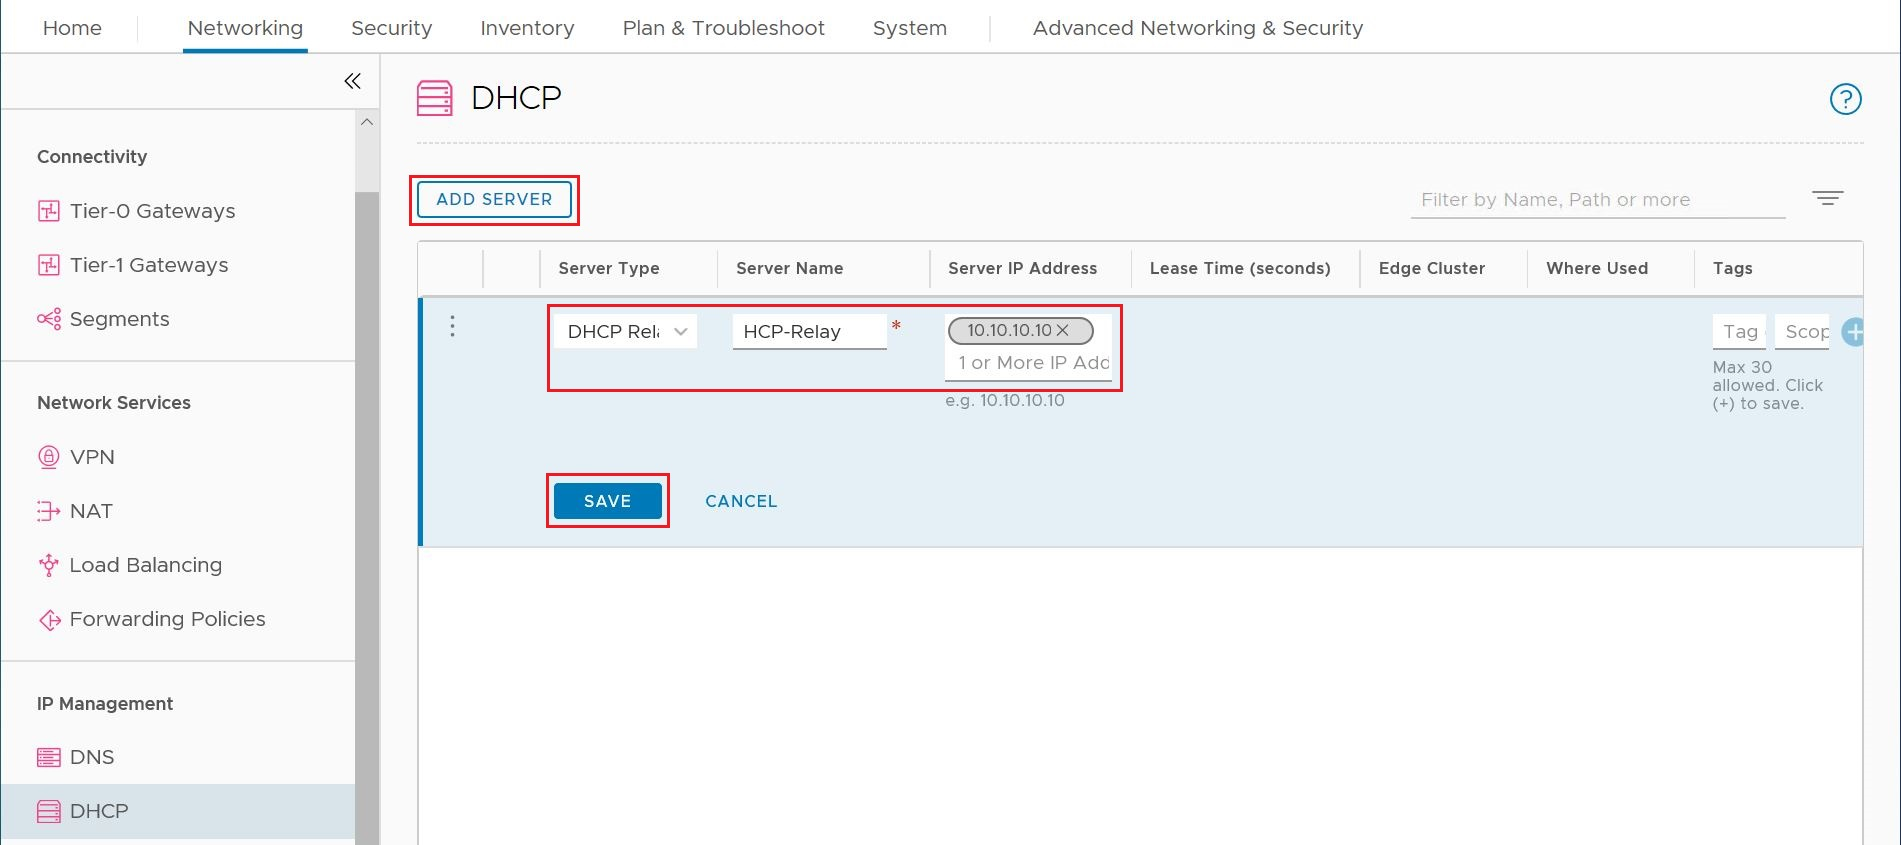
In NSX-T Manager, select Networking > DHCP, and then select Add Server.
Select DHCP Relay for the Server Type, provide the server name and IP address, and select Save.
Select Tier 1 Gateways, select the vertical ellipsis on the Tier-1 gateway, and then select Edit.
Select No IP Allocation Set to define the IP address allocation.
For Type, select DHCP Server.
For the DHCP Server, select DHCP Relay, and then select Save.
Select Save again and then select Close Editing.
Specify the DHCP IP address range
When you create a relay to a DHCP server, you need to specify the DHCP IP address range.
Note
The IP address range shouldn't overlap with the IP range used in other virtual networks in your subscription and on-premises networks.
In NSX-T Manager, select Networking > Segments.
Select the vertical ellipsis on the segment name and select Edit.
Select Set Subnets to specify the DHCP IP address for the subnet.
Modify the gateway IP address if needed, and enter the DHCP range IP.
Select Apply, and then Save. The segment is assigned a DHCP server pool.
Next steps
If you want to send DHCP requests from your Azure VMware Solution VMs to a non-NSX-T DHCP server, see the Configure DHCP on L2 stretched VMware HCX networks procedure.
Feedback
Coming soon: Throughout 2024 we will be phasing out GitHub Issues as the feedback mechanism for content and replacing it with a new feedback system. For more information see: https://aka.ms/ContentUserFeedback.
Submit and view feedback for