Write directly to storage
APPLIES TO: SDK v4
You can read and write directly to your storage object without using middleware or context object. This can be appropriate for data your bot uses to preserve a conversation, or data that comes from a source outside your bot's conversation flow. In this data storage model, data is read in directly from storage instead of using a state manager. The code examples in this article show you how to read and write data to storage using memory, Cosmos DB, Azure Blob, and Azure Blob transcript storage.
Note
The Bot Framework JavaScript, C#, and Python SDKs will continue to be supported, however, the Java SDK is being retired with final long-term support ending in November 2023. Only critical security and bug fixes within this repository will be undertaken.
Existing bots built with the Java SDK will continue to function.
For new bot building, consider using Power Virtual Agents and read about choosing the right chatbot solution.
For more information, see The future of bot building.
Prerequisites
- If you don't have an Azure subscription, create a free account before you begin.
- Familiarity with Creating a bot locally.
- Bot Framework SDK v4 templates for Visual Studio (C#), Node.js, or Yeoman.
Note
You can install the templates from within Visual Studio.
- In the menu, select Extensions then Manage Extensions.
- In the Manage Extensions dialog, search for and install Bot Framework v4 SDK templates for Visual Studio.
For information about deploying .NET bots to Azure, see how to Provision and publish a bot.
About this sample
The sample code in this article begins with the structure of a basic echo bot, then extends that bot's functionality by adding additional code (provided below). This extended code creates a list to preserve user inputs as they're received. Each turn, the full list of user inputs, saved to memory, is echoed back to the user. The data structure containing this list of inputs is then modified to save to storage. Various types of storage are explored as additional functionality is added to this sample code.
Memory storage
The Bot Framework SDK allows you to store user inputs using in-memory storage. Since in-memory storage is cleared each time the bot is restarted, it's best suited for testing purposes and isn't intended for production use. Persistent storage types, such as database storage, are best for production bots.
Build a basic bot
The rest of this topic builds off of an Echo bot. The Echo bot sample code can be locally built by following the quickstart instructions to Create a bot.
Replace the code in EchoBot.cs with the following code:
using System;
using System.Threading.Tasks;
using Microsoft.Bot.Builder;
using Microsoft.Bot.Schema;
using System.Collections.Generic;
using System.Linq;
using System.Threading;

// Represents a bot saves and echoes back user input.
public class EchoBot : ActivityHandler
{
   // Create local Memory Storage.
   private static readonly MemoryStorage _myStorage = new MemoryStorage();

   // Create cancellation token (used by Async Write operation).
   public CancellationToken cancellationToken { get; private set; }

   // Class for storing a log of utterances (text of messages) as a list.
   public class UtteranceLog : IStoreItem
   {
      // A list of things that users have said to the bot
      public List<string> UtteranceList { get; } = new List<string>();

      // The number of conversational turns that have occurred
      public int TurnNumber { get; set; } = 0;

      // Create concurrency control where this is used.
      public string ETag { get; set; } = "*";
   }

   // Echo back user input.
   protected override async Task OnMessageActivityAsync(ITurnContext<IMessageActivity> turnContext, CancellationToken cancellationToken)
   {
      // preserve user input.
      var utterance = turnContext.Activity.Text;

      // Make empty local log-items list.
      UtteranceLog logItems = null;

      // See if there are previous messages saved in storage.
      try
      {
         string[] utteranceList = { "UtteranceLog" };
         logItems = _myStorage.ReadAsync<UtteranceLog>(utteranceList).Result?.FirstOrDefault().Value;
      }
      catch
      {
         // Inform the user an error occurred.
         await turnContext.SendActivityAsync("Sorry, something went wrong reading your stored messages!");
      }

      // If no stored messages were found, create and store a new entry.
      if (logItems is null)
      {
         // Add the current utterance to a new object.
         logItems = new UtteranceLog();
         logItems.UtteranceList.Add(utterance);

         // Set initial turn counter to 1.
         logItems.TurnNumber++;

         // Show user new user message.
         await turnContext.SendActivityAsync($"{logItems.TurnNumber}: The list is now: {string.Join(", ", logItems.UtteranceList)}");

         // Create dictionary object to hold received user messages.
         var changes = new Dictionary<string, object>();
         {
            changes.Add("UtteranceLog", logItems);
         }
         try
         {
            // Save the user message to your Storage.
            await _myStorage.WriteAsync(changes, cancellationToken);
         }
         catch
         {
            // Inform the user an error occurred.
            await turnContext.SendActivityAsync("Sorry, something went wrong storing your message!");
         }
      }
      // Else, our storage already contained saved user messages, add new one to the list.
      else
      {
         // add new message to list of messages to display.
         logItems.UtteranceList.Add(utterance);
         // increment turn counter.
         logItems.TurnNumber++;

         // show user new list of saved messages.
         await turnContext.SendActivityAsync($"{logItems.TurnNumber}: The list is now: {string.Join(", ", logItems.UtteranceList)}");

         // Create Dictionary object to hold new list of messages.
         var changes = new Dictionary<string, object>();
         {
            changes.Add("UtteranceLog", logItems);
         };

         try
         {
            // Save new list to your Storage.
            await _myStorage.WriteAsync(changes,cancellationToken);
         }
         catch
         {
            // Inform the user an error occurred.
            await turnContext.SendActivityAsync("Sorry, something went wrong storing your message!");
         }
      }
   }
}
Start your bot
Run your bot locally.
Start the Emulator and connect your bot
Install the Bot Framework Emulator Next, start the Emulator and then connect to your bot in the Emulator:
- Select the Create new bot configuration link in the Emulator Welcome tab.
- Fill in fields to connect to your bot, given the information on the webpage displayed when you started your bot.
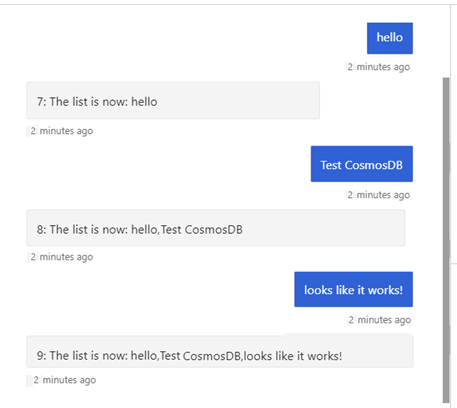
Interact with your bot
Send a message to your bot. The bot will list the messages it has received.
The remainder of this article will demonstrate how to save to persistent storage instead of the bot's internal memory.
Using Cosmos DB
Important
The Cosmos DB storage class has been deprecated. Containers originally created with CosmosDbStorage had no partition key set, and were given the default partition key of _/partitionKey.
Containers created with Cosmos DB storage can be used with Cosmos DB partitioned storage. Read Partitioning in Azure Cosmos DB for more information.
Also note that, unlike the legacy Cosmos DB storage, the Cosmos DB partitioned storage doesn't automatically create a database within your Cosmos DB account. You need to create a new database manually, but skip manually creating a container since CosmosDbPartitionedStorage will create the container for you.
Now that you've used memory storage, we'll update the code to use Azure Cosmos DB. Cosmos DB is Microsoft's globally distributed, multi-model database. Azure Cosmos DB enables you to elastically and independently scale throughput and storage across any number of Azure's geographic regions. It offers throughput, latency, availability, and consistency guarantees with comprehensive service level agreements (SLAs).
Set up a Cosmos DB resource
To use Cosmos DB in your bot, you'll need to create a database resource before getting into the code. For an in-depth description of Cosmos DB database and app creation, see the quickstart for .NET, Node.js, or Python.
Create your database account
Go to the Azure portal to create an Azure Cosmos DB account. Search for and select Azure Cosmos DB.
In the Azure Cosmos DB page, select New to bring up the Create Azure Cosmos DB Account page.
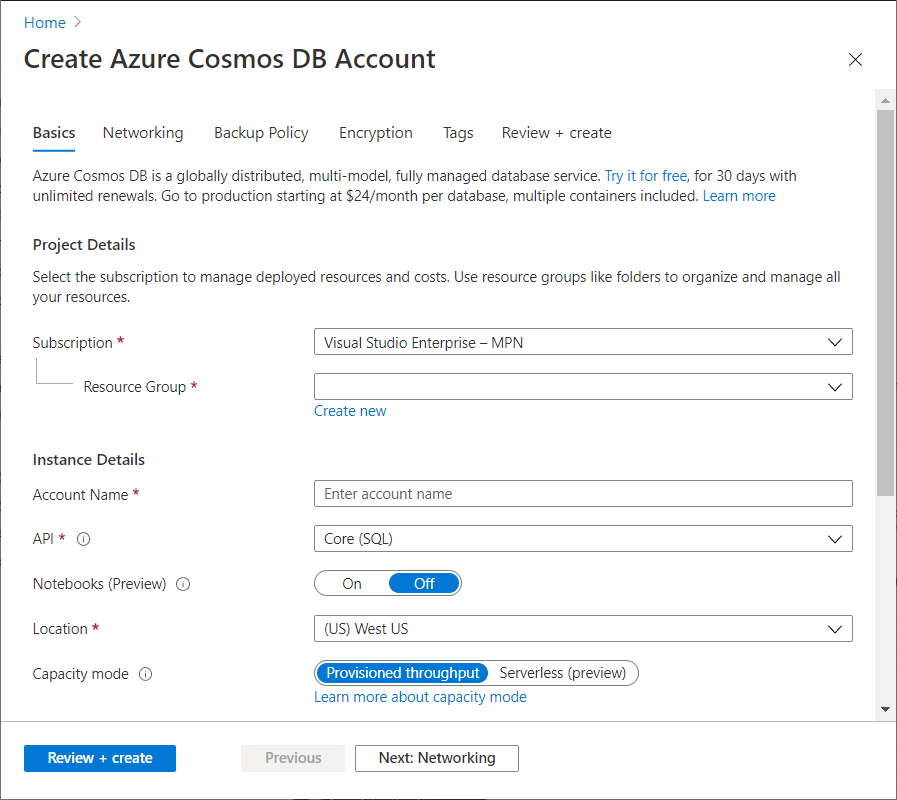
Provide values for the following fields:
- Subscription. Select the Azure subscription that you want to use for this Azure Cosmos account.
- Resource group. Select an existing resource group or select Create new, and enter a name for a new resource group.
- Account name. Enter a name to identify your Azure Cosmos account. Because documents.azure.com is appended to the name that you provide to create your URI, use a unique name. Note the following guidelines:
- The name must be unique across Azure.
- The name must be between 3 and 31 characters long.
- The name can include only lowercase letters, numbers, and the hyphen (-) character.
- API. Select Core(SQL)
- Location. select a location that is closest to your users to give them the fastest access to the data.
Select Review + Create.
Once validated, select Create.
The account creation takes a few minutes. Wait for the portal to display the Congratulations! Your Azure Cosmos DB account was created page.
Add a database
Note
Don't create the container yourself. Your bot will create it for you when creating its internal Cosmos DB client, ensuring it's configured correctly for storing bot state.
Navigate to the Data Explorer page within your newly created Cosmos DB account, then choose New Database from the New Container drop-down. A panel will then open on the right-hand side of the window, where you can enter the details for the new database.
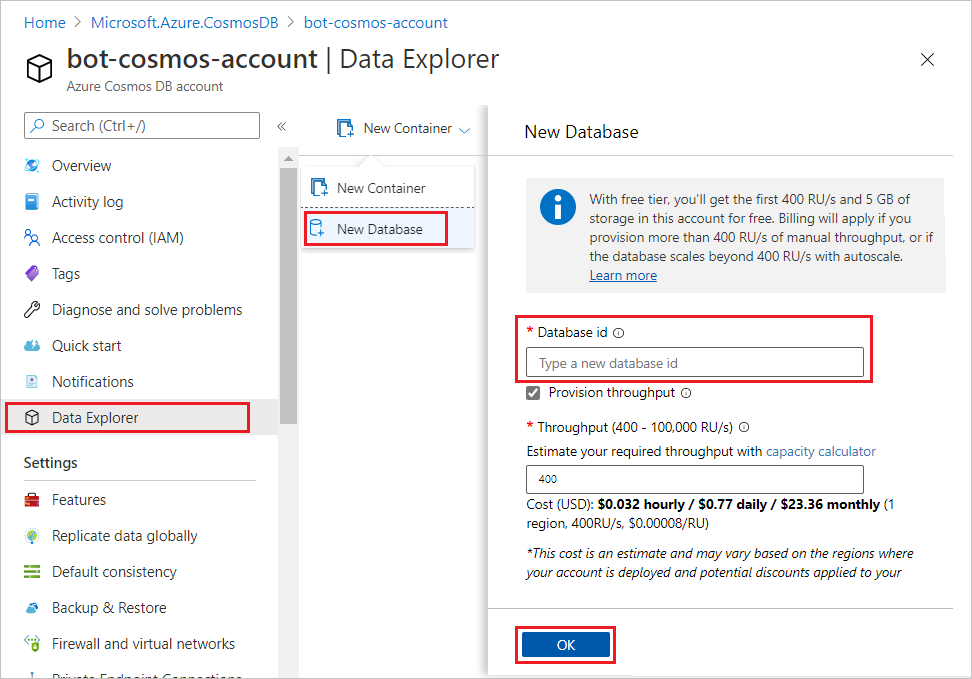
Enter an ID for your new database and, optionally, set the throughput (you can change this later) and finally select OK to create your database. Make a note of this database ID for use later on when configuring your bot.
Now that you've created a Cosmos DB account and a database, you need to copy over some of the values for integrating your new database into your bot. To retrieve these, navigate to the Keys tab within the database settings section of your Cosmos DB account. From this page, you'll need your URI (Cosmos DB endpoint) and your PRIMARY KEY (authorization key).
You should now have a Cosmos DB account with a database and the following values ready to use in your bot settings.
- URI
- Primary Key
- Database ID
Add Cosmos DB configuration information
Use the details you made a note of in the previous part of this article to set your endpoint, authorization key, and database ID. Finally, you should choose an appropriate name for the container that will be created within your database to store your bot state. In the example below the Cosmos DB container that is created will be named "bot-storage".
Add the following information to your configuration file.
appsettings.json
"CosmosDbEndpoint": "<your-CosmosDb-URI>",
"CosmosDbAuthKey": "<your-primary-key>",
"CosmosDbDatabaseId": "<your-database-id>",
"CosmosDbContainerId": "bot-storage"
Installing Cosmos DB packages
Make sure you've the packages necessary for Cosmos DB.
Install the Microsoft.Bot.Builder.Azure NuGet package. For more information on using NuGet, see Install and manage packages in Visual Studio using the NuGet Package Manager .
Cosmos DB implementation
Note
Version 4.6 introduced a new Cosmos DB storage provider, the Cosmos DB partitioned storage class, and the original Cosmos DB storage class is deprecated. Containers created with Cosmos DB storage can be used with Cosmos DB partitioned storage. Read Partitioning in Azure Cosmos DB for more information.
Unlike the legacy Cosmos DB storage, the Cosmos DB partitioned storage doesn't automatically create a database within your Cosmos DB account. You need to create a new database manually, but skip manually creating a container since CosmosDbPartitionedStorage will create the container for you.
The following sample code runs using the same bot code as the memory storage sample provided above, with the exceptions listed here. The code snippets below show an implementation of Cosmos DB storage for 'myStorage' that replaces local Memory storage.
You first need to update Startup.cs to reference the bot builder Azure library:
using Microsoft.Bot.Builder.Azure;
Next, in the ConfigureServices method in Startup.cs, create the CosmosDbPartitionedStorage object. This will be passed into the EchoBot constructor through dependency injection.
// Use partitioned CosmosDB for storage, instead of in-memory storage.
services.AddSingleton<IStorage>(
    new CosmosDbPartitionedStorage(
        new CosmosDbPartitionedStorageOptions
        {
            CosmosDbEndpoint = Configuration.GetValue<string>("CosmosDbEndpoint"),
            AuthKey = Configuration.GetValue<string>("CosmosDbAuthKey"),
            DatabaseId = Configuration.GetValue<string>("CosmosDbDatabaseId"),
            ContainerId = Configuration.GetValue<string>("CosmosDbContainerId"),
            CompatibilityMode = false,
        }));
In EchoBot.cs change the _myStorage variable declaration private static readonly MemoryStorage _myStorage = new MemoryStorage(); to the following:
// variable used to save user input to CosmosDb Storage.
private readonly IStorage _myStorage;
Then pass in the IStorage object to the EchoBot constructor:
public EchoBot(IStorage storage)
{
    if (storage is null) throw new ArgumentNullException();
    _myStorage = storage;
}
Start your Cosmos DB bot
Run your bot locally.
Test your Cosmos DB bot with Bot Framework Emulator
Now start the Bot Framework Emulator and connect to your bot:
- Select the create a new bot configuration link in the Emulator Welcome tab.
- Fill in fields to connect to your bot, given the information on the webpage displayed when you started your bot.
Interact with your Cosmos DB bot
Send a message to your bot, and the bot will list the messages it received.
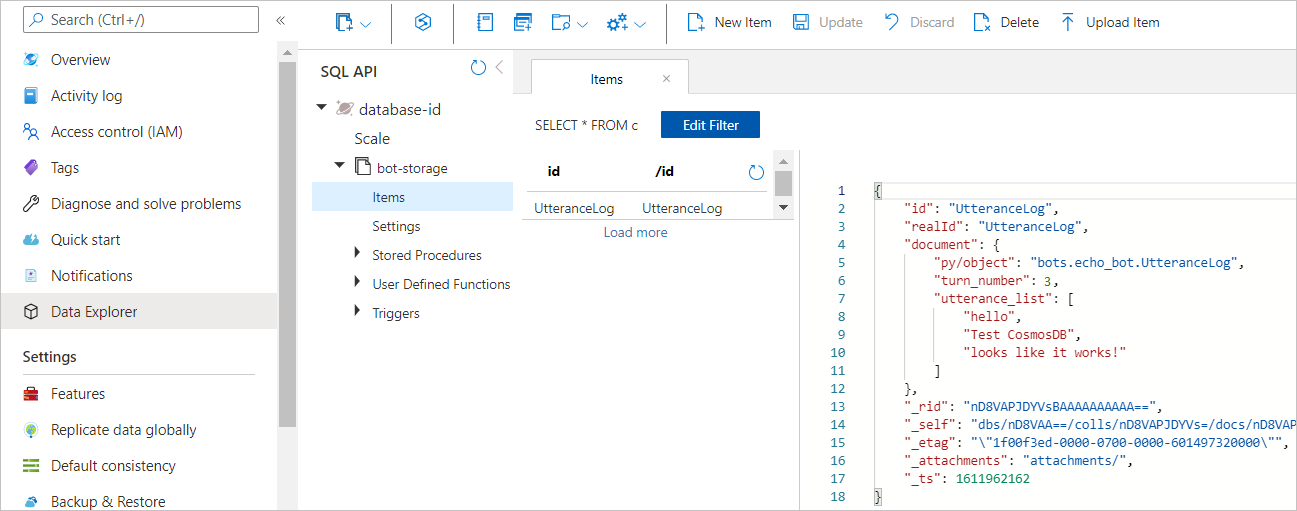
View your Cosmos DB data
After you've run your bot and saved your information, you can view the data stored in the Azure portal under the Data Explorer tab.
Using Blob storage
Azure Blob storage is Microsoft's object storage solution for the cloud. Blob storage is optimized for storing massive amounts of unstructured data, such as text or binary data. This section explains how to create an Azure blob storage account and container, then how to reference your blob storage container from your bot.
For more information on Blob Storage, see What is Azure Blob storage?
Create your Blob storage account
To use Blob storage in your bot, you'll need to get a few things set up before getting into the code.
In the Azure portal, select All services.
In the Featured section of the All services page, select Storage accounts.
In the Storage accounts page, select New.
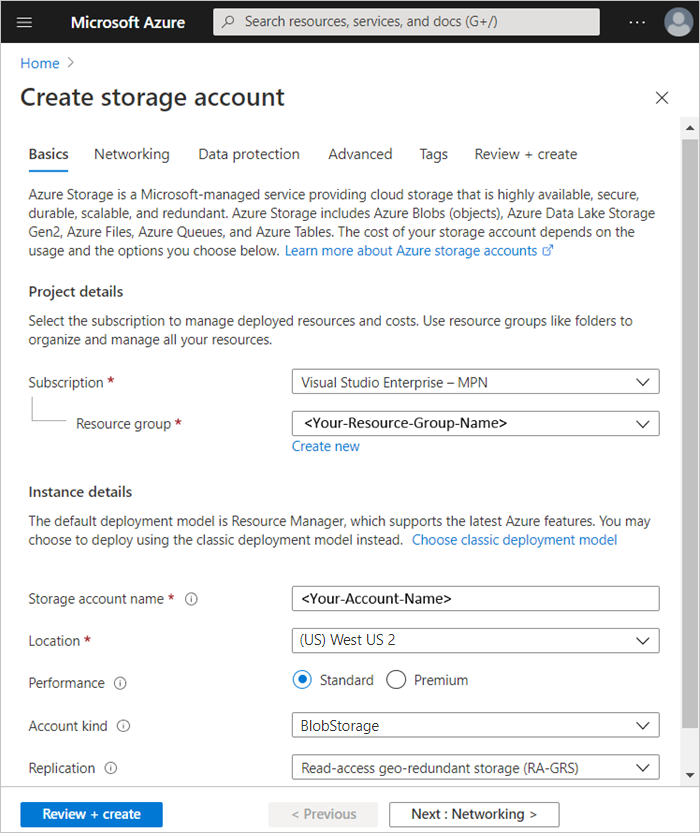
In the Subscription field, select the subscription in which to create the storage account.
In the Resource group field, select an existing resource group or select Create new, and enter a name for the new resource group.
In the Storage account name field, enter a name for the account. Note the following guidelines:
- The name must be unique across Azure.
- The name must be between 3 and 24 characters long.
- The name can include only numbers and lowercase letters.
In the Location field, select a location for the storage account, or use the default location.
For the rest of the settings, configure the following:
- Performance: Standard. Learn more about performance.
- Account kind: BlobStorage. Learn more about storage accounts.
- Replication: Leave the default setting. Learn more about redundancy.
In the Project details section of the Create storage account page, select the desired values for subscription and Resource group.
In the Instance details section of the Create storage account page, enter the Storage account name then select values for Location, Account kind, and Replication.
Select Review + create to review the storage account settings.
Once validated, select Create.
Create Blob storage container
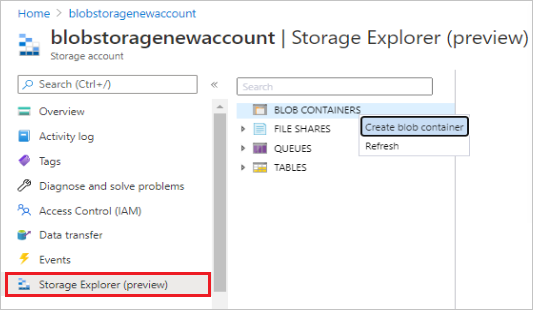
Once your Blob storage account is created, open it, then:
Select Storage Explorer (Preview).
Then right-click on BLOB CONTAINERS
Select Create blob container from the drop-down list.
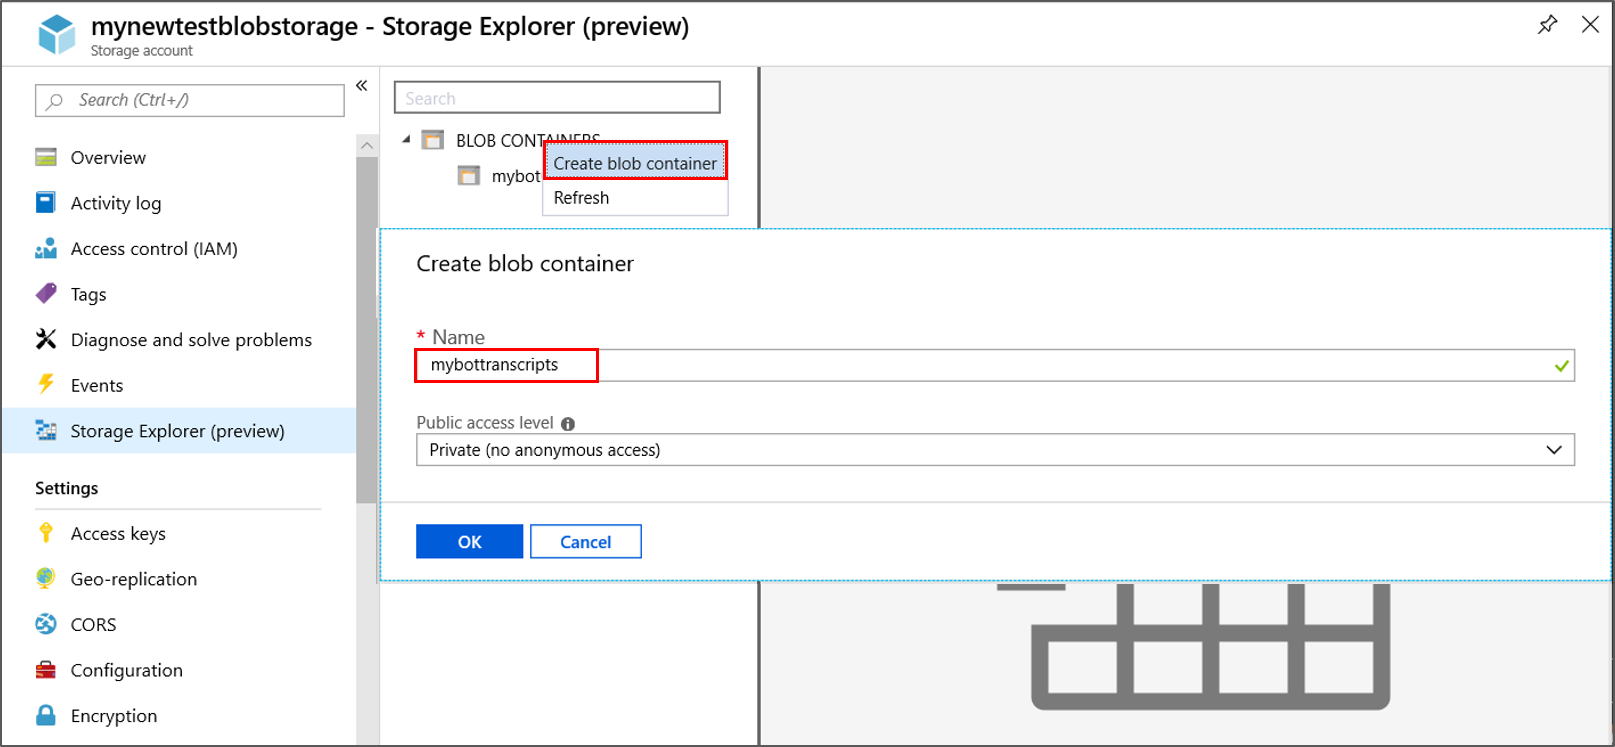
Enter a name in the New container form. You'll use this name for the value of your "blob container name" to provide access to your Blob storage account. Note the following guidelines:
- This name may only contain lowercase letters, numbers, and hyphens.
- This name must begin with a letter or a number.
- Each hyphen must be preceded and followed by a valid non-hyphen character.
- The name must be between 3 and 63 characters long.
Add Blob storage configuration information
Find the Blob storage keys you need to configure Blob storage for your bot as shown above:
- In the Azure portal, open your Blob storage account and select Access keys in the Settings section.
- To configure your bot to access to your Blob storage account, use Connection string as the value for the blob connection string.
Add the following information to your configuration file.
appsettings.json
"BlobConnectionString": "<your-blob-connection-string>",
"BlobContainerName": "<your-blob-container-name>",
Installing Blob storage packages
If not previously installed, install the following packages.
Install the Microsoft.Bot.Builder.Azure.Blobs NuGet package. For more information on using NuGet, see Install and manage packages in Visual Studio using the NuGet Package Manager.
Blob storage implementation
Blob storage is used to store bot state.
Note
As of version 4.10, Microsoft.Bot.Builder.Azure.AzureBlobStorage is deprecated. Use the new Microsoft.Bot.Builder.Azure.Blobs.BlobsStorage in its place.
The following sample code runs using the same bot code as the memory storage sample provided above, with the exceptions listed here.
The code snippets below show an implementation of Blob storage for 'myStorage' that replaces local Memory storage.
You first need to update Startup.cs to reference the bot builder Azure blobs library:
Startup.cs
using Microsoft.Bot.Builder.Azure.Blobs;
Next, in the ConfigureServices method in Startup.cs, create the BlobsStorage object, passing in the values from appsettings.json. This will be passed into the EchoBot constructor through dependency injection.
//Use Azure Blob storage, instead of in-memory storage.
services.AddSingleton<IStorage>(
    new BlobsStorage(
        Configuration.GetValue<string>("BlobConnectionString"),
        Configuration.GetValue<string>("BlobContainerName")
        ));
Now you first need to update EchoBot.cs to reference the bot builder Azure blobs library:
EchoBot.cs
using Microsoft.Bot.Builder.Azure.Blobs;
Next, remove or comment out the line of code that creates the MemoryStorage variable 'private static readonly MemoryStorage _myStorage = new MemoryStorage();', and create a new variable that will be used to save user input to the Blob Storage.
EchoBot.cs
// variable used to save user input to CosmosDb Storage.
private readonly IStorage _myStorage;
Then pass in the IStorage object to the EchoBot constructor:
public EchoBot(IStorage storage)
{
    if (storage is null) throw new ArgumentNullException();
    _myStorage = storage;
}
Once your storage is set to point to your Blob Storage account, your bot code will now store and retrieve data from Blob storage.
Once your storage is set to point to your Blob Storage account, your bot code will now store and retrieve data from Blob storage.
Start your Blob storage bot
Run your bot locally.
Start the Emulator and connect your Blob storage bot
Next, start the Emulator and then connect to your bot in the Emulator:
- Select the Create new bot configuration link in the Emulator "Welcome" tab.
- Fill in fields to connect to your bot, given the information on the webpage displayed when you started your bot.
Interact with your Blob storage bot
Send a message to your bot, and the bot will list the messages it receives.
View your Blob storage data
After you've run your bot and saved your information, we can view it in under the Storage Explorer tab in the Azure portal.
Blob transcript storage
Azure blob transcript storage provides a specialized storage option that allows you to easily save and retrieve user conversations in the form of a recorded transcript. Azure blob transcript storage is useful for automatically capturing user inputs to examine while debugging your bot's performance.
Note
Python doesn't currently support Azure Blob transcript storage. While JavaScript supports Blob transcript storage, the following directions are for C# only.
Set up a Blob transcript storage container
Azure blob transcript storage can use the same blob storage account created following the steps detailed in sections "Create your blob storage account" and "Add configuration information" above. We now add a container to hold our transcripts
- Open your Azure blob storage account.
- Select Storage Explorer.
- Right click on BLOB CONTAINERS and select create blob container.
- Enter a name for your transcript container and then select OK. (We entered mybottranscripts)
Blob transcript storage implementation
The following code connects transcript storage pointer _myTranscripts to your new Azure blob transcript storage account. To create this link with a new container name, <your-blob-transcript-container-name>, it creates a new container within Blob storage to hold your transcript files.
Blob transcript storage is designed to store bot transcripts.
Note
As of version 4.10, Microsoft.Bot.Builder.Azure.AzureBlobTranscriptStore is deprecated. Use the new Microsoft.Bot.Builder.Azure.Blobs.BlobsTranscriptStore in its place.
echoBot.cs
using Microsoft.Bot.Builder.Azure.Blobs;

public class EchoBot : ActivityHandler
{
   ...

   private readonly BlobsTranscriptStore _myTranscripts = new BlobsTranscriptStore("<your-azure-storage-connection-string>", "<your-blob-transcript-container-name>");

   ...
}
Store user conversations in Azure blob transcripts
After a blob container is available to store transcripts, you can begin to preserve your users' conversations with your bot. These conversations can later be used as a debugging tool to see how users interact with your bot. Each Emulator Restart conversation initiates the creation of a new transcript conversation list. The following code preserves user conversation inputs within a stored transcript file.
- The current transcript is saved using
LogActivityAsync. - Saved transcripts are retrieved using
ListTranscriptsAsync. In this sample code, the ID of each stored transcript is saved into a list named "storedTranscripts". This list is later used to manage the number of stored blob transcripts we retain.
echoBot.cs
protected override async Task OnMessageActivityAsync(ITurnContext<IMessageActivity> turnContext, CancellationToken cancellationToken)
{
    await _myTranscripts.LogActivityAsync(turnContext.Activity);

    List<string> storedTranscripts = new List<string>();
    PagedResult<Microsoft.Bot.Builder.TranscriptInfo> pagedResult = null;
    var pageSize = 0;
    do
    {
       pagedResult = await _myTranscripts.ListTranscriptsAsync("emulator", pagedResult?.ContinuationToken);
       pageSize = pagedResult.Items.Count();

       // transcript item contains ChannelId, Created, Id.
       // save the channelIds found by "ListTranscriptsAsync" to a local list.
       foreach (var item in pagedResult.Items)
       {
          storedTranscripts.Add(item.Id);
       }
    } while (pagedResult.ContinuationToken != null);

    ...
}
Manage stored blob transcripts
While stored transcripts can be used as a debugging tool, over time the number of stored transcripts can grow larger than you care to preserve. The additional code included below uses DeleteTranscriptAsync to remove all but the last three retrieved transcript items from your blob transcript store.
echoBot.cs
protected override async Task OnMessageActivityAsync(ITurnContext<IMessageActivity> turnContext, CancellationToken cancellationToken)
{
    await _myTranscripts.LogActivityAsync(turnContext.Activity);

    List<string> storedTranscripts = new List<string>();
    PagedResult<Microsoft.Bot.Builder.TranscriptInfo> pagedResult = null;
    var pageSize = 0;
    do
    {
       pagedResult = await _myTranscripts.ListTranscriptsAsync("emulator", pagedResult?.ContinuationToken);
       pageSize = pagedResult.Items.Count();

       // transcript item contains ChannelId, Created, Id.
       // save the channelIds found by "ListTranscriptsAsync" to a local list.
       foreach (var item in pagedResult.Items)
       {
          storedTranscripts.Add(item.Id);
       }
    } while (pagedResult.ContinuationToken != null);

    // Manage the size of your transcript storage.
    for (int i = 0; i < pageSize; i++)
    {
       // Remove older stored transcripts, save just the last three.
       if (i < pageSize - 3)
       {
          string thisTranscriptId = storedTranscripts[i];
          try
          {
             await _myTranscripts.DeleteTranscriptAsync("emulator", thisTranscriptId);
           }
           catch (System.Exception ex)
           {
              await turnContext.SendActivityAsync("Debug Out: DeleteTranscriptAsync had a problem!");
              await turnContext.SendActivityAsync("exception: " + ex.Message);
           }
       }
    }
    ...
}
For more information about the class, see Azure Blob Transcript Storage.
Additional Information
Manage concurrency using eTags
In our bot code example, we set the eTag property of each IStoreItem to *. The eTag (entity tag) member of your store object is used within Cosmos DB to manage concurrency. The eTag tells your database what to do if another instance of the bot has changed the object in the same storage that your bot is writing to.
Last write wins - allow overwrites
An eTag property value of asterisk (*) indicates that the last writer wins. When creating a new data store, you can set eTag of a property to * to indicate that you've not previously saved the data that you're writing, or that you want the last writer to overwrite any previously saved property. If concurrency isn't an issue for your bot, setting the eTag property to * for any data that you're writing enables overwrites.
Maintain concurrency and prevent overwrites
When storing your data into Cosmos DB, use a value other than * for the eTag if you want to prevent concurrent access to a property and avoid overwriting changes from another instance of the bot. The bot receives an error response with the message etag conflict key= when it attempts to save state data and the eTag isn't the same value as the eTag in storage.
By default, the Cosmos DB store checks the eTag property of a storage object for equality every time a bot writes to that item, and then updates it to a new unique value after each write. If the eTag property on write doesn't match the eTag in storage, it means another bot or thread changed the data.
For example, let's say you want your bot to edit a saved note, but you don't want your bot to overwrite changes that another instance of the bot has done. If another instance of the bot has made edits, you want the user to edit the version with the latest updates.
First, create a class that implements IStoreItem.
EchoBot.cs
public class Note : IStoreItem
{
    public string Name { get; set; }
    public string Contents { get; set; }
    public string ETag { get; set; }
}
Next, create an initial note by creating a storage object, and add the object to your store.
EchoBot.cs
// create a note for the first time, with a non-null, non-* ETag.
var note = new Note { Name = "Shopping List", Contents = "eggs", ETag = "x" };

var changes = Dictionary<string, object>();
{
    changes.Add("Note", note);
};
await NoteStore.WriteAsync(changes, cancellationToken);
Then, access and update the note later, keeping its eTag that you read from the store.
EchoBot.cs
var note = NoteStore.ReadAsync<Note>("Note").Result?.FirstOrDefault().Value;

if (note != null)
{
    note.Contents += ", bread";
    var changes = new Dictionary<string, object>();
    {
         changes.Add("Note1", note);
    };
    await NoteStore.WriteAsync(changes, cancellationToken);
}
If the note was updated in the store before you write your changes, the call to Write will throw an exception.
To maintain concurrency, always read a property from storage, then modify the property you read, so that the eTag is maintained. If you read user data from the store, the response will contain the eTag property. If you change the data and write updated data to the store, your request should include the eTag property that specifies the same value as you read earlier. However, writing an object with its eTag set to * will allow the write to overwrite any other changes.
Next steps
Now that you know how to read and write directly from storage, lets take a look at how you can use the state manager to do that for you.
Feedback
Coming soon: Throughout 2024 we will be phasing out GitHub Issues as the feedback mechanism for content and replacing it with a new feedback system. For more information see: https://aka.ms/ContentUserFeedback.
Submit and view feedback for