Add voice talent consent to the professional voice project
A voice talent is an individual or target speaker whose voices are recorded and used to create neural voice models.
Before you can train a neural voice, you must submit a recording of the voice talent's consent statement. The voice talent statement is a recording of the voice talent reading a statement that they consent to the usage of their speech data to train a custom voice model. The consent statement is also used to verify that the voice talent is the same person as the speaker in the training data.
Tip
Before you get started in Speech Studio, define your voice persona and choose the right voice talent.
You can find the verbal consent statement in multiple languages on GitHub. The language of the verbal statement must be the same as your recording. See also the disclosure for voice talent.
Add voice talent
To add a voice talent profile and upload their consent statement, follow these steps:
- Sign in to the Speech Studio.
- Select Custom voice > Your project name > Set up voice talent > Add voice talent.
- In the Add new voice talent wizard, describe the characteristics of the voice you're going to create. The scenarios that you specify here must be consistent with what you provided in the application form.
- Select Next.
- On the Upload voice talent statement page, follow the instructions to upload the voice talent statement you've recorded beforehand. Make sure the verbal statement was recorded with the same settings, environment, and speaking style as your training data.
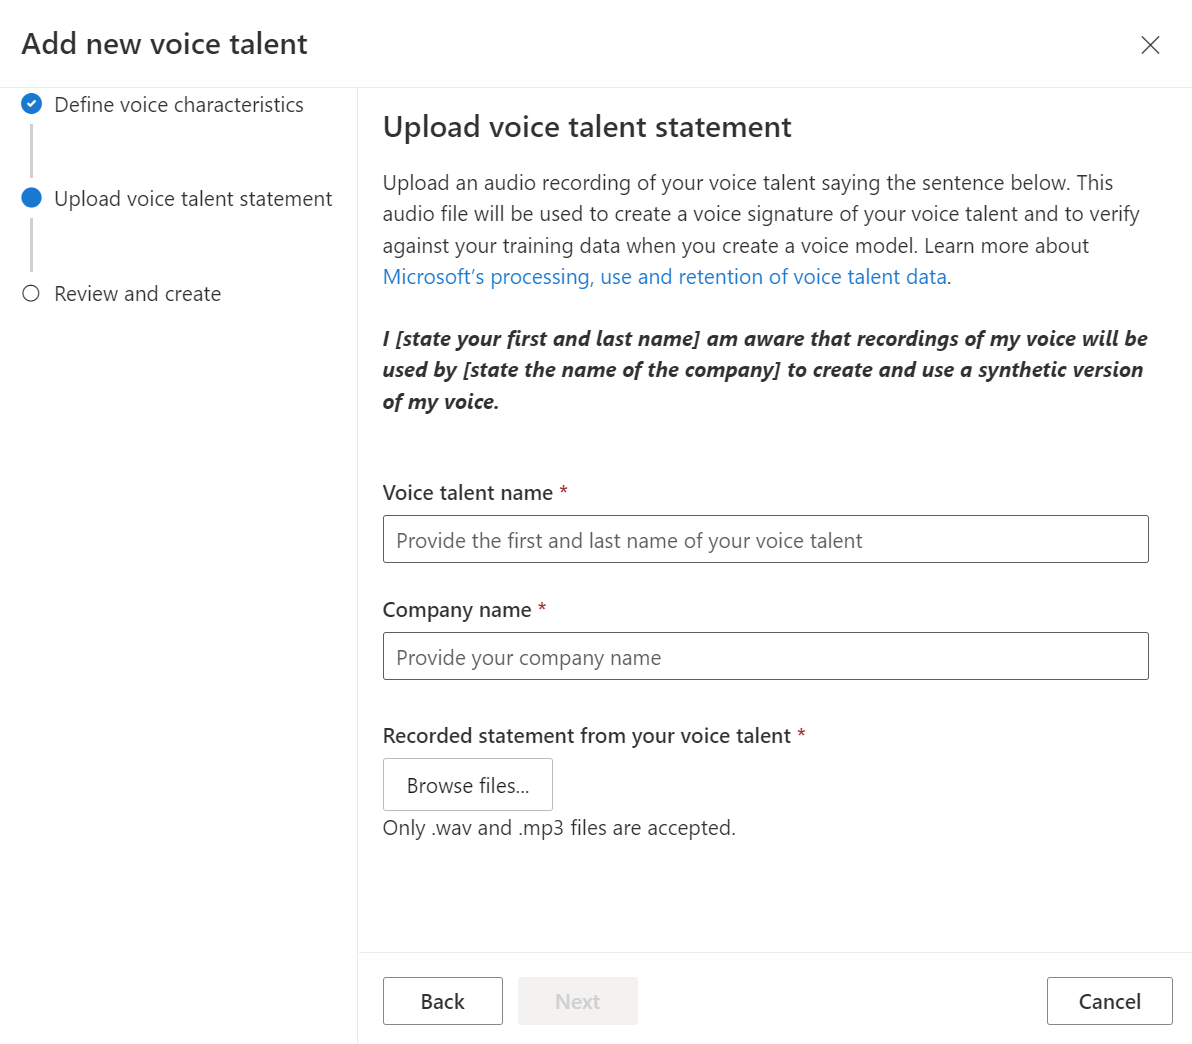
- Enter the voice talent name and company name. The voice talent name must be the name of the person who recorded the consent statement. The company name must match the company name that was spoken in the recorded statement.
- Select Next.
- Review the voice talent and persona details, and select Submit.
After the voice talent status is Succeeded, you can proceed to train your custom voice model.
Next steps
With the professional voice feature, it's required that every voice be created with explicit consent from the user. A recorded statement from the user is required acknowledging that the customer (Azure AI Speech resource owner) will create and use their voice.
To add voice talent consent to the professional voice project, you get the prerecorded consent audio file from a publicly accessible URL (Consents_Create) or upload the audio file (Consents_Post). In this article, you add consent from a URL.
Consent statement
You need an audio recording of the user speaking the consent statement.
You can get the consent statement text for each locale from the text to speech GitHub repository. See SpeakerAuthorization.txt for the consent statement for the en-US locale:
"I [state your first and last name] am aware that recordings of my voice will be used by [state the name of the company] to create and use a synthetic version of my voice."
Add consent from a URL
To add consent to a professional voice project from the URL of an audio file, use the Consents_Create operation of the custom voice API. Construct the request body according to the following instructions:
- Set the required
projectIdproperty. See create a project. - Set the required
voiceTalentNameproperty. The voice talent name can't be changed later. - Set the required
companyNameproperty. The company name can't be changed later. - Set the required
audioUrlproperty. The URL of the voice talent consent audio file. Use a URI with the shared access signatures (SAS) token. - Set the required
localeproperty. This should be the locale of the consent. The locale can't be changed later. You can find the text to speech locale list here.
Make an HTTP PUT request using the URI as shown in the following Consents_Create example.
- Replace
YourResourceKeywith your Speech resource key. - Replace
YourResourceRegionwith your Speech resource region. - Replace
JessicaConsentIdwith a consent ID of your choice. The case sensitive ID will be used in the consent's URI and can't be changed later.
curl -v -X PUT -H "Ocp-Apim-Subscription-Key: YourResourceKey" -H "Content-Type: application/json" -d '{
  "description": "Consent for Jessica voice",
  "projectId": "ProjectId",
  "voiceTalentName": "Jessica Smith",
  "companyName": "Contoso",
  "audioUrl": "https://contoso.blob.core.windows.net/public/jessica-consent.wav?mySasToken",
  "locale": "en-US"
} '  "https://YourResourceRegion.api.cognitive.microsoft.com/customvoice/consents/JessicaConsentId?api-version=2023-12-01-preview"
You should receive a response body in the following format:
{
  "id": "JessicaConsentId",
  "description": "Consent for Jessica voice",
  "projectId": "ProjectId",
  "voiceTalentName": "Jessica Smith",
  "companyName": "Contoso",
  "locale": "en-US",
  "status": "NotStarted",
  "createdDateTime": "2023-04-01T05:30:00.000Z",
  "lastActionDateTime": "2023-04-02T10:15:30.000Z"
}
The response header contains the Operation-Location property. Use this URI to get details about the Consents_Create operation. Here's an example of the response header:
Operation-Location: https://eastus.api.cognitive.microsoft.com/customvoice/operations/070f7986-ef17-41d0-ba2b-907f0f28e314?api-version=2023-12-01-preview
Operation-Id: 070f7986-ef17-41d0-ba2b-907f0f28e314
Next steps
Feedback
Coming soon: Throughout 2024 we will be phasing out GitHub Issues as the feedback mechanism for content and replacing it with a new feedback system. For more information see: https://aka.ms/ContentUserFeedback.
Submit and view feedback for