Project Acoustics Unreal and Wwise Integration
This article describes how to integrate the Project Acoustics plug-in package into your existing Unreal and Wwise game project.
Installation
Software requirements:
- Unreal Engine 4.26+
- AudioKinetic Wwise 2021.1+
- Wwise plug-in for Unreal
If you're using a direct integration of the Wwise SDK instead of the Wwise Unreal plug-in, consult the Project Acoustics Unreal plug-in and adjust Wwise API calls.
Download Project Acoustics
Download the Project Acoustics Unreal and Wwise plug-in package if you haven't already.
An Unreal Engine plug-in and a Wwise plug-in are included in the package. The Unreal plug-in provides editor and runtime integration. During gameplay, the Project Acoustics Unreal plug-in computes parameters such as occlusion for each game object for each frame. These parameters are translated into Wwise API calls.
Install the Project Acoustics plug-in for Wwise
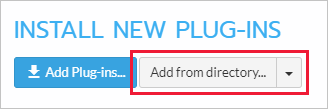
Open the Wwise launcher. On the Plug-ins tab, under Install New Plug-ins, select Add from Directory.
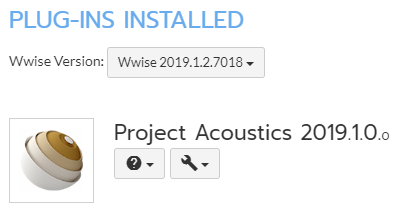
Select the AcousticsWwisePlugin\ProjectAcoustics directory that's in the download package. It contains the Wwise plug-in bundle.
Wwise will install the plug-in. Project Acoustics should appear on the installed plug-ins list in Wwise.
Redeploy Wwise into your game
Redeploy Wwise into your game even if you've already integrated Wwise. This step adds the Project Acoustics Wwise plug-in to any existing integration.
Note
Engine plug-in: If you have Wwise installed as a game plug-in in an Unreal C++ project, skip this step. If it's installed instead as an engine plug-in, for instance because your Unreal project is Blueprint only, Wwise deployment with our plug-in is more complex. Create a dummy empty Unreal C++ project. Close the Unreal editor if it opens and follow the remaining procedure to deploy Wwise into the dummy project. Then, copy out the deployed Wwise plug-in.
From the Wwise launcher, select the Unreal Engine tab. Select the "hamburger" (icon) menu next to Recent Unreal Engine Projects and then select Browse for project. Open your game's Unreal project .uproject file.

Select Integrate Wwise in Project or Modify Wwise in Project. This step integrates Wwise binaries into your project, including the Project Acoustics plug-in for Wwise.
Note
Engine plug-in: If you're using Wwise as an engine plug-in and you created the dummy project as described earlier, copy the folder that Wwise deployed: [DummyUProject]\Plugins\Wwise. Paste it over [UESource]\Engine\Plugins\Wwise. [DummyUProject] is the empty Unreal C++ project path, and [UESource] is where the Unreal Engine sources are installed. After you copy the folder, you can delete the dummy project.
Add the Project Acoustics Unreal plug-in to your game
Copy the Unreal\ProjectAcousticsWwise folder from the downloaded plug-in package to your project's directory, e.g. [UProjectDir]\Plugins\ProjectAcousticsWwise, where [UProjectDir] is your game's project folder that contains the .uproject file.
Note
Engine plug-in: If you're using Wwise as an engine plug-in, you should use Project Acoustics as an Unreal engine plug-in as well. Instead of the destination directory cited previously, use [UESource]\Engine\Plugins\ProjectAcousticsWwise.
Confirm that you see a Wwise folder alongside the ProjectAcousticsWwise folder. It contains the Wwise plug-in along with its binaries that you deployed earlier.
Extend Wwise Unreal plug-in functionality
Note
This section only applies to versions of Wwise 2021 and lower. Skip this section if using Wwise 2022 or newer.
The Project Acoustics Unreal plug-in requires additional behavior exposed from the Wwise Unreal plug-in API per these guidelines. We've included a batch file to automate the patching procedure.
- Inside Plugins\ProjectAcousticsWwise\Resources, run PatchWwise.bat.
Build the game and check that Python is enabled
Compile your game, and make sure that it builds correctly. If it doesn't build, check the previous steps carefully before you continue.
Open your project in Unreal Editor.
Note
Engine plug-in: If you're using ProjectAcoustics as an engine plug-in, also make sure that it's enabled under "built-in" plug-ins.
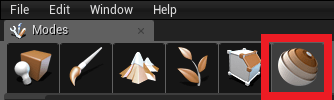
You should see a new mode, which indicates that Project Acoustics has been integrated.
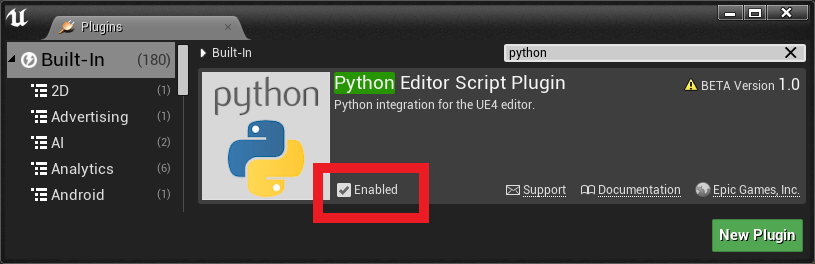
Confirm that the Python plug-in for Unreal is enabled so that editor integration functions correctly.
Set up your Wwise project to use Project Acoustics
From the Project menu, select Import Factory Assets.

Select Project Acoustics from the list of available assets.

An example Wwise project is included in the samples download. We recommend that you view it along with these instructions. The screenshots later in this article are from this project. There are many options for integrating Project Acoustics with Wwise. All options are represented within the sample project, although some of them are disabled by default.
Dry path
For a fully cross-platform HRTF solution for headphones, we recommend our Project Acoustics Spatializer plug-in. Otherwise, we suggest using Wwise's 3D Spatialization.
Project Acoustics Spatializer (for headphones only)
Project Acoustics Spatializer is not compatible with Wwise's 3D Spatialization. You must pick one or the other.
Create a parent audio bus (shown as Headphone Mix below). Set its bus configuration to Audio Objects.

Go the the Effects tab and add the Project Acoustics Spatializer.

Open the plugin's Effect Editor and set Distance Units Per Meter based on your game engine (e.g. 100 for Unreal Engine, 1 for Unity).

Wwise's 3D Spatialization
Wwise's 3D Spatialization is not compatible with Project Acoustics Spatializer. You must pick one or the other.
Open the settings panel for the System Audio Device. Check the boxes for Allow 3D Audio and Allow System Audio Objects as shown below.

For more information on 3D audio support in Wwise, refer to Audiokinetic's documentation.
Wet path
We support two reverb methods:
Note
You only need to setup the reverb method you wish to use, but our Unreal Editor plugin allows you switch between the two at game start (if both are enabled).
Project Acoustics Spatial Reverb
Note
You may skip this section if only using Wwise convolution reverb.
Project Acoustics Spatial Reverb enables object-based directionally-aware reverb that can be spatialized how you like, using Project Acoustics Spatializer, Wwise's 3D Spatialization, or even panning.
To begin, create a new aux bus, navigate to its Effects tab, and add the Project Acoustics Spatial Reverb. If using Project Acoustics Spatializer, place this bus under your Headphone Mix bus.

Open the plugin's Effect Editor and set Distance Units Per Meter based on your game engine (e.g. 100 for Unreal Engine, 1 for Unity).

Enabling spatial reverb on actor-mixers
There are three steps to enable spatial reverb on each actor-mixer.
Under General Settings, add the spatial reverb bus to the User-defined Auxiliary Sends.

Under Metadata, add PA_Metadata_RTPCs share-set.

This share-set provides the default mapping from game syncs to reverb parameters. The metadata is attached to audio objects for this Actor-mixer, and is consumed by the Project Acoustics Spatial Reverb plugin.
Under Positioning, enable Attenuation and open the Attenuation Editor. Select Custom as the Auxiliary send volumes (User-defined) curve. Draw a horizontal line, starting at 0.0, and ending with a desired rolloff. You can adjust this curve to control the wetness level.

Modifying spatial reverb metadata
To design the reverb parameters, open up the share-set (or a copy) in the Metadata Editor and select the RTPC tab. For each parameter, the X-axis is the value provided by the Project Acoustics game engine plugin, and the Y-axis is the interpreted value passed on to the spatial reverb plugin. By default, these are all 1:1 linear mappings - the spatial reverb gets the exact value produced by Project Acoustics. To modify these values, draw design curves as you would for any other game sync. An example curve is drawn below.

Wwise Convolution Reverb
Note
You may skip this section if only using Project Acoustics Spatial Reverb.
Important
Make sure you have Wwise Convolution Reverb plugin installed via the Wwise Launcher before proceeding. The plugin requires a license to use in your projects. Contact your Audiokinetic representative to obtain a license.
Before continuing, it is good practice to ensure the Factory Assets were imported properly. Most Wwise projects will be OK, but some custom configurations may have lost the link to the impulse responses necessary inside the convolution reverb presets. In Wwise, navigate to the ShareSets tab. Under Effects, expand ProjectAcoustics. Click through each of the Convolution_ presets and ensure that the impulse response is populated in the effect window. If any are missing, you'll need to manually relink them. The impulse responses will be in your project's Originals/Plugins/Wwise Convolution Reverb directory.
Ensure you have Python 3 installed, open a command prompt and run:
py -3 -m pip install waapi-clientThis adds the Wwise Authoring API (WAAPI) to your python installation.
With your Wwise project open, run SetupWwiseBusses.py (located in the Wwise plugin bundle).
Important
Ensure only a single Wwise project is open when running this script.
When it is finished, you will see new busses in your Wwise project:
Note
Bus Names: Do not change the names of any busses created by SetupWwiseBusses.py. The Unreal Engine plugin code looks for these busses by name. Changing their names will break this connection.

This script uses WAAPI to configure Wwise convolution reverb on your behalf. Appropriate Impulse Responses are included in the Project Acoustics Factory Assets. This script creates the required aux busses and adds instances of Wwise Convolution Reverb with the expected impulse response populated. You may swap out these impulse responses for your own at any time. If you want to go back to default settings, the fastest thing to do is to delete the entire tree of aux busses and re-run SetupWwiseBusses.py.
Enabling convolution reverb on actor-mixers
There are three steps to enable convolution reverb on each actor-mixer.
Under General Settings tab, enable Use game-defined aux sends.

Under Positioning, enable Attenuation and open the Attenuation Editor. Select Custom as the Auxiliary send volumes (Game-defined) curve. Draw a horizontal line, starting at 0.0, and ending with a desired rolloff. You can adjust this curve to control the wetness level.

Convolution reverb with sound banks
Note
If you are only using event-based-packaging, you may skip this section.
If you are using sound banks, make sure to add the ProjectAcoustics Effect ShareSet to your sound bank, otherwise the impulse responses will not be correctly deployed as part of your bank.

Audio setup in Unreal
- First, you need to bake your game level to produce an acoustics asset, which will be placed in Content\Acoustics. Consult the Unreal Bake Tutorial. Some pre-baked levels are included in the sample package.
In your Unreal project settings, navigate to Plugins > Project Acoustics and select either Spatial Reverb or Stereo Convolution as your chosen reverb type.

Create an Acoustics space actor in your scene. Only create one of these actors in a level, because it represents the acoustics for the whole level.

Assign the baked acoustic data asset to the Acoustics data slot on the Acoustics space actor. Your scene now has acoustics!

Adding acoustics to an actor

Add an Acoustics audio component to the actor. This component adds Project Acoustics functionality to the Wwise audio component.
This setting triggers an associated Wwise event at level startup. If you don't want the event to trigger as soon as the actor is spawned, uncheck this.
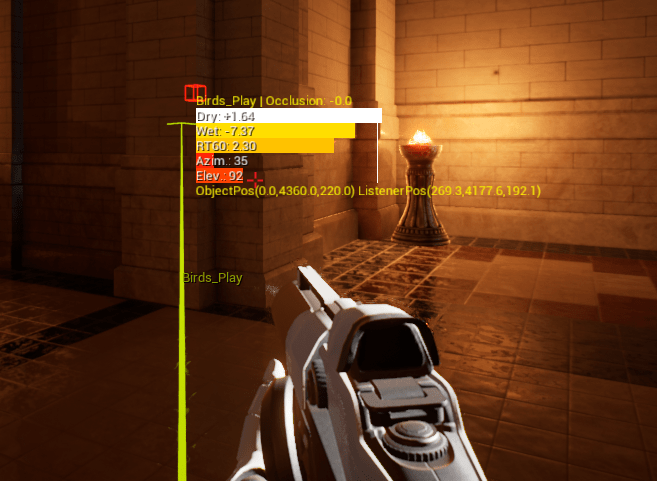
Use the Show Acoustics Parameters check box to print on-screen debug information about the source.
Assign a Wwise event per the usual Wwise workflow.
You're all set. Move around the scene and explore the acoustic effects!
Next steps
- Learn how to do bakes for your game scenes.
- Learn about Project Acoustics Unreal/Wwise Design.
- Learn about advanced usage and debugging.