Use Azure AI Vision container with Kubernetes and Helm
One option to manage your Azure AI Vision containers on-premises is to use Kubernetes and Helm. Using Kubernetes and Helm to define an Azure AI Vision container image, we'll create a Kubernetes package. This package will be deployed to a Kubernetes cluster on-premises. Finally, we'll explore how to test the deployed services. For more information about running Docker containers without Kubernetes orchestration, see install and run Azure AI Vision containers.
Prerequisites
The following prerequisites before using Azure AI Vision containers on-premises:
| Required | Purpose |
|---|---|
| Azure Account | If you don't have an Azure subscription, create a free account before you begin. |
| Kubernetes CLI | The Kubernetes CLI is required for managing the shared credentials from the container registry. Kubernetes is also needed before Helm, which is the Kubernetes package manager. |
| Helm CLI | Install the Helm CLI, which is used to install a helm chart (container package definition). |
| Computer Vision resource | In order to use the container, you must have: A Computer Vision resource and the associated API key the endpoint URI. Both values are available on the Overview and Keys pages for the resource and are required to start the container. {API_KEY}: One of the two available resource keys on the Keys page {ENDPOINT_URI}: The endpoint as provided on the Overview page |
Gather required parameters
Three primary parameters for all Azure AI containers are required. The Microsoft Software License Terms must be present with a value of accept. An Endpoint URI and API key are also needed.
Endpoint URI
The {ENDPOINT_URI} value is available on the Azure portal Overview page of the corresponding Azure AI services resource. Go to the Overview page, hover over the endpoint, and a Copy to clipboard icon appears. Copy and use the endpoint where needed.

Keys
The {API_KEY} value is used to start the container and is available on the Azure portal's Keys page of the corresponding Azure AI services resource. Go to the Keys page, and select the Copy to clipboard icon.
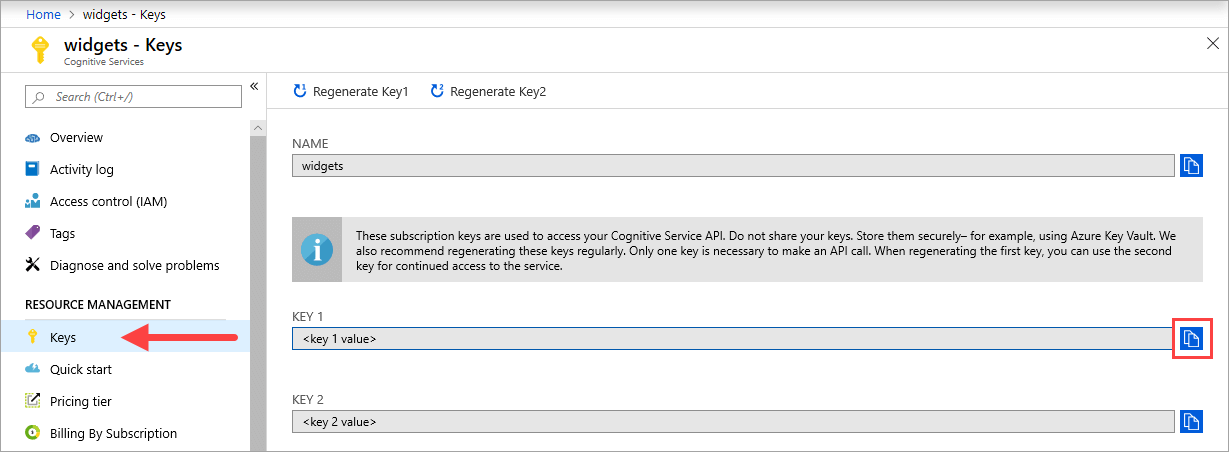
Important
These subscription keys are used to access your Azure AI services API. Don't share your keys. Store them securely. For example, use Azure Key Vault. We also recommend that you regenerate these keys regularly. Only one key is necessary to make an API call. When you regenerate the first key, you can use the second key for continued access to the service.
The host computer
The host is an x64-based computer that runs the Docker container. It can be a computer on your premises or a Docker hosting service in Azure, such as:
- Azure Kubernetes Service.
- Azure Container Instances.
- A Kubernetes cluster deployed to Azure Stack. For more information, see Deploy Kubernetes to Azure Stack.
Container requirements and recommendations
Note
The requirements and recommendations are based on benchmarks with a single request per second, using a 523-KB image of a scanned business letter that contains 29 lines and a total of 803 characters. The recommended configuration resulted in approximately 2x faster response compared with the minimum configuration.
The following table describes the minimum and recommended allocation of resources for each Read OCR container.
| Container | Minimum | Recommended |
|---|---|---|
| Read 3.2 2022-04-30 | 4 cores, 8-GB memory | 8 cores, 16-GB memory |
| Read 3.2 2021-04-12 | 4 cores, 16-GB memory | 8 cores, 24-GB memory |
- Each core must be at least 2.6 gigahertz (GHz) or faster.
Core and memory correspond to the --cpus and --memory settings, which are used as part of the docker run command.
Connect to the Kubernetes cluster
The host computer is expected to have an available Kubernetes cluster. See this tutorial on deploying a Kubernetes cluster for a conceptual understanding of how to deploy a Kubernetes cluster to a host computer. You can find more information on deployments in the Kubernetes documentation.
Configure Helm chart values for deployment
Begin by creating a folder named read. Then, paste the following YAML content in a new file named chart.yaml:
apiVersion: v2
name: read
version: 1.0.0
description: A Helm chart to deploy the Read OCR container to a Kubernetes cluster
dependencies:
- name: rabbitmq
  condition: read.image.args.rabbitmq.enabled
  version: ^6.12.0
  repository: https://kubernetes-charts.storage.googleapis.com/
- name: redis
  condition: read.image.args.redis.enabled
  version: ^6.0.0
  repository: https://kubernetes-charts.storage.googleapis.com/
To configure the Helm chart default values, copy and paste the following YAML into a file named values.yaml. Replace the # {ENDPOINT_URI} and # {API_KEY} comments with your own values. Configure resultExpirationPeriod, Redis, and RabbitMQ if needed.
# These settings are deployment specific and users can provide customizations
read:
  enabled: true
  image:
    name: cognitive-services-read
    registry:  mcr.microsoft.com/
    repository: azure-cognitive-services/vision/read
    tag: 3.2-preview.1
    args:
      eula: accept
      billing: # {ENDPOINT_URI}
      apikey: # {API_KEY}

      # Result expiration period setting. Specify when the system should clean up recognition results.
      # For example, resultExpirationPeriod=1, the system will clear the recognition result 1hr after the process.
      # resultExpirationPeriod=0, the system will clear the recognition result after result retrieval.
      resultExpirationPeriod: 1

      # Redis storage, if configured, will be used by read OCR container to store result records.
      # A cache is required if multiple read OCR containers are placed behind load balancer.
      redis:
        enabled: false # {true/false}
        password: password

      # RabbitMQ is used for dispatching tasks. This can be useful when multiple read OCR containers are
      # placed behind load balancer.
      rabbitmq:
        enabled: false # {true/false}
        rabbitmq:
          username: user
          password: password
Important
If the
billingandapikeyvalues aren't provided, the services expire after 15 minutes. Likewise, verification fails because the services aren't available.If you deploy multiple Read OCR containers behind a load balancer, for example, under Docker Compose or Kubernetes, you must have an external cache. Because the processing container and the GET request container might not be the same, an external cache stores the results and shares them across containers. For details about cache settings, see Configure Azure AI Vision Docker containers.
Create a templates folder under the read directory. Copy and paste the following YAML into a file named deployment.yaml. The deployment.yaml file will serve as a Helm template.
Templates generate manifest files, which are YAML-formatted resource descriptions that Kubernetes can understand. - Helm Chart Template Guide
apiVersion: apps/v1
kind: Deployment
metadata:
  name: read
  labels:
    app: read-deployment
spec:
  selector:
    matchLabels:
      app: read-app
  template:
    metadata:
      labels:
        app: read-app
    spec:
      containers:
      - name: {{.Values.read.image.name}}
        image: {{.Values.read.image.registry}}{{.Values.read.image.repository}}
        ports:
        - containerPort: 5000
        env:
        - name: EULA
          value: {{.Values.read.image.args.eula}}
        - name: billing
          value: {{.Values.read.image.args.billing}}
        - name: apikey
          value: {{.Values.read.image.args.apikey}}
        args:
        - ReadEngineConfig:ResultExpirationPeriod={{ .Values.read.image.args.resultExpirationPeriod }}
        {{- if .Values.read.image.args.rabbitmq.enabled }}
        - Queue:RabbitMQ:HostName={{ include "rabbitmq.hostname" . }}
        - Queue:RabbitMQ:Username={{ .Values.read.image.args.rabbitmq.rabbitmq.username }}
        - Queue:RabbitMQ:Password={{ .Values.read.image.args.rabbitmq.rabbitmq.password }}
        {{- end }}
        {{- if .Values.read.image.args.redis.enabled }}
        - Cache:Redis:Configuration={{ include "redis.connStr" . }}
        {{- end }}
      imagePullSecrets:
      - name: {{.Values.read.image.pullSecret}}
---
apiVersion: v1
kind: Service
metadata:
  name: read-service
spec:
  type: LoadBalancer
  ports:
  - port: 5000
  selector:
    app: read-app
In the same templates folder, copy and paste the following helper functions into helpers.tpl. helpers.tpl defines useful functions to help generate Helm template.
{{- define "rabbitmq.hostname" -}}
{{- printf "%s-rabbitmq" .Release.Name -}}
{{- end -}}

{{- define "redis.connStr" -}}
{{- $hostMain := printf "%s-redis-master:6379" .Release.Name }}
{{- $hostReplica := printf "%s-redis-replica:6379" .Release.Name -}}
{{- $passWord := printf "password=%s" .Values.read.image.args.redis.password -}}
{{- $connTail := "ssl=False,abortConnect=False" -}}
{{- printf "%s,%s,%s,%s" $hostMain $hostReplica $passWord $connTail -}}
{{- end -}}
The template specifies a load balancer service and the deployment of your container/image for Read.
The Kubernetes package (Helm chart)
The Helm chart contains the configuration of which docker image(s) to pull from the mcr.microsoft.com container registry.
A Helm chart is a collection of files that describe a related set of Kubernetes resources. A single chart might be used to deploy something simple, like a memcached pod, or something complex, like a full web app stack with HTTP servers, databases, caches, and so on.
The provided Helm charts pull the docker images of the Azure AI Vision Service, and the corresponding service from the mcr.microsoft.com container
registry.
Install the Helm chart on the Kubernetes cluster
To install the helm chart, we'll need to execute the helm install command. Ensure to execute the install command from the directory above the read folder.
helm install read ./read
Here is an example output you might expect to see from a successful install execution:
NAME: read
LAST DEPLOYED: Thu Sep 04 13:24:06 2019
NAMESPACE: default
STATUS: DEPLOYED

RESOURCES:
==> v1/Pod(related)
NAME                    READY  STATUS             RESTARTS  AGE
read-57cb76bcf7-45sdh   0/1    ContainerCreating  0         0s

==> v1/Service
NAME     TYPE          CLUSTER-IP    EXTERNAL-IP  PORT(S)         AGE
read     LoadBalancer  10.110.44.86  localhost    5000:31301/TCP  0s

==> v1beta1/Deployment
NAME    READY  UP-TO-DATE  AVAILABLE  AGE
read    0/1    1           0          0s
The Kubernetes deployment can take over several minutes to complete. To confirm that both pods and services are properly deployed and available, execute the following command:
kubectl get all
You should expect to see something similar to the following output:
kubectl get all
NAME                        READY   STATUS    RESTARTS   AGE
pod/read-57cb76bcf7-45sdh   1/1     Running   0          17s

NAME                   TYPE           CLUSTER-IP     EXTERNAL-IP   PORT(S)          AGE
service/kubernetes     ClusterIP      10.96.0.1      <none>        443/TCP          45h
service/read           LoadBalancer   10.110.44.86   localhost     5000:31301/TCP   17s

NAME                   READY   UP-TO-DATE   AVAILABLE   AGE
deployment.apps/read   1/1     1            1           17s

NAME                              DESIRED   CURRENT   READY   AGE
replicaset.apps/read-57cb76bcf7   1         1         1       17s
Deploy multiple v3 containers on the Kubernetes cluster
Starting in v3 of the container, you can use the containers in parallel on both a task and page level.
By design, each v3 container has a dispatcher and a recognition worker. The dispatcher is responsible for splitting a multi-page task into multiple single page sub-tasks. The recognition worker is optimized for recognizing a single page document. To achieve page level parallelism, deploy multiple v3 containers behind a load balancer and let the containers share a universal storage and queue.
Note
Currently only Azure Storage and Azure Queue are supported.
The container receiving the request can split the task into single page sub-tasks, and add them to the universal queue. Any recognition worker from a less busy container can consume single page sub-tasks from the queue, perform recognition, and upload the result to the storage. The throughput can be improved up to n times, depending on the number of containers that are deployed.
The v3 container exposes the liveness probe API under the /ContainerLiveness path. Use the following deployment example to configure a liveness probe for Kubernetes.
Copy and paste the following YAML into a file named deployment.yaml. Replace the # {ENDPOINT_URI} and # {API_KEY} comments with your own values. Replace the # {AZURE_STORAGE_CONNECTION_STRING} comment with your Azure Storage Connection String. Configure replicas to the number you want, which is set to 3 in the following example.
apiVersion: apps/v1
kind: Deployment
metadata:
  name: read
  labels:
    app: read-deployment
spec:
  selector:
    matchLabels:
      app: read-app
  replicas: # {NUMBER_OF_READ_CONTAINERS}
  template:
    metadata:
      labels:
        app: read-app
    spec:
      containers:
      - name: cognitive-services-read
        image: mcr.microsoft.com/azure-cognitive-services/vision/read
        ports:
        - containerPort: 5000
        env:
        - name: EULA
          value: accept
        - name: billing
          value: # {ENDPOINT_URI}
        - name: apikey
          value: # {API_KEY}
        - name: Storage__ObjectStore__AzureBlob__ConnectionString
          value: # {AZURE_STORAGE_CONNECTION_STRING}
        - name: Queue__Azure__ConnectionString
          value: # {AZURE_STORAGE_CONNECTION_STRING}
        livenessProbe:
          httpGet:
            path: /ContainerLiveness
            port: 5000
          initialDelaySeconds: 60
          periodSeconds: 60
          timeoutSeconds: 20
---
apiVersion: v1
kind: Service
metadata:
  name: azure-cognitive-service-read
spec:
  type: LoadBalancer
  ports:
  - port: 5000
    targetPort: 5000
  selector:
    app: read-app
Run the following command.
kubectl apply -f deployment.yaml
Below is an example output you might see from a successful deployment execution:
deployment.apps/read created
service/azure-cognitive-service-read created
The Kubernetes deployment can take several minutes to complete. To confirm that both pods and services are properly deployed and available, then execute the following command:
kubectl get all
You should see console output similar to the following:
kubectl get all
NAME                       READY   STATUS    RESTARTS   AGE
pod/read-6cbbb6678-58s9t   1/1     Running   0          3s
pod/read-6cbbb6678-kz7v4   1/1     Running   0          3s
pod/read-6cbbb6678-s2pct   1/1     Running   0          3s

NAME                                   TYPE           CLUSTER-IP   EXTERNAL-IP    PORT(S)          AGE
service/azure-cognitive-service-read   LoadBalancer   10.0.134.0   <none>         5000:30846/TCP   17h
service/kubernetes                     ClusterIP      10.0.0.1     <none>         443/TCP          78d

NAME                   READY   UP-TO-DATE   AVAILABLE   AGE
deployment.apps/read   3/3     3            3           3s

NAME                             DESIRED   CURRENT   READY   AGE
replicaset.apps/read-6cbbb6678   3         3         3       3s
Validate that a container is running
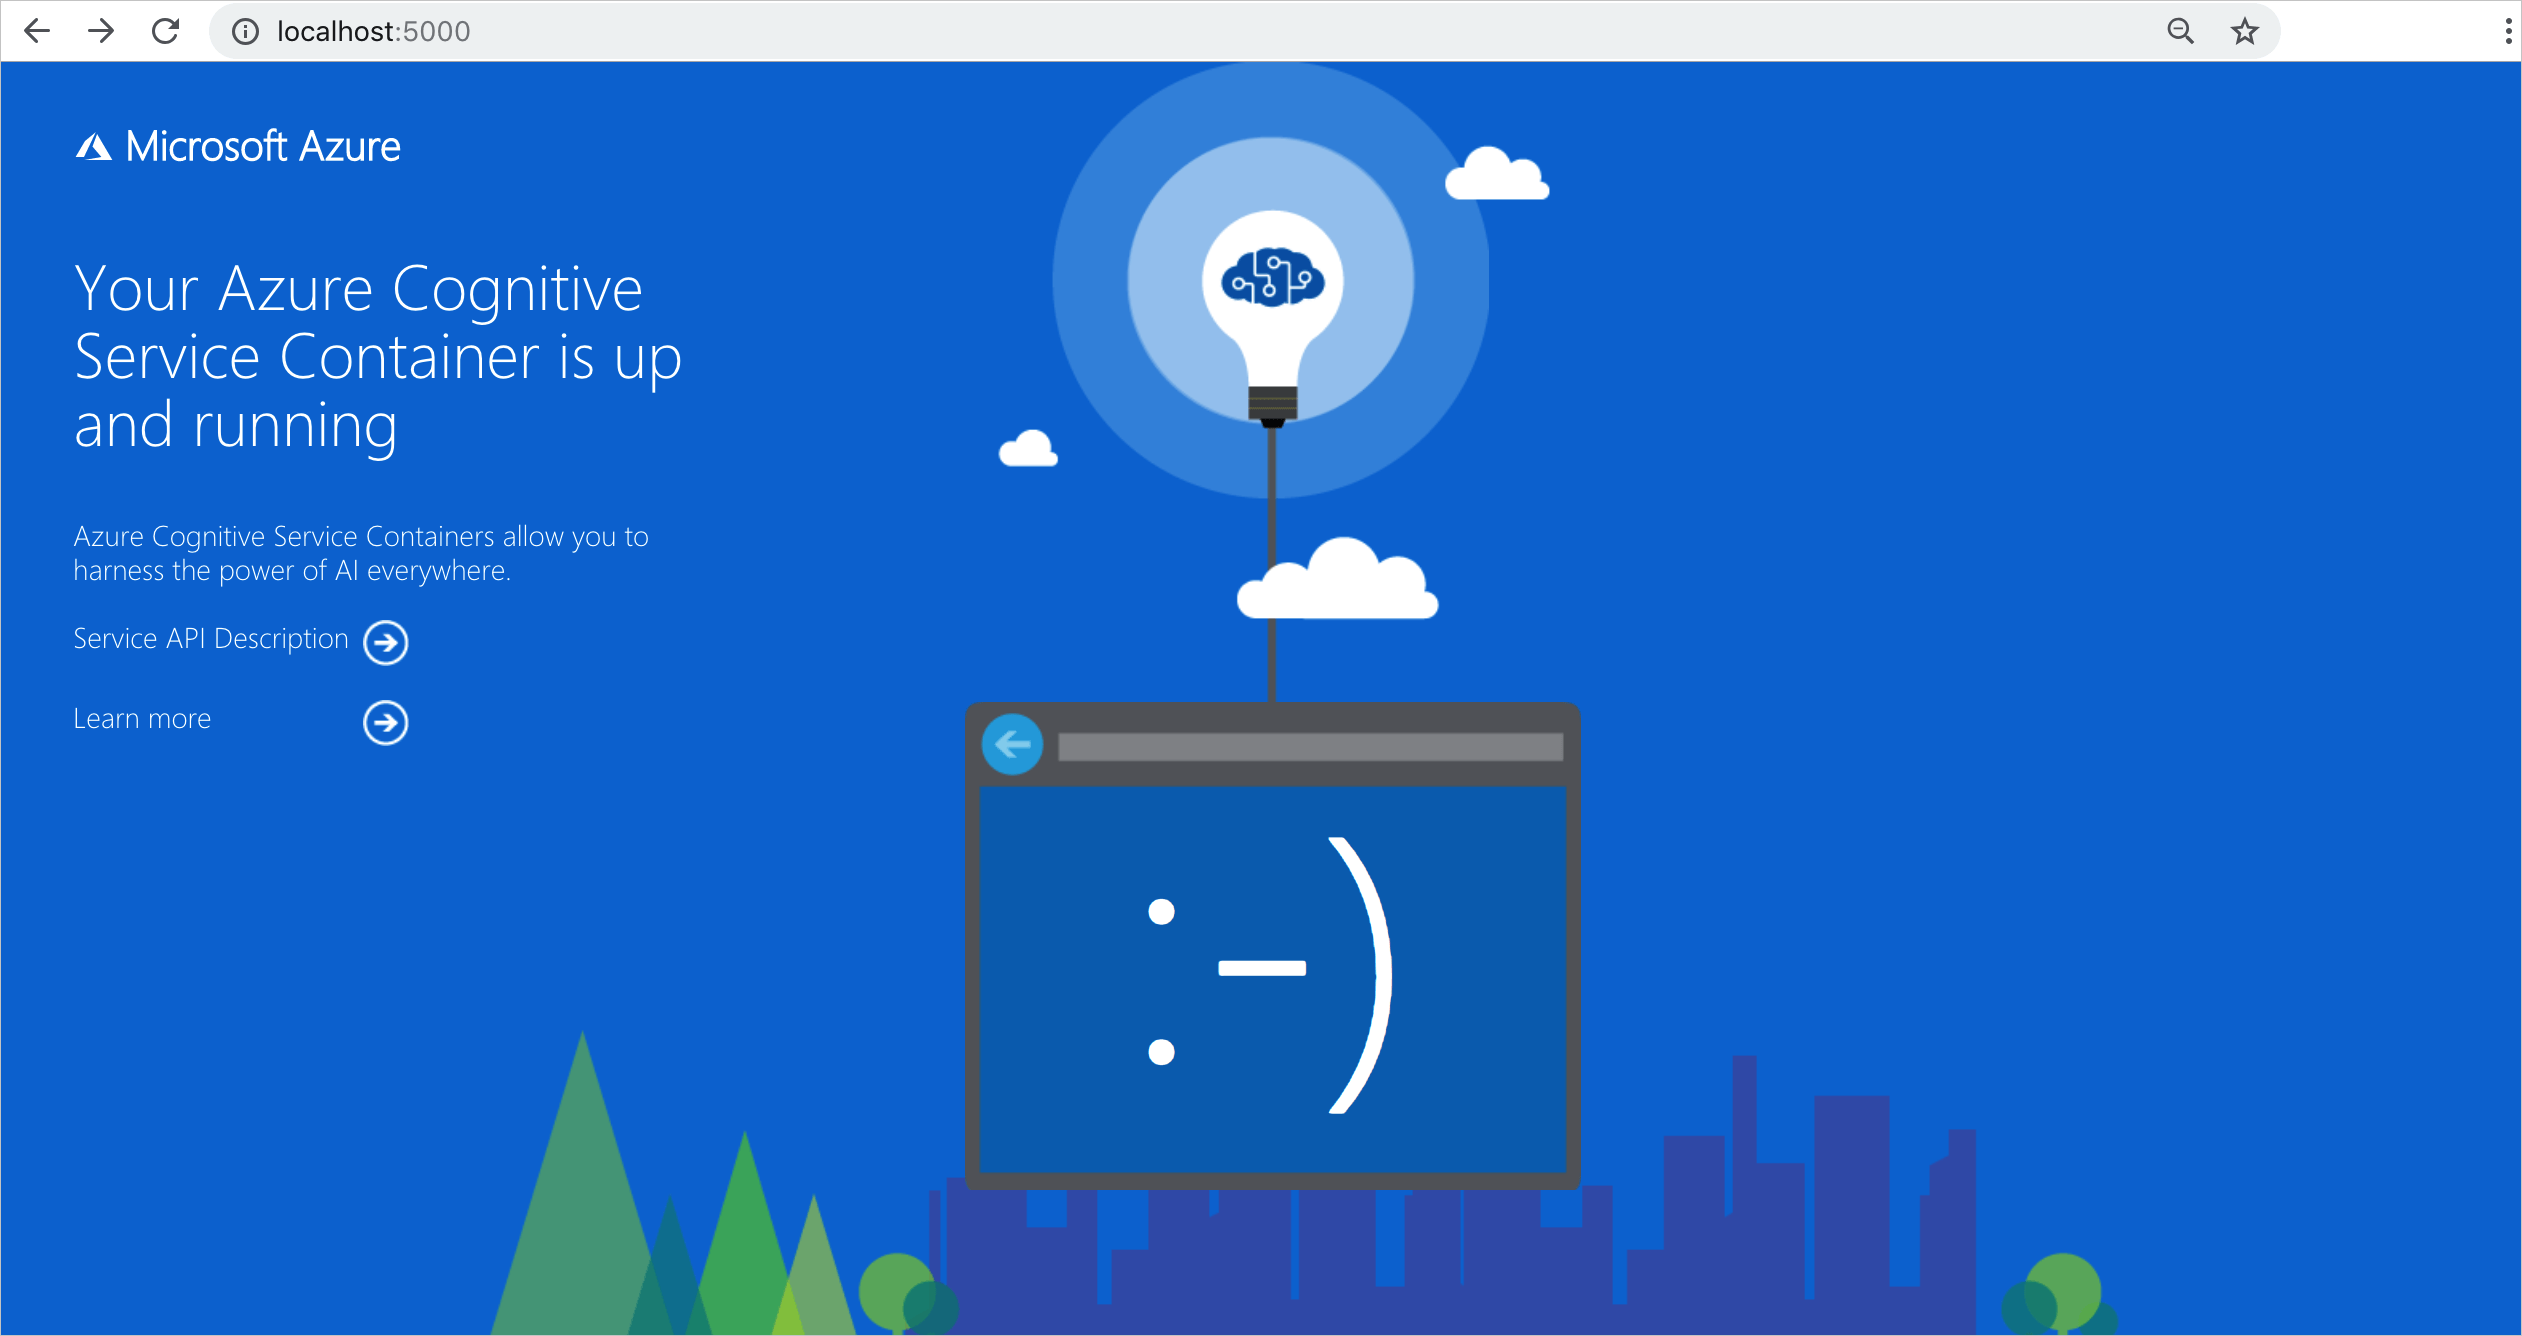
There are several ways to validate that the container is running. Locate the External IP address and exposed port of the container in question, and open your favorite web browser. Use the various request URLs that follow to validate the container is running. The example request URLs listed here are http://localhost:5000, but your specific container might vary. Make sure to rely on your container's External IP address and exposed port.
| Request URL | Purpose |
|---|---|
http://localhost:5000/ |
The container provides a home page. |
http://localhost:5000/ready |
Requested with GET, this URL provides a verification that the container is ready to accept a query against the model. This request can be used for Kubernetes liveness and readiness probes. |
http://localhost:5000/status |
Also requested with GET, this URL verifies if the api-key used to start the container is valid without causing an endpoint query. This request can be used for Kubernetes liveness and readiness probes. |
http://localhost:5000/swagger |
The container provides a full set of documentation for the endpoints and a Try it out feature. With this feature, you can enter your settings into a web-based HTML form and make the query without having to write any code. After the query returns, an example CURL command is provided to demonstrate the HTTP headers and body format that's required. |
Next steps
For more details on installing applications with Helm in Azure Kubernetes Service (AKS), visit here.
Feedback
Coming soon: Throughout 2024 we will be phasing out GitHub Issues as the feedback mechanism for content and replacing it with a new feedback system. For more information see: https://aka.ms/ContentUserFeedback.
Submit and view feedback for