Quickstart: Custom named entity recognition
Use this article to get started with creating a custom NER project where you can train custom models for custom entity recognition. A model is artificial intelligence software that's trained to do a certain task. For this system, the models extract named entities and are trained by learning from tagged data.
In this article, we use Language Studio to demonstrate key concepts of custom Named Entity Recognition (NER). As an example we’ll build a custom NER model to extract relevant entities from loan agreements, such as the:
- Date of the agreement
- Borrower's name, address, city and state
- Lender's name, address, city and state
- Loan and interest amounts
Prerequisites
- Azure subscription - Create one for free
Create a new Azure AI Language resource and Azure storage account
Before you can use custom NER, you'll need to create an Azure AI Language resource, which will give you the credentials that you need to create a project and start training a model. You'll also need an Azure storage account, where you can upload your dataset that will be used to build your model.
Important
To quickly get started, we recommend creating a new Azure AI Language resource using the steps provided in this article. Using the steps in this article will let you create the Language resource and storage account at the same time, which is easier than doing it later.
If you have a pre-existing resource that you'd like to use, you will need to connect it to storage account. See guidance to using a pre-existing resource for information.
Create a new resource from the Azure portal
Sign in to the Azure portal to create a new Azure AI Language resource.
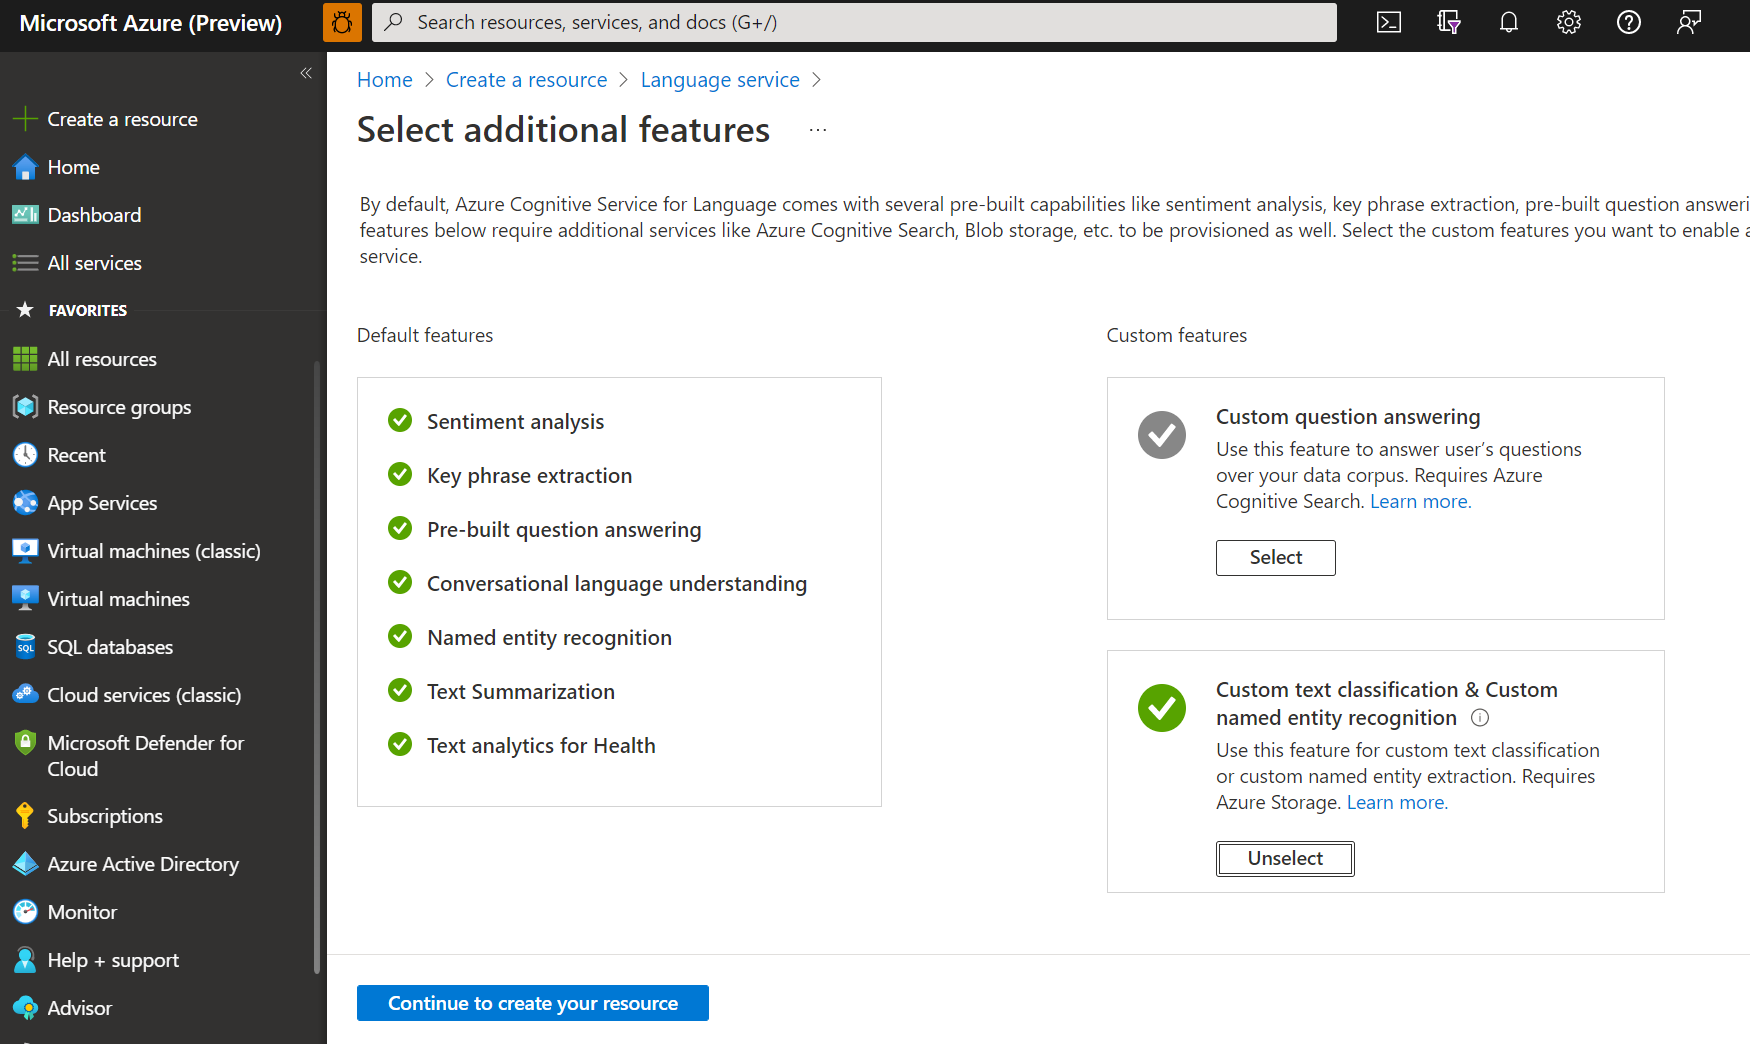
In the window that appears, select Custom text classification & custom named entity recognition from the custom features. Select Continue to create your resource at the bottom of the screen.
Create a Language resource with following details.
Name Description Subscription Your Azure subscription. Resource group A resource group that will contain your resource. You can use an existing one, or create a new one. Region The region for your Language resource. For example, "West US 2". Name A name for your resource. Pricing tier The pricing tier for your Language resource. You can use the Free (F0) tier to try the service. Note
If you get a message saying "your login account is not an owner of the selected storage account's resource group", your account needs to have an owner role assigned on the resource group before you can create a Language resource. Contact your Azure subscription owner for assistance.
In the Custom text classification & custom named entity recognition section, select an existing storage account or select New storage account. These values are to help you get started, and not necessarily the storage account values you’ll want to use in production environments. To avoid latency during building your project connect to storage accounts in the same region as your Language resource.
Storage account value Recommended value Storage account name Any name Storage account type Standard LRS Make sure the Responsible AI Notice is checked. Select Review + create at the bottom of the page, then select Create.

Upload sample data to blob container
After you have created an Azure storage account and connected it to your Language resource, you will need to upload the documents from the sample dataset to the root directory of your container. These documents will later be used to train your model.
Download the sample dataset from GitHub.
Open the .zip file, and extract the folder containing the documents.
In the Azure portal, navigate to the storage account you created, and select it.
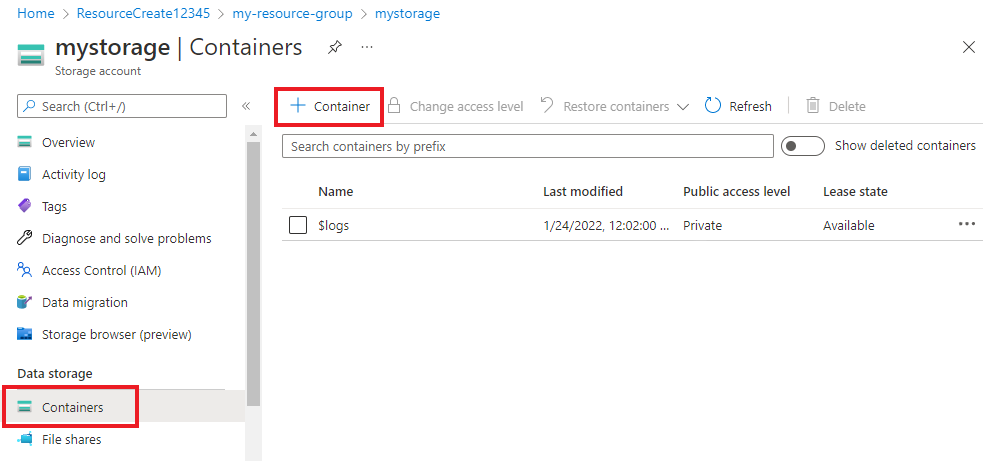
In your storage account, select Containers from the left menu, located below Data storage. On the screen that appears, select + Container. Give the container the name example-data and leave the default Public access level.
After your container has been created, select it. Then select Upload button to select the
.txtand.jsonfiles you downloaded earlier.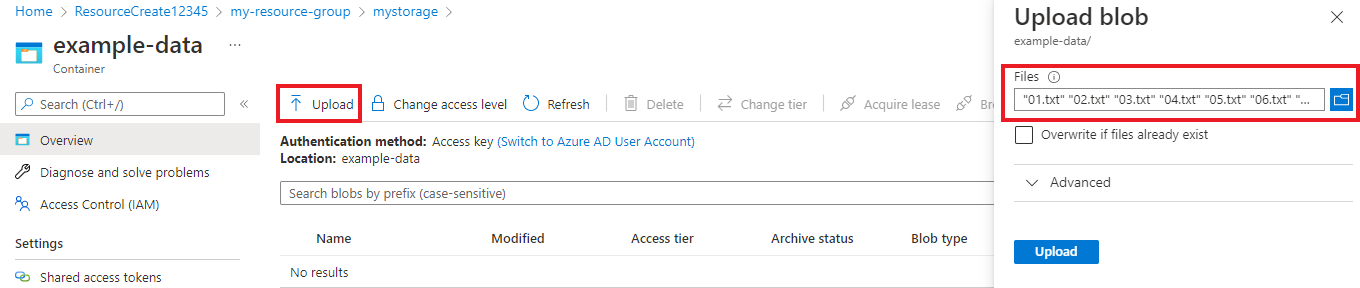


The provided sample dataset contains 20 loan agreements. Each agreement includes two parties: a lender and a borrower. You can use the provided sample file to extract relevant information for: both parties, an agreement date, a loan amount, and an interest rate.
Create a custom named entity recognition project
Once your resource and storage account are configured, create a new custom NER project. A project is a work area for building your custom ML models based on your data. Your project can only be accessed by you and others who have access to the Language resource being used.
Sign into the Language Studio. A window will appear to let you select your subscription and Language resource. Select the Language resource you created in the above step.
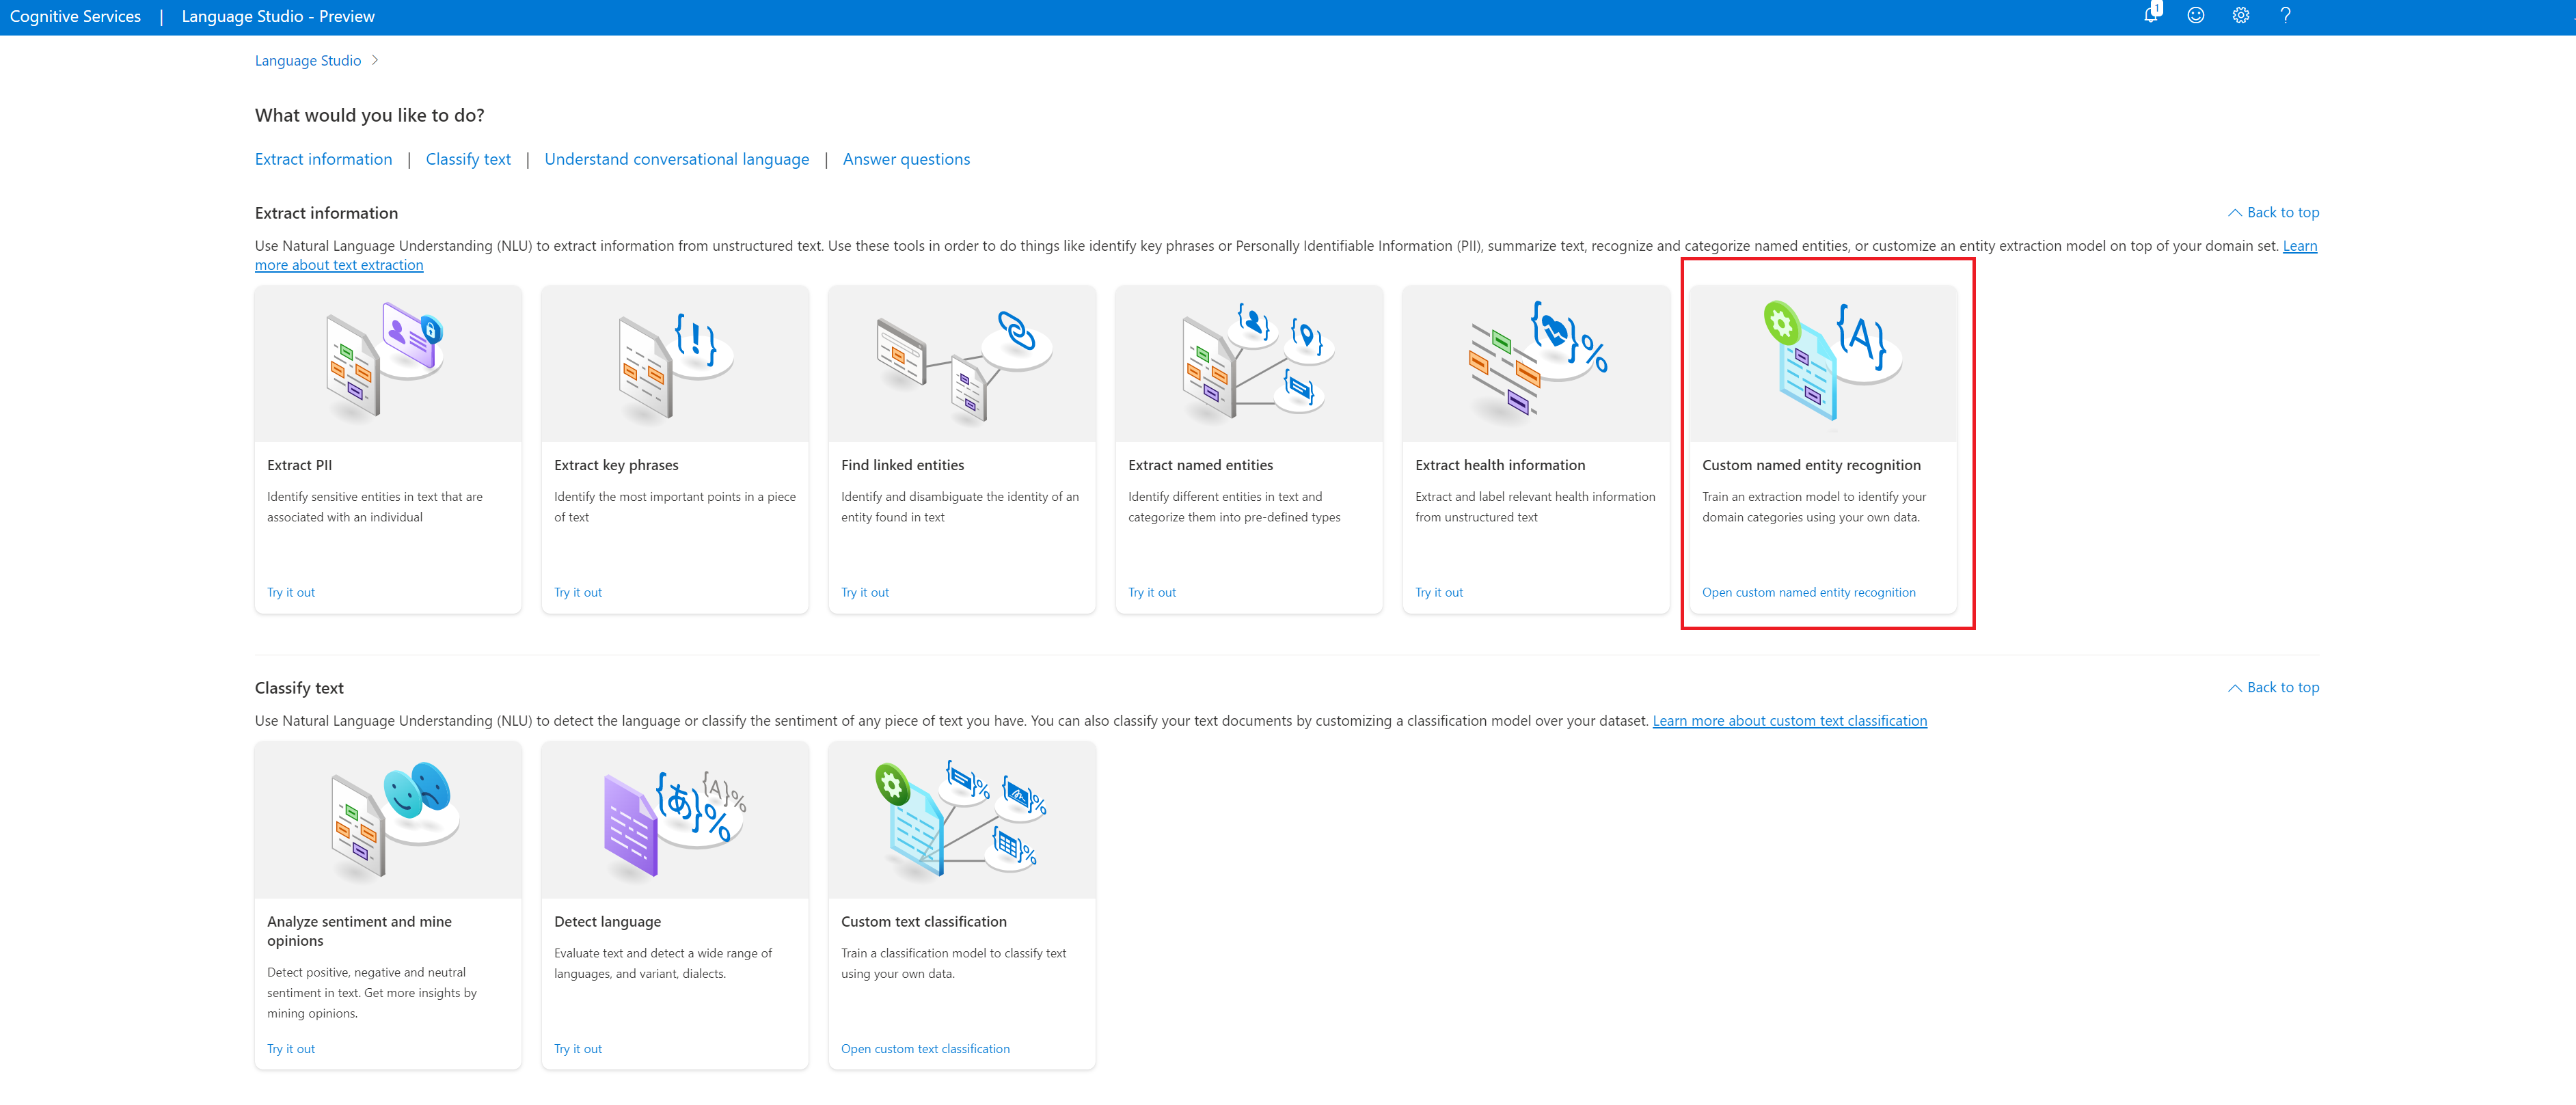
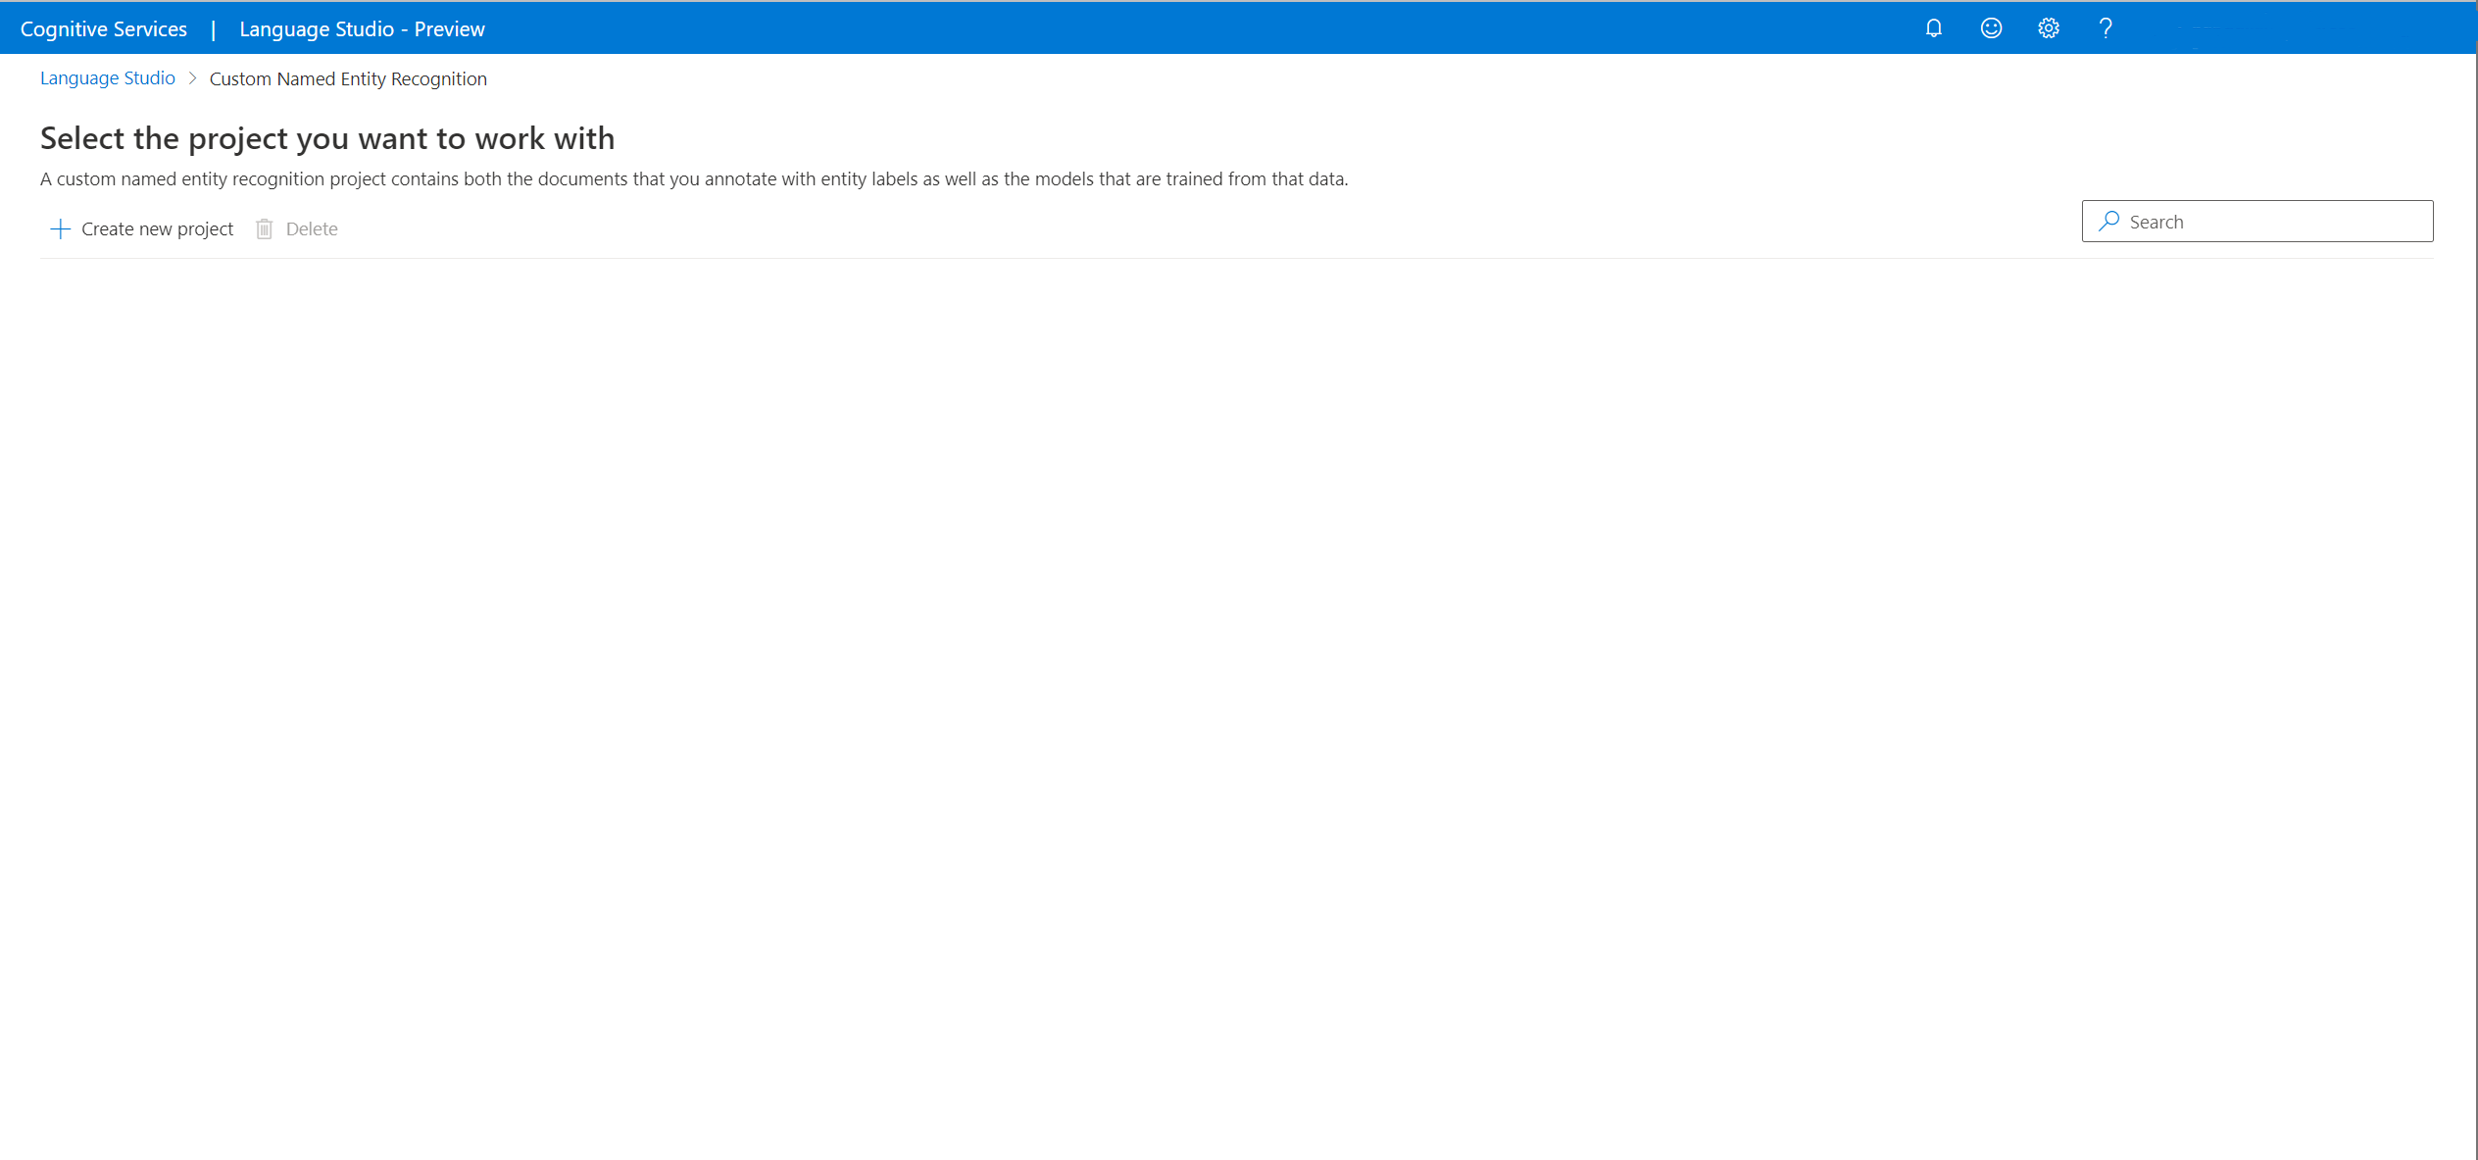
Under the Extract information section of Language Studio, select Custom named entity recognition.
Select Create new project from the top menu in your projects page. Creating a project will let you tag data, train, evaluate, improve, and deploy your models.
After you click, Create new project, a window will appear to let you connect your storage account. If you've already connected a storage account, you will see the storage accounted connected. If not, choose your storage account from the dropdown that appears and select Connect storage account; this will set the required roles for your storage account. This step will possibly return an error if you are not assigned as owner on the storage account.
Note
- You only need to do this step once for each new resource you use.
- This process is irreversible, if you connect a storage account to your Language resource you cannot disconnect it later.
- You can only connect your Language resource to one storage account.

Enter the project information, including a name, description, and the language of the files in your project. If you're using the example dataset, select English. You won’t be able to change the name of your project later. Select Next
Tip
Your dataset doesn't have to be entirely in the same language. You can have multiple documents, each with different supported languages. If your dataset contains documents of different languages or if you expect text from different languages during runtime, select enable multi-lingual dataset option when you enter the basic information for your project. This option can be enabled later from the Project settings page.
Select the container where you have uploaded your dataset. If you have already labeled data make sure it follows the supported format and select Yes, my files are already labeled and I have formatted JSON labels file and select the labels file from the drop-down menu. Select Next.
Review the data you entered and select Create Project.


Train your model
Typically after you create a project, you go ahead and start tagging the documents you have in the container connected to your project. For this quickstart, you have imported a sample tagged dataset and initialized your project with the sample JSON tags file.
To start training your model from within the Language Studio:
Select Training jobs from the left side menu.
Select Start a training job from the top menu.
Select Train a new model and type in the model name in the text box. You can also overwrite an existing model by selecting this option and choosing the model you want to overwrite from the dropdown menu. Overwriting a trained model is irreversible, but it won't affect your deployed models until you deploy the new model.

Select data splitting method. You can choose Automatically splitting the testing set from training data where the system will split your labeled data between the training and testing sets, according to the specified percentages. Or you can Use a manual split of training and testing data, this option is only enabled if you have added documents to your testing set during data labeling. See How to train a model for information about data splitting.
Select the Train button.
If you select the Training Job ID from the list, a side pane will appear where you can check the Training progress, Job status, and other details for this job.
Note
- Only successfully completed training jobs will generate models.
- Training can take some time between a couple of minutes and several hours based on the size of your labeled data.
- You can only have one training job running at a time. You can't start other training job within the same project until the running job is completed.

Deploy your model
Generally after training a model you would review its evaluation details and make improvements if necessary. In this quickstart, you will just deploy your model, and make it available for you to try in Language studio, or you can call the prediction API.
To deploy your model from within the Language Studio:
Select Deploying a model from the left side menu.
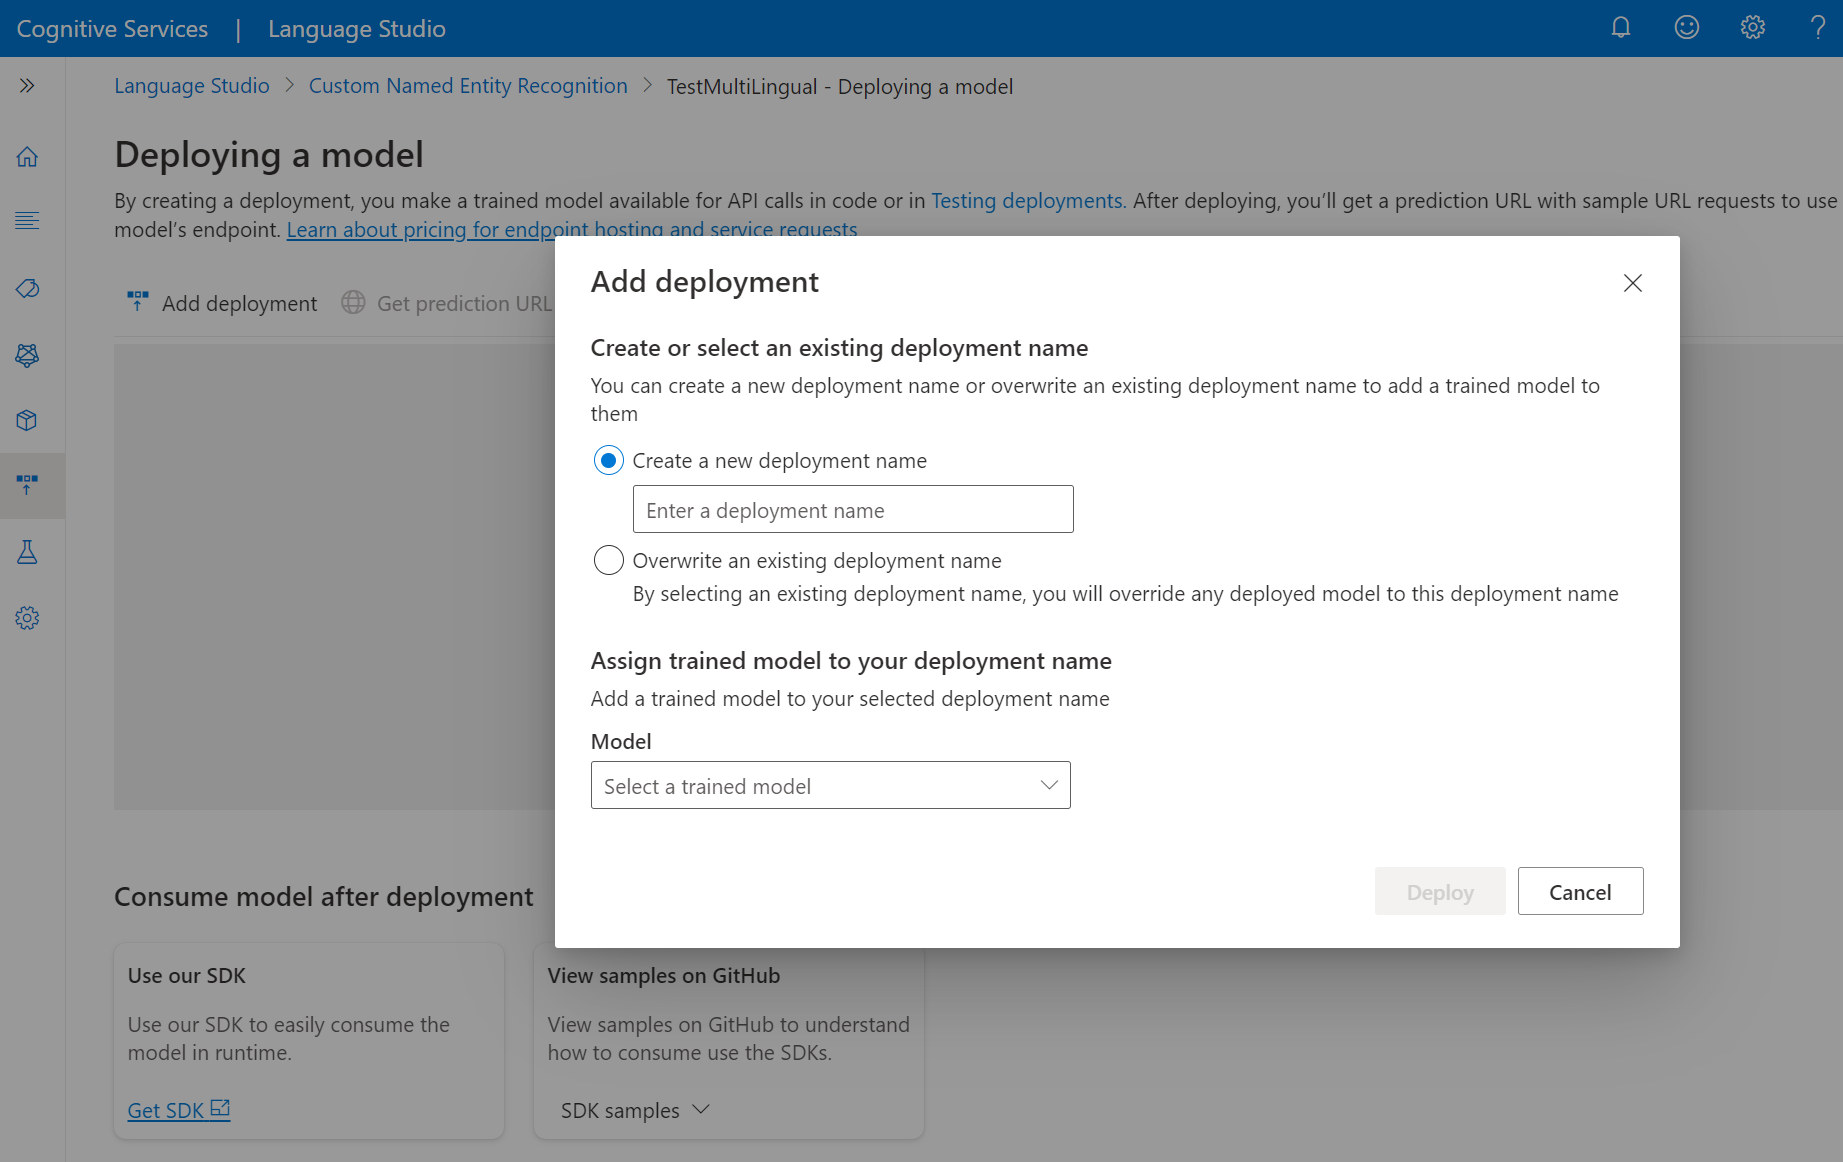
Select Add deployment to start a new deployment job.

Select Create new deployment to create a new deployment and assign a trained model from the dropdown below. You can also Overwrite an existing deployment by selecting this option and select the trained model you want to assign to it from the dropdown below.
Note
Overwriting an existing deployment doesn't require changes to your prediction API call but the results you get will be based on the newly assigned model.
Select Deploy to start the deployment job.
After deployment is successful, an expiration date will appear next to it. Deployment expiration is when your deployed model will be unavailable to be used for prediction, which typically happens twelve months after a training configuration expires.


Test your model
After your model is deployed, you can start using it to extract entities from your text via Prediction API. For this quickstart, you will use the Language Studio to submit the custom entity recognition task and visualize the results. In the sample dataset you downloaded earlier, you can find some test documents that you can use in this step.
To test your deployed models from within the Language Studio:
Select Testing deployments from the left side menu.
Select the deployment you want to test. You can only test models that are assigned to deployments.
For multilingual projects, from the language dropdown, select the language of the text you are testing.
Select the deployment you want to query/test from the dropdown.
You can enter the text you want to submit to the request or upload a
.txtfile to use.Select Run the test from the top menu.
In the Result tab, you can see the extracted entities from your text and their types. You can also view the JSON response under the JSON tab.

Clean up resources
When you don't need your project anymore, you can delete your project using Language Studio. Select Custom named entity recognition (NER) from the top, select the project you want to delete, and then select Delete from the top menu.
Prerequisites
- Azure subscription - Create one for free
Create a new Azure AI Language resource and Azure storage account
Before you can use custom NER, you'll need to create an Azure AI Language resource, which will give you the credentials that you need to create a project and start training a model. You'll also need an Azure storage account, where you can upload your dataset that will be used in building your model.
Important
To get started quickly, we recommend creating a new Azure AI Language resource using the steps provided in this article, which will let you create the Language resource, and create and/or connect a storage account at the same time, which is easier than doing it later.
If you have a pre-existing resource that you'd like to use, you will need to connect it to storage account. See create project for information.
Create a new resource from the Azure portal
Sign in to the Azure portal to create a new Azure AI Language resource.
In the window that appears, select Custom text classification & custom named entity recognition from the custom features. Select Continue to create your resource at the bottom of the screen.
Create a Language resource with following details.
Name Description Subscription Your Azure subscription. Resource group A resource group that will contain your resource. You can use an existing one, or create a new one. Region The region for your Language resource. For example, "West US 2". Name A name for your resource. Pricing tier The pricing tier for your Language resource. You can use the Free (F0) tier to try the service. Note
If you get a message saying "your login account is not an owner of the selected storage account's resource group", your account needs to have an owner role assigned on the resource group before you can create a Language resource. Contact your Azure subscription owner for assistance.
In the Custom text classification & custom named entity recognition section, select an existing storage account or select New storage account. These values are to help you get started, and not necessarily the storage account values you’ll want to use in production environments. To avoid latency during building your project connect to storage accounts in the same region as your Language resource.
Storage account value Recommended value Storage account name Any name Storage account type Standard LRS Make sure the Responsible AI Notice is checked. Select Review + create at the bottom of the page, then select Create.
Upload sample data to blob container
After you have created an Azure storage account and connected it to your Language resource, you will need to upload the documents from the sample dataset to the root directory of your container. These documents will later be used to train your model.
Download the sample dataset from GitHub.
Open the .zip file, and extract the folder containing the documents.
In the Azure portal, navigate to the storage account you created, and select it.
In your storage account, select Containers from the left menu, located below Data storage. On the screen that appears, select + Container. Give the container the name example-data and leave the default Public access level.
After your container has been created, select it. Then select Upload button to select the
.txtand.jsonfiles you downloaded earlier.
The provided sample dataset contains 20 loan agreements. Each agreement includes two parties: a lender and a borrower. You can use the provided sample file to extract relevant information for: both parties, an agreement date, a loan amount, and an interest rate.
Get your resource keys and endpoint
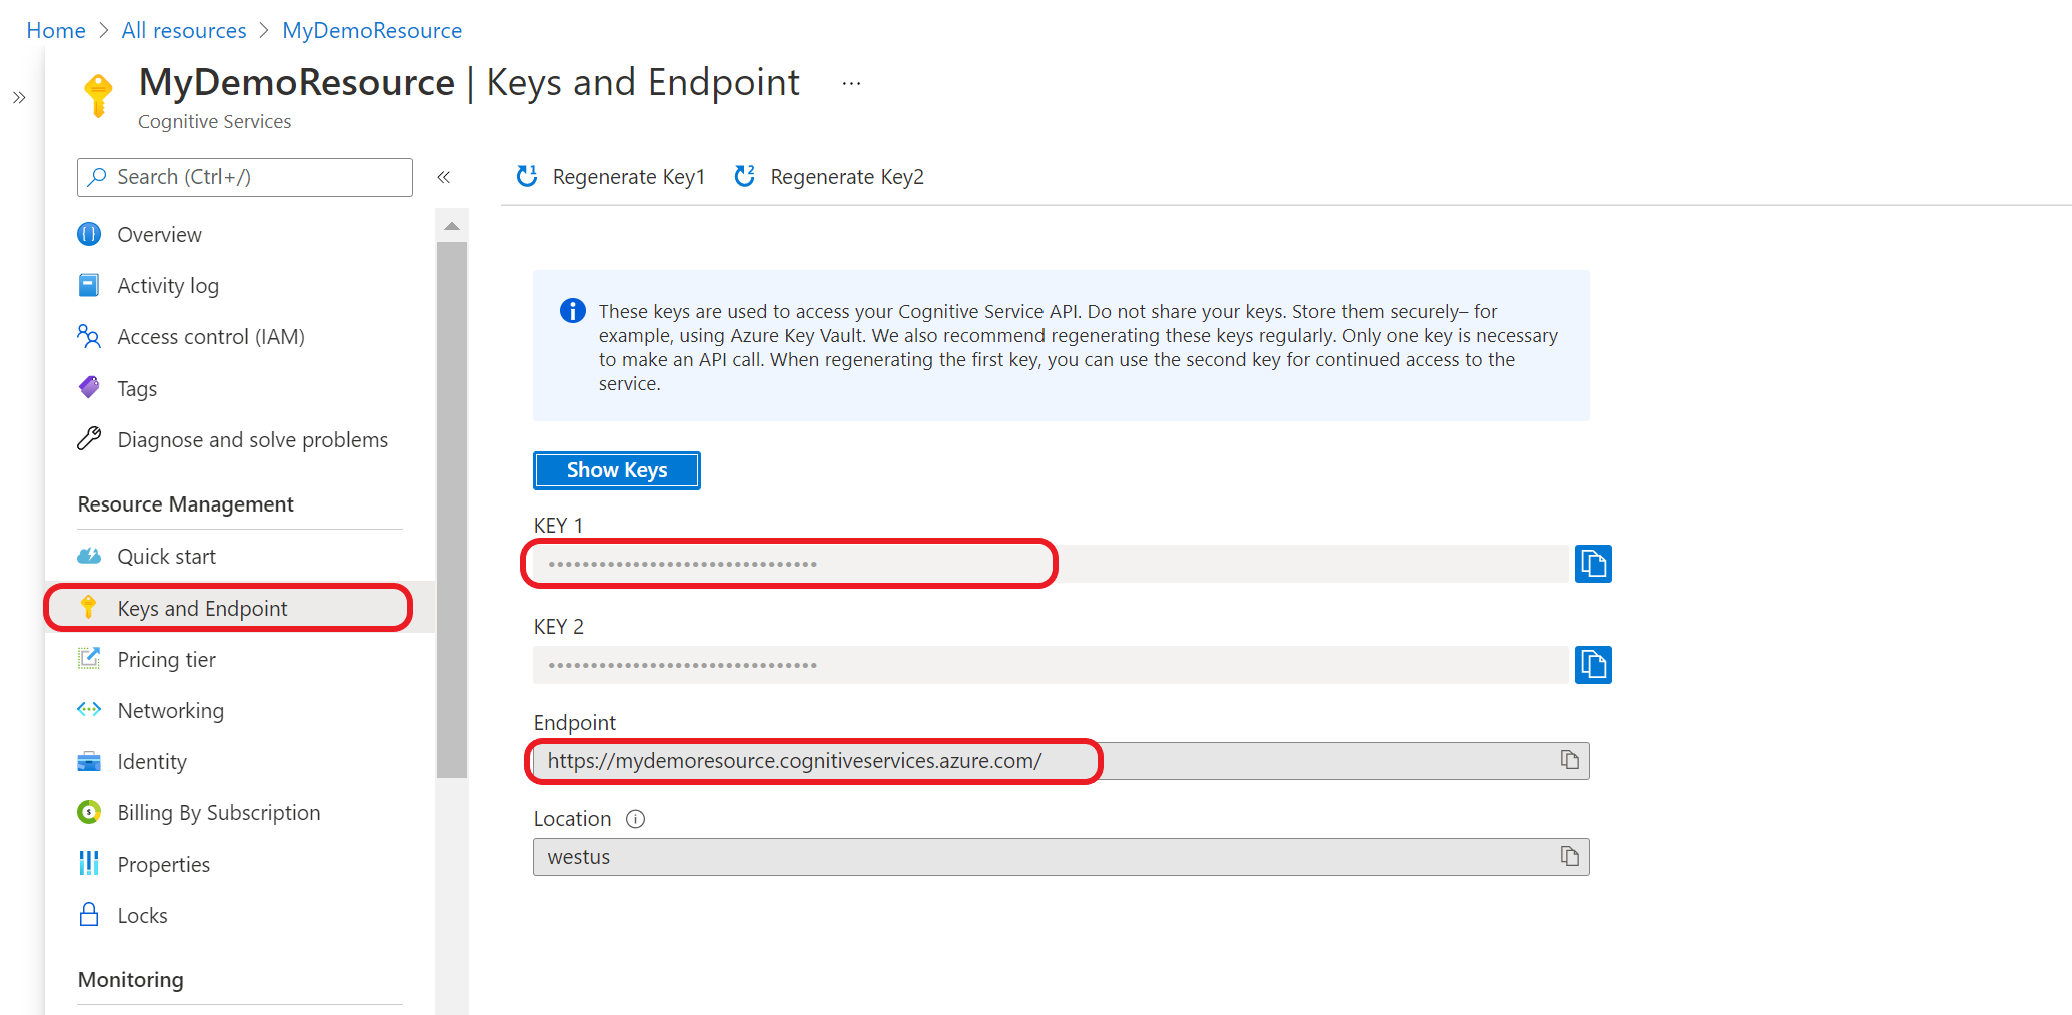
Go to your resource overview page in the Azure portal
From the menu on the left side, select Keys and Endpoint. You will use the endpoint and key for the API requests

Create a custom NER project
Once your resource and storage account are configured, create a new custom NER project. A project is a work area for building your custom ML models based on your data. Your project can only be accessed by you and others who have access to the Language resource being used.
Use the tags file you downloaded from the sample data in the previous step and add it to the body of the following request.
Trigger import project job
Submit a POST request using the following URL, headers, and JSON body to import your labels file. Make sure that your labels file follow the accepted format.
If a project with the same name already exists, the data of that project is replaced.
{Endpoint}/language/authoring/analyze-text/projects/{projectName}/:import?api-version={API-VERSION}
| Placeholder | Value | Example |
|---|---|---|
{ENDPOINT} |
The endpoint for authenticating your API request. | https://<your-custom-subdomain>.cognitiveservices.azure.com |
{PROJECT-NAME} |
The name for your project. This value is case-sensitive. | myProject |
{API-VERSION} |
The version of the API you are calling. The value referenced here is for the latest version released. See Model lifecycle to learn more about other available API versions. | 2022-05-01 |
Headers
Use the following header to authenticate your request.
| Key | Value |
|---|---|
Ocp-Apim-Subscription-Key |
The key to your resource. Used for authenticating your API requests. |
Body
Use the following JSON in your request. Replace the placeholder values below with your own values.
{
    "projectFileVersion": "{API-VERSION}",
    "stringIndexType": "Utf16CodeUnit",
    "metadata": {
        "projectName": "{PROJECT-NAME}",
        "projectKind": "CustomEntityRecognition",
        "description": "Trying out custom NER",
        "language": "{LANGUAGE-CODE}",
        "multilingual": true,
        "storageInputContainerName": "{CONTAINER-NAME}",
        "settings": {}
    },
    "assets": {
    "projectKind": "CustomEntityRecognition",
        "entities": [
            {
                "category": "Entity1"
            },
            {
                "category": "Entity2"
            }
        ],
        "documents": [
            {
                "location": "{DOCUMENT-NAME}",
                "language": "{LANGUAGE-CODE}",
                "dataset": "{DATASET}",
                "entities": [
                    {
                        "regionOffset": 0,
                        "regionLength": 500,
                        "labels": [
                            {
                                "category": "Entity1",
                                "offset": 25,
                                "length": 10
                            },
                            {
                                "category": "Entity2",
                                "offset": 120,
                                "length": 8
                            }
                        ]
                    }
                ]
            },
            {
                "location": "{DOCUMENT-NAME}",
                "language": "{LANGUAGE-CODE}",
                "dataset": "{DATASET}",
                "entities": [
                    {
                        "regionOffset": 0,
                        "regionLength": 100,
                        "labels": [
                            {
                                "category": "Entity2",
                                "offset": 20,
                                "length": 5
                            }
                        ]
                    }
                ]
            }
        ]
    }
}
| Key | Placeholder | Value | Example |
|---|---|---|---|
api-version |
{API-VERSION} |
The version of the API you are calling. The version used here must be the same API version in the URL. Learn more about other available API versions | 2022-03-01-preview |
projectName |
{PROJECT-NAME} |
The name of your project. This value is case-sensitive. | myProject |
projectKind |
CustomEntityRecognition |
Your project kind. | CustomEntityRecognition |
language |
{LANGUAGE-CODE} |
A string specifying the language code for the documents used in your project. If your project is a multilingual project, choose the language code of the majority of the documents. | en-us |
multilingual |
true |
A boolean value that enables you to have documents in multiple languages in your dataset and when your model is deployed you can query the model in any supported language (not necessarily included in your training documents. See language support for information on multilingual support. | true |
storageInputContainerName |
{CONTAINER-NAME} | The name of your Azure storage container where you have uploaded your documents. | myContainer |
entities |
Array containing all the entity types you have in the project. These are the entity types that will be extracted from your documents into. | ||
documents |
Array containing all the documents in your project and list of the entities labeled within each document. | [] | |
location |
{DOCUMENT-NAME} |
The location of the documents in the storage container. Since all the documents are in the root of the container this should be the document name. | doc1.txt |
dataset |
{DATASET} |
The test set to which this file will go to when split before training. See How to train a model for more information on how your data is split. Possible values for this field are Train and Test. |
Train |
Once you send your API request, you’ll receive a 202 response indicating that the job was submitted correctly. In the response headers, extract the operation-location value. It will be formatted like this:
{ENDPOINT}/language/authoring/analyze-text/projects/{PROJECT-NAME}/import/jobs/{JOB-ID}?api-version={API-VERSION}
{JOB-ID} is used to identify your request, since this operation is asynchronous. You’ll use this URL to get the import job status.
Possible error scenarios for this request:
- The selected resource doesn't have proper permissions for the storage account.
- The
storageInputContainerNamespecified doesn't exist. - Invalid language code is used, or if the language code type isn't string.
multilingualvalue is a string and not a boolean.
Get import job status
Use the following GET request to get the status of your importing your project. Replace the placeholder values below with your own values.
Request URL
{ENDPOINT}/language/authoring/analyze-text/projects/{PROJECT-NAME}/import/jobs/{JOB-ID}?api-version={API-VERSION}
| Placeholder | Value | Example |
|---|---|---|
{ENDPOINT} |
The endpoint for authenticating your API request. | https://<your-custom-subdomain>.cognitiveservices.azure.com |
{PROJECT-NAME} |
The name of your project. This value is case-sensitive. | myProject |
{JOB-ID} |
The ID for locating your model's training status. This value is in the location header value you received in the previous step. |
xxxxxxxx-xxxx-xxxx-xxxx-xxxxxxxxxxxxx |
{API-VERSION} |
The version of the API you are calling. The value referenced here is for the latest version released. See Model lifecycle to learn more about other available API versions. | 2022-05-01 |
Headers
Use the following header to authenticate your request.
| Key | Value |
|---|---|
Ocp-Apim-Subscription-Key |
The key to your resource. Used for authenticating your API requests. |
Train your model
Typically after you create a project, you go ahead and start tagging the documents you have in the container connected to your project. For this quickstart, you have imported a sample tagged dataset and initialized your project with the sample JSON tags file.
Start training job
After your project has been imported, you can start training your model.
Submit a POST request using the following URL, headers, and JSON body to submit a training job. Replace the placeholder values below with your own values.
{ENDPOINT}/language/authoring/analyze-text/projects/{PROJECT-NAME}/:train?api-version={API-VERSION}
| Placeholder | Value | Example |
|---|---|---|
{ENDPOINT} |
The endpoint for authenticating your API request. | https://<your-custom-subdomain>.cognitiveservices.azure.com |
{PROJECT-NAME} |
The name of your project. This value is case-sensitive. | myProject |
{API-VERSION} |
The version of the API you are calling. The value referenced here is for the latest version released. See Model lifecycle to learn more about other available API versions. | 2022-05-01 |
Headers
Use the following header to authenticate your request.
| Key | Value |
|---|---|
Ocp-Apim-Subscription-Key |
The key to your resource. Used for authenticating your API requests. |
Request body
Use the following JSON in your request body. The model will be given the {MODEL-NAME} once training is complete. Only successful training jobs will produce models.
{
	"modelLabel": "{MODEL-NAME}",
	"trainingConfigVersion": "{CONFIG-VERSION}",
	"evaluationOptions": {
		"kind": "percentage",
		"trainingSplitPercentage": 80,
		"testingSplitPercentage": 20
	}
}
| Key | Placeholder | Value | Example |
|---|---|---|---|
| modelLabel | {MODEL-NAME} |
The model name that will be assigned to your model once trained successfully. | myModel |
| trainingConfigVersion | {CONFIG-VERSION} |
This is the model version that will be used to train the model. | 2022-05-01 |
| evaluationOptions | Option to split your data across training and testing sets. | {} |
|
| kind | percentage |
Split methods. Possible values are percentage or manual. See How to train a model for more information. |
percentage |
| trainingSplitPercentage | 80 |
Percentage of your tagged data to be included in the training set. Recommended value is 80. |
80 |
| testingSplitPercentage | 20 |
Percentage of your tagged data to be included in the testing set. Recommended value is 20. |
20 |
Note
The trainingSplitPercentage and testingSplitPercentage are only required if Kind is set to percentage and the sum of both percentages should be equal to 100.
Once you send your API request, you’ll receive a 202 response indicating that the job was submitted correctly. In the response headers, extract the location value. It will be formatted like this:
{ENDPOINT}/language/authoring/analyze-text/projects/{PROJECT-NAME}/train/jobs/{JOB-ID}?api-version={API-VERSION}
{JOB-ID} is used to identify your request, since this operation is asynchronous. You can use this URL to get the training status.
Get training job status
Training could take sometime between 10 and 30 minutes for this sample dataset. You can use the following request to keep polling the status of the training job until it is successfully completed.
Use the following GET request to get the status of your model's training progress. Replace the placeholder values below with your own values.
Request URL
{ENDPOINT}/language/authoring/analyze-text/projects/{PROJECT-NAME}/train/jobs/{JOB-ID}?api-version={API-VERSION}
| Placeholder | Value | Example |
|---|---|---|
{ENDPOINT} |
The endpoint for authenticating your API request. | https://<your-custom-subdomain>.cognitiveservices.azure.com |
{PROJECT-NAME} |
The name of your project. This value is case-sensitive. | myProject |
{JOB-ID} |
The ID for locating your model's training status. This value is in the location header value you received in the previous step. |
xxxxxxxx-xxxx-xxxx-xxxx-xxxxxxxxxxxxx |
{API-VERSION} |
The version of the API you are calling. The value referenced here is for the latest version released. See Model lifecycle to learn more about other available API versions. | 2022-05-01 |
Headers
Use the following header to authenticate your request.
| Key | Value |
|---|---|
Ocp-Apim-Subscription-Key |
The key to your resource. Used for authenticating your API requests. |
Response Body
Once you send the request, you’ll get the following response.
{
  "result": {
    "modelLabel": "{MODEL-NAME}",
    "trainingConfigVersion": "{CONFIG-VERSION}",
    "estimatedEndDateTime": "2022-04-18T15:47:58.8190649Z",
    "trainingStatus": {
      "percentComplete": 3,
      "startDateTime": "2022-04-18T15:45:06.8190649Z",
      "status": "running"
    },
    "evaluationStatus": {
      "percentComplete": 0,
      "status": "notStarted"
    }
  },
  "jobId": "{JOB-ID}",
  "createdDateTime": "2022-04-18T15:44:44Z",
  "lastUpdatedDateTime": "2022-04-18T15:45:48Z",
  "expirationDateTime": "2022-04-25T15:44:44Z",
  "status": "running"
}
Deploy your model
Generally after training a model you would review it's evaluation details and make improvements if necessary. In this quickstart, you will just deploy your model, and make it available for you to try in Language Studio, or you can call the prediction API.
Start deployment job
Submit a PUT request using the following URL, headers, and JSON body to submit a deployment job. Replace the placeholder values below with your own values.
{Endpoint}/language/authoring/analyze-text/projects/{projectName}/deployments/{deploymentName}?api-version={API-VERSION}
| Placeholder | Value | Example |
|---|---|---|
{ENDPOINT} |
The endpoint for authenticating your API request. | https://<your-custom-subdomain>.cognitiveservices.azure.com |
{PROJECT-NAME} |
The name of your project. This value is case-sensitive. | myProject |
{DEPLOYMENT-NAME} |
The name of your deployment. This value is case-sensitive. | staging |
{API-VERSION} |
The version of the API you are calling. The value referenced here is for the latest version released. See Model lifecycle to learn more about other available API versions. | 2022-05-01 |
Headers
Use the following header to authenticate your request.
| Key | Value |
|---|---|
Ocp-Apim-Subscription-Key |
The key to your resource. Used for authenticating your API requests. |
Request body
Use the following JSON in the body of your request. Use the name of the model you to assign to the deployment.
{
  "trainedModelLabel": "{MODEL-NAME}"
}
| Key | Placeholder | Value | Example |
|---|---|---|---|
| trainedModelLabel | {MODEL-NAME} |
The model name that will be assigned to your deployment. You can only assign successfully trained models. This value is case-sensitive. | myModel |
Once you send your API request, you’ll receive a 202 response indicating that the job was submitted correctly. In the response headers, extract the operation-location value. It will be formatted like this:
{ENDPOINT}/language/authoring/analyze-text/projects/{PROJECT-NAME}/deployments/{DEPLOYMENT-NAME}/jobs/{JOB-ID}?api-version={API-VERSION}
{JOB-ID} is used to identify your request, since this operation is asynchronous. You can use this URL to get the deployment status.
Get deployment job status
Use the following GET request to query the status of the deployment job. You can use the URL you received from the previous step, or replace the placeholder values below with your own values.
{ENDPOINT}/language/authoring/analyze-text/projects/{PROJECT-NAME}/deployments/{DEPLOYMENT-NAME}/jobs/{JOB-ID}?api-version={API-VERSION}
| Placeholder | Value | Example |
|---|---|---|
{ENDPOINT} |
The endpoint for authenticating your API request. | https://<your-custom-subdomain>.cognitiveservices.azure.com |
{PROJECT-NAME} |
The name of your project. This value is case-sensitive. | myProject |
{DEPLOYMENT-NAME} |
The name of your deployment. This value is case-sensitive. | staging |
{JOB-ID} |
The ID for locating your model's training status. This is in the location header value you received in the previous step. |
xxxxxxxx-xxxx-xxxx-xxxx-xxxxxxxxxxxxx |
{API-VERSION} |
The version of the API you are calling. The value referenced here is for the latest version released. See Model lifecycle to learn more about other available API versions. | 2022-05-01 |
Headers
Use the following header to authenticate your request.
| Key | Value |
|---|---|
Ocp-Apim-Subscription-Key |
The key to your resource. Used for authenticating your API requests. |
Response Body
Once you send the request, you will get the following response. Keep polling this endpoint until the status parameter changes to "succeeded". You should get a 200 code to indicate the success of the request.
{
    "jobId":"{JOB-ID}",
    "createdDateTime":"{CREATED-TIME}",
    "lastUpdatedDateTime":"{UPDATED-TIME}",
    "expirationDateTime":"{EXPIRATION-TIME}",
    "status":"running"
}
Extract custom entities
After your model is deployed, you can start using it to extract entities from your text using the prediction API. In the sample dataset you downloaded earlier you can find some test documents that you can use in this step.
Submit a custom NER task
Use this POST request to start a text classification task.
{ENDPOINT}/language/analyze-text/jobs?api-version={API-VERSION}
| Placeholder | Value | Example |
|---|---|---|
{ENDPOINT} |
The endpoint for authenticating your API request. | https://<your-custom-subdomain>.cognitiveservices.azure.com |
{API-VERSION} |
The version of the API you are calling. The value referenced here is for the latest version released. See Model lifecycle to learn more about other available API versions. | 2022-05-01 |
Headers
| Key | Value |
|---|---|
| Ocp-Apim-Subscription-Key | Your key that provides access to this API. |
Body
{
  "displayName": "Extracting entities",
  "analysisInput": {
    "documents": [
      {
        "id": "1",
        "language": "{LANGUAGE-CODE}",
        "text": "Text1"
      },
      {
        "id": "2",
        "language": "{LANGUAGE-CODE}",
        "text": "Text2"
      }
    ]
  },
  "tasks": [
     {
      "kind": "CustomEntityRecognition",
      "taskName": "Entity Recognition",
      "parameters": {
        "projectName": "{PROJECT-NAME}",
        "deploymentName": "{DEPLOYMENT-NAME}"
      }
    }
  ]
}
| Key | Placeholder | Value | Example |
|---|---|---|---|
displayName |
{JOB-NAME} |
Your job name. | MyJobName |
documents |
[{},{}] | List of documents to run tasks on. | [{},{}] |
id |
{DOC-ID} |
Document name or ID. | doc1 |
language |
{LANGUAGE-CODE} |
A string specifying the language code for the document. If this key isn't specified, the service will assume the default language of the project that was selected during project creation. See language support for a list of supported language codes. | en-us |
text |
{DOC-TEXT} |
Document task to run the tasks on. | Lorem ipsum dolor sit amet |
tasks |
List of tasks we want to perform. | [] |
|
taskName |
CustomEntityRecognition |
The task name | CustomEntityRecognition |
parameters |
List of parameters to pass to the task. | ||
project-name |
{PROJECT-NAME} |
The name for your project. This value is case-sensitive. | myProject |
deployment-name |
{DEPLOYMENT-NAME} |
The name of your deployment. This value is case-sensitive. | prod |
Response
You will receive a 202 response indicating that your task has been submitted successfully. In the response headers, extract operation-location.
operation-location is formatted like this:
{ENDPOINT}/language/analyze-text/jobs/{JOB-ID}?api-version={API-VERSION}
You can use this URL to query the task completion status and get the results when task is completed.
Get task results
Use the following GET request to query the status/results of the custom entity recognition task.
{ENDPOINT}/language/analyze-text/jobs/{JOB-ID}?api-version={API-VERSION}
| Placeholder | Value | Example |
|---|---|---|
{ENDPOINT} |
The endpoint for authenticating your API request. | https://<your-custom-subdomain>.cognitiveservices.azure.com |
{API-VERSION} |
The version of the API you are calling. The value referenced here is for the latest version released. See Model lifecycle to learn more about other available API versions. | 2022-05-01 |
Headers
| Key | Value |
|---|---|
| Ocp-Apim-Subscription-Key | Your key that provides access to this API. |
Response Body
The response will be a JSON document with the following parameters
{
  "createdDateTime": "2021-05-19T14:32:25.578Z",
  "displayName": "MyJobName",
  "expirationDateTime": "2021-05-19T14:32:25.578Z",
  "jobId": "xxxx-xxxx-xxxxx-xxxxx",
  "lastUpdateDateTime": "2021-05-19T14:32:25.578Z",
  "status": "succeeded",
  "tasks": {
    "completed": 1,
    "failed": 0,
    "inProgress": 0,
    "total": 1,
    "items": [
      {
        "kind": "EntityRecognitionLROResults",
        "taskName": "Recognize Entities",
        "lastUpdateDateTime": "2020-10-01T15:01:03Z",
        "status": "succeeded",
        "results": {
          "documents": [
            {
              "entities": [
                {
                  "category": "Event",
                  "confidenceScore": 0.61,
                  "length": 4,
                  "offset": 18,
                  "text": "trip"
                },
                {
                  "category": "Location",
                  "confidenceScore": 0.82,
                  "length": 7,
                  "offset": 26,
                  "subcategory": "GPE",
                  "text": "Seattle"
                },
                {
                  "category": "DateTime",
                  "confidenceScore": 0.8,
                  "length": 9,
                  "offset": 34,
                  "subcategory": "DateRange",
                  "text": "last week"
                }
              ],
              "id": "1",
              "warnings": []
            }
          ],
          "errors": [],
          "modelVersion": "2020-04-01"
        }
      }
    ]
  }
}
Clean up resources
When you no longer need your project, you can delete it with the following DELETE request. Replace the placeholder values with your own values.
{Endpoint}/language/authoring/analyze-text/projects/{projectName}?api-version={API-VERSION}
| Placeholder | Value | Example |
|---|---|---|
{ENDPOINT} |
The endpoint for authenticating your API request. | https://<your-custom-subdomain>.cognitiveservices.azure.com |
{PROJECT-NAME} |
The name for your project. This value is case-sensitive. | myProject |
{API-VERSION} |
The version of the API you are calling. The value referenced here is for the latest version released. See Model lifecycle to learn more about other available API versions. | 2022-05-01 |
Headers
Use the following header to authenticate your request.
| Key | Value |
|---|---|
| Ocp-Apim-Subscription-Key | The key to your resource. Used for authenticating your API requests. |
Once you send your API request, you will receive a 202 response indicating success, which means your project has been deleted. A successful call results with an Operation-Location header used to check the status of the job.
Next steps
After you've created entity extraction model, you can:
When you start to create your own custom NER projects, use the how-to articles to learn more about tagging, training and consuming your model in greater detail:
Feedback
Coming soon: Throughout 2024 we will be phasing out GitHub Issues as the feedback mechanism for content and replacing it with a new feedback system. For more information see: https://aka.ms/ContentUserFeedback.
Submit and view feedback for