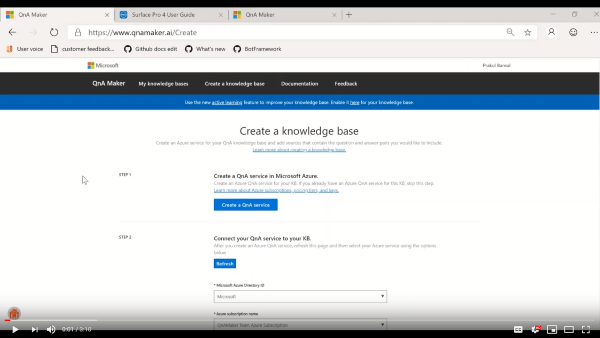
Use follow-up prompts to create multiple turns of a conversation
Use follow-up prompts and context to manage the multiple turns, known as multi-turn, for your bot from one question to another.
To see how multi-turn works, view the following demonstration video:
Note
The QnA Maker service is being retired on the 31st of March, 2025. A newer version of the question and answering capability is now available as part of Azure AI Language. For question answering capabilities within the Language Service, see question answering. Starting 1st October, 2022 you won’t be able to create new QnA Maker resources. For information on migrating existing QnA Maker knowledge bases to question answering, consult the migration guide.
What is a multi-turn conversation?
Some questions can't be answered in a single turn. When you design your client application (chat bot) conversations, a user might ask a question that needs to be filtered or refined to determine the correct answer. You make this flow through the questions possible by presenting the user with follow-up prompts.
When a user asks a question, QnA Maker returns the answer and any follow-up prompts. This response allows you to present the follow-up questions as choices.
Caution
Multi-turn prompts are not extracted from FAQ documents. If you need multi-turn extraction, remove the question marks that designate the QnA pairs as FAQs.
Example multi-turn conversation with chat bot
With multi-turn, a chat bot manages a conversation with a user to determine the final answer, as shown in the following image:
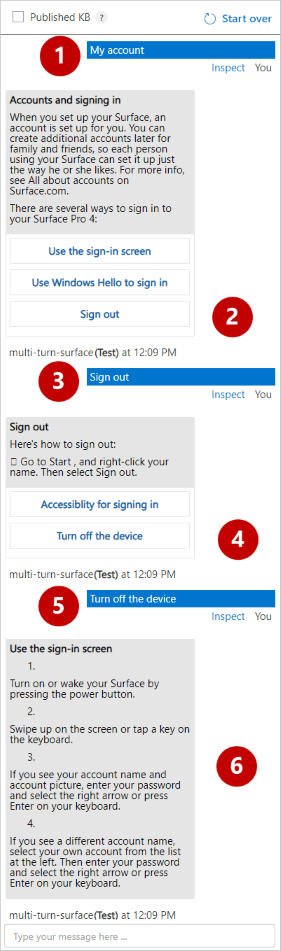
In the preceding image, a user has started a conversation by entering My account. The knowledge base has three linked question-and-answer pairs. To refine the answer, the user selects one of the three choices in the knowledge base. The question (#1), has three follow-up prompts, which are presented in the chat bot as three options (#2).
When the user selects an option (#3), the next list of refining options (#4) is presented. This sequence continues (#5) until the user determines the correct, final answer (#6).
Use multi-turn in a bot
After publishing your KB, you can select the Create Bot button to deploy your QnA Maker bot to Azure AI Bot Service. The prompts will appear in the chat clients that you have enabled for your bot.
Create a multi-turn conversation from a document's structure
When you create a knowledge base, the Populate your KB section displays an Enable multi-turn extraction from URLs, .pdf or .docx files check box.
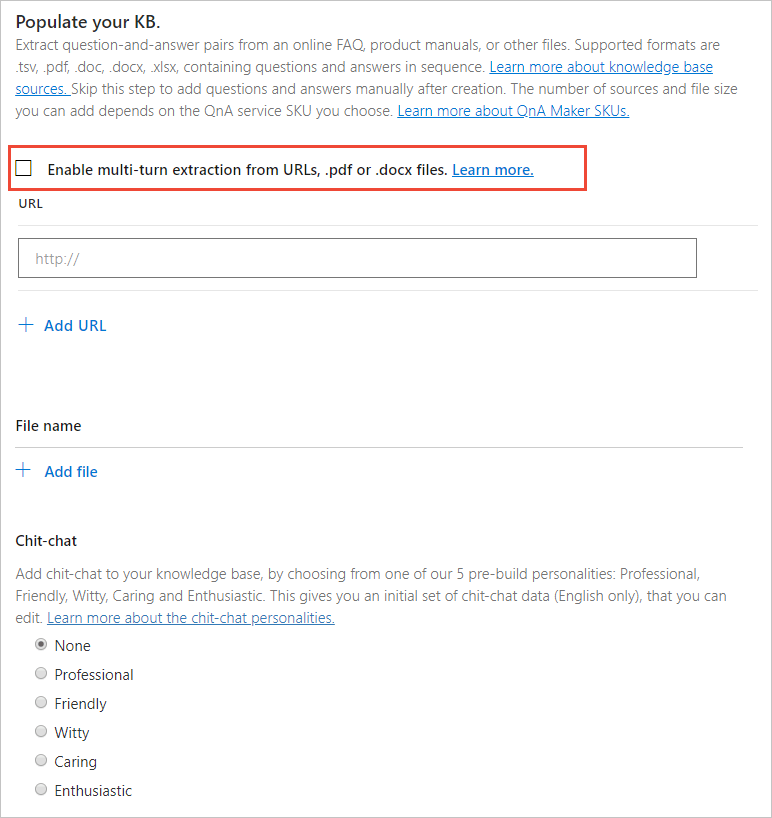
When you select this option, QnA Maker extracts the hierarchy present in the document structure. The hierarchy is converted in to follow up prompts and the root of the hierarchy serves as the parent QnA. In some documents, the root of the hierarchy does not have content, which could serve as an answer. You can provide the 'Default Answer Text' to be used as a substitute answer text to extract such hierarchies.
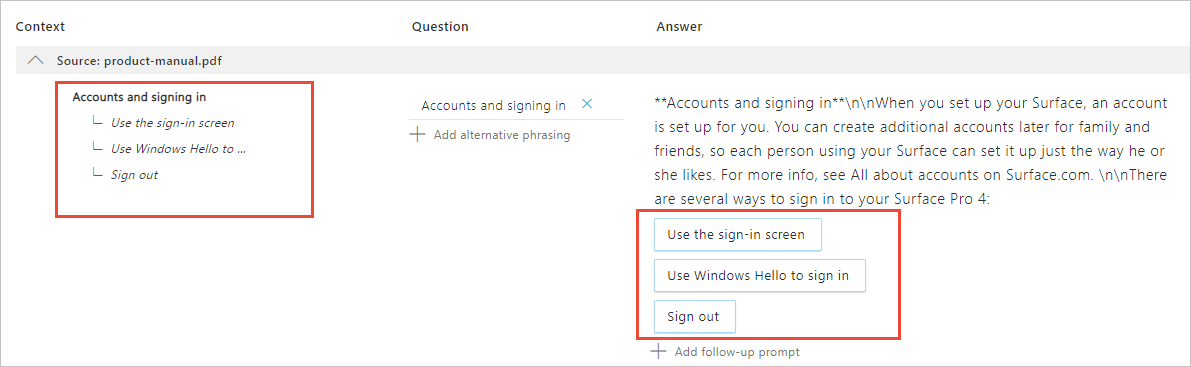
Multi-turn structure can be inferred only from URLs, PDF files, or DOCX files. For an example of structure, view an image of a Microsoft Surface user manual PDF file.

Building your own multi-turn document
If you are creating a multi-turn document, keep in mind the following guidelines:
Use headings and sub-headings to denote hierarchy. For example, use a h1 to denote the parent QnA and h2 to denote the QnA that should be taken as prompt. Use small heading size to denote subsequent hierarchy. Don't use style, color, or some other mechanism to imply structure in your document, QnA Maker will not extract the multi-turn prompts.
First character of heading must be capitalized.
Do not end a heading with a question mark,
?.You can use the sample document as an example to create your own multi-turn document.
Adding files to a multi-turn KB
When you add a hierarchical document, QnA Maker determines follow-up prompts from the structure to create conversational flow.
- In QnA Maker, select an existing knowledge base, which was created with Enable multi-turn extraction from URLs, .pdf or .docx files enabled.
- Go to the Settings page, select the file or URL to add.
- Save and train the knowledge base.
Caution
Support for using an exported TSV or XLS multi-turn knowledge base file as a data source for a new or empty knowledge base isn't supported. You need to Import that file type, from the Settings page of the QnA Maker portal, in order to add exported multi-turn prompts to a knowledge base.
Create knowledge base with multi-turn prompts with the Create API
You can create a knowledge case with multi-turn prompts using the QnA Maker Create API. The prompts are adding in the context property's prompts array.
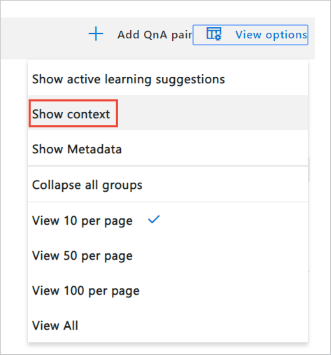
Show questions and answers with context
Reduce the displayed question-and-answer pairs to only those pairs with contextual conversations.
Select View options, and then select Show context. The list displays question-and-answer pairs that contain follow-up prompts.
The multi-turn context is displayed in the first column.

In the preceding image, #1 indicates bold text in the column, which signifies the current question. The parent question is the top item in the row. Any questions below it are the linked question-and-answer pairs. These items are selectable, so that you can immediately go to the other context items.
Add an existing question-and-answer pair as a follow-up prompt
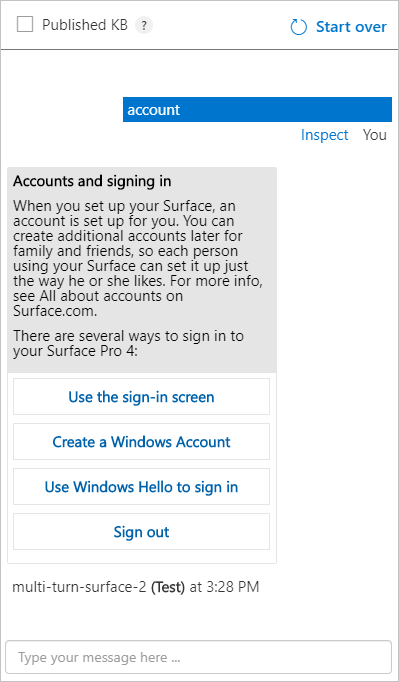
The original question, My account, has follow-up prompts, such as Accounts and signing in.
Add a follow-up prompt to an existing question-and-answer pair that isn't currently linked. Because the question isn't linked to any question-and-answer pair, the current view setting needs to be changed.
To link an existing question-and-answer pair as a follow-up prompt, select the row for the question-and-answer pair. For the Surface manual, search for Sign out to reduce the list.
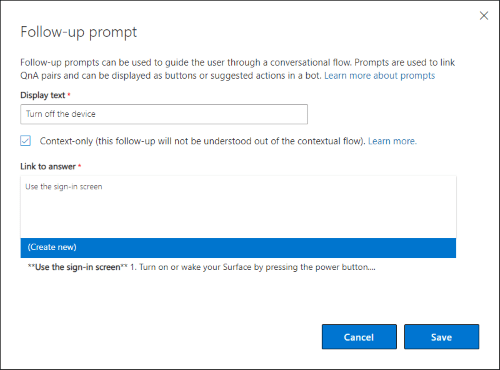
In the row for Signout, in the Answer column, select Add follow-up prompt.
In the fields in the Follow-up prompt pop-up window, enter the following values:
Field Value Display text Enter Turn off the device. This is custom text to display in the follow-up prompt. Context-only Select this check box. An answer is returned only if the question specifies context. Link to answer Enter Use the sign-in screen to find the existing question-and-answer pair. One match is returned. Select this answer as the follow-up, and then select Save.
After you've added the follow-up prompt, select Save and train in the top navigation.
Edit the display text
When a follow-up prompt is created, and an existing question-and-answer pair is entered as the Link to Answer, you can enter new Display text. This text doesn't replace the existing question, and it doesn't add a new alternate question. It is separate from those values.
To edit the display text, search for and select the question in the Context field.
In the row for that question, select the follow-up prompt in the answer column.
Select the display text you want to edit, and then select Edit.

In the Follow-up prompt pop-up window, change the existing display text.
When you're done editing the display text, select Save.
In the top navigation bar, Save and train.
Add a new question-and-answer pair as a follow-up prompt
When you add a new question-and-answer pair to the knowledge base, each pair should be linked to an existing question as a follow-up prompt.
On the knowledge base toolbar, search for and select the existing question-and-answer pair for Accounts and signing in.
In the Answer column for this question, select Add follow-up prompt.
Under Follow-up prompt (PREVIEW), create a new follow-up prompt by entering the following values:
Field Value Display text Create a Windows Account. The custom text to display in the follow-up prompt. Context-only Select this check box. This answer is returned only if the question specifies context. Link to answer Enter the following text as the answer:
Create a Windows account with a new or existing email account.
When you save and train the database, this text will be converted.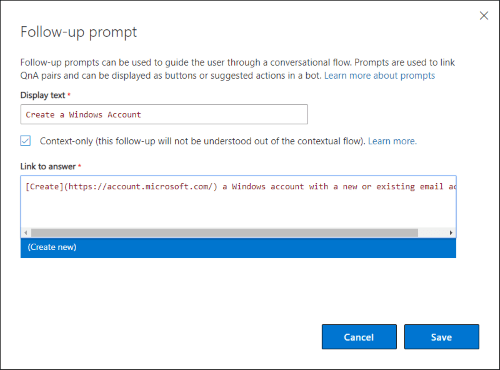
Select Create new, and then select Save.
This action creates a new question-and-answer pair and links the selected question as a follow-up prompt. The Context column, for both questions, indicates a follow-up prompt relationship.
Select View options, and then select Show context (PREVIEW).
The new question shows how it's linked.

The parent question displays a new question as one of its choices.

After you've added the follow-up prompt, select Save and train in the top navigation bar.

View multi-turn during testing of follow-up prompts
When you test the question with follow-up prompts in the Test pane, the response includes the follow-up prompts.
A JSON request to return an initial answer and follow-up prompts
Use the empty context object to request the answer to the user's question and include follow-up prompts.
{
  "question": "accounts and signing in",
  "top": 10,
  "userId": "Default",
  "isTest": false,
  "context": {}
}
A JSON response to return an initial answer and follow-up prompts
The preceding section requested an answer and any follow-up prompts to Accounts and signing in. The response includes the prompt information, which is located at answers[0].context, and the text to display to the user.
{
    "answers": [
        {
            "questions": [
                "Accounts and signing in"
            ],
            "answer": "**Accounts and signing in**\n\nWhen you set up your Surface, an account is set up for you. You can create additional accounts later for family and friends, so each person using your Surface can set it up just the way he or she likes. For more info, see All about accounts on Surface.com. \n\nThere are several ways to sign in to your Surface Pro 4: ",
            "score": 100.0,
            "id": 15,
            "source": "product-manual.pdf",
            "metadata": [],
            "context": {
                "isContextOnly": true,
                "prompts": [
                    {
                        "displayOrder": 0,
                        "qnaId": 16,
                        "qna": null,
                        "displayText": "Use the sign-in screen"
                    }
                ]
            }
        },
        {
            "questions": [
                "Sign out"
            ],
            "answer": "**Sign out**\n\nHere's how to sign out: \n\n  Go to Start, and right-click your name. Then select Sign out. ",
            "score": 38.01,
            "id": 18,
            "source": "product-manual.pdf",
            "metadata": [],
            "context": {
                "isContextOnly": true,
                "prompts": [
                    {
                        "displayOrder": 0,
                        "qnaId": 16,
                        "qna": null,
                        "displayText": "Turn off the device"
                    }
                ]
            }
        },
        {
            "questions": [
                "Use the sign-in screen"
            ],
            "answer": "**Use the sign-in screen**\n\n1.  \n\nTurn on or wake your Surface by pressing the power button. \n\n2.  \n\nSwipe up on the screen or tap a key on the keyboard. \n\n3.  \n\nIf you see your account name and account picture, enter your password and select the right arrow or press Enter on your keyboard. \n\n4.  \n\nIf you see a different account name, select your own account from the list at the left. Then enter your password and select the right arrow or press Enter on your keyboard. ",
            "score": 27.53,
            "id": 16,
            "source": "product-manual.pdf",
            "metadata": [],
            "context": {
                "isContextOnly": true,
                "prompts": []
            }
        }
    ]
}
The prompts array provides text in the displayText property and the qnaId value. You can show these answers as the next displayed choices in the conversation flow and then send the selected qnaId back to QnA Maker in the following request.
A JSON request to return a non-initial answer and follow-up prompts
Fill the context object to include the previous context.
In the following JSON request, the current question is Use Windows Hello to sign in and the previous question was accounts and signing in.
{
  "question": "Use Windows Hello to sign in",
  "top": 10,
  "userId": "Default",
  "isTest": false,
  "qnaId": 17,
  "context": {
    "previousQnAId": 15,
    "previousUserQuery": "accounts and signing in"
  }
}
A JSON response to return a non-initial answer and follow-up prompts
The QnA Maker GenerateAnswer JSON response includes the follow-up prompts in the context property of the first item in the answers object:
{
    "answers": [
        {
            "questions": [
                "Use Windows Hello to sign in"
            ],
            "answer": "**Use Windows Hello to sign in**\n\nSince Surface Pro 4 has an infrared (IR) camera, you can set up Windows Hello to sign in just by looking at the screen. \n\nIf you have the Surface Pro 4 Type Cover with Fingerprint ID (sold separately), you can set up your Surface sign you in with a touch. \n\nFor more info, see What is Windows Hello? on Windows.com. ",
            "score": 100.0,
            "id": 17,
            "source": "product-manual.pdf",
            "metadata": [],
            "context": {
                "isContextOnly": true,
                "prompts": []
            }
        },
        {
            "questions": [
                "Meet Surface Pro 4"
            ],
            "answer": "**Meet Surface Pro 4**\n\nGet acquainted with the features built in to your Surface Pro 4. \n\nHere's a quick overview of Surface Pro 4 features: \n\n\n\n\n\n\n\nPower button \n\n\n\n\n\nPress the power button to turn your Surface Pro 4 on. You can also use the power button to put it to sleep and wake it when you're ready to start working again. \n\n\n\n\n\n\n\nTouchscreen \n\n\n\n\n\nUse the 12.3" display, with its 3:2 aspect ratio and 2736 x 1824 resolution, to watch HD movies, browse the web, and use your favorite apps. \n\nThe new Surface G5 touch processor provides up to twice the touch accuracy of Surface Pro 3 and lets you use your fingers to select items, zoom in, and move things around. For more info, see Surface touchscreen on Surface.com. \n\n\n\n\n\n\n\nSurface Pen \n\n\n\n\n\nEnjoy a natural writing experience with a pen that feels like an actual pen. Use Surface Pen to launch Cortana in Windows or open OneNote and quickly jot down notes or take screenshots. \n\nSee Using Surface Pen (Surface Pro 4 version) on Surface.com for more info. \n\n\n\n\n\n\n\nKickstand \n\n\n\n\n\nFlip out the kickstand and work or play comfortably at your desk, on the couch, or while giving a hands-free presentation. \n\n\n\n\n\n\n\nWi-Fi and Bluetooth® \n\n\n\n\n\nSurface Pro 4 supports standard Wi-Fi protocols (802.11a/b/g/n/ac) and Bluetooth 4.0. Connect to a wireless network and use Bluetooth devices like mice, printers, and headsets. \n\nFor more info, see Add a Bluetooth device and Connect Surface to a wireless network on Surface.com. \n\n\n\n\n\n\n\nCameras \n\n\n\n\n\nSurface Pro 4 has two cameras for taking photos and recording video: an 8-megapixel rear-facing camera with autofocus and a 5-megapixel, high-resolution, front-facing camera. Both cameras record video in 1080p, with a 16:9 aspect ratio. Privacy lights are located on the right side of both cameras. \n\nSurface Pro 4 also has an infrared (IR) face-detection camera so you can sign in to Windows without typing a password. For more info, see Windows Hello on Surface.com. \n\nFor more camera info, see Take photos and videos with Surface and Using autofocus on Surface 3, Surface Pro 4, and Surface Book on Surface.com. \n\n\n\n\n\n\n\nMicrophones \n\n\n\n\n\nSurface Pro 4 has both a front and a back microphone. Use the front microphone for calls and recordings. Its noise-canceling feature is optimized for use with Skype and Cortana. \n\n\n\n\n\n\n\nStereo speakers \n\n\n\n\n\nStereo front speakers provide an immersive music and movie playback experience. To learn more, see Surface sound, volume, and audio accessories on Surface.com. \n\n\n\n\n",
            "score": 21.92,
            "id": 3,
            "source": "product-manual.pdf",
            "metadata": [],
            "context": {
                "isContextOnly": true,
                "prompts": [
                    {
                        "displayOrder": 0,
                        "qnaId": 4,
                        "qna": null,
                        "displayText": "Ports and connectors"
                    }
                ]
            }
        },
        {
            "questions": [
                "Use the sign-in screen"
            ],
            "answer": "**Use the sign-in screen**\n\n1.  \n\nTurn on or wake your Surface by pressing the power button. \n\n2.  \n\nSwipe up on the screen or tap a key on the keyboard. \n\n3.  \n\nIf you see your account name and account picture, enter your password and select the right arrow or press Enter on your keyboard. \n\n4.  \n\nIf you see a different account name, select your own account from the list at the left. Then enter your password and select the right arrow or press Enter on your keyboard. ",
            "score": 19.04,
            "id": 16,
            "source": "product-manual.pdf",
            "metadata": [],
            "context": {
                "isContextOnly": true,
                "prompts": []
            }
        }
    ]
}
Query the knowledge base with the QnA Maker ID
If you are building a custom application, in the initial question's response, any follow-up prompts, and its associated qnaId are returned. Now that you have the ID, you can pass it in the follow-up prompt's request body. If the request body contains the qnaId, and the context object (which contains the previous QnA Maker properties), then GenerateAnswer will return the exact question by ID, instead of using the ranking algorithm to find the answer by the question text.
Display order is supported in the Update API
The display text and display order, returned in the JSON response, is supported for editing by the Update API.
Add or delete multi-turn prompts with the Update API
You can add or delete multi-turn prompts using the QnA Maker Update API. The prompts are adding in the context property's promptsToAdd array and the promptsToDelete array.
Export knowledge base for version control
QnA Maker supports version control by including multi-turn conversation steps in the exported file.
Next steps
- Learn more about contextual conversations from this dialog sample or learn more about conceptual bot design for multi-turn conversations.