In this quickstart, you install the Speech SDK for C#.
Code samples in the documentation are written in C# 8 and run on .NET standard 2.0.
Platform requirements
The Speech SDK for C# is compatible with Windows, Linux, and macOS.
Caution
This article references CentOS, a Linux distribution that is nearing End Of Life (EOL) status. Please consider your use and planning accordingly. For more information, see the CentOS End Of Life guidance.
To use the Speech SDK in Alpine Linux, create a Debian chroot environment as documented in the Alpine Linux Wiki on running glibc programs. Then follow the Debian instructions here.
This article references CentOS, a Linux distribution that is nearing End Of Life (EOL) status. Please consider your use and planning accordingly. For more information, see the CentOS End Of Life guidance.
Create a Visual Studio project and install the Speech SDK
You need to install the Speech SDK NuGet package so you can reference it in your code. To do that, you might first need to create a helloworld project. If you already have a project with the .NET desktop development workload available, you can use that project and skip to Use NuGet Package Manager to install the Speech SDK.
Create a helloworld project
Open Visual Studio.
Under Get started, select Create a new project.
In Create a new project, choose Console App (.NET Framework), and then select Next.
In Configure your new project, for Project name enter helloworld, choose or create the directory path in Location, and then select Create.
From the Visual Studio menu bar, select Tools > Get Tools and Features. This step opens Visual Studio Installer and displays the Modifying dialog box.
Check whether the .NET desktop development workload is available. If the workload isn't installed, select it, and then select Modify to start the installation. It might take a few minutes to download and install.
If .NET desktop development is already selected, select Close to close the dialog box.
Close Visual Studio Installer.
Use NuGet Package Manager to install the Speech SDK
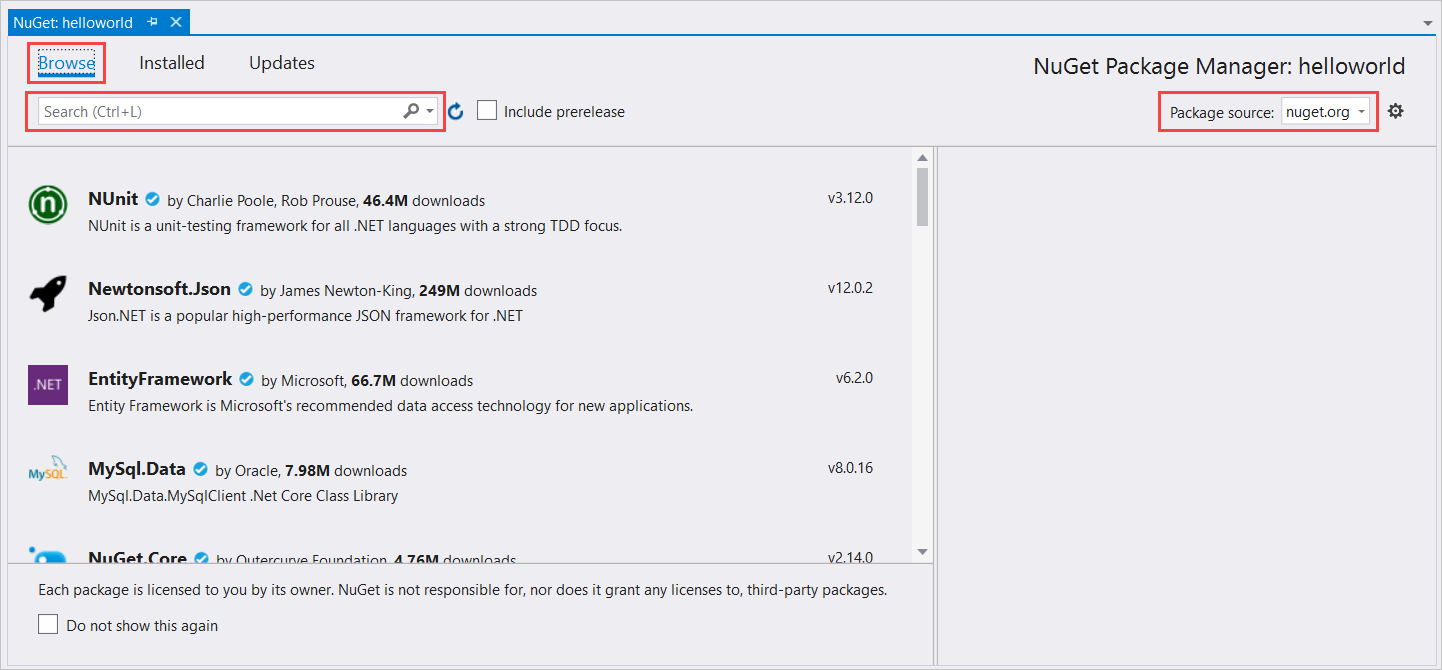
In Solution Explorer, right-click the helloworld project, and then select Manage NuGet Packages to show NuGet Package Manager.
In the upper-right corner, find the Package Source dropdown box, and make sure that nuget.org is selected.
In the upper-left corner, select Browse.
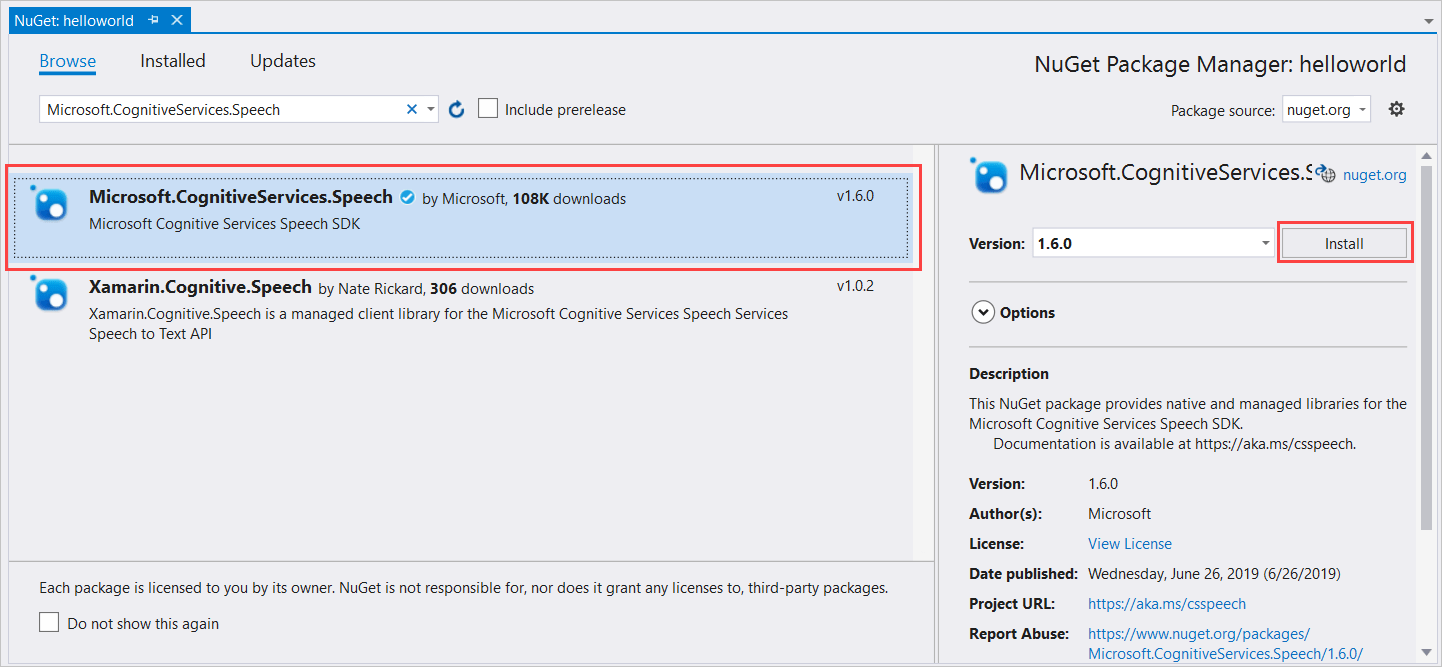
In the search box, enter Microsoft.CognitiveServices.Speech and select Enter.
From the search results, select the Microsoft.CognitiveServices.Speech package, and then select Install to install the latest stable version.
Accept all agreements and licenses to start the installation.
After the package is installed, a confirmation appears in the Package Manager Console window.
Choose target architecture
To build and run the console application, create a platform configuration that matches your computer's architecture.
From the menu, select Build > Configuration Manager. The Configuration Manager dialog box appears.
In the Active solution platform dropdown box, select New. The New Solution Platform dialog box appears.
In the Type or select the new platform dropdown box:
If you're running 64-bit Windows, select x64.
If you're running 32-bit Windows, select x86.
Select OK and then Close.
This guide shows how to install the Speech SDK for a .NET Core console app. .NET Core is an open-source, cross-platform .NET platform that implements the .NET Standard specification.
Create a Visual Studio project and install the Speech SDK
Start Visual Studio 2017.
Make sure that the .NET cross-platform development workload is available. Select Tools > Get Tools and Features from the Visual Studio menu bar to open the Visual Studio Installer. If this workload is already enabled, close the dialog box.
Otherwise, select .NET Core cross-platform development, and select Modify. Installation of the new feature takes a moment.
Create a new Visual C# .NET Core console app in the New Project dialog box. From the left pane, expand Installed > Visual C# > .NET Core. Then select Console App (.NET Core). For the project name, enter helloworld.
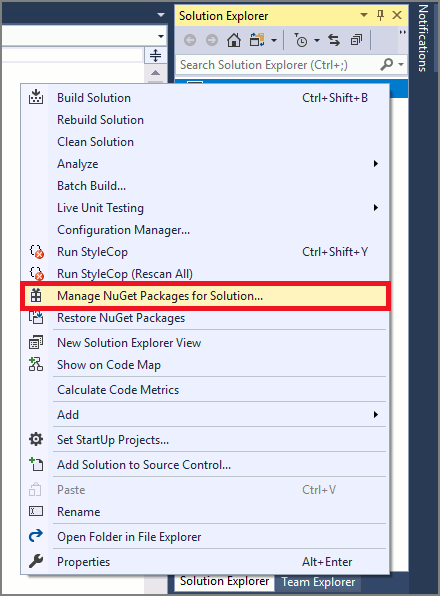
Install and reference the Speech SDK NuGet package. In Solution Explorer, right-click the solution and select Manage NuGet Packages for Solution.
Select Browse, then in the upper-right corner, for Package Source, select nuget.org.
Search for the Microsoft.CognitiveServices.Speech package, and install it into the helloworld project.
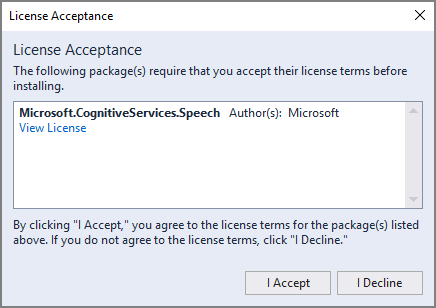
Accept the displayed license to begin installation of the NuGet package.
After the package is installed, a confirmation appears in the Package Manager console.
For Unity development, the Speech SDK supports Windows Desktop (x86 and x64) or Universal Windows Platform (x86, x64, ARM/ARM64), Android (x86, ARM32/64), iOS (x64 simulator and ARM64), and Mac (x64).
On Android, an ARM-based Android device (API 23: Android 6.0 Marshmallow or later) enabled for development with a working microphone.
On iOS, an iOS device (ARM64) enabled for development with a working microphone.
On macOS, a Mac device (x64) and the latest LTS version of Unity 2019 or later for integrated support for microphone access in Unity Player settings.
Install the Speech SDK for Unity
To install the Speech SDK for Unity, follow these steps:
Download and open the Speech SDK for Unity. The SDK is packaged as a Unity asset package (.unitypackage) and should already be associated with Unity. When the asset package is opened, the Import Unity Package dialog box appears. You might need to create and open an empty project for this step to work.
Ensure that all files are selected, and then select Import. After a few moments, the Unity asset package is imported into your project.
For more information about importing asset packages into Unity, see the Unity documentation.
This guide shows how to create a Universal Windows Platform (UWP) project and install the Speech SDK for C#. The Universal Windows Platform lets you develop apps that run on any device that supports Windows 10, including PCs, Xbox, Surface Hub, and other devices.
Create a Visual Studio project and install the Speech SDK
To create a Visual Studio project for UWP development, you need to:
Set up Visual Studio development options.
Create the project and select the target architecture.
Set up audio capture.
Install the Speech SDK.
Set up Visual Studio development options
Make sure you're set up correctly in Visual Studio for UWP development:
Open Visual Studio to display the start window.
Select Continue without code to go to the Visual Studio IDE.
From the Visual Studio menu bar, select Tools > Get Tools and Features to open Visual Studio Installer and view the Modifying dialog box.
On the Workloads tab, find the Universal Windows Platform development workload. If that workload is already selected, close the Modifying dialog box and close Visual Studio Installer. Skip the rest of this procedure.
Select Universal Windows Platform development, and then select Modify.
In the Before we get started dialog box, select Continue to install the UWP development workload. Installation of the new feature might take a while.
Close Visual Studio Installer.
Create the project
Next, create your project and select the target architecture:
On the Visual Studio menu bar, select File > New > Project to display the Create a new project window.
Find and select Blank App (Universal Windows). Make sure that you select the C# version of this project type, as opposed to Visual Basic.
Select Next.
In the Configure your new project dialog box, in Project name, enter helloworld.
In Location, go to and select or create the folder where you want to save your project.
Select Create.
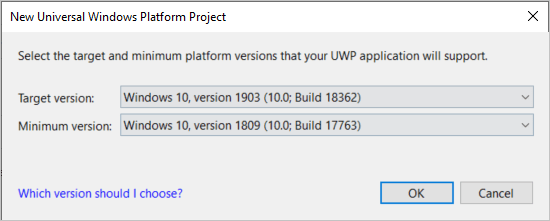
In the New Universal Windows Platform Project window, in Minimum version (the second dropdown box), select Windows 10 Fall Creators Update (10.0; Build 16299). That requirement is the minimum for the Speech SDK.
In Target version (the first dropdown box), choose a value identical to or later than the value in Minimum version.
Select OK. You return to the Visual Studio IDE, with the new project created and visible on the Solution Explorer pane.
Select your target platform architecture. On the Visual Studio toolbar, find the Solution Platforms dropdown box. If you don't see it, select View > Toolbars > Standard to display the toolbar that contains Solution Platforms.
If you're running 64-bit Windows, select x64 in the drop-down box. 64-bit Windows can also run 32-bit applications, so you can choose x86 if you prefer.
Note
The Speech SDK supports all Intel-compatible processors, but only x64 versions of ARM processors.
Set up audio capture
Allow the project to capture audio input:
In Solution Explorer, select Package.appxmanifest to open the package application manifest.
Select the Capabilities tab, then select the Microphone capability.
From the menu bar, select File > Save Package.appxmanifest to save your changes.
In Solution Explorer, right-click your solution, and select Manage NuGet Packages for Solution to go to the NuGet - Solution window.
Select Browse. In Package source, select nuget.org.
In the Search box, enter Microsoft.CognitiveServices.Speech. Choose that package after it appears in the search results.
In the package status pane next to the search results, select your helloworld project.
Select Install.
In the Preview Changes dialog box, select Apply.
In the License Acceptance dialog box, view the license, and then select I Accept. The package installation begins.
When installation is complete, the Output pane displays a message that's similar to the following text: Successfully installed 'Microsoft.CognitiveServices.Speech 1.15.0' to helloworld.
This guide shows how to create a Xamarin forms project and install the Speech SDK. Xamarin is an open-source platform for building modern and performant applications for iOS, Android, and Windows by using .NET.
Create a Visual Studio project and install the Speech SDK
To create a Visual Studio project for cross-platform mobile app development with .NET and Xamarin, you need to:
Set up Visual Studio development options.
Create the project and select the target architecture.
Install the Speech SDK.
Set up Visual Studio development options
Make sure you're set up correctly in Visual Studio for cross-platform mobile development with .NET:
Open Visual Studio 2019. Then select Continue without code.
From the Visual Studio menu, select Tools > Get Tools and Features to open Visual Studio Installer and view the Modifying dialog box.
On the Workloads tab, find the Mobile development with .NET workload. If that workload is already selected, close the Modifying dialog box and close Visual Studio Installer. Skip the rest of this procedure.
Select Mobile development with .NET, and then select Modify.
In the Before we get started dialog box, select Continue to install the workload for mobile development with .NET. Installation of the new feature might take a while.
Close Visual Studio Installer.
Create the project
Next, create your project and select the target architecture:
On the Visual Studio menu bar, select File > New > Project to display the Create a new project window.
Find and select Mobile App (Xamarin.Forms).
Select Next.
In the Configure your new project dialog box, in Project name, enter helloworld.
In Location, go to and select or create the folder where you want to save your project.
Select Create.
In the New Cross Platform App window, select the Blank template, and then select Android, iOS, and Windows (UWP). Select Create.
Select OK. You return to the Visual Studio IDE, with the new project created and visible in the Solution Explorer pane.
Select your target platform architecture and startup project. On the Visual Studio toolbar, find the Solution Platforms dropdown box. If you don't see it, select View > Toolbars > Standard to display the toolbar that contains Solution Platforms.
If you're running 64-bit Windows, select x64 in the drop-down box. You can select x86 if you want because 64-bit Windows also can run 32-bit applications.
In the Start-up Projects dropdown box, select helloworld.UWP (Universal Windows).
In Solution Explorer, right-click your solution. Select Manage NuGet Packages for Solution to go to the NuGet - Solution window.
Select Browse.
In Package source, select nuget.org.
In the Search box, enter Microsoft.CognitiveServices.Speech. Then select that package after it appears in the search results.
Note
The iOS library inside Microsoft.CognitiveServices.Speech NuGet doesn't have bitcode enabled. If you need the bitcode library enabled for your application, use Microsoft.CognitiveServices.Speech.Xamarin.iOS NuGet for the iOS project specifically.
In the package status pane next to the search results, select all projects.
Select Install.
In the Preview Changes dialog box, select OK.
In the License Acceptance dialog box, view the license, and then select I Accept. Install the Speech SDK package reference to all projects.
After installation finishes successfully, you might see the following warning for helloworld.iOS. This warning is a known issue and shouldn't affect your app's functionality.
Could not resolve reference "C:\Users\Default\.nuget\packages\microsoft.cognitiveservices.speech\1.7.0\build\Xamarin.iOS\libMicrosoft.CognitiveServices.Speech.core.a". If this reference is required by your code, you may get compilation errors.
The Speech SDK is now installed. You can now delete or reuse the helloworld project that you created in the previous steps.
This article references CentOS, a Linux distribution that is nearing End Of Life (EOL) status. Please consider your use and planning accordingly. For more information, see the CentOS End Of Life guidance.
The Speech SDK for C++ only supports the following distributions on the x86 (Debian/Ubuntu), x64, ARM32 (Debian/Ubuntu), and ARM64 (Debian/Ubuntu) architectures:
Ubuntu 18.04/20.04
Debian 10/11
Red Hat Enterprise Linux (RHEL) 7/8
CentOS 7
Important
Use the most recent LTS release of the Linux distribution. For example, if you are using Ubuntu 20.04 LTS, use the latest release of Ubuntu 20.04.X.
The Speech SDK depends on the following Linux system libraries:
The shared libraries of the GNU C library, including the POSIX Threads Programming library, libpthreads.
The OpenSSL library (libssl) version 1.x and certificates (ca-certificates).
The shared library for ALSA applications (libasound).
You should also install ca-certificates to establish a secure websocket and avoid the WS_OPEN_ERROR_UNDERLYING_IO_OPEN_FAILED error.
Important
The Speech SDK does not yet support OpenSSL 3.0, which is the default in Ubuntu 22.04 and Debian 12.
To use the Speech SDK in Alpine Linux, create a Debian chroot environment as documented in the Alpine Linux Wiki on running glibc programs. Then follow the Debian instructions here.
This article references CentOS, a Linux distribution that is nearing End Of Life (EOL) status. Please consider your use and planning accordingly. For more information, see the CentOS End Of Life guidance.
Choose a directory for the Speech SDK files. Set the SPEECHSDK_ROOT environment variable to point to that directory. This variable makes it easy to refer to the directory in future commands.
To use the directory speechsdk in your home directory, run the following command:
export SPEECHSDK_ROOT="$HOME/speechsdk"
Create the directory if it doesn't exist:
mkdir -p "$SPEECHSDK_ROOT"
Download and extract the .tar.gz archive that contains the Speech SDK binaries:
Validate the contents of the top-level directory of the extracted package:
ls -l "$SPEECHSDK_ROOT"
The directory listing should contain the partner notices and license files. The listing should also contain an include directory that holds header (.h) files and a lib directory that holds libraries for arm32, arm64, x64, and x86.
Path
Description
license.md
License
ThirdPartyNotices.md
Partner notices
REDIST.txt
Redistribution notice
include
Required header files for C++
lib/arm32
Native library for ARM32 required to link your application
lib/arm64
Native library for ARM64 required to link your application
lib/x64
Native library for x64 required to link your application
lib/x86
Native library for x86 required to link your application
Choose a directory for the Speech SDK files. Set the SPEECHSDK_ROOT environment variable to point to that directory. This variable makes it easy to refer to the directory in future commands.
To use the directory speechsdk in your home directory, run the following command:
export SPEECHSDK_ROOT="$HOME/speechsdk"
Create the directory if it doesn't exist:
mkdir -p "$SPEECHSDK_ROOT"
Download and extract the .zip archive that contains the Speech SDK XCFramework:
Create a project in Visual Studio and install the Speech SDK
To create a Visual Studio project for C++ desktop development, you need to:
Set up Visual Studio development options.
Create the project.
Select the target architecture.
Install the Speech SDK.
Set up Visual Studio development options
To start, make sure you're set up correctly in Visual Studio for C++ desktop development:
Open Visual Studio 2019 to display the start window.
Select Continue without code to go to the Visual Studio IDE.
From the Visual Studio menu bar, select Tools > Get Tools and Features to open Visual Studio Installer and view the Modifying dialog box.
On the Workloads tab, under Windows, find the Desktop development with C++ workload. If that workload isn't already selected, select it.
On the Individual components tab, find NuGet package manager. If it isn't already selected, select it.
Select either Close or Modify. The button name varies depending on whether you selected any features for installation.
If you select Modify, installation begins. The process might take a while.
Close Visual Studio Installer.
Create the project
Next, create your project and select the target architecture:
From the Visual Studio menu, select File > New > Project to display the Create a new project window.
Find and select Console App. Make sure that you select the C++ version of this project type, as opposed to C# or Visual Basic.
Select Next.
In the Configure your new project dialog box, in Project name, enter helloworld.
In Location, go to and select or create the folder where you want to save your project, and then select Create.
Select your target platform architecture. On the Visual Studio toolbar, find the Solution Platforms dropdown box. If you don't see it, select View > Toolbars > Standard to display the toolbar that contains Solution Platforms.
If you're running 64-bit Windows, select x64 in the dropdown box. 64-bit Windows can also run 32-bit applications, so you can choose x86 if you prefer.
In Solution Explorer, right-click your solution, and then select Manage NuGet Packages for Solution to go to the NuGet - Solution window.
Select Browse.
In Package source, select nuget.org.
In the Search box, enter Microsoft.CognitiveServices.Speech. Choose that package after it appears in the search results.
In the package status pane next to the search results, select your helloworld project.
Select Install.
In the Preview Changes dialog box, select OK.
In the License Acceptance dialog box, view the license, and then select I Accept. The package installation begins. When installation is complete, the Output pane displays a message that's similar to the following text: Successfully installed 'Microsoft.CognitiveServices.Speech 1.15.0' to helloworld.
In this quickstart, you install the Speech SDK for Go.
Platform requirements
Caution
This article references CentOS, a Linux distribution that is nearing End Of Life (EOL) status. Please consider your use and planning accordingly. For more information, see the CentOS End Of Life guidance.
The Speech SDK for Go supports the following distributions on the x64 architecture:
Ubuntu 18.04/20.04
Debian 9/10/11
Red Hat Enterprise Linux (RHEL) 8
CentOS 7
Important
Use the most recent LTS release of the Linux distribution. For example, if you are using Ubuntu 20.04 LTS, use the latest release of Ubuntu 20.04.X.
The Speech SDK depends on the following Linux system libraries:
The shared libraries of the GNU C library, including the POSIX Threads Programming library, libpthreads.
The OpenSSL library (libssl) version 1.x and certificates (ca-certificates).
The shared library for ALSA applications (libasound).
You should also install ca-certificates to establish a secure websocket and avoid the WS_OPEN_ERROR_UNDERLYING_IO_OPEN_FAILED error.
Important
The Speech SDK does not yet support OpenSSL 3.0, which is the default in Ubuntu 22.04 and Debian 12.
To use the Speech SDK in Alpine Linux, create a Debian chroot environment as documented in the Alpine Linux Wiki on running glibc programs. Then follow the Debian instructions here.
This article references CentOS, a Linux distribution that is nearing End Of Life (EOL) status. Please consider your use and planning accordingly. For more information, see the CentOS End Of Life guidance.
Choose a directory for the Speech SDK files. Set the SPEECHSDK_ROOT environment variable to point to that directory. This variable makes it easy to refer to the directory in future commands.
To use the directory speechsdk in your home directory, run the following command:
export SPEECHSDK_ROOT="$HOME/speechsdk"
Create the directory if it doesn't exist:
mkdir -p "$SPEECHSDK_ROOT"
Download and extract the .tar.gz archive that contains the Speech SDK binaries:
Validate the contents of the top-level directory of the extracted package:
ls -l "$SPEECHSDK_ROOT"
The directory listing should contain the partner notices and license files. The listing should also contain an include directory that holds header (.h) files and a lib directory that holds libraries for arm32, arm64, x64, and x86.
Path
Description
license.md
License
ThirdPartyNotices.md
Partner notices
REDIST.txt
Redistribution notice
include
Required header files for C++
lib/arm32
Native library for ARM32 required to link your application
lib/arm64
Native library for ARM64 required to link your application
lib/x64
Native library for x64 required to link your application
lib/x86
Native library for x86 required to link your application
Configure the Go environment
The following steps enable your Go environment to find the Speech SDK.
Because the bindings rely on cgo, you need to set the environment variables so Go can find the SDK.
The Speech SDK for Java doesn't support Windows on ARM64.
Caution
This article references CentOS, a Linux distribution that is nearing End Of Life (EOL) status. Please consider your use and planning accordingly. For more information, see the CentOS End Of Life guidance.
The Speech SDK for Java supports the following distributions on the x64, ARM32 (Debian/Ubuntu), and ARM64 (Debian/Ubuntu) architectures:
Ubuntu 18.04/20.04
Debian 10/11
Red Hat Enterprise Linux (RHEL) 7/8
CentOS 7
Important
Use the most recent LTS release of the Linux distribution. For example, if you are using Ubuntu 20.04 LTS, use the latest release of Ubuntu 20.04.X.
The Speech SDK depends on the following Linux system libraries:
The shared libraries of the GNU C library, including the POSIX Threads Programming library, libpthreads.
The OpenSSL library (libssl) version 1.x and certificates (ca-certificates).
The shared library for ALSA applications (libasound).
You should also install ca-certificates to establish a secure websocket and avoid the WS_OPEN_ERROR_UNDERLYING_IO_OPEN_FAILED error.
Important
The Speech SDK does not yet support OpenSSL 3.0, which is the default in Ubuntu 22.04 and Debian 12.
To use the Speech SDK in Alpine Linux, create a Debian chroot environment as documented in the Alpine Linux Wiki on running glibc programs. Then follow the Debian instructions here.
This article references CentOS, a Linux distribution that is nearing End Of Life (EOL) status. Please consider your use and planning accordingly. For more information, see the CentOS End Of Life guidance.
Run the following Maven command to install the Speech SDK and dependencies.
mvn clean dependency:copy-dependencies
Create an Eclipse project and install the Speech SDK
Install the Eclipse Java IDE. This IDE requires Java to already be installed.
Start Eclipse.
In Eclipse Launcher, in the Workspace box, enter the name of a new workspace directory. Then select Launch.
In a moment, the main window of the Eclipse IDE appears. Close the Welcome screen if one is present.
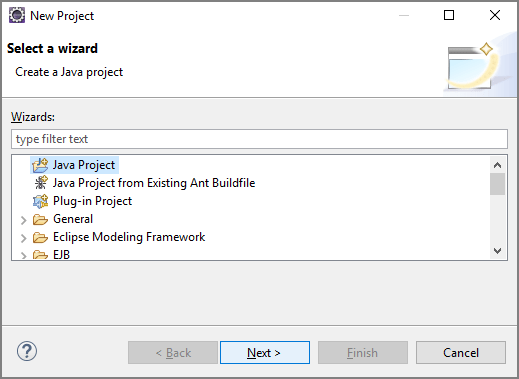
From the Eclipse menu, select File > New > Project.
The New Project dialog box appears. Select Java Project, and then select Next.
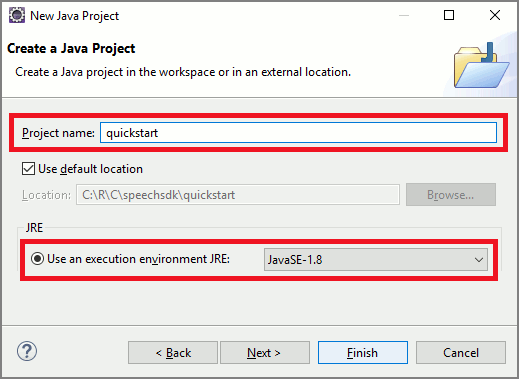
The New Java Project wizard starts. In the Project name field, enter quickstart. Choose JavaSE-1.8 as the execution environment. Select Finish.
If the Open Associated Perspective? window appears, select Open Perspective.
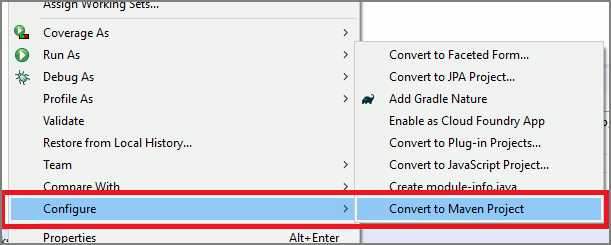
In Package Explorer, right-click the quickstart project. Select Configure > Convert to Maven Project from the context menu.
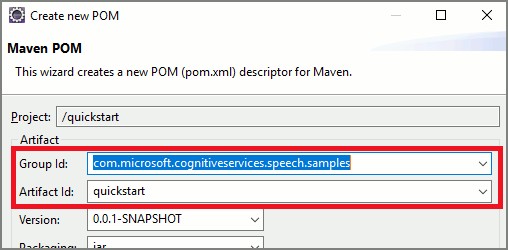
The Create new POM window appears. In the Group Id field, enter com.microsoft.cognitiveservices.speech.samples. In the Artifact Id field, enter quickstart. Then select Finish.
Open the pom.xml file and edit it:
Add a dependencies element at the end of the file, before the closing tag </project>, with the Speech SDK as a dependency:
This guide shows how to install the Speech SDK for Java on Android.
The Speech SDK for Android is packaged as an Android Archive (AAR) file, which includes the necessary libraries and required Android permissions.
Install the Speech SDK by using Android Studio
Create a new project in Android Studio and add the Speech SDK for Java as a library dependency. The setup is based on the Speech SDK Maven Package and Android Studio Chipmunk 2021.2.1.
Create an empty project
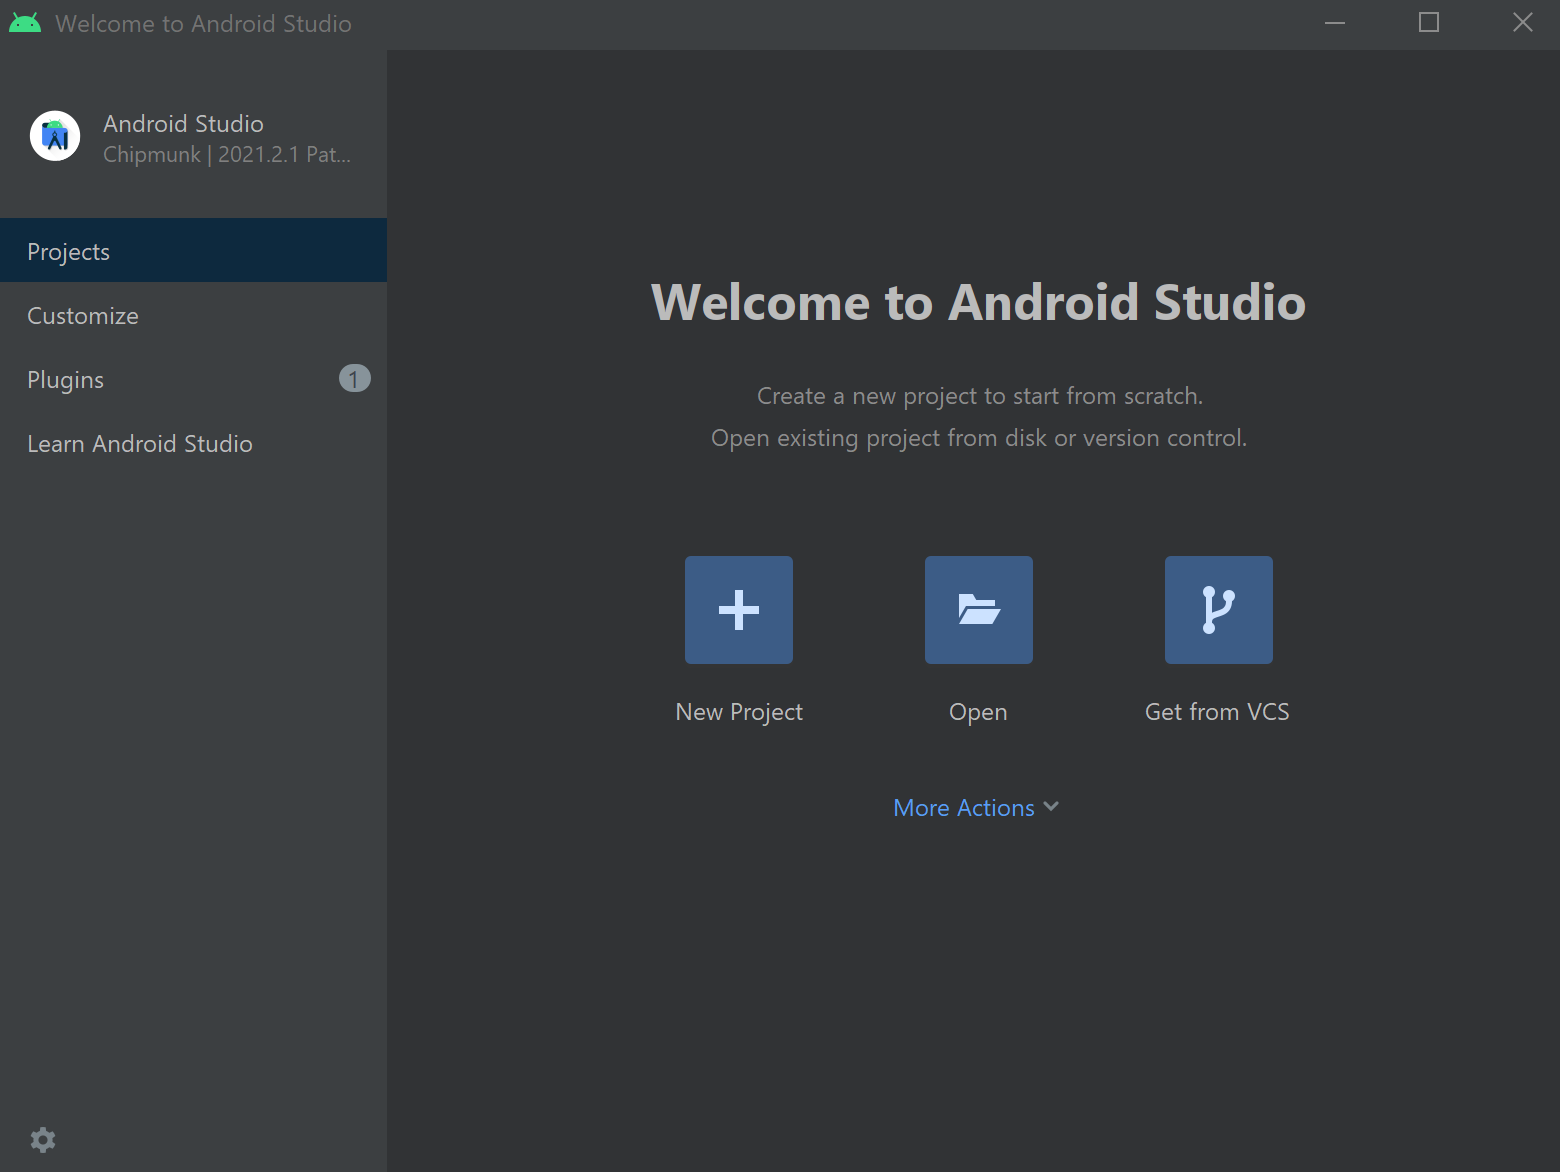
Open Android Studio, and select New project.
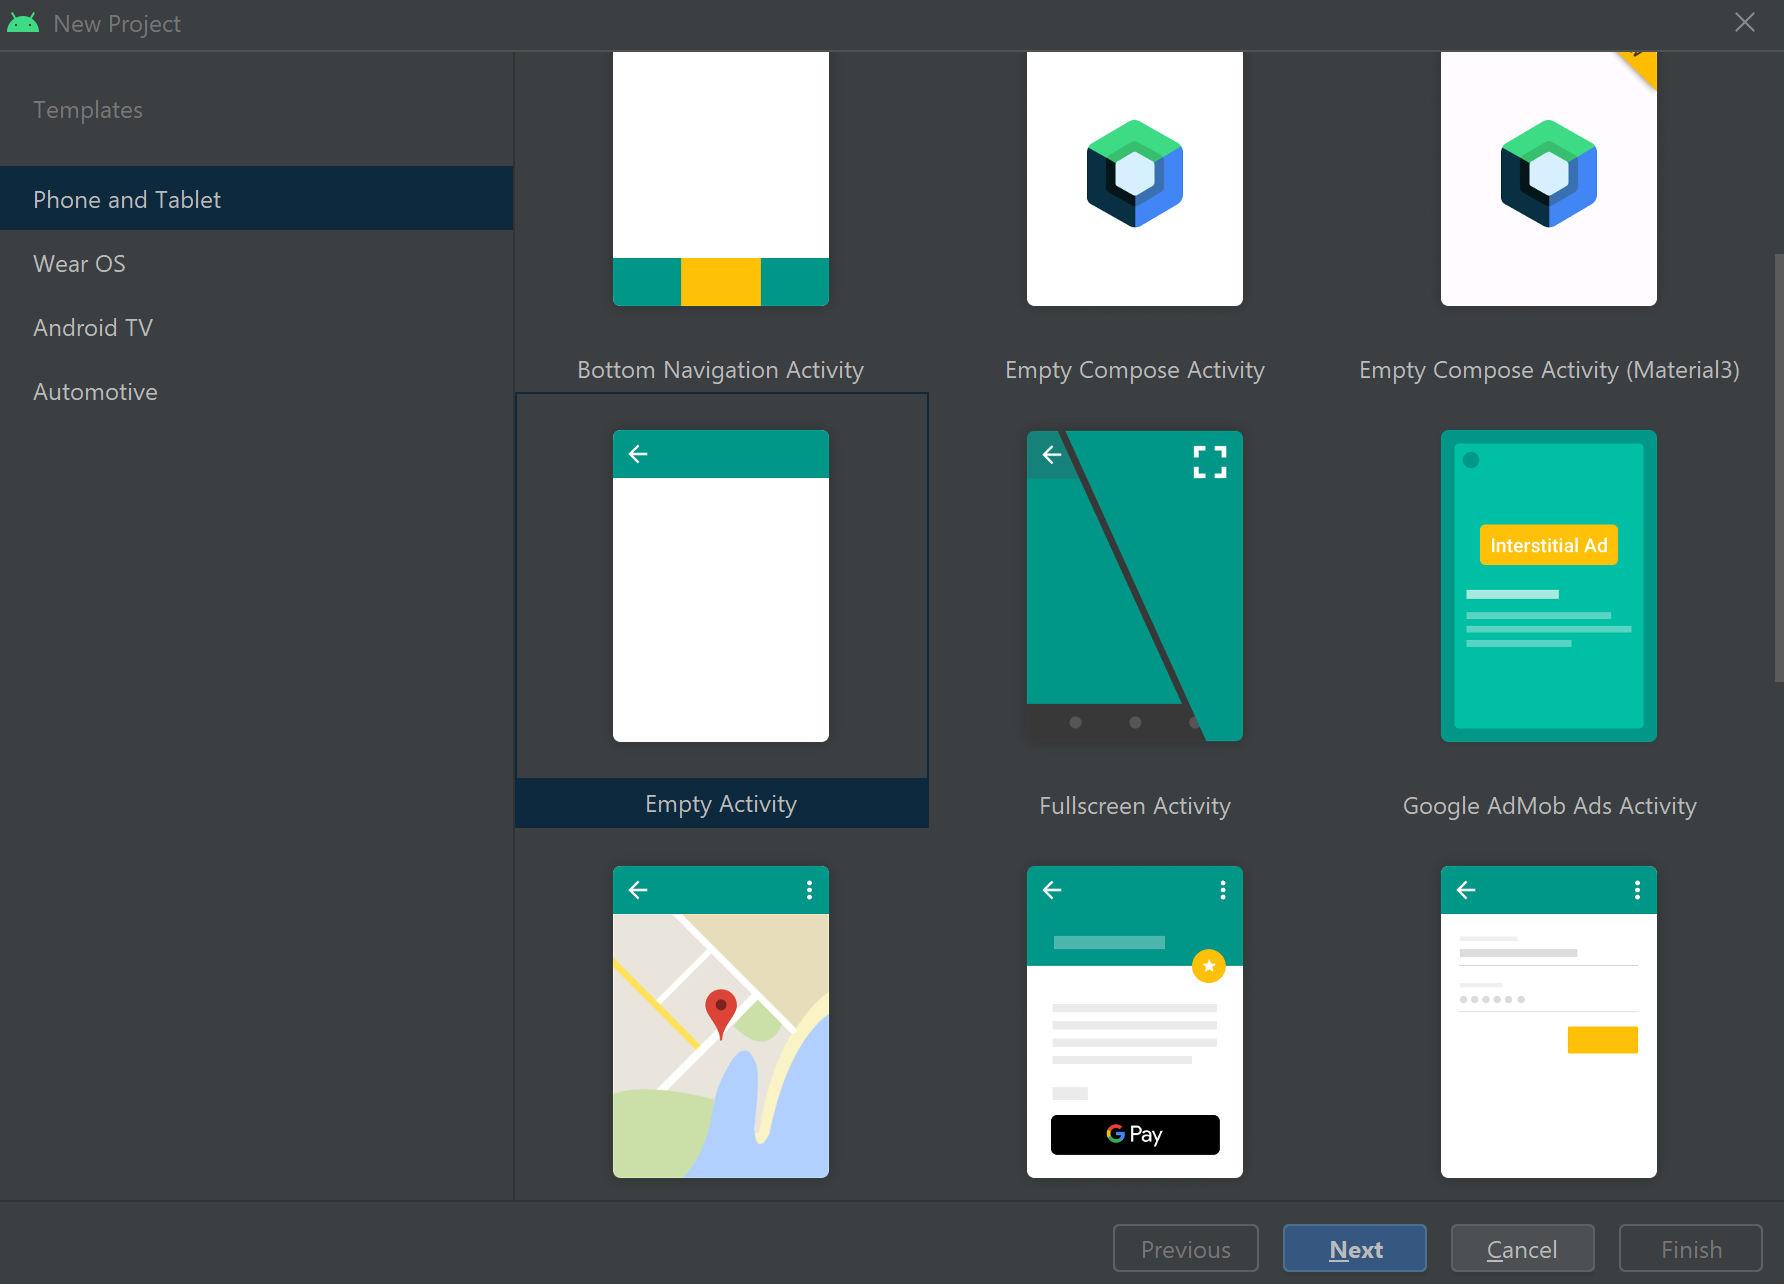
In the New project window that appears, select Phone and Tablet > Empty Activity, and then select Next.
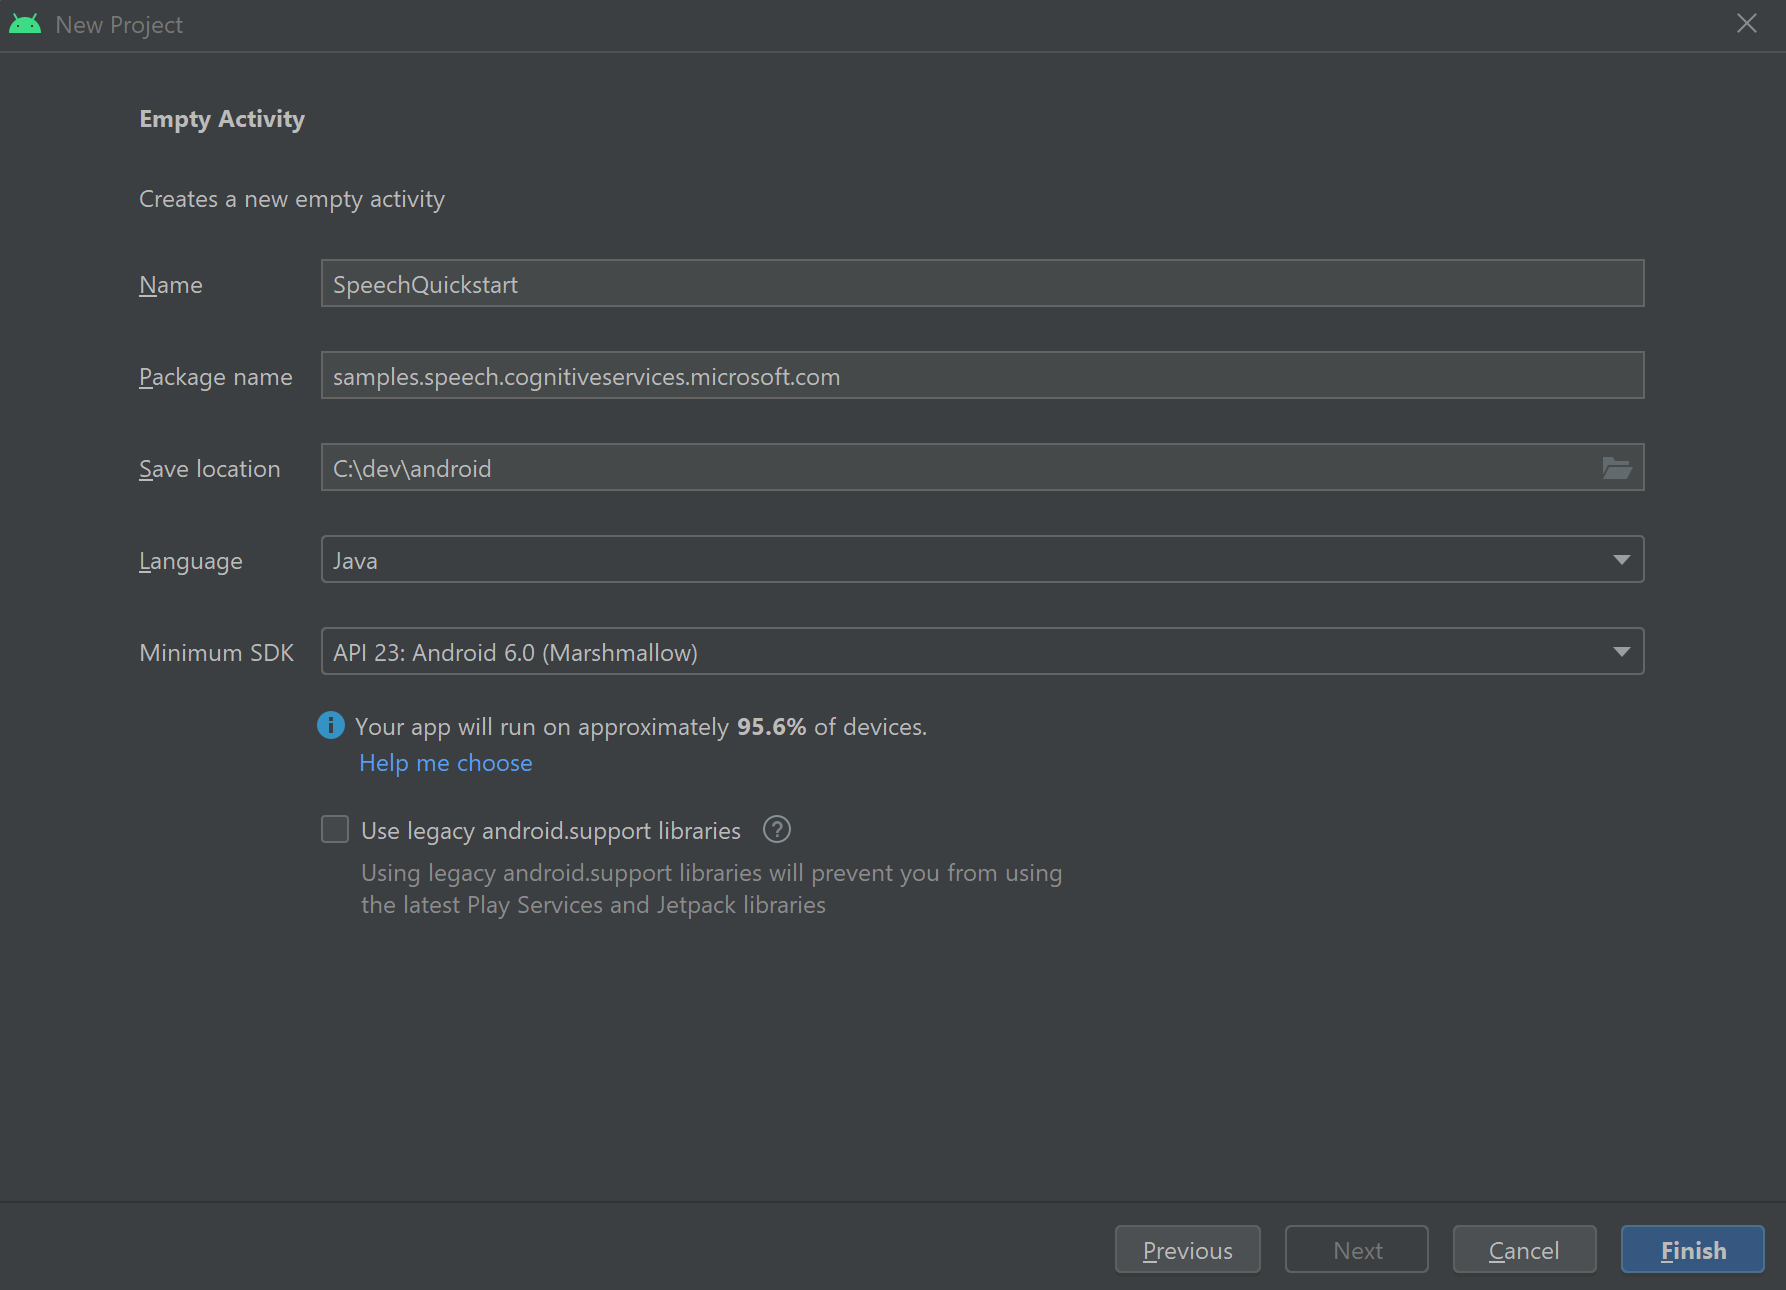
Enter SpeechQuickstart in the Name text box.
Enter samples.speech.cognitiveservices.microsoft.com in the Package name text box.
Select a project directory in the Save location selection box.
Select Java in the Language selection box.
Select API 23: Android 6.0 (Marshmallow) in the Minimum API level selection box.
Select Finish.
Android Studio takes some time to prepare your new project. For your first time using Android Studio, it might take a few minutes to set preferences, accept licenses, and complete the wizard.
Install the Speech SDK for Java on Android
Add the Speech SDK as a dependency in your project.
Select the plus symbol (+) to add a dependency under Declared Dependencies. Then select Library dependency from the dropdown menu.
In the Add Library Dependency window that appears, enter the name and version of the Speech SDK for Java: com.microsoft.cognitiveservices.speech:client-sdk:1.37.0. Then select Search.
Make sure that the selected Group ID is com.microsoft.cognitiveservices.speech, and then select OK.
Select OK to close the Project Structure window and apply your changes to the project.
Understand the architectural implications between Node.js and client web browsers. For example, the document object model (DOM) isn't available for server-side applications. The Node.js file system isn't available to client-side applications.
Install the Speech SDK for JavaScript
Depending on the target environment, use one of the following guides:
This guide shows how to install the Speech SDK for JavaScript for use with a webpage.
Unpack to a folder
Create a new, empty folder. If you want to host the sample on a web server, make sure that the web server can access the folder.
Download the Speech SDK as a .zip package and unpack it into the newly created folder. These files are unpacked:
microsoft.cognitiveservices.speech.sdk.bundle.js: A human-readable version of the Speech SDK.
microsoft.cognitiveservices.speech.sdk.bundle.js.map: A map file to use for debugging SDK code.
microsoft.cognitiveservices.speech.sdk.bundle.d.ts: Object definitions for use with TypeScript.
microsoft.cognitiveservices.speech.sdk.bundle-min.js: A minified version of the Speech SDK.
speech-processor.js: Code to improve performance on some browsers.
Create a new file named index.html in the folder, and open this file with a text editor.
HTML script tag
Download and extract the microsoft.cognitiveservices.speech.sdk.bundle.js file from the Speech SDK for JavaScript. Place it in a folder that your HTML file can access.
If you're targeting a web browser and using the <script> tag, the sdk prefix is not needed. The sdk prefix is an alias that's used to name the require module.
Alternatively, you could directly include a <script> tag in the HTML <head> element, relying on the JSDelivr.
The Speech SDK for Objective-C is available natively as a CocoaPod package for Mac x64 and ARM-based systems.
System requirements for Mac:
A macOS version 10.14 or later
The macOS CocoaPod package is available for download and use with the Xcode 9.4.1 or later integrated development environment (IDE).
Go to the Xcode directory where your .xcodeproj project file is located.
Run pod init to create a pod file named Podfile.
Replace the contents of Podfile with the following content. Update the target name from AppName to the name of your app. Update the platform or pod version as needed.
platform :osx, 10.14
use_frameworks!

target 'AppName' do
  pod 'MicrosoftCognitiveServicesSpeech-macOS', '~> 1.37.0'
end
Run pod install to install the Speech SDK.
Alternatively, download the binary CocoaPod and extract its contents. In your Xcode project, add a reference to the extracted MicrosoftCognitiveServicesSpeech.xcframework folder and its contents.
Note
.NET developers can build native macOS applications by using the Xamarin.Mac application framework. For more information, see Xamarin.Mac.
The Speech SDK for Objective-C is available natively as a CocoaPod package.
System requirements for iOS:
A macOS version 10.14 or later
Target iOS 9.3 or later
The macOS CocoaPod package is available for download and use with the Xcode 9.4.1 or later integrated development environment (IDE).
Go to the Xcode directory where your .xcodeproj project file is located.
Run pod init to create a pod file named Podfile.
Replace the contents of Podfile with the following content. Update the target name from AppName to the name of your app. Update the platform or pod version as needed.
platform :ios, '9.3'
use_frameworks!

target 'AppName' do
  pod 'MicrosoftCognitiveServicesSpeech-iOS', '~> 1.37.0'
end
Run pod install to install the Speech SDK.
Alternatively, download the binary CocoaPod and extract its contents. In your Xcode project, add a reference to the extracted MicrosoftCognitiveServicesSpeech.xcframework folder and its contents.
Note
.NET developers can build native iOS applications by using the Xamarin.iOS application framework. For more information, see Xamarin.iOS.
The Speech SDK for Swift is available natively as a CocoaPod package for Mac x64 and ARM-based systems.
System requirements for Mac:
A macOS version 10.14 or later
The macOS CocoaPod package is available for download and use with the Xcode 9.4.1 or later integrated development environment (IDE).
Go to the Xcode directory where your .xcodeproj project file is located.
Run pod init to create a pod file named Podfile.
Replace the contents of Podfile with the following content. Update the target name from AppName to the name of your app. Update the platform or pod version as needed.
platform :osx, 10.14
use_frameworks!

target 'AppName' do
  pod 'MicrosoftCognitiveServicesSpeech-macOS', '~> 1.37.0'
end
Run pod install to install the Speech SDK.
Alternatively, download the binary CocoaPod and extract its contents. In your Xcode project, add a reference to the extracted MicrosoftCognitiveServicesSpeech.xcframework folder and its contents.
Note
.NET developers can build native macOS applications by using the Xamarin.Mac application framework. For more information, see Xamarin.Mac.
The Speech SDK for Swift is available natively as a CocoaPod package.
System requirements for iOS:
A macOS version 10.14 or later
Target iOS 9.3 or later
The macOS CocoaPod package is available for download and use with the Xcode 9.4.1 or later integrated development environment (IDE).
Go to the Xcode directory where your .xcodeproj project file is located.
Run pod init to create a pod file named Podfile.
Replace the contents of Podfile with the following. Update the target name from AppName to the name of your app. Update the platform or pod version as needed.
platform :ios, '9.3'
use_frameworks!

target 'AppName' do
  pod 'MicrosoftCognitiveServicesSpeech-iOS', '~> 1.37.0'
end
Run pod install to install the Speech SDK.
Alternatively, download the binary CocoaPod and extract its contents. In your Xcode project, add a reference to the extracted MicrosoftCognitiveServicesSpeech.xcframework folder and its contents.
Note
.NET developers can build native iOS applications by using the Xamarin.iOS application framework. For more information, see Xamarin.iOS.
Make sure that packages of the same target architecture are installed. For example, if you install the x64 redistributable package, install the x64 Python package.
Caution
This article references CentOS, a Linux distribution that is nearing End Of Life (EOL) status. Please consider your use and planning accordingly. For more information, see the CentOS End Of Life guidance.
The Speech SDK for Python supports the following distributions on the x64 and ARM64 architectures:
Ubuntu 18.04/20.04
Debian 10/11
Red Hat Enterprise Linux (RHEL) 8
CentOS 7
Important
Use the most recent LTS release of the Linux distribution. For example, if you are using Ubuntu 20.04 LTS, use the latest release of Ubuntu 20.04.X.
The Speech SDK depends on the following Linux system libraries:
The shared libraries of the GNU C library, including the POSIX Threads Programming library, libpthreads.
The OpenSSL library (libssl) version 1.x and certificates (ca-certificates).
The shared library for ALSA applications (libasound).
You should also install ca-certificates to establish a secure websocket and avoid the WS_OPEN_ERROR_UNDERLYING_IO_OPEN_FAILED error.
Important
The Speech SDK does not yet support OpenSSL 3.0, which is the default in Ubuntu 22.04 and Debian 12.
To use the Speech SDK in Alpine Linux, create a Debian chroot environment as documented in the Alpine Linux Wiki on running glibc programs. Then follow the Debian instructions here.
This article references CentOS, a Linux distribution that is nearing End Of Life (EOL) status. Please consider your use and planning accordingly. For more information, see the CentOS End Of Life guidance.
You can check which Speech SDK for Python version is currently installed by inspecting the azure.cognitiveservices.speech.__version__ variable. For example, run this command in a console window:
pip list
Install the Speech SDK by using Visual Studio Code
Coming soon: Throughout 2024 we will be phasing out GitHub Issues as the feedback mechanism for content and replacing it with a new feedback system. For more information see: https://aka.ms/ContentUserFeedback.