Enable push notifications for calls
Here, we learn how to enable push notifications for Azure Communication Services calls. Setting up the push notifications let your users know when they have an incoming call, which they can then answer.
Push notification
Push notifications allow you to send information from your application to users' devices. You can use push notifications to show a dialog, play a sound, or display incoming call into the app UI layer. Azure Communication Services provides integrations with Azure Event Grid and Azure Notification Hubs that enable you to add push notifications to your apps.
TTL token
The Time To Live (TTL) token is a setting that determines the length of time a notification token stays valid before becoming invalid. This setting is useful for applications where user engagement doesn't require daily interaction but remains critical over longer periods.
The TTL configuration allows the management of push notifications' lifecycle, reducing the need for frequent token renewals while ensuring that the communication channel between the application and its users remains open and reliable for extended durations.
Currently, the maximum value for TTL is 180 days (15,552,000 seconds), and the min value is 5 minutes (300 seconds). You can enter this value and adjust it accordingly to your needs. If you don't provide a value, the default value is 24 hours (86,400 seconds).
Once the register push notification API is called when the device token information is saved in Registrar. After TTL lifespan ends, the device endpoint information is deleted. Any incoming calls on those devices can't be delivered to the devices if those devices don't call the register push notification API again.
In case that you want to revoke an identity you need to follow this process, once the identity is revoked the Registrar entry should be deleted.
Note
For CTE (Custom Teams Endpoint) the max TTL value is 24 hrs (86,400 seconds) there's no way to increase this value.
Prerequisites
- An Azure account with an active subscription. Create an account for free.
- A deployed Communication Services resource. Create a Communication Services resource.
- A user access token to enable the calling client. For more information, see Create and manage access tokens.
- Optional: Complete the quickstart to add voice calling to your application
Azure Communication Services Web Calling SDK - Web push notifications quickstart
Important
This feature of Azure Communication Services is currently in preview.
Preview APIs and SDKs are provided without a service-level agreement. We recommend that you don't use them for production workloads. Some features might not be supported, or they might have constrained capabilities.
For more information, review Supplemental Terms of Use for Microsoft Azure Previews.
Azure Communication Services Web Calling SDK - Web push notifications are in public preview and available as part of version 1.12.0-beta.2+.
Please visit our web push notifications quickstart tutorial: https://github.com/Azure-Samples/communication-services-javascript-quickstarts/blob/main/calling-web-push-notifications/README.md
Install the SDK
Locate your project-level build.gradle file and add mavenCentral() to the list of repositories under buildscript and allprojects:
buildscript {
    repositories {
    ...
        mavenCentral()
    ...
    }
}
allprojects {
    repositories {
    ...
        mavenCentral()
    ...
    }
}
Then, in your module-level build.gradle file, add the following lines to the dependencies section:
dependencies {
    ...
    implementation 'com.azure.android:azure-communication-calling:1.0.0'
    ...
}
Initialize the required objects
To create a CallAgent instance, you have to call the createCallAgent method on a CallClient instance. This call asynchronously returns a CallAgent instance object.
The createCallAgent method takes CommunicationUserCredential as an argument, which encapsulates an access token.
To access DeviceManager, you must create a callAgent instance first. Then you can use the CallClient.getDeviceManager method to get DeviceManager.
String userToken = '<user token>';
CallClient callClient = new CallClient();
CommunicationTokenCredential tokenCredential = new CommunicationTokenCredential(userToken);
android.content.Context appContext = this.getApplicationContext(); // From within an activity, for instance
CallAgent callAgent = callClient.createCallAgent(appContext, tokenCredential).get();
DeviceManager deviceManager = callClient.getDeviceManager(appContext).get();
To set a display name for the caller, use this alternative method:
String userToken = '<user token>';
CallClient callClient = new CallClient();
CommunicationTokenCredential tokenCredential = new CommunicationTokenCredential(userToken);
android.content.Context appContext = this.getApplicationContext(); // From within an activity, for instance
CallAgentOptions callAgentOptions = new CallAgentOptions();
callAgentOptions.setDisplayName("Alice Bob");
DeviceManager deviceManager = callClient.getDeviceManager(appContext).get();
CallAgent callAgent = callClient.createCallAgent(appContext, tokenCredential, callAgentOptions).get();
Additional Prerequisites for Push Notifications
A Firebase account set up with Cloud Messaging (FCM) enabled and with your Firebase Cloud Messaging service connected to an Azure Notification Hub instance. See Communication Services notifications for more information. Additionally, the tutorial assumes you're using Android Studio version 3.6 or higher to build your application.
A set of permissions is required for the Android application in order to be able to receive notifications messages from Firebase Cloud Messaging. In your AndroidManifest.xml file, add the following set of permissions right after the <manifest ...> or below the </application> tag.
<uses-permission android:name="android.permission.INTERNET"/>
<uses-permission android:name="android.permission.GET_ACCOUNTS"/>
<uses-permission android:name="com.google.android.c2dm.permission.RECEIVE" />
Overview
Mobile push notifications are the pop-up notifications you see on mobile devices. For calling, we'll be focusing on VoIP (Voice over Internet Protocol) push notifications. We'll register for push notifications, handle push notifications, and then un-register push notifications.
Note
To Register for Push Notifications and handling of the Push Notifications for a Custom Teams Endpoint (CTE) the API's are the same. The API's described below can also be invoked on the CommonCallAgent or TeamsCallAgent class for Custom Teams Endpoint (CTE).
Register for push notifications
To register for push notifications, the application needs to call registerPushNotification() on a CallAgent instance with a device registration token.
To obtain the device registration token, add the Firebase SDK to your application module's build.gradle file by adding the following lines in the dependencies section if it's not already there:
// Add the SDK for Firebase Cloud Messaging
implementation 'com.google.firebase:firebase-core:16.0.8'
implementation 'com.google.firebase:firebase-messaging:20.2.4'
In your project level's build.gradle file, add the following in the dependencies section if it's not already there:
classpath 'com.google.gms:google-services:4.3.3'
Add the following plugin to the beginning of the file if it's not already there:
apply plugin: 'com.google.gms.google-services'
Select Sync Now in the toolbar. Add the following code snippet to get the device registration token generated by the Firebase Cloud Messaging SDK for the client application instance Be sure to add the below imports to the header of the main Activity for the instance. They're required for the snippet to retrieve the token:
import com.google.android.gms.tasks.OnCompleteListener;
import com.google.android.gms.tasks.Task;
import com.google.firebase.iid.FirebaseInstanceId;
import com.google.firebase.iid.InstanceIdResult;
Add this snippet to retrieve the token:
FirebaseInstanceId.getInstance().getInstanceId()
    .addOnCompleteListener(new OnCompleteListener<InstanceIdResult>() {
        @Override
        public void onComplete(@NonNull Task<InstanceIdResult> task) {
            if (!task.isSuccessful()) {
                Log.w("PushNotification", "getInstanceId failed", task.getException());
                return;
            }

            // Get new Instance ID token
            String deviceToken = task.getResult().getToken();
            // Log
            Log.d("PushNotification", "Device Registration token retrieved successfully");
        }
    });
Register the device registration token with the Calling Services SDK for incoming call push notifications:
String deviceRegistrationToken = "<Device Token from previous section>";
try {
    callAgent.registerPushNotification(deviceRegistrationToken).get();
}
catch(Exception e) {
    System.out.println("Something went wrong while registering for Incoming Calls Push Notifications.")
}
Push notification handling
To receive incoming call push notifications, call handlePushNotification() on a CallAgent instance with a payload.
To obtain the payload from Firebase Cloud Messaging, begin by creating a new Service (File > New > Service > Service) that extends the FirebaseMessagingService Firebase SDK class and override the onMessageReceived method. This method is the event handler called when Firebase Cloud Messaging delivers the push notification to the application.
public class MyFirebaseMessagingService extends FirebaseMessagingService {
    private java.util.Map<String, String> pushNotificationMessageDataFromFCM;

    @Override
    public void onMessageReceived(RemoteMessage remoteMessage) {
        // Check if message contains a notification payload.
        if (remoteMessage.getNotification() != null) {
            Log.d("PushNotification", "Message Notification Body: " + remoteMessage.getNotification().getBody());
        }
        else {
            pushNotificationMessageDataFromFCM = remoteMessage.getData();
        }
    }
}
Add the following service definition to the AndroidManifest.xml file, inside the <application> tag:
<service
    android:name=".MyFirebaseMessagingService"
    android:exported="false">
    <intent-filter>
        <action android:name="com.google.firebase.MESSAGING_EVENT" />
    </intent-filter>
</service>
- Once the payload is retrieved, it can be passed to the Communication Services SDK to be parsed out into an internal IncomingCallInformation object that will be handled by calling the handlePushNotification method on a CallAgent instance. A
CallAgentinstance is created by calling thecreateCallAgent(...)method on theCallClientclass.
try {
    IncomingCallInformation notification = IncomingCallInformation.fromMap(pushNotificationMessageDataFromFCM);
    Future handlePushNotificationFuture = callAgent.handlePushNotification(notification).get();
}
catch(Exception e) {
    System.out.println("Something went wrong while handling the Incoming Calls Push Notifications.");
}
When the handling of the Push notification message is successful, and the all events handlers are registered properly, the application will ring.
Unregister push notifications
Applications can unregister push notification at any time. Call the unregisterPushNotification() method on callAgent to unregister.
try {
    callAgent.unregisterPushNotification().get();
}
catch(Exception e) {
    System.out.println("Something went wrong while un-registering for all Incoming Calls Push Notifications.")
}
Set up your system
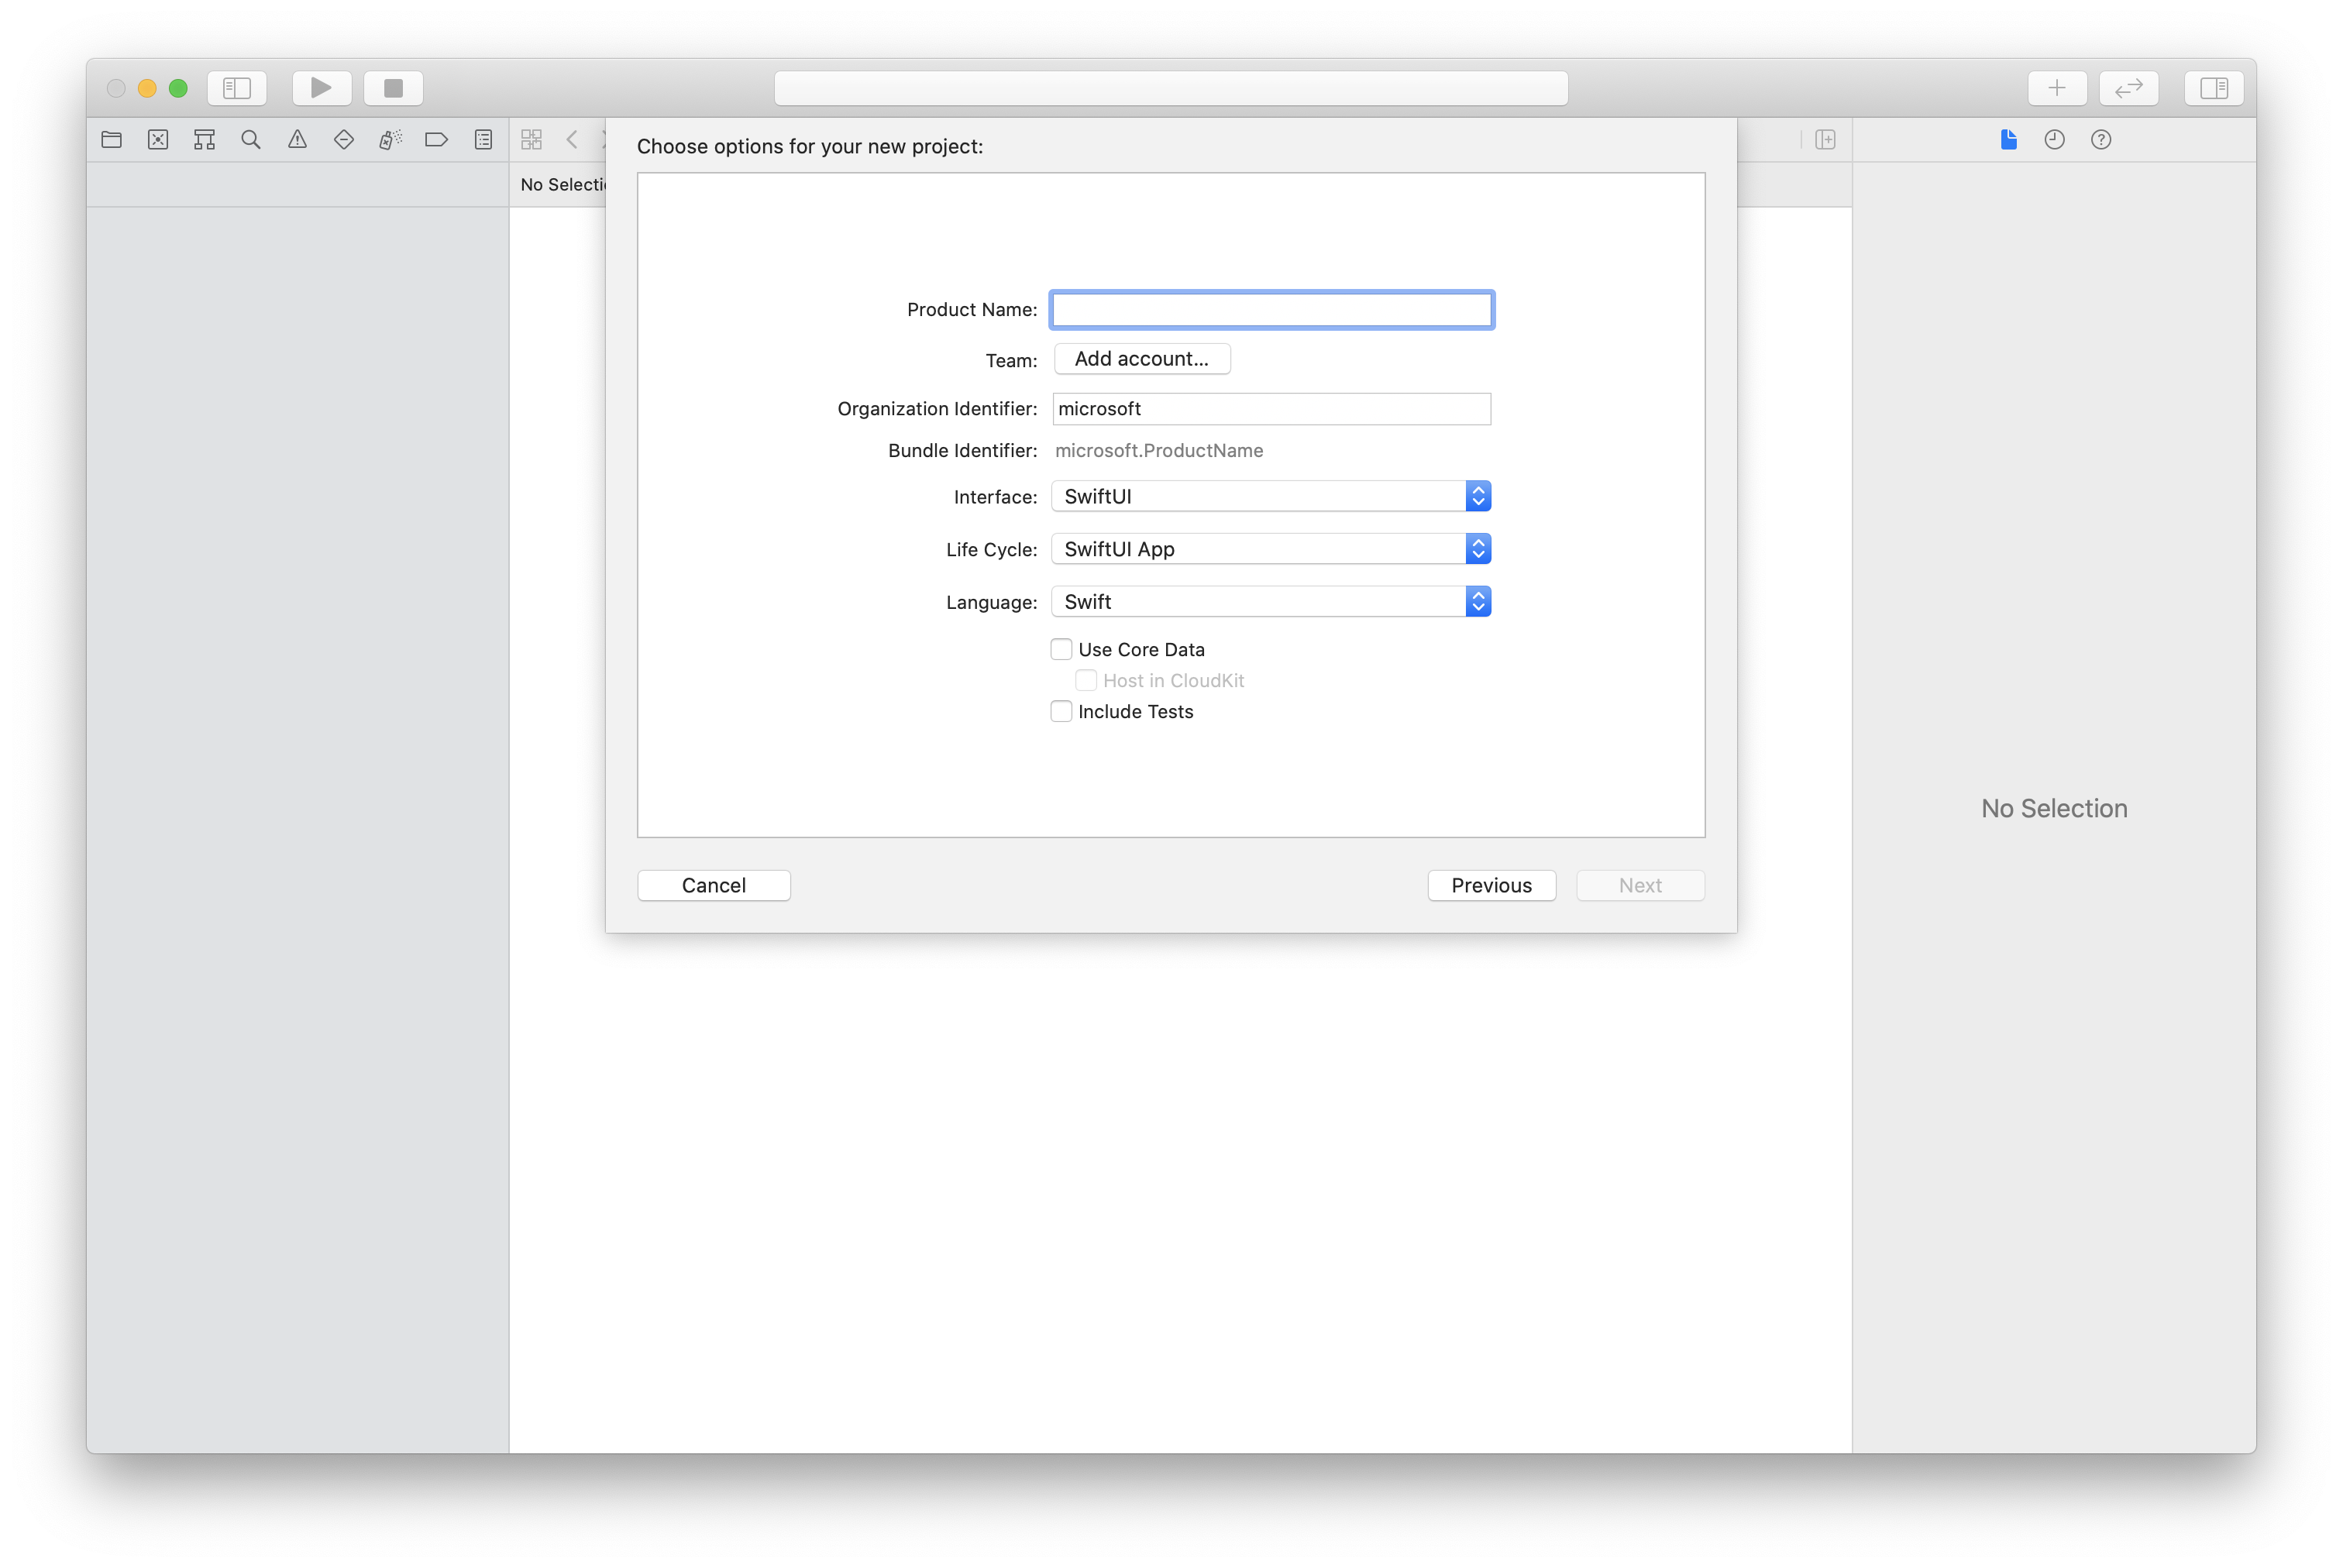
Create the Xcode project
In Xcode, create a new iOS project and select the Single View App template. This quickstart uses the SwiftUI framework, so you should set Language to Swift and set Interface to SwiftUI.
You're not going to create tests during this quickstart. Feel free to clear the Include Tests checkbox.
Install the package and dependencies by using CocoaPods
Create a Podfile for your application, like this example:
platform :ios, '13.0'
use_frameworks!
target 'AzureCommunicationCallingSample' do
    pod 'AzureCommunicationCalling', '~> 1.0.0'
end
Run
pod install.Open
.xcworkspaceby using Xcode.
Request access to the microphone
To access the device's microphone, you need to update your app's information property list by using NSMicrophoneUsageDescription. You set the associated value to a string that will be included in the dialog that the system uses to request access from the user.
Right-click the Info.plist entry of the project tree, and then select Open As > Source Code. Add the following lines in the top-level <dict> section, and then save the file.
<key>NSMicrophoneUsageDescription</key>
<string>Need microphone access for VOIP calling.</string>
Set up the app framework
Open your project's ContentView.swift file. Add an import declaration to the top of the file to import the AzureCommunicationCalling library. In addition, import AVFoundation. You'll need it for audio permission requests in the code.
import AzureCommunicationCalling
import AVFoundation
Initialize CallAgent
To create a CallAgent instance from CallClient, you have to use a callClient.createCallAgent method that asynchronously returns a CallAgent object after it's initialized.
To create a call client, pass a CommunicationTokenCredential object:
import AzureCommunication

let tokenString = "token_string"
var userCredential: CommunicationTokenCredential?
do {
    let options = CommunicationTokenRefreshOptions(initialToken: token, refreshProactively: true, tokenRefresher: self.fetchTokenSync)
    userCredential = try CommunicationTokenCredential(withOptions: options)
} catch {
    updates("Couldn't created Credential object", false)
    initializationDispatchGroup!.leave()
    return
}

// tokenProvider needs to be implemented by Contoso, which fetches a new token
public func fetchTokenSync(then onCompletion: TokenRefreshOnCompletion) {
    let newToken = self.tokenProvider!.fetchNewToken()
    onCompletion(newToken, nil)
}
Pass the CommunicationTokenCredential object that you created to CallClient, and set the display name:
self.callClient = CallClient()
let callAgentOptions = CallAgentOptions()
options.displayName = " iOS Azure Communication Services User"

self.callClient!.createCallAgent(userCredential: userCredential!,
    options: callAgentOptions) { (callAgent, error) in
        if error == nil {
            print("Create agent succeeded")
            self.callAgent = callAgent
        } else {
            print("Create agent failed")
        }
})
Overview
Mobile push notifications are the pop-up notifications you see on mobile devices. For calling, we'll be focusing on VoIP (Voice over Internet Protocol) push notifications. We'll register for push notifications, handle push notifications, and then un-register push notifications. For a guide on CallKit integration in your iOS application, refer here, CallKit integration with iOS ACS SDK.
Note
To Register for Push Notifications and handling of the Push Notifications for a Custom Teams Endpoint (CTE) the APIs are the same. The APIs described can also be invoked on the CommonCallAgent or TeamsCallAgent class for Custom Teams Endpoint (CTE).
Set up push notifications
A mobile push notification is the pop-up notification that you get in the mobile device. For calling, we'll focus on VoIP (voice over Internet Protocol) push notifications.
The following sections describe how to register for, handle, and unregister push notifications. Before you start those tasks, complete these prerequisites:
- In Xcode, go to Signing & Capabilities. Add a capability by selecting + Capability, and then select Push Notifications.
- Add another capability by selecting + Capability, and then select Background Modes.
- Under Background Modes, select the Voice over IP and Remote notifications checkboxes.

Register for push notifications
To register for push notifications, call registerPushNotification() on a CallAgent instance with a device registration token.
Registration for push notifications needs to happen after successful initialization. When the callAgent object is destroyed, logout will be called, which will automatically unregister push notifications.
let deviceToken: Data = pushRegistry?.pushToken(for: PKPushType.voIP)
callAgent.registerPushNotifications(deviceToken: deviceToken!) { (error) in
    if(error == nil) {
        print("Successfully registered to push notification.")
    } else {
        print("Failed to register push notification.")
    }
}
Handle push notifications
To receive push notifications for incoming calls, call handlePushNotification() on a CallAgent instance with a dictionary payload.
let callNotification = PushNotificationInfo.fromDictionary(pushPayload.dictionaryPayload)

callAgent.handlePush(notification: callNotification) { (error) in
    if (error == nil) {
        print("Handling of push notification was successful")
    } else {
        print("Handling of push notification failed")
    }
}
Unregister push notifications
Applications can unregister push notification at any time. Simply call the unregisterPushNotification method on CallAgent.
Note
Applications are not automatically unregistered from push notifications on logout.
callAgent.unregisterPushNotification { (error) in
    if (error == nil) {
        print("Unregister of push notification was successful")
    } else {
       print("Unregister of push notification failed, please try again")
    }
}
Set up your system
Create the Visual Studio project
For a UWP app, in Visual Studio 2022, create a new Blank App (Universal Windows) project. After you enter the project name, feel free to choose any Windows SDK later than 10.0.17763.0.
For a WinUI 3 app, create a new project with the Blank App, Packaged (WinUI 3 in Desktop) template to set up a single-page WinUI 3 app. Windows App SDK version 1.3 or later is required.
Install the package and dependencies by using NuGet Package Manager
The Calling SDK APIs and libraries are publicly available via a NuGet package.
The following steps exemplify how to find, download, and install the Calling SDK NuGet package:
- Open NuGet Package Manager by selecting Tools > NuGet Package Manager > Manage NuGet Packages for Solution.
- Select Browse, and then enter
Azure.Communication.Calling.WindowsClientin the search box. - Make sure that the Include prerelease check box is selected.
- Select the
Azure.Communication.Calling.WindowsClientpackage, and then selectAzure.Communication.Calling.WindowsClient1.4.0-beta.1 or a newer version. - Select the checkbox that corresponds to the Communication Services project on the right-side tab.
- Select the Install button.
Overview
Push notifications on Windows platform are delivered using Windows Push Notification Service (WNS),.
Note
To Register for Push Notifications and handling of the Push Notifications for a Custom Teams Endpoint (CTE) the API's are the same. The API's described below can also be invoked on the CommonCallAgent or TeamsCallAgent class for Custom Teams Endpoint (CTE).
Set up push notifications
A push notification is the pop-up notification that you get in your device. For calling, we'll focus on VoIP (voice over Internet Protocol) push notifications.
The following sections describe how to register for, handle, and show a Windows notification to answer/decline an incoming call. Before you start those tasks, complete these prerequisites:
Follow Tutorial: Send notifications to Universal Windows Platform apps using Azure Notification Hubs. After following this tutorial, you have:
- An application that has the
WindowsAzure.Messaging.ManagedandMicrosoft.Toolkit.Uwp.Notificationspackages. - An Azure PNH (Push Notifications Hub) Hub name referenced as
<AZURE_PNH_HUB_NAME>and the Azure PNH Connection String referenced as<AZURE_PNH_HUB_CONNECTION_STRING>in this quickstart.
- An application that has the
To register for a WNS (Windows Notification Service) channel on every application init, make sure you add the initialization code on your App.xaml.cs file:
// App.xaml.cs

protected override async void OnLaunched(LaunchActivatedEventArgs e)
{
    await InitNotificationsAsync();

    ...
}

private async Task InitNotificationsAsync()
{
    if (AZURE_PNH_HUB_NAME != "<AZURE_PNH_HUB_NAME>" && AZURE_PNH_HUB_CONNECTION_STRING != "<AZURE_PNH_HUB_CONNECTION_STRING>")
    {
        var channel = await PushNotificationChannelManager.CreatePushNotificationChannelForApplicationAsync();
        channel.PushNotificationReceived += Channel_PushNotificationReceived;

        var hub = new NotificationHub(AZURE_PNH_HUB_NAME, AZURE_PNH_HUB_CONNECTION_STRING);
        var result = await hub.RegisterNativeAsync(channel.Uri);

        if (result.ChannelUri != null)
        {
            PNHChannelUri = new Uri(result.ChannelUri);
        }
        else
        {
            Debug.WriteLine("Cannot register WNS channel");
        }
    }
}
- Register the event handler activated when a new push notification message arrives on App.xaml.cs:
// App.xaml.cs

private void Channel_PushNotificationReceived(PushNotificationChannel sender, PushNotificationReceivedEventArgs args)
{
    switch (args.NotificationType)
    {
      case PushNotificationType.Toast:
      case PushNotificationType.Tile:
      case PushNotificationType.TileFlyout:
      case PushNotificationType.Badge:
          break;
      case PushNotificationType.Raw:
          var frame = (Frame)Window.Current.Content;
          if (frame.Content is MainPage)
          {
              var mainPage = frame.Content as MainPage;
              await mainPage.HandlePushNotificationIncomingCallAsync(args.RawNotification.Content);
          }
          break;
    }
}
Register for push notifications
To register for push notifications, call RegisterForPushNotificationAsync() on a CallAgent instance with the WNS registration channel obtained on application init.
Registration for push notifications needs to happen after successful initialization.
// MainPage.xaml.cs

this.callAgent = await this.callClient.CreateCallAgentAsync(tokenCredential, callAgentOptions);

if ((Application.Current as App).PNHChannelUri != null)
{
    await this.callAgent.RegisterForPushNotificationAsync((Application.Current as App).PNHChannelUri.ToString());
}

this.callAgent.CallsUpdated += OnCallsUpdatedAsync;
this.callAgent.IncomingCallReceived += OnIncomingCallAsync;
Handle push notifications
To receive push notifications for incoming calls, call handlePushNotification() on a CallAgent instance with a dictionary payload.
// MainPage.xaml.cs

public async Task HandlePushNotificationIncomingCallAsync(string notificationContent)
{
    if (this.callAgent != null)
    {
        PushNotificationDetails pnDetails = PushNotificationDetails.Parse(notificationContent);
        await callAgent.HandlePushNotificationAsync(pnDetails);
    }
}
This triggers an incoming call event on CallAgent that shows the incoming call notification.
// MainPage.xaml.cs

private async void OnIncomingCallAsync(object sender, IncomingCallReceivedEventArgs args)
{
    incomingCall = args.IncomingCall;
    (Application.Current as App).ShowIncomingCallNotification(incomingCall);
}
// App.xaml.cs

public void ShowIncomingCallNotification(IncomingCall incomingCall)
{
    string incomingCallType = incomingCall.IsVideoEnabled ? "Video" : "Audio";
    string caller = incomingCall.CallerDetails.DisplayName != "" ? incomingCall.CallerDetails.DisplayName : incomingCall.CallerDetails.Identifier.RawId;
    new ToastContentBuilder()
    .SetToastScenario(ToastScenario.IncomingCall)
    .AddText(caller + " is calling you.")
    .AddText("New Incoming " + incomingCallType + " Call")
      .AddButton(new ToastButton()
          .SetContent("Decline")
          .AddArgument("action", "decline"))
      .AddButton(new ToastButton()
          .SetContent("Accept")
          .AddArgument("action", "accept"))
      .Show();
}
Add the code to handle the button press for the notification in the OnActivated method:
// App.xaml.cs

protected override async void OnActivated(IActivatedEventArgs e)
{
    // Handle notification activation
    if (e is ToastNotificationActivatedEventArgs toastActivationArgs)
    {
      ToastArguments args = ToastArguments.Parse(toastActivationArgs.Argument);
      string action = args?.Get("action");

      if (!string.IsNullOrEmpty(action))
      {
          var frame = Window.Current.Content as Frame;
          if (frame.Content is MainPage)
          {
              var mainPage = frame.Content as MainPage;
              await mainPage.AnswerIncomingCall(action);
          }
      }
    }
}
// MainPage.xaml.cs

public async Task AnswerIncomingCall(string action)
{
    if (action == "accept")
    {
      var acceptCallOptions = new AcceptCallOptions()
      {
          IncomingVideoOptions = new IncomingVideoOptions()
          {
              StreamKind = VideoStreamKind.RemoteIncoming
          }
      };

      call = await incomingCall?.AcceptAsync(acceptCallOptions);
      call.StateChanged += OnStateChangedAsync;
      call.RemoteParticipantsUpdated += OnRemoteParticipantsUpdatedAsync;
    }
    else if (action == "decline")
    {
      await incomingCall?.RejectAsync();
    }
}
Next steps
Feedback
Coming soon: Throughout 2024 we will be phasing out GitHub Issues as the feedback mechanism for content and replacing it with a new feedback system. For more information see: https://aka.ms/ContentUserFeedback.
Submit and view feedback for