Quickstart: Create and manage access tokens
Access tokens let Azure Communication Services SDKs authenticate directly against Azure Communication Services as a particular identity. You'll need to create access tokens if you want your users to join a call or chat thread within your application.
In this quickstart, you'll learn how to use the Azure Communication Services SDKs to create identities and manage your access tokens. For production use cases, we recommend that you generate access tokens on a server-side service.
Prerequisites
- An Azure account with an active subscription. Create an account for free.
- An active Communication Services resource and connection string. Create a Communication Services resource.
- Install Azure CLI.
Setting up
Add the extension
Add the Azure Communication Services extension for Azure CLI by using the az extension command.
az extension add --name communication
Sign in to Azure CLI
You'll need to sign in to Azure CLI. You can sign in running the az login command from the terminal and providing your credentials.
(Optional) Use Azure CLI identity operations without passing in a connection string
You can configure the AZURE_COMMUNICATION_CONNECTION_STRING environment variable to use Azure CLI identity operations without having to use --connection_string to pass in the connection string. To configure an environment variable, open a console window and select your operating system from the below tabs. Replace <yourConnectionString> with your actual connection string.
Open a console window and enter the following command:
setx AZURE_COMMUNICATION_CONNECTION_STRING "<yourConnectionString>"
After you add the environment variable, you may need to restart any running programs that will need to read the environment variable, including the console window. For example, if you're using Visual Studio as your editor, restart Visual Studio before running the example.
Store your access token in an environment variable
To configure an environment variable, open a console window and select your operating system from the below tabs. Replace <yourAccessToken> with your actual access token.
Open a console window and enter the following command:
setx AZURE_COMMUNICATION_ACCESS_TOKEN "<yourAccessToken>"
After you add the environment variable, you may need to restart any running programs that will need to read the environment variable, including the console window. For example, if you're using Visual Studio as your editor, restart Visual Studio before running the example.
Operations
Create an identity
To create access tokens, you need an identity. Azure Communication Services maintains a lightweight identity directory for this purpose. Use the user create command to create a new entry in the directory with a unique Id. The identity is required later for issuing access tokens.
az communication identity user create --connection-string "<yourConnectionString>"
- Replace
<yourConnectionString>with your connection string.
Create an identity and issue an access token in the same request
Run the following command to create a Communication Services identity and issue an access token for it at the same time. The scopes parameter defines a set of access token permissions and roles. For more information, see the list of supported actions in Authenticate to Azure Communication Services.
az communication identity token issue --scope chat --connection-string "<yourConnectionString>"
Make this replacement in the code:
- Replace
<yourConnectionString>with your connection string.
Issue access token
Run the following command to issue an access token for your Communication Services identity. The scopes parameter defines a set of access token permissions and roles. For more information, see the list of supported actions in Authenticate to Azure Communication Services.
az communication identity token issue --scope chat --user "<userId>" --connection-string "<yourConnectionString>"
Make this replacement in the code:
- Replace
<yourConnectionString>with your connection string. - Replace
<userId>with your userId.
Access tokens are short-lived credentials that need to be reissued. Not doing so might cause a disruption of your application users' experience. The expires_on response property indicates the lifetime of the access token.
Issue access token with multiple scopes
Run the following command to issue an access token with multiple scopes for your Communication Services identity. The scopes parameter defines a set of access token permissions and roles. For more information, see the list of supported actions in Identity model.
az communication identity token issue --scope chat voip --user "<userId>" --connection-string "<yourConnectionString>"
Make this replacement in the code:
- Replace
<yourConnectionString>with your connection string. - Replace
<userId>with your userId.
Access tokens are short-lived credentials that need to be reissued. Not doing so might cause a disruption of your application users' experience. The expires_on response property indicates the lifetime of the access token.
Exchange a Microsoft Entra access token of the Teams User for a Communication Identity access token
Use the token get-for-teams-user command to issue an access token for the Teams user that can be used with the Azure Communication Services SDKs.
az communication identity token get-for-teams-user --aad-token "<yourAadToken>" --client "<yourAadApplication>" --aad-user "<yourAadUser>" --connection-string "<yourConnectionString>"
Make this replacement in the code:
- Replace
<yourConnectionString>with your connection string. - Replace
<yourAadUser>with your Microsoft Entra userId. - Replace
<yourAadApplication>with your Microsoft Entra application Id. - Replace
<yourAadToken>with your Microsoft Entra access token.
Revoke access tokens
You might occasionally need to explicitly revoke an access token. For example, you would do so when application users change the password they use to authenticate to your service. The token revoke command invalidates all active access tokens that were issued to the identity.
az communication identity token revoke --user "<userId>" --connection-string "<yourConnectionString>"
Make this replacement in the code:
- Replace
<yourConnectionString>with your connection string. - Replace
<userId>with your userId.
Delete an identity
When you delete an identity, you revoke all active access tokens and prevent the further issuance of access tokens for the identity. Doing so also removes all persisted content that's associated with the identity.
az communication identity user delete --user "<userId>" --connection-string "<yourConnectionString>"
Make this replacement in the code:
- Replace
<yourConnectionString>with your connection string. - Replace
<userId>with your userId.
Prerequisites
- An Azure account with an active subscription. Create an account for free.
- The latest .NET Core SDK version for your operating system.
- An active Communication Services resource and connection string. Create a Communication Services resource.
Final code
Find the finalized code for this quickstart on GitHub.
Set up your environment
Create a new C# application
In a Command Prompt window, such as cmd, PowerShell, or Bash, run the dotnet new command to create a new console app with the name AccessTokensQuickstart. This command creates a simple "Hello World" C# project with a single source file, Program.cs.
dotnet new console -o AccessTokensQuickstart
Change your directory to the newly created app folder, and use the dotnet build command to compile your application.
cd AccessTokensQuickstart
dotnet build
A simple "Hello World" output should be displayed. If it is, your setup is working correctly, and you can get started writing your Azure Communication Services-specific code.
Install the package
While you're still in the application directory, install the Azure Communication Services Identity library for .NET package by using the dotnet add package command.
dotnet add package Azure.Communication.Identity
Set up the app framework
In the project directory, do the following:
- Open the Program.cs file in a text editor.
- Add a
usingdirective to include theAzure.Communication.Identitynamespace. - Update the
Mainmethod declaration to support async code.
To begin, run the following code:
using System;
using Azure;
using Azure.Core;
using Azure.Communication.Identity;

namespace AccessTokensQuickstart
{
    class Program
    {
        static async System.Threading.Tasks.Task Main(string[] args)
        {
            Console.WriteLine("Azure Communication Services - Access Tokens Quickstart");

            // Quickstart code goes here
        }
    }
}
Authenticate the client
Initialize CommunicationIdentityClient with your connection string. The following code, which you add to the Main method, retrieves the connection string for the resource from an environment variable named COMMUNICATION_SERVICES_CONNECTION_STRING.
For more information, see the "Store your connection string" section of Create and manage Communication Services resources.
// This code demonstrates how to retrieve your connection string
// from an environment variable.
string connectionString = Environment.GetEnvironmentVariable("COMMUNICATION_SERVICES_CONNECTION_STRING");
var client = new CommunicationIdentityClient(connectionString);
Alternatively, you can separate the endpoint and access key by running the following code:
// This code demonstrates how to fetch your endpoint and access key
// from an environment variable.
string endpoint = Environment.GetEnvironmentVariable("COMMUNICATION_SERVICES_ENDPOINT");
string accessKey = Environment.GetEnvironmentVariable("COMMUNICATION_SERVICES_ACCESSKEY");
var client = new CommunicationIdentityClient(new Uri(endpoint), new AzureKeyCredential(accessKey));
If you've already set up a Microsoft Entra application, you can authenticate by using Microsoft Entra ID.
TokenCredential tokenCredential = new DefaultAzureCredential();
var client = new CommunicationIdentityClient(new Uri(endpoint), tokenCredential);
Create an identity
To create access tokens, you need an identity. Azure Communication Services maintains a lightweight identity directory for this purpose. Use the createUser method to create a new entry in the directory with a unique Id. The identity is required later for issuing access tokens.
var identityResponse = await client.CreateUserAsync();
var identity = identityResponse.Value;
Console.WriteLine($"\nCreated an identity with ID: {identity.Id}");
Store the received identity with mapping to your application's users (for example, by storing it in your application server database).
Issue an access token
After you have a Communication Services identity, use the GetToken method to issue an access token for it. The scopes parameter defines a set of access token permissions and roles. For more information, see the list of supported actions in Identity model. You can also construct a new instance of communicationUser based on a string representation of an Azure Communication Service identity.
// Issue an access token with a validity of 24 hours and the "voip" scope for an identity
var tokenResponse = await client.GetTokenAsync(identity, scopes: new [] { CommunicationTokenScope.VoIP });

// Get the token from the response
var token =  tokenResponse.Value.Token;
var expiresOn = tokenResponse.Value.ExpiresOn;
Console.WriteLine($"\nIssued an access token with 'voip' scope that expires at {expiresOn}:");
Console.WriteLine(token);
Access tokens are short-lived credentials that need to be reissued. Not doing so might cause a disruption of your application users' experience. The expiresOn property indicates the lifetime of the access token.
Set a custom token expiration time
The default token expiration time is 24 hours, but you can configure it by providing a value between an hour and 24 hours to the optional parameter tokenExpiresIn. When requesting a new token, it's recommended that you specify the expected typical length of a communication session for the token expiration time.
// Issue an access token with a validity of an hour and the "voip" scope for an identity
TimeSpan tokenExpiresIn = TimeSpan.FromHours(1);
CommunicationTokenScope[] scopes = new[] { CommunicationTokenScope.VoIP };
var tokenResponse = await client.GetTokenAsync(identity, scopes, tokenExpiresIn);
Create an identity and issue a token in the same request
You can use the CreateUserAndTokenAsync method to create a Communication Services identity and issue an access token for it at the same time. The scopes parameter defines a set of access token permissions and roles. For more information, see the list of supported actions in Authenticate to Azure Communication Services.
// Issue an identity and an access token with a validity of 24 hours and the "voip" scope for the new identity
var identityAndTokenResponse = await client.CreateUserAndTokenAsync(scopes: new[] { CommunicationTokenScope.VoIP });

// Retrieve the identity, token, and expiration date from the response
var identity = identityAndTokenResponse.Value.User;
var token = identityAndTokenResponse.Value.AccessToken.Token;
var expiresOn = identityAndTokenResponse.Value.AccessToken.ExpiresOn;
Console.WriteLine($"\nCreated an identity with ID: {identity.Id}");
Console.WriteLine($"\nIssued an access token with 'voip' scope that expires at {expiresOn}:");
Console.WriteLine(token);
Refresh an access token
To refresh an access token, pass an instance of the CommunicationUserIdentifier object into GetTokenAsync. If you've stored this Id and need to create a new CommunicationUserIdentifier, you can do so by passing your stored Id into the CommunicationUserIdentifier constructor as follows:
var identityToRefresh = new CommunicationUserIdentifier(identity.Id);
var tokenResponse = await client.GetTokenAsync(identityToRefresh, scopes: new [] { CommunicationTokenScope.VoIP });
Revoke access tokens
You might occasionally need to explicitly revoke an access token. For example, you would do so when application users change the password they use to authenticate to your service. The RevokeTokensAsync method invalidates all active access tokens that were issued to the identity.
await client.RevokeTokensAsync(identity);
Console.WriteLine($"\nSuccessfully revoked all access tokens for identity with ID: {identity.Id}");
Delete an identity
When you delete an identity, you revoke all active access tokens and prevent the further issuance of access tokens for the identity. Doing so also removes all persisted content that's associated with the identity.
await client.DeleteUserAsync(identity);
Console.WriteLine($"\nDeleted the identity with ID: {identity.Id}");
Run the code
When you've finished creating the access token, you can run the application from your application directory by using the dotnet run command.
dotnet run
The app's output describes each completed action:
Azure Communication Services - Access Tokens Quickstart

Created an identity with ID: 8:acs:4ccc92c8-9815-4422-bddc-ceea181dc774_00000006-19e0-2727-80f5-8b3a0d003502

Issued an access token with 'voip' scope that expires at 10/11/2022 7:34:29 AM +00:00:
eyJhbGciOiJSUzI1NiIsImtpZCI6IjEwNiIsIng1dCI6Im9QMWFxQnlfR3hZU3pSaXhuQ25zdE5PU2p2cyIsInR5cCI6IkpXVCJ9.eyJza3lwZWlkIjoiYWNzOjAwMDAwMDAwLTAwMDAtMDAwMC0wMDAwLTAwMDAwMDAwMDAwMF8wMDAwMDAwMC0wMDAwLTAwMDAtMDAwMC0wMDAwMDAwMDAwMDAiLCJzY3AiOjE3OTIsImNzaSI6IjE2NjUzODcyNjkiLCJleHAiOjE2NjUzOTA4NjksImFjc1Njb3BlIjoidm9pcCIsInJlc291cmNlSWQiOiIwMDAwMDAwMC0wMDAwLTAwMDAtMDAwMC0wMDAwMDAwMDAwMDAiLCJyZXNvdXJjZUxvY2F0aW9uIjoidW5pdGVkc3RhdGVzIiwiaWF0IjoxNjY1Mzg3MjY5fQ.kTXpQQtY7w6O82kByljZXrKtBvNNOleDE5m06LapzLeoWfRZCCpJQcDzBoLRA146mOhNzLZ0b5WMNTa5tD-0hWCiicDwgKLMASEGY9g0EvNQOidPff47g2hh6yqi9PKiDPp-t5siBMYqA6Nh6CQ-Oeh-35vcRW09VfcqFN38IgSSzJ7QkqBiY_QtfXz-iaj81Td0287KO4U1y2LJIGiyJLWC567F7A_p1sl6NmPKUmvmwM47tyCcQ1r_lfkRdeyDmcrGgY6yyI3XJZQbpxyt2DZqOTSVPB4PuRl7iyXxvppEa4Uo_y_BdMOOWFe6YTRB5O5lhI8m7Tf0LifisxX2sw

Created an identity with ID: 8:acs:4ccc92c8-9815-4422-bddc-ceea181dc774_00000006-1ce9-31b4-54b7-a43a0d006a52

Issued an access token with 'voip' scope that expires at 10/11/2022 7:34:29 AM +00:00:
eyJhbGciOiJSUzI1NiIsImtpZCI6IjEwNiIsIng1dCI6Im9QMWFxQnlfR3hZU3pSaXhuQ25zdE5PU2p2cyIsInR5cCI6IkpXVCJ9.eyJza3lwZWlkIjoiYWNzOjAwMDAwMDAwLTAwMDAtMDAwMC0wMDAwLTAwMDAwMDAwMDAwMF8wMDAwMDAwMC0wMDAwLTAwMDAtMDAwMC0wMDAwMDAwMDAwMDAiLCJzY3AiOjE3OTIsImNzaSI6IjE2NjUzODcyNjkiLCJleHAiOjE2NjUzOTA4NjksImFjc1Njb3BlIjoidm9pcCIsInJlc291cmNlSWQiOiIwMDAwMDAwMC0wMDAwLTAwMDAtMDAwMC0wMDAwMDAwMDAwMDAiLCJyZXNvdXJjZUxvY2F0aW9uIjoidW5pdGVkc3RhdGVzIiwiaWF0IjoxNjY1Mzg3MjY5fQ.kTXpQQtY7w6O82kByljZXrKtBvNNOleDE5m06LapzLeoWfRZCCpJQcDzBoLRA146mOhNzLZ0b5WMNTa5tD-0hWCiicDwgKLMASEGY9g0EvNQOidPff47g2hh6yqi9PKiDPp-t5siBMYqA6Nh6CQ-Oeh-35vcRW09VfcqFN38IgSSzJ7QkqBiY_QtfXz-iaj81Td0287KO4U1y2LJIGiyJLWC567F7A_p1sl6NmPKUmvmwM47tyCcQ1r_lfkRdeyDmcrGgY6yyI3XJZQbpxyt2DZqOTSVPB4PuRl7iyXxvppEa4Uo_y_BdMOOWFe6YTRB5O5lhI8m7Tf0LifisxX2sw

Successfully revoked all access tokens for identity with ID: 8:acs:4ccc92c8-9815-4422-bddc-ceea181dc774_00000006-19e0-2727-80f5-8b3a0d003502

Deleted the identity with ID: 8:acs:4ccc92c8-9815-4422-bddc-ceea181dc774_00000006-19e0-2727-80f5-8b3a0d003502
Prerequisites
- An Azure account with an active subscription. Create an account for free.
- Node.js Active LTS and Maintenance LTS versions (8.11.1 and 10.14.1 recommended).
- An active Communication Services resource and connection string. Create a Communication Services resource.
Final code
Find the finalized code for this quickstart on GitHub.
Set up your environment
Create a new Node.js application
In a terminal or Command Prompt window, create a new directory for your app, and then open it.
mkdir access-tokens-quickstart && cd access-tokens-quickstart
Run npm init -y to create a package.json file with default settings.
npm init -y
Install the package
Use the npm install command to install the Azure Communication Services Identity SDK for JavaScript.
npm install @azure/communication-identity@latest --save
The --save option lists the library as a dependency in your package.json file.
Set up the app framework
Create a file named
issue-access-token.jsin the project directory and add the following code:const { CommunicationIdentityClient } = require('@azure/communication-identity'); const main = async () => { console.log("Azure Communication Services - Access Tokens Quickstart") // Quickstart code goes here }; main().catch((error) => { console.log("Encountered an error"); console.log(error); })
Authenticate the client
Instantiate CommunicationIdentityClient with your connection string. The following code, which you add to the Main method, retrieves the connection string for the resource from an environment variable named COMMUNICATION_SERVICES_CONNECTION_STRING.
For more information, see the "Store your connection string" section of Create and manage Communication Services resources.
// This code demonstrates how to fetch your connection string
// from an environment variable.
const connectionString = process.env['COMMUNICATION_SERVICES_CONNECTION_STRING'];

// Instantiate the identity client
const identityClient = new CommunicationIdentityClient(connectionString);
Alternatively, you can separate the endpoint and access key by running the following code:
// This code demonstrates how to fetch your endpoint and access key
// from an environment variable.
const endpoint = process.env["COMMUNICATION_SERVICES_ENDPOINT"];
const accessKey = process.env["COMMUNICATION_SERVICES_ACCESSKEY"];

// Create the credential
const tokenCredential = new AzureKeyCredential(accessKey);

// Instantiate the identity client
const identityClient = new CommunicationIdentityClient(endpoint, tokenCredential)
If you've already set up a Microsoft Entra application, you can authenticate by using Microsoft Entra ID.
const endpoint = process.env["COMMUNICATION_SERVICES_ENDPOINT"];
const tokenCredential = new DefaultAzureCredential();
const identityClient = new CommunicationIdentityClient(endpoint, tokenCredential);
Create an identity
To create access tokens, you need an identity. Azure Communication Services maintains a lightweight identity directory for this purpose. Use the createUser method to create a new entry in the directory with a unique Id. The identity is required later for issuing access tokens.
let identityResponse = await identityClient.createUser();
console.log(`\nCreated an identity with ID: ${identityResponse.communicationUserId}`);
Store the received identity with mapping to your application's users (for example, by storing it in your application server database).
Issue an access token
Use the getToken method to issue an access token for your Communication Services identity. The scopes parameter defines a set of access token permissions and roles. For more information, see the list of supported actions in Identity model. You can also construct a new instance of a communicationUser based on a string representation of the Azure Communication Service identity.
// Issue an access token with a validity of 24 hours and the "voip" scope for an identity
let tokenResponse = await identityClient.getToken(identityResponse, ["voip"]);

// Get the token and its expiration date from the response
const { token, expiresOn } = tokenResponse;
console.log(`\nIssued an access token with 'voip' scope that expires at ${expiresOn}:`);
console.log(token);
Access tokens are short-lived credentials that need to be reissued. Not doing so might cause a disruption of your application users' experience. The expiresOn property indicates the lifetime of the access token.
Set a custom token expiration time
The default token expiration time is 24 hours (1440 minutes), but you can configure it by providing a value between 60 minutes and 1440 minutes to the optional parameter tokenExpiresInMinutes. When requesting a new token, it's recommended that you specify the expected typical length of a communication session for the token expiration time.
// Issue an access token with a validity of an hour and the "voip" scope for an identity
const tokenOptions: GetTokenOptions = { tokenExpiresInMinutes: 60 };
let tokenResponse = await identityClient.getToken
(identityResponse, ["voip"], tokenOptions);
Create an identity and issue a token in one method call
You can use the createUserAndToken method to create a Communication Services identity and issue an access token for it at the same time. The scopes parameter defines a set of access token permissions and roles. Again, you create it with the voip scope.
// Issue an identity and an access token with a validity of 24 hours and the "voip" scope for the new identity
let identityTokenResponse = await identityClient.createUserAndToken(["voip"]);

// Get the token, its expiration date, and the user from the response
const { token, expiresOn, user } = identityTokenResponse;
console.log(`\nCreated an identity with ID: ${user.communicationUserId}`);
console.log(`\nIssued an access token with 'voip' scope that expires at ${expiresOn}:`);
console.log(token);
Refresh an access token
As tokens expire, you'll periodically need to refresh them. Refreshing is easy just call getToken again with the same identity that was used to issue the tokens. You'll also need to provide the scopes of the refreshed tokens.
// Value of identityResponse represents the Azure Communication Services identity stored during identity creation and then used to issue the tokens being refreshed
let refreshedTokenResponse = await identityClient.getToken(identityResponse, ["voip"]);
Revoke access tokens
You might occasionally need to revoke an access token. For example, you would do so when application users change the password they use to authenticate to your service. The revokeTokens method invalidates all active access tokens that were issued to the identity.
await identityClient.revokeTokens(identityResponse);

console.log(`\nSuccessfully revoked all access tokens for identity with ID: ${identityResponse.communicationUserId}`);
Delete an identity
When you delete an identity, you revoke all active access tokens and prevent the further issuance of access tokens for the identity. Doing so also removes all persisted content that's associated with the identity.
await identityClient.deleteUser(identityResponse);

console.log(`\nDeleted the identity with ID: ${identityResponse.communicationUserId}`);
Run the code
From a console prompt, go to the directory that contains the issue-access-token.js file, and then execute the following node command to run the app:
node ./issue-access-token.js
The app's output describes each completed action:
Azure Communication Services - Access Tokens Quickstart

Created an identity with ID: 8:acs:4ccc92c8-9815-4422-bddc-ceea181dc774_00000006-19e0-2727-80f5-8b3a0d003502

Issued an access token with 'voip' scope that expires at 2022-10-11T07:34:29.9028648+00:00:
eyJhbGciOiJSUzI1NiIsImtpZCI6IjEwNiIsIng1dCI6Im9QMWFxQnlfR3hZU3pSaXhuQ25zdE5PU2p2cyIsInR5cCI6IkpXVCJ9.eyJza3lwZWlkIjoiYWNzOjAwMDAwMDAwLTAwMDAtMDAwMC0wMDAwLTAwMDAwMDAwMDAwMF8wMDAwMDAwMC0wMDAwLTAwMDAtMDAwMC0wMDAwMDAwMDAwMDAiLCJzY3AiOjE3OTIsImNzaSI6IjE2NjUzODcyNjkiLCJleHAiOjE2NjUzOTA4NjksImFjc1Njb3BlIjoidm9pcCIsInJlc291cmNlSWQiOiIwMDAwMDAwMC0wMDAwLTAwMDAtMDAwMC0wMDAwMDAwMDAwMDAiLCJyZXNvdXJjZUxvY2F0aW9uIjoidW5pdGVkc3RhdGVzIiwiaWF0IjoxNjY1Mzg3MjY5fQ.kTXpQQtY7w6O82kByljZXrKtBvNNOleDE5m06LapzLeoWfRZCCpJQcDzBoLRA146mOhNzLZ0b5WMNTa5tD-0hWCiicDwgKLMASEGY9g0EvNQOidPff47g2hh6yqi9PKiDPp-t5siBMYqA6Nh6CQ-Oeh-35vcRW09VfcqFN38IgSSzJ7QkqBiY_QtfXz-iaj81Td0287KO4U1y2LJIGiyJLWC567F7A_p1sl6NmPKUmvmwM47tyCcQ1r_lfkRdeyDmcrGgY6yyI3XJZQbpxyt2DZqOTSVPB4PuRl7iyXxvppEa4Uo_y_BdMOOWFe6YTRB5O5lhI8m7Tf0LifisxX2sw

Created an identity with ID: 8:acs:4ccc92c8-9815-4422-bddc-ceea181dc774_00000006-1ce9-31b4-54b7-a43a0d006a52

Issued an access token with 'voip' scope that expires at 2022-10-11T07:34:29.9028648+00:00:
eyJhbGciOiJSUzI1NiIsImtpZCI6IjEwNiIsIng1dCI6Im9QMWFxQnlfR3hZU3pSaXhuQ25zdE5PU2p2cyIsInR5cCI6IkpXVCJ9.eyJza3lwZWlkIjoiYWNzOjAwMDAwMDAwLTAwMDAtMDAwMC0wMDAwLTAwMDAwMDAwMDAwMF8wMDAwMDAwMC0wMDAwLTAwMDAtMDAwMC0wMDAwMDAwMDAwMDAiLCJzY3AiOjE3OTIsImNzaSI6IjE2NjUzODcyNjkiLCJleHAiOjE2NjUzOTA4NjksImFjc1Njb3BlIjoidm9pcCIsInJlc291cmNlSWQiOiIwMDAwMDAwMC0wMDAwLTAwMDAtMDAwMC0wMDAwMDAwMDAwMDAiLCJyZXNvdXJjZUxvY2F0aW9uIjoidW5pdGVkc3RhdGVzIiwiaWF0IjoxNjY1Mzg3MjY5fQ.kTXpQQtY7w6O82kByljZXrKtBvNNOleDE5m06LapzLeoWfRZCCpJQcDzBoLRA146mOhNzLZ0b5WMNTa5tD-0hWCiicDwgKLMASEGY9g0EvNQOidPff47g2hh6yqi9PKiDPp-t5siBMYqA6Nh6CQ-Oeh-35vcRW09VfcqFN38IgSSzJ7QkqBiY_QtfXz-iaj81Td0287KO4U1y2LJIGiyJLWC567F7A_p1sl6NmPKUmvmwM47tyCcQ1r_lfkRdeyDmcrGgY6yyI3XJZQbpxyt2DZqOTSVPB4PuRl7iyXxvppEa4Uo_y_BdMOOWFe6YTRB5O5lhI8m7Tf0LifisxX2sw

Successfully revoked all access tokens for identity with ID: 8:acs:4ccc92c8-9815-4422-bddc-ceea181dc774_00000006-19e0-2727-80f5-8b3a0d003502

Deleted the identity with ID: 8:acs:4ccc92c8-9815-4422-bddc-ceea181dc774_00000006-19e0-2727-80f5-8b3a0d003502
Prerequisites
- An Azure account with an active subscription. Create an account for free.
- Python 3.8+.
- An active Communication Services resource and connection string. Create a Communication Services resource.
Final code
Find the finalized code for this quickstart on GitHub.
Set up your environment
Create a new Python application
In a terminal or Command Prompt window, create a new directory for your app, and then open it.
mkdir access-tokens-quickstart && cd access-tokens-quickstartUse a text editor to create a file called issue-access-tokens.py in the project root directory and add the structure for the program, including basic exception handling. You'll add all the source code for this quickstart to this file in the sections that follow.
import os
from datetime import timedelta
from azure.communication.identity import CommunicationIdentityClient, CommunicationUserIdentifier

try:
   print("Azure Communication Services - Access Tokens Quickstart")
   # Quickstart code goes here
except Exception as ex:
   print("Exception:")
   print(ex)
Install the package
While you're still in the application directory, install the Azure Communication Services Identity SDK for Python package by using the pip install command.
pip install azure-communication-identity
Authenticate the client
Instantiate a CommunicationIdentityClient with your connection string. The following code, which you add to the try block, retrieves the connection string for the resource from an environment variable named COMMUNICATION_SERVICES_CONNECTION_STRING.
For more information, see the "Store your connection string" section of Create and manage Communication Services resources.
# This code demonstrates how to retrieve your connection string
# from an environment variable.
connection_string = os.environ["COMMUNICATION_SERVICES_CONNECTION_STRING"]

# Instantiate the identity client
client = CommunicationIdentityClient.from_connection_string(connection_string)
Alternatively, if you've already set up a Microsoft Entra application, you can authenticate by using Microsoft Entra ID.
endpoint = os.environ["COMMUNICATION_SERVICES_ENDPOINT"]
client = CommunicationIdentityClient(endpoint, DefaultAzureCredential())
Create an identity
To create access tokens, you need an identity. Azure Communication Services maintains a lightweight identity directory for this purpose. Use the create_user method to create a new entry in the directory with a unique Id. The identity is required later for issuing access tokens.
identity = client.create_user()
print("\nCreated an identity with ID: " + identity.properties['id'])
Store the received identity with mapping to your application's users (for example, by storing it in your application server database).
Issue an access token
Use the get_token method to issue an access token for your Communication Services identity. The scopes parameter defines a set of access token permissions and roles. For more information, see the list of supported actions in Identity model. You can also construct a new instance of parameter CommunicationUserIdentifier based on a string representation of the Azure Communication Service identity.
# Issue an access token with a validity of 24 hours and the "voip" scope for an identity
token_result = client.get_token(identity, ["voip"])
print("\nIssued an access token with 'voip' scope that expires at " + token_result.expires_on + ":")
print(token_result.token)
Access tokens are short-lived credentials that need to be reissued. Not doing so might cause a disruption of your application users' experience. The expires_on response property indicates the lifetime of the access token.
Set a custom token expiration time
The default token expiration time is 24 hours, but you can configure it by providing a value between an hour and 24 hours to the optional parameter token_expires_in. When requesting a new token, it's recommended that you specify the expected typical length of a communication session for the token expiration time.
# Issue an access token with a validity of an hour and the "voip" scope for an identity
token_expires_in = timedelta(hours=1)
token_result = client.get_token(identity, ["voip"], token_expires_in=token_expires_in)
Create an identity and issue an access token in the same request
You can use the create_user_and_token method to create a Communication Services identity and issue an access token for it at the same time. The scopes parameter defines a set of access token permissions and roles. For more information, see the list of supported actions in Authenticate to Azure Communication Services.
# Issue an identity and an access token with a validity of 24 hours and the "voip" scope for the new identity
identity_token_result = client.create_user_and_token(["voip"])

# Get the token details from the response
identity = identity_token_result[0]
token = identity_token_result[1].token
expires_on = identity_token_result[1].expires_on
print("\nCreated an identity with ID: " + identity.properties['id'])
print("\nIssued an access token with 'voip' scope that expires at " + expires_on + ":")
print(token)
Refresh an access token
To refresh an access token, use the CommunicationUserIdentifier object to reissue a token by passing in the existing identity:
# The existingIdentity value represents the Communication Services identity that's stored during identity creation
identity = CommunicationUserIdentifier(existingIdentity)
token_result = client.get_token(identity, ["voip"])
Revoke access tokens
You might occasionally need to explicitly revoke an access token. For example, you would do so when application users change the password they use to authenticate to your service. The revoke_tokens method invalidates all active access tokens that were issued to the identity.
client.revoke_tokens(identity)
print("\nSuccessfully revoked all access tokens for identity with ID: " + identity.properties['id'])
Delete an identity
When you delete an identity, you revoke all active access tokens and prevent the further issuance of access tokens for the identity. Doing so also removes all persisted content that's associated with the identity.
client.delete_user(identity)
print("\nDeleted the identity with ID: " + identity.properties['id'])
Run the code
From a console prompt, go to the directory that contains the issue-access-tokens.py file, and then execute the following python command to run the app.
python ./issue-access-tokens.py
The app's output describes each completed action:
Azure Communication Services - Access Tokens Quickstart

Created an identity with ID: 8:acs:4ccc92c8-9815-4422-bddc-ceea181dc774_00000006-19e0-2727-80f5-8b3a0d003502

Issued an access token with 'voip' scope that expires at 2022-10-11T07:34:29.9028648+00:00:
eyJhbGciOiJSUzI1NiIsImtpZCI6IjEwNiIsIng1dCI6Im9QMWFxQnlfR3hZU3pSaXhuQ25zdE5PU2p2cyIsInR5cCI6IkpXVCJ9.eyJza3lwZWlkIjoiYWNzOjAwMDAwMDAwLTAwMDAtMDAwMC0wMDAwLTAwMDAwMDAwMDAwMF8wMDAwMDAwMC0wMDAwLTAwMDAtMDAwMC0wMDAwMDAwMDAwMDAiLCJzY3AiOjE3OTIsImNzaSI6IjE2NjUzODcyNjkiLCJleHAiOjE2NjUzOTA4NjksImFjc1Njb3BlIjoidm9pcCIsInJlc291cmNlSWQiOiIwMDAwMDAwMC0wMDAwLTAwMDAtMDAwMC0wMDAwMDAwMDAwMDAiLCJyZXNvdXJjZUxvY2F0aW9uIjoidW5pdGVkc3RhdGVzIiwiaWF0IjoxNjY1Mzg3MjY5fQ.kTXpQQtY7w6O82kByljZXrKtBvNNOleDE5m06LapzLeoWfRZCCpJQcDzBoLRA146mOhNzLZ0b5WMNTa5tD-0hWCiicDwgKLMASEGY9g0EvNQOidPff47g2hh6yqi9PKiDPp-t5siBMYqA6Nh6CQ-Oeh-35vcRW09VfcqFN38IgSSzJ7QkqBiY_QtfXz-iaj81Td0287KO4U1y2LJIGiyJLWC567F7A_p1sl6NmPKUmvmwM47tyCcQ1r_lfkRdeyDmcrGgY6yyI3XJZQbpxyt2DZqOTSVPB4PuRl7iyXxvppEa4Uo_y_BdMOOWFe6YTRB5O5lhI8m7Tf0LifisxX2sw

Created an identity with ID: 8:acs:4ccc92c8-9815-4422-bddc-ceea181dc774_00000006-1ce9-31b4-54b7-a43a0d006a52

Issued an access token with 'voip' scope that expires at 2022-10-11T07:34:29.9028648+00:00:
eyJhbGciOiJSUzI1NiIsImtpZCI6IjEwNiIsIng1dCI6Im9QMWFxQnlfR3hZU3pSaXhuQ25zdE5PU2p2cyIsInR5cCI6IkpXVCJ9.eyJza3lwZWlkIjoiYWNzOjAwMDAwMDAwLTAwMDAtMDAwMC0wMDAwLTAwMDAwMDAwMDAwMF8wMDAwMDAwMC0wMDAwLTAwMDAtMDAwMC0wMDAwMDAwMDAwMDAiLCJzY3AiOjE3OTIsImNzaSI6IjE2NjUzODcyNjkiLCJleHAiOjE2NjUzOTA4NjksImFjc1Njb3BlIjoidm9pcCIsInJlc291cmNlSWQiOiIwMDAwMDAwMC0wMDAwLTAwMDAtMDAwMC0wMDAwMDAwMDAwMDAiLCJyZXNvdXJjZUxvY2F0aW9uIjoidW5pdGVkc3RhdGVzIiwiaWF0IjoxNjY1Mzg3MjY5fQ.kTXpQQtY7w6O82kByljZXrKtBvNNOleDE5m06LapzLeoWfRZCCpJQcDzBoLRA146mOhNzLZ0b5WMNTa5tD-0hWCiicDwgKLMASEGY9g0EvNQOidPff47g2hh6yqi9PKiDPp-t5siBMYqA6Nh6CQ-Oeh-35vcRW09VfcqFN38IgSSzJ7QkqBiY_QtfXz-iaj81Td0287KO4U1y2LJIGiyJLWC567F7A_p1sl6NmPKUmvmwM47tyCcQ1r_lfkRdeyDmcrGgY6yyI3XJZQbpxyt2DZqOTSVPB4PuRl7iyXxvppEa4Uo_y_BdMOOWFe6YTRB5O5lhI8m7Tf0LifisxX2sw

Successfully revoked all access tokens for identity with ID: 8:acs:4ccc92c8-9815-4422-bddc-ceea181dc774_00000006-19e0-2727-80f5-8b3a0d003502

Deleted the identity with ID: 8:acs:4ccc92c8-9815-4422-bddc-ceea181dc774_00000006-19e0-2727-80f5-8b3a0d003502
Prerequisites
- An Azure account with an active subscription. Create an account for free.
- Java Development Kit (JDK) version 8 or later.
- Apache Maven.
- An active Communication Services resource and connection string. Create a Communication Services resource.
Final code
Find the finalized code for this quickstart on GitHub.
Set up your environment
Create a new Java application
In a terminal or Command Prompt window, go to the directory where you want to create your Java application. To generate a Java project from the maven-archetype-quickstart template, run the following code:
mvn archetype:generate -DgroupId=com.communication.quickstart -DartifactId=communication-quickstart -DarchetypeArtifactId=maven-archetype-quickstart -DarchetypeVersion=1.4 -DinteractiveMode=false
You'll notice that the generate task creates a directory with the same name as artifactId. Under this directory, the src/main/java directory contains the project source code, the src/test/java directory contains the test source, and the pom.xml file is the project's Project Object Model, or POM. This file is used for project configuration parameters.
Install the Communication Services packages
Open the pom.xml file in your text editor. Add the following dependency element to the group of dependencies:
<dependency>
    <groupId>com.azure</groupId>
    <artifactId>azure-communication-identity</artifactId>
    <version>[1.4.0,)</version>
</dependency>
This code instructs Maven to install the Communication Services Identity SDK, which you'll use later.
Set up the app framework
In the project directory, do the following:
- Go to the /src/main/java/com/communication/quickstart directory.
- Open the App.java file in your editor.
- Replace the
System.out.println("Hello world!");statement. - Add
importdirectives.
Use the following code to begin:
package com.communication.quickstart;

import com.azure.communication.common.*;
import com.azure.communication.identity.*;
import com.azure.communication.identity.models.*;
import com.azure.core.credential.*;

import java.io.IOException;
import java.time.*;
import java.util.*;

public class App
{
    public static void main( String[] args ) throws IOException
    {
        System.out.println("Azure Communication Services - Access Tokens Quickstart");
        // Quickstart code goes here
    }
}
Authenticate the client
Instantiate a CommunicationIdentityClient with your resource's access key and endpoint. For more information, see the "Store your connection string" section of Create and manage Communication Services resources.
In addition, you can initialize the client with any custom HTTP client that implements the com.azure.core.http.HttpClient interface.
In the App.java file, add the following code to the main method:
// You can find your endpoint and access key from your resource in the Azure portal
String endpoint = "https://<RESOURCE_NAME>.communication.azure.com";
String accessKey = "SECRET";

CommunicationIdentityClient communicationIdentityClient = new CommunicationIdentityClientBuilder()
        .endpoint(endpoint)
        .credential(new AzureKeyCredential(accessKey))
        .buildClient();
Instead of providing the endpoint and access key, you can provide the entire connection string by using the connectionString() method.
// You can find your connection string from your Communication Services resource in the Azure portal
String connectionString = "<connection_string>";

CommunicationIdentityClient communicationIdentityClient = new CommunicationIdentityClientBuilder()
    .connectionString(connectionString)
    .buildClient();
If you've already set up a Microsoft Entra application, you can authenticate by using Microsoft Entra ID.
String endpoint = "https://<RESOURCE_NAME>.communication.azure.com";
TokenCredential credential = new DefaultAzureCredentialBuilder().build();

CommunicationIdentityClient communicationIdentityClient = new CommunicationIdentityClientBuilder()
        .endpoint(endpoint)
        .credential(credential)
        .buildClient();
Create an identity
To create access tokens, you need an identity. Azure Communication Services maintains a lightweight identity directory for this purpose. Use the createUser method to create a new entry in the directory with a unique Id.
CommunicationUserIdentifier user = communicationIdentityClient.createUser();
System.out.println("\nCreated an identity with ID: " + user.getId());
The created identity is required later for issuing access tokens. Store the received identity with mapping to your application's users (for example, by storing it in your application server database).
Issue an access token
Use the getToken method to issue an access token for your Communication Services identity. The scopes parameter defines a set of access token permissions and roles. For more information, see the list of supported actions in Identity model.
In the following code, use the user variable that you created in the preceding step to get a token.
// Issue an access token with a validity of 24 hours and the "voip" scope for a user identity
List<CommunicationTokenScope> scopes = new ArrayList<>(Arrays.asList(CommunicationTokenScope.VOIP));
AccessToken accessToken = communicationIdentityClient.getToken(user, scopes);
OffsetDateTime expiresAt = accessToken.getExpiresAt();
String token = accessToken.getToken();
System.out.println("\nIssued an access token with 'voip' scope that expires at: " + expiresAt + ": " + token);
Access tokens are short-lived credentials that need to be reissued. Not doing so might cause a disruption of your application users' experience. The expiresAt property indicates the lifetime of the access token.
Set a custom token expiration time
The default token expiration time is 24 hours, but you can configure it by providing a value between an hour and 24 hours to the optional parameter tokenExpiresIn. When requesting a new token, it's recommended that you specify the expected typical length of a communication session for the token expiration time.
// Issue an access token with a validity of an hour and the "voip" scope for a user identity
List<CommunicationTokenScope> scopes = new ArrayList<>(Arrays.asList(CommunicationTokenScope.VOIP));
Duration tokenExpiresIn = Duration.ofHours(1);
AccessToken accessToken = communicationIdentityClient.getToken(user, scopes, tokenExpiresIn);
Create an identity and issue a token in one request
Alternatively, you can use the 'createUserAndToken' method to create a new entry in the directory with a unique Id and
issue an access token at the same time.
//Create an identity and issue token with a validity of 24 hours in one call
List<CommunicationTokenScope> scopes = Arrays.asList(CommunicationTokenScope.CHAT);
CommunicationUserIdentifierAndToken result = communicationIdentityClient.createUserAndToken(scopes);
CommunicationUserIdentifier user = result.getUser();
System.out.println("\nCreated a user identity with ID: " + user.getId());
AccessToken accessToken = result.getUserToken();
OffsetDateTime expiresAt = accessToken.getExpiresAt();
String token = accessToken.getToken();
System.out.println("\nIssued an access token with 'chat' scope that expires at: " + expiresAt + ": " + token);
Refresh an access token
To refresh an access token, use the CommunicationUserIdentifier object to reissue it:
// existingIdentity represents the Communication Services identity that's stored during identity creation
CommunicationUserIdentifier identity = new CommunicationUserIdentifier(existingIdentity.getId());
AccessToken response = communicationIdentityClient.getToken(identity, scopes);
Revoke an access token
You might occasionally need to explicitly revoke an access token. For example, you would do so when application users change the password they use to authenticate to your service. The revokeTokens method invalidates all active access tokens for a particular user. In the following code, you can use the previously created user.
communicationIdentityClient.revokeTokens(user);
System.out.println("\nSuccessfully revoked all access tokens for user identity with ID: " + user.getId());
Delete an identity
When you delete an identity, you revoke all active access tokens and prevent the further issuance of access tokens for the identity. Doing so also removes all persisted content that's associated with the identity.
communicationIdentityClient.deleteUser(user);
System.out.println("\nDeleted the user identity with ID: " + user.getId());
Run the code
Go to the directory that contains the pom.xml file, and then compile the project by using the following mvn command:
mvn compile
Then, build the package:
mvn package
Run the following mvn command to execute the app:
mvn exec:java -Dexec.mainClass="com.communication.quickstart.App" -Dexec.cleanupDaemonThreads=false
The app's output describes each completed action:
Azure Communication Services - Access Tokens Quickstart

Created an identity with ID: 8:acs:4ccc92c8-9815-4422-bddc-ceea181dc774_00000006-19e0-2727-80f5-8b3a0d003502

Issued an access token with 'voip' scope that expires at 2022-10-11T07:34:29.902864800Z:
eyJhbGciOiJSUzI1NiIsImtpZCI6IjEwNiIsIng1dCI6Im9QMWFxQnlfR3hZU3pSaXhuQ25zdE5PU2p2cyIsInR5cCI6IkpXVCJ9.eyJza3lwZWlkIjoiYWNzOjAwMDAwMDAwLTAwMDAtMDAwMC0wMDAwLTAwMDAwMDAwMDAwMF8wMDAwMDAwMC0wMDAwLTAwMDAtMDAwMC0wMDAwMDAwMDAwMDAiLCJzY3AiOjE3OTIsImNzaSI6IjE2NjUzODcyNjkiLCJleHAiOjE2NjUzOTA4NjksImFjc1Njb3BlIjoidm9pcCIsInJlc291cmNlSWQiOiIwMDAwMDAwMC0wMDAwLTAwMDAtMDAwMC0wMDAwMDAwMDAwMDAiLCJyZXNvdXJjZUxvY2F0aW9uIjoidW5pdGVkc3RhdGVzIiwiaWF0IjoxNjY1Mzg3MjY5fQ.kTXpQQtY7w6O82kByljZXrKtBvNNOleDE5m06LapzLeoWfRZCCpJQcDzBoLRA146mOhNzLZ0b5WMNTa5tD-0hWCiicDwgKLMASEGY9g0EvNQOidPff47g2hh6yqi9PKiDPp-t5siBMYqA6Nh6CQ-Oeh-35vcRW09VfcqFN38IgSSzJ7QkqBiY_QtfXz-iaj81Td0287KO4U1y2LJIGiyJLWC567F7A_p1sl6NmPKUmvmwM47tyCcQ1r_lfkRdeyDmcrGgY6yyI3XJZQbpxyt2DZqOTSVPB4PuRl7iyXxvppEa4Uo_y_BdMOOWFe6YTRB5O5lhI8m7Tf0LifisxX2sw

Created an identity with ID: 8:acs:4ccc92c8-9815-4422-bddc-ceea181dc774_00000006-1ce9-31b4-54b7-a43a0d006a52

Issued an access token with 'chat' scope that expires at 2022-10-11T07:34:29.902864800Z:
eyJhbGciOiJSUzI1NiIsImtpZCI6IjEwNiIsIng1dCI6Im9QMWFxQnlfR3hZU3pSaXhuQ25zdE5PU2p2cyIsInR5cCI6IkpXVCJ9.eyJza3lwZWlkIjoiYWNzOjAwMDAwMDAwLTAwMDAtMDAwMC0wMDAwLTAwMDAwMDAwMDAwMF8wMDAwMDAwMC0wMDAwLTAwMDAtMDAwMC0wMDAwMDAwMDAwMDAiLCJzY3AiOjE3OTIsImNzaSI6IjE2NjUzODcyNjkiLCJleHAiOjE2NjUzOTA4NjksImFjc1Njb3BlIjoidm9pcCIsInJlc291cmNlSWQiOiIwMDAwMDAwMC0wMDAwLTAwMDAtMDAwMC0wMDAwMDAwMDAwMDAiLCJyZXNvdXJjZUxvY2F0aW9uIjoidW5pdGVkc3RhdGVzIiwiaWF0IjoxNjY1Mzg3MjY5fQ.kTXpQQtY7w6O82kByljZXrKtBvNNOleDE5m06LapzLeoWfRZCCpJQcDzBoLRA146mOhNzLZ0b5WMNTa5tD-0hWCiicDwgKLMASEGY9g0EvNQOidPff47g2hh6yqi9PKiDPp-t5siBMYqA6Nh6CQ-Oeh-35vcRW09VfcqFN38IgSSzJ7QkqBiY_QtfXz-iaj81Td0287KO4U1y2LJIGiyJLWC567F7A_p1sl6NmPKUmvmwM47tyCcQ1r_lfkRdeyDmcrGgY6yyI3XJZQbpxyt2DZqOTSVPB4PuRl7iyXxvppEa4Uo_y_BdMOOWFe6YTRB5O5lhI8m7Tf0LifisxX2sw

Successfully revoked all access tokens for identity with ID: 8:acs:4ccc92c8-9815-4422-bddc-ceea181dc774_00000006-19e0-2727-80f5-8b3a0d003502

Deleted the identity with ID: 8:acs:4ccc92c8-9815-4422-bddc-ceea181dc774_00000006-19e0-2727-80f5-8b3a0d003502
Prerequisites
Create the access tokens
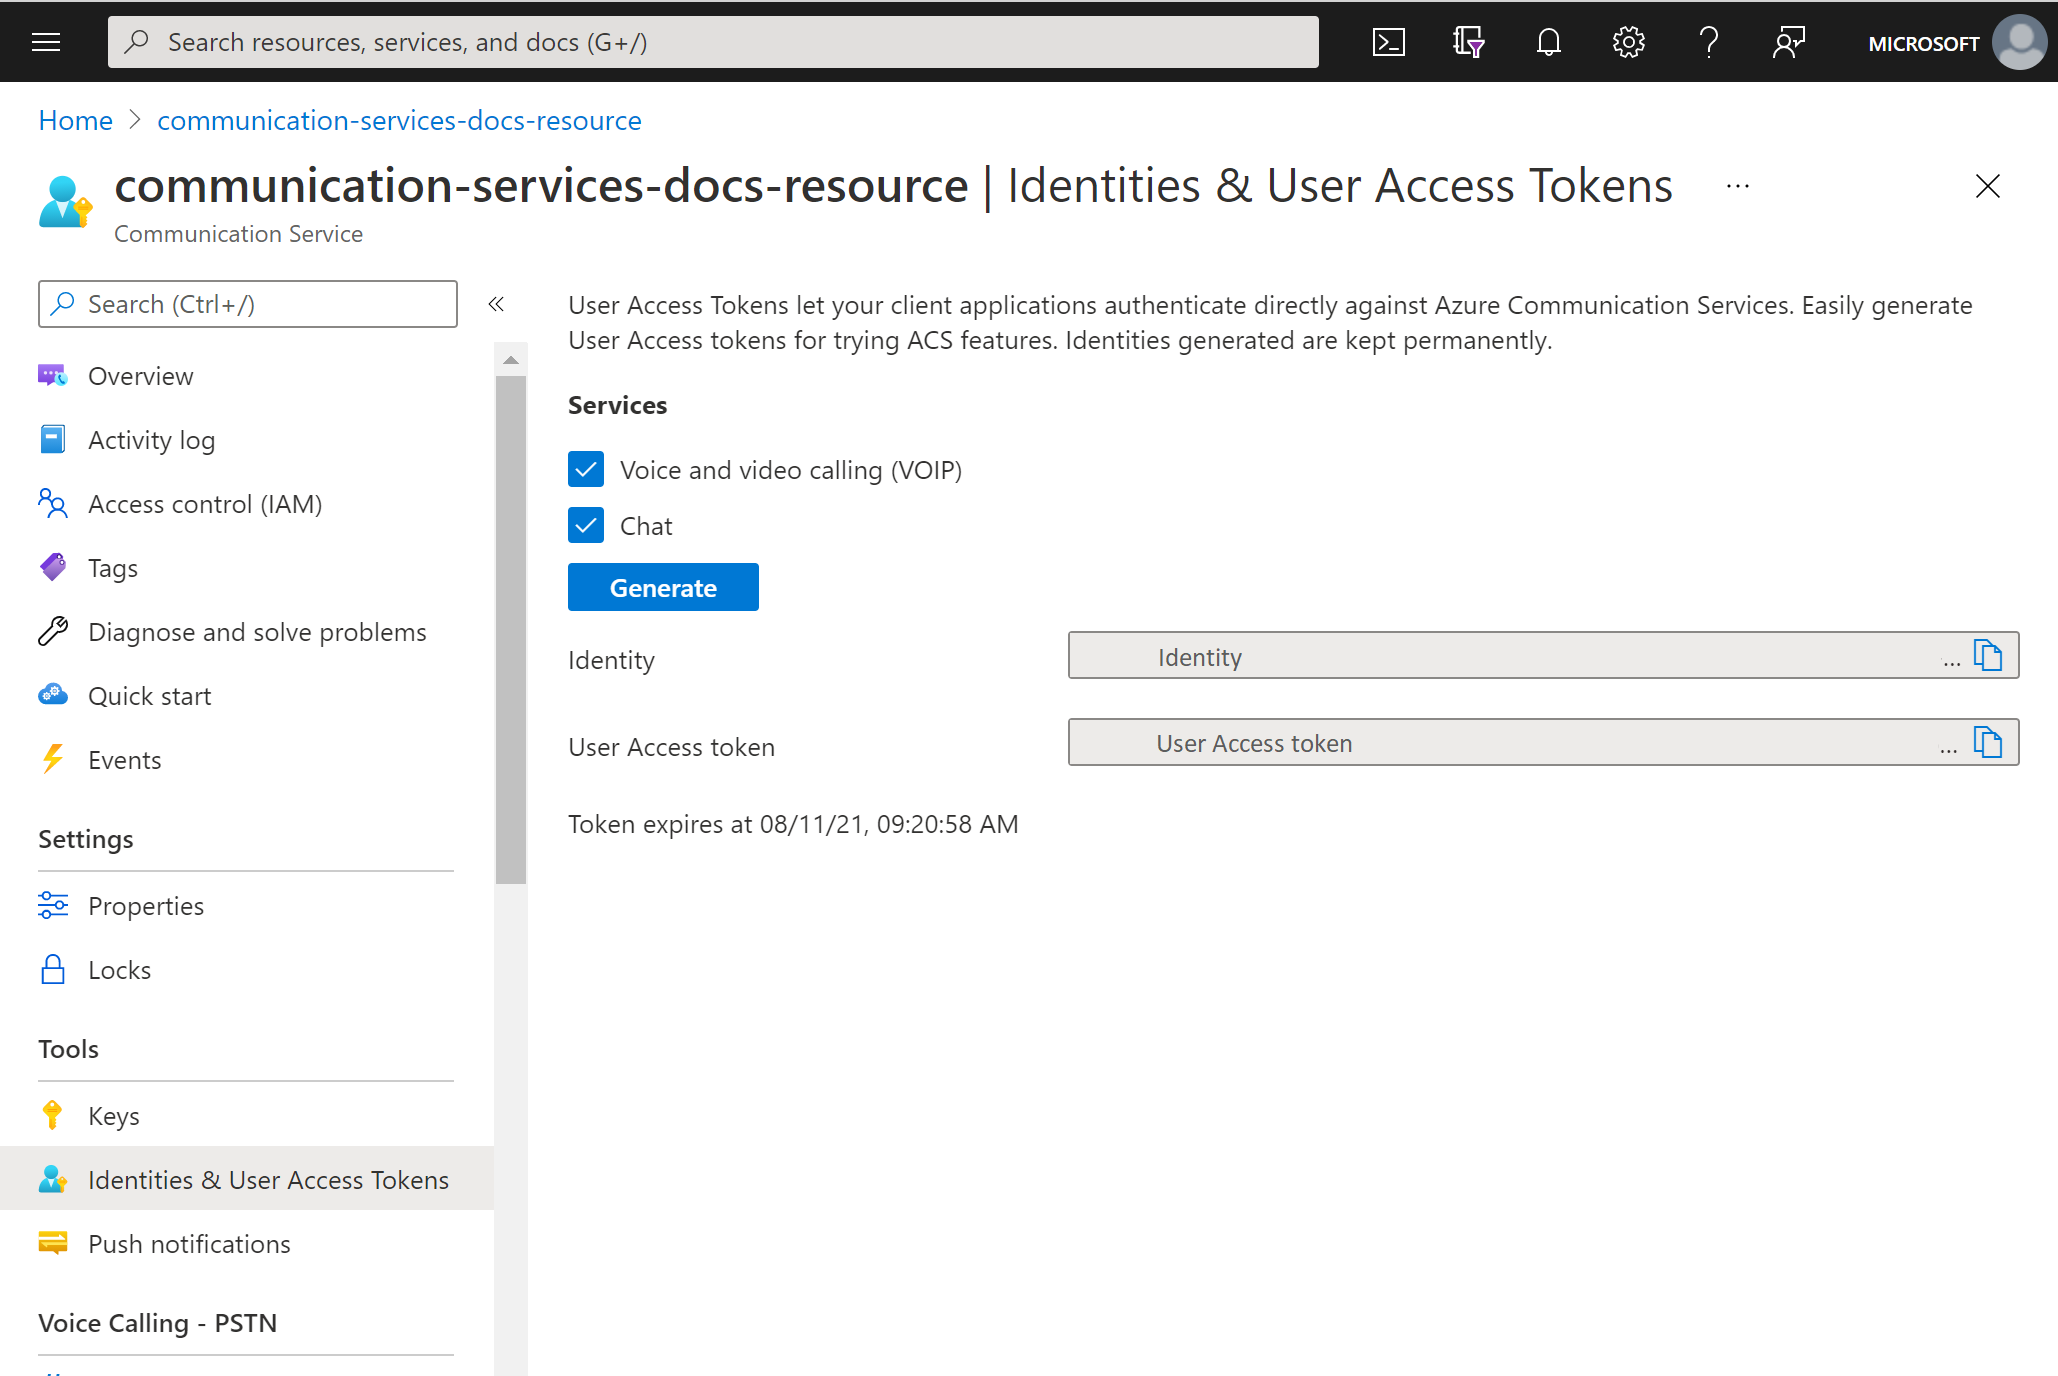
In the Azure portal, navigate to the Identities & User Access Tokens blade within your Communication Services resource.
Choose the scope of the access tokens. You can select none, one, or multiple. Click Generate.
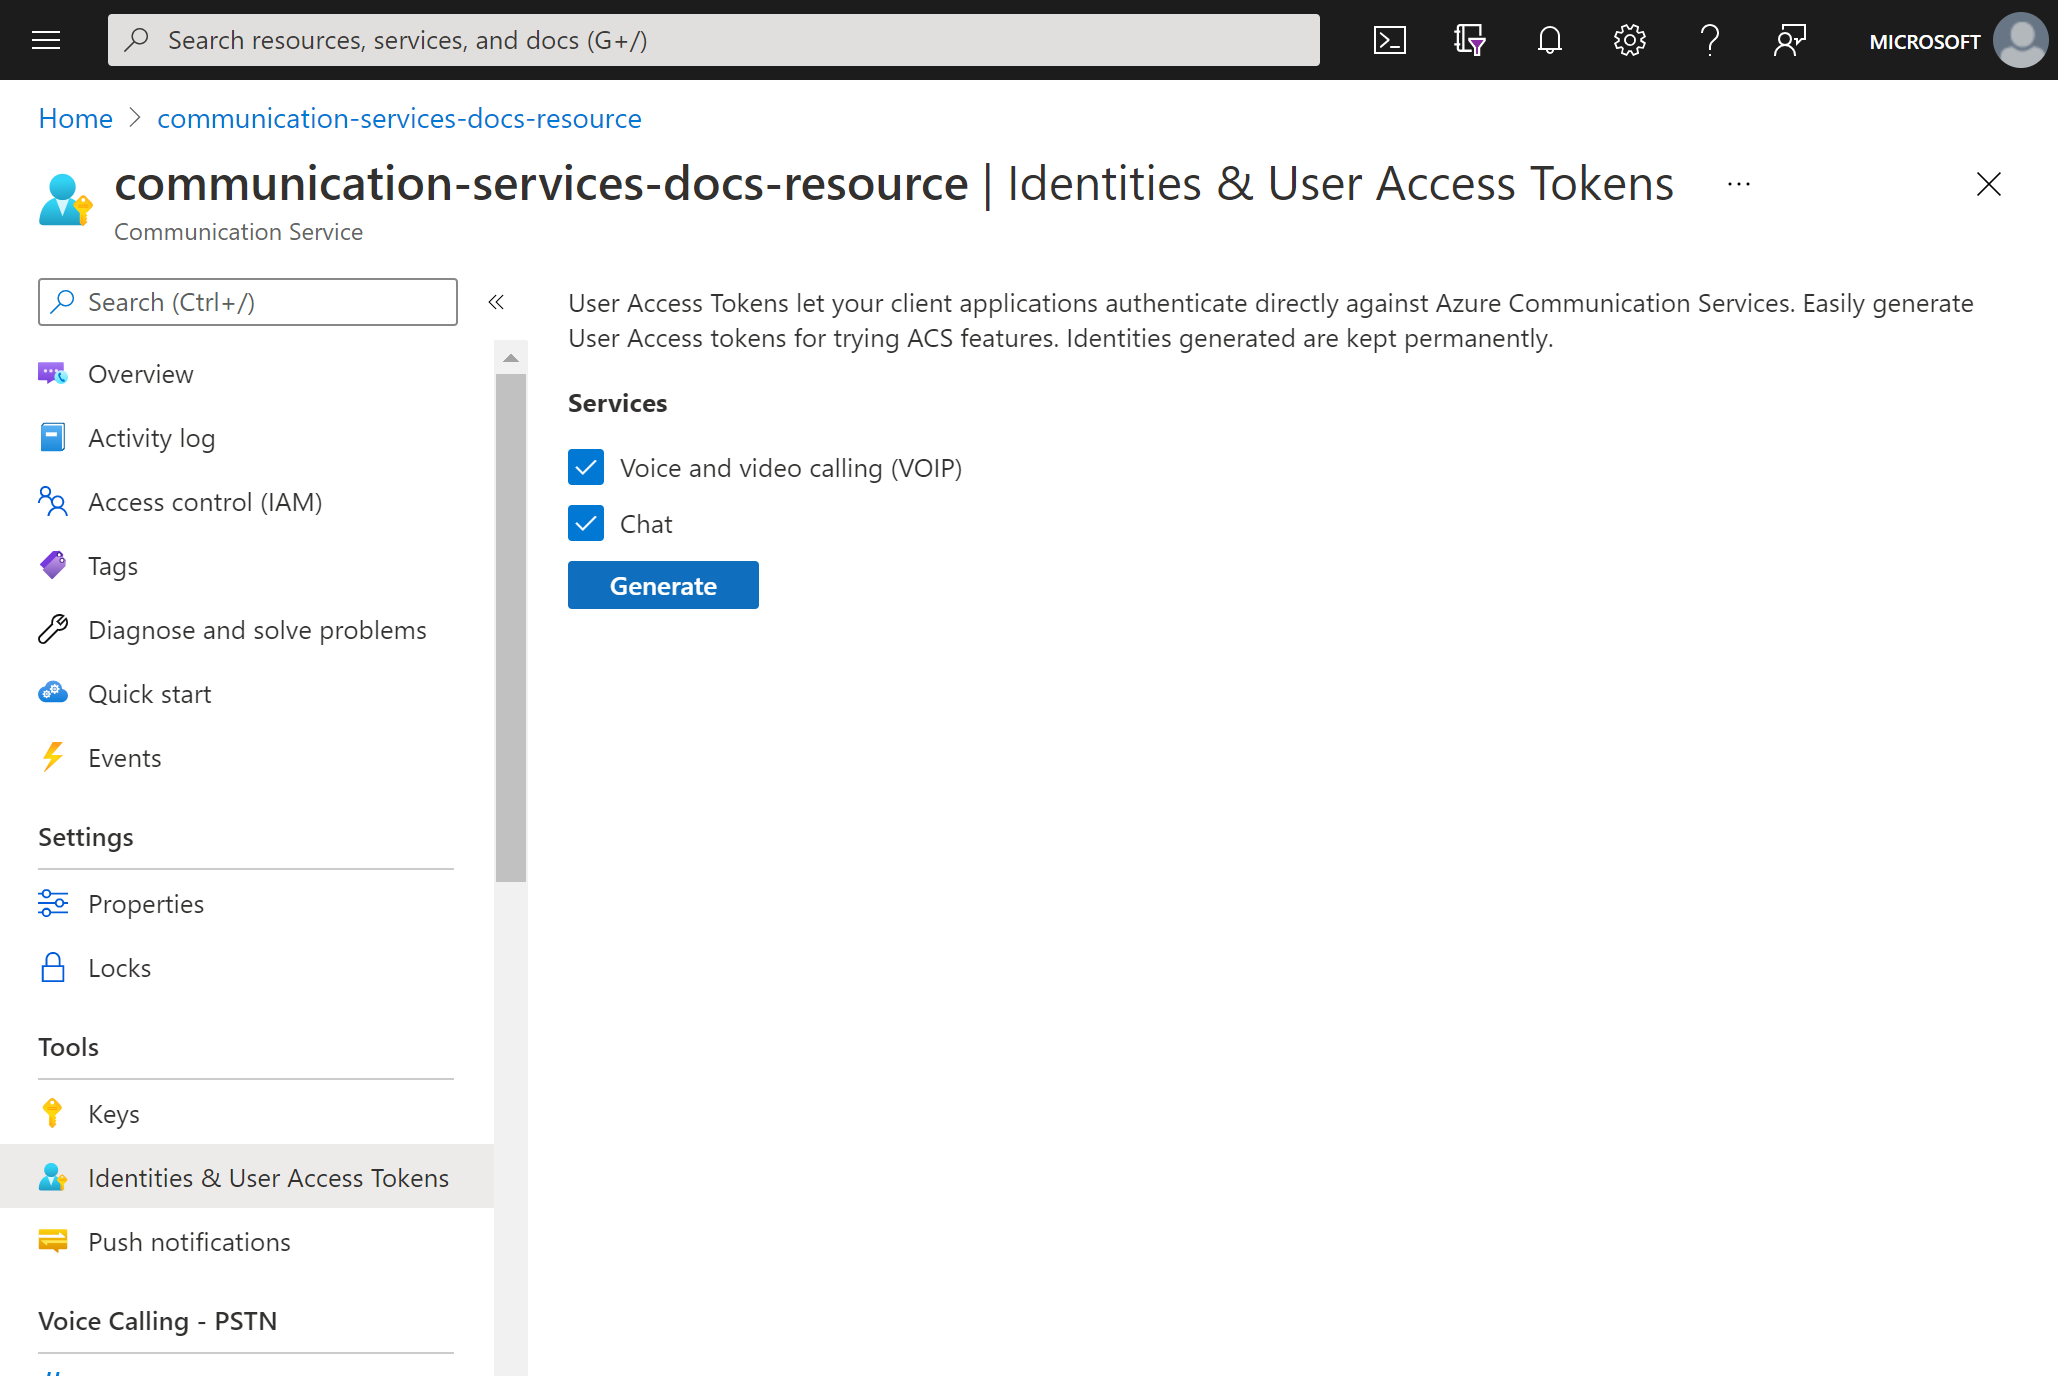
You'll see an identity and corresponding user access token generated. You can copy these strings and use them in the sample apps and other testing scenarios.
Prerequisites
An Azure account with an active subscription, or create an Azure account for free.
An active Azure Communication Services resource, or create a Communication Services resource.
An active Azure Logic Apps resource (logic app), or create a Consumption logic app workflow with the trigger that you want to use. Currently, the Azure Communication Services Identity connector provides only actions, so your logic app requires a trigger, at minimum.
Create user
Add a new step in your workflow by using the Azure Communication Services Identity connector, follow these steps in Power Automate with your Power Automate flow open in edit mode.
On the designer, under the step where you want to add the new action, select New step. Alternatively, to add the new action between steps, move your pointer over the arrow between those steps, select the plus sign (+), and select Add an action.
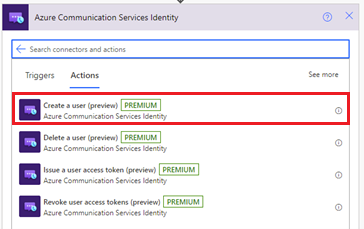
In the Choose an operation search box, enter Communication Services Identity. From the actions list, select Create a user.
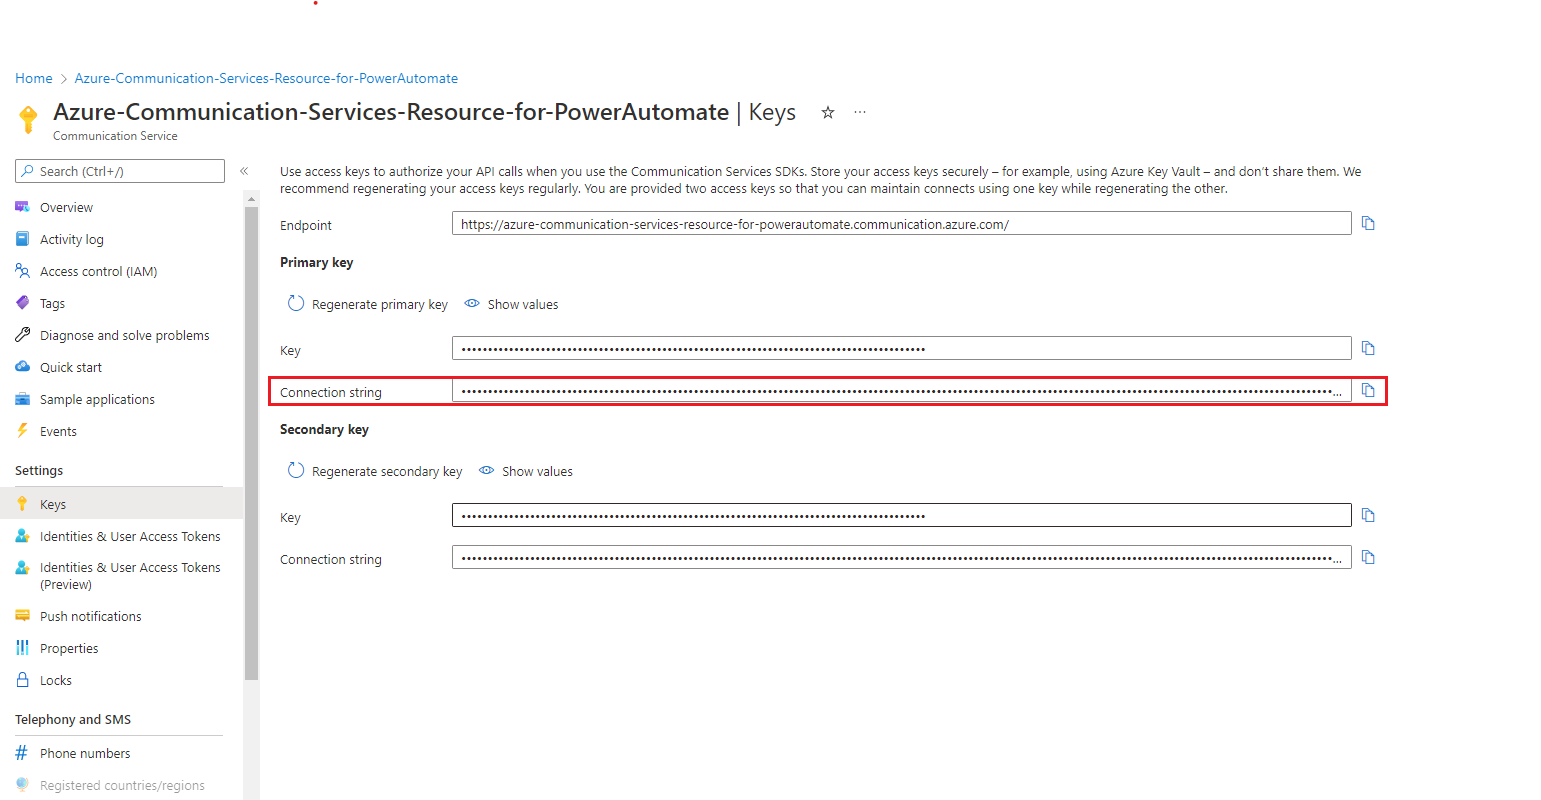
Provide the Connection String. This can be found in the Microsoft Azure, within your Azure Communication Service Resource, on the Keys option from the left menu > Connection String
Provide a Connection Name
Click Create
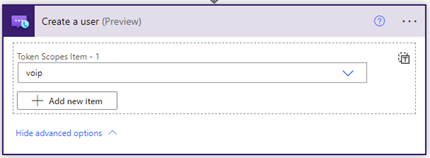
This action will output a User ID, which is a Communication Services user identity. Additionally, if you click “Show advanced options” and select the Token Scope the action will also output an access token and its expiration time with the specified scope.


Issue a user access token
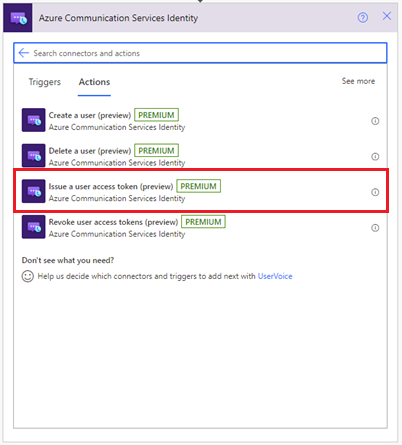
After you have a Communication Services identity, you can use the Issue a user access token action to issue an access token. The following steps will show you how:
Add a new action and enter Communication Services Identity in the search box. From the actions list, select Issue a user access token.
Then, you can use the User ID output from the previous Create a user step.
Specify the token scope: VoIP or chat. Learn more about tokens and authentication.
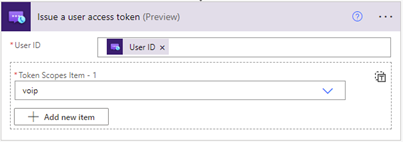
This will output an access token and its expiration time with the specified scope.
Revoke user access tokens
After you have a Communication Services identity, you can use the Issue a user access token action to revoke an access token. The following steps will show you how:
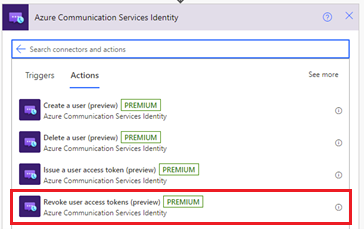
Add a new action and enter Communication Services Identity in the search box. From the actions list, select Revoke user access tokens.
Specify the User ID

This will revoke all user access tokens for the specified user, there are no outputs for this action.
Delete a user
After you have a Communication Services identity, you can use the Issue a user access token action to delete an access token . The following steps will show you how:
Add a new action and enter Communication Services Identity in the search box. From the actions list, select Delete a user.
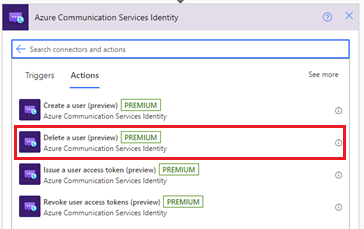
Specify the User ID

This will remove the user and revoke all user access tokens for the specified user, there are no outputs for this action.
Test your logic app
To manually start your workflow, on the designer toolbar, select Run. The workflow should create a user, issue an access token for that user, then remove it and delete the user. For more information, review how to run your workflow. You can check the outputs of these actions after the workflow runs successfully.
Use identity for monitoring and metrics
The user ID is intended to act as a primary key for logs and metrics that are collected through Azure Monitor. To view all of a user's calls, for example, you can set up your authentication in a way that maps a specific Azure Communication Services identity (or identities) to a single user.
Learn more about authentication concepts, call diagnostics through log analytics, and metrics that are available to you.
Clean up resources
To clean up and remove a Communication Services subscription, delete the resource or resource group. Deleting a resource group also deletes any other resources that are associated with it. For more information, see the "Clean up resources" section of Create and manage Communication Services resources.
To clean up your logic app workflow and related resources, review how to clean up Azure Logic Apps resources.
Next steps
In this quickstart, you learned how to:
- Issue access tokens
- Manage identities
You might also want to:
Next steps
In this quickstart, you learned how to create a user, delete a user, issue a user an access token and remove user access token using the Azure Communication Services Identity connector. To learn more check the Azure Communication Services Identity Connector documentation.
To see how tokens are use by other connectors, check out how to send a chat message from Power Automate using Azure Communication Services.
To learn more about how to send an email using the Azure Communication Services Email connector check Send email message in Power Automate with Azure Communication Services.
Feedback
Coming soon: Throughout 2024 we will be phasing out GitHub Issues as the feedback mechanism for content and replacing it with a new feedback system. For more information see: https://aka.ms/ContentUserFeedback.
Submit and view feedback for