Quickstart: Get started with UI Library
Get started with Azure Communication Services UI Library to quickly integrate communication experiences into your applications. In this quickstart, learn how to integrate UI Library composites into an application and set up the experience for your app users.
Communication Services UI Library renders a full communication experience right in your application. It takes care of connecting to the call, and it sets up the user's participation in the call behind the scenes. As a developer, you need to worry about where in your app's user experience you want the communication experience to launch. The composite takes the user through setting up their devices, joining the call and participating in it, and rendering other participants.
View this video for an overview:
Note
For detailed documentation and quickstarts about the Web UI Library visit the Web UI Library Storybook.
Prerequisites
- An Azure account with an active subscription. Create an account for free.
- A deployed Communication Services resource. Create a Communication Services resource.
- Azure Communication Services Token. See example
You can access the following quickstarts
Get the sample Android application for this quickstart in the open source Azure Communication Services UI Library for Android.
Prerequisites
- An Azure account and an active Azure subscription. Create an account for free.
- An OS running Android Studio.
- A deployed Azure Communication Services resource.
- An Azure Communication Services access token.
Set up the project
Complete the following sections to set up the quickstart project.
Create a new Android project
In Android Studio, create a new project:
In the File menu, select New > New Project.
In New Project, select the Empty Activity project template.
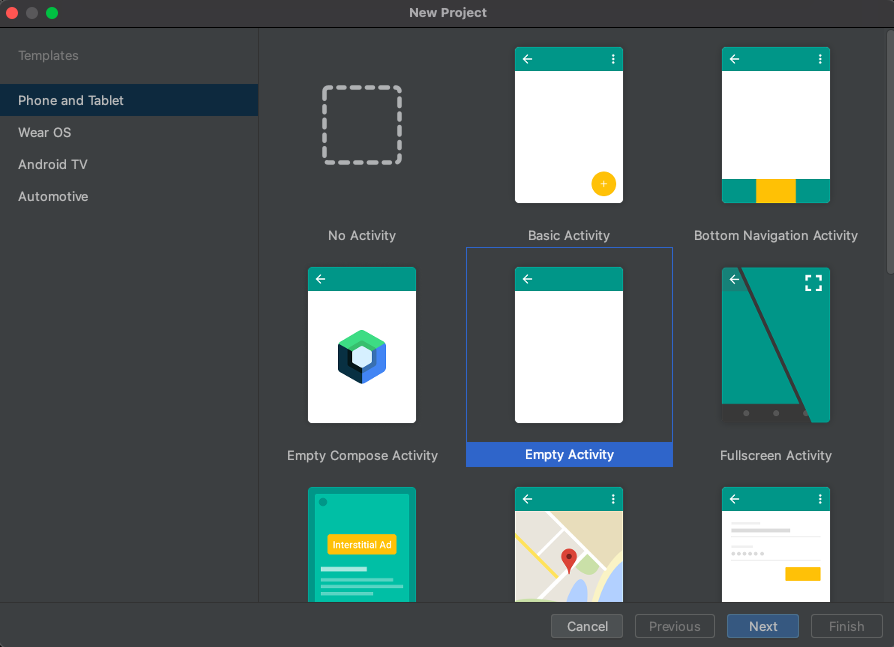
Select Next.
In Empty Activity, name the project UILibraryQuickStart. For language, select Java/Kotlin. For the minimum SDK, select API 21: Android 5.0 (Lollipop) or later.
Select Finish.

Install the packages
Complete the following sections to install the required application packages.
Add a dependency
In your app-level UILibraryQuickStart/app/build.gradle file (in the app folder), add the following dependency:
dependencies {
    ...
    implementation 'com.azure.android:azure-communication-ui-calling:+'
    ...
}
Add Maven repositories
Two Maven repositories are required to integrate the library:
- MavenCentral
- The Azure package repository
To add the repositories:
In your project Gradle scripts, ensure that the following repositories are added. For Android Studio (2020.*),
repositoriesis insettings.gradle, underdependencyResolutionManagement(Gradle version 6.8 or greater). For earlier versions of Android Studio (4.*),repositoriesis in the project-levelbuild.gradle, underallprojects{}.// dependencyResolutionManagement repositories { ... mavenCentral() maven { url "https://pkgs.dev.azure.com/MicrosoftDeviceSDK/DuoSDK-Public/_packaging/Duo-SDK-Feed/maven/v1" } ... }Sync your project with the Gradle files. To sync the project, on the File menu, select Sync Project With Gradle Files.
Add a button to Activity_main.xml
In the app/src/main/res/layout/activity_main.xml layout file, add the following code to create a button to start the composite:
<?xml version="1.0" encoding="utf-8"?>
<androidx.constraintlayout.widget.ConstraintLayout xmlns:android="http://schemas.android.com/apk/res/android"
    xmlns:app="http://schemas.android.com/apk/res-auto"
    xmlns:tools="http://schemas.android.com/tools"
    android:layout_width="match_parent"
    android:layout_height="match_parent"
    tools:context=".MainActivity">

    <Button
        android:id="@+id/startButton"
        android:layout_width="wrap_content"
        android:layout_height="wrap_content"
        android:text="Launch"
        app:layout_constraintBottom_toBottomOf="parent"
        app:layout_constraintLeft_toLeftOf="parent"
        app:layout_constraintRight_toRightOf="parent"
        app:layout_constraintTop_toTopOf="parent" />

</androidx.constraintlayout.widget.ConstraintLayout>
Initialize the composite
To initialize the composite:
Go to
MainActivity.Add the following code to initialize your composite components for calling. Replace
"GROUP_CALL_ID"with the group ID for your call. Replace"DISPLAY_NAME"with your name. Replace"USER_ACCESS_TOKEN"with your token.
package com.example.uilibraryquickstart

import androidx.appcompat.app.AppCompatActivity
import android.os.Bundle
import android.widget.Button
import com.azure.android.communication.common.CommunicationTokenCredential
import com.azure.android.communication.common.CommunicationTokenRefreshOptions
import com.azure.android.communication.ui.calling.CallComposite
import com.azure.android.communication.ui.calling.CallCompositeBuilder
import com.azure.android.communication.ui.calling.models.CallCompositeGroupCallLocator
import com.azure.android.communication.ui.calling.models.CallCompositeJoinLocator
import com.azure.android.communication.ui.calling.models.CallCompositeRemoteOptions
import java.util.UUID

class MainActivity : AppCompatActivity() {
    override fun onCreate(savedInstanceState: Bundle?) {
        super.onCreate(savedInstanceState)
        setContentView(R.layout.activity_main)

        val startButton: Button = findViewById(R.id.startButton)
        startButton.setOnClickListener { l -> startCallComposite() }
    }

    private fun startCallComposite() {
        val communicationTokenRefreshOptions = CommunicationTokenRefreshOptions({ fetchToken() }, true)
        val communicationTokenCredential = CommunicationTokenCredential(communicationTokenRefreshOptions)

        val locator: CallCompositeJoinLocator = CallCompositeGroupCallLocator(UUID.fromString("GROUP_CALL_ID"))
        val remoteOptions = CallCompositeRemoteOptions(locator, communicationTokenCredential, "DISPLAY_NAME")

        val callComposite: CallComposite = CallCompositeBuilder().build()
        callComposite.launch(this, remoteOptions)
    }

    private fun fetchToken(): String? {
        return "USER_ACCESS_TOKEN"
    }
}
Run the code
In Android Studio, build and start the application:
- Select Launch.
- Accept permissions, and then select device, microphone, and video settings.
- Select Join call.

Object model
The following classes and interfaces handle some key features of the Azure Communication Services Android UI:
| Name | Description |
|---|---|
| CallComposite | Composite component that renders a call experience with participant gallery and controls |
| CallCompositeBuilder | Builder that builds CallComposite with options |
| CallCompositeJoinMeetingLocator | Passed-in CallComposite launch to start a group call |
| CallCompositeTeamsMeetingLinkLocator | Passed to CallComposite launch to join a Microsoft Teams meeting |
| CallCompositeLocalizationOptions | Injected as optional in CallCompositeBuilder to set the language of the composite |
UI Library functionality
Get the code to create key communication features for your Android application.
Create CallComposite
To create CallComposite, inside the startCallComposite function, initialize a CallCompositeBuilder instance and a CallComposite instance.
Set up authentication
To set up authentication, inside the startCallComposite function, initialize a CommunicationTokenCredential instance. Replace "USER_ACCESS_TOKEN" with your access token.
val callComposite: CallComposite = CallCompositeBuilder().build()

val communicationTokenRefreshOptions = CommunicationTokenRefreshOptions(this::fetchToken, true)

val communicationTokenCredential = CommunicationTokenCredential(communicationTokenRefreshOptions)
Set up a group call
To set up a group call, initialize a CallCompositeGroupCallLocator and supply it to the CallCompositeRemoteOptions object.
val locator = CallCompositeGroupCallLocator(UUID.fromString("GROUP_CALL_ID"))

val remoteOptions = CallCompositeRemoteOptions(
    locator,
    communicationTokenCredential,
    "DISPLAY_NAME",
)
Set up a Teams meeting
To set up a Microsoft Teams meeting, initialize a CallCompositeTeamsMeetingLinkLocator and supply it to the CallCompositeRemoteOptions object.
val locator = CallCompositeTeamsMeetingLinkLocator("TEAMS_MEETING_LINK")

val remoteOptions = CallCompositeRemoteOptions(
    locator,
    communicationTokenCredential,
    "DISPLAY_NAME",
)
Set up a Rooms call
Important
This feature of Azure Communication Services is currently in preview.
Preview APIs and SDKs are provided without a service-level agreement. We recommend that you don't use them for production workloads. Some features might not be supported, or they might have constrained capabilities.
For more information, review Supplemental Terms of Use for Microsoft Azure Previews.
To set up a Azure Communication Services Rooms call, initialize a CallCompositeRoomLocator, supply it to the CallCompositeRemoteOptions object and set CallCompositeParticipantRole to the CallCompositeLocalOptions by setRoleHint().
CallComposite will use role hint before connecting to the call. Once call is connected, actual up-to-date participant role is retrieved from Azure Communication Services.
For more information about Rooms, how to create and manage one see Rooms Quickstart
val locator = CallCompositeRoomLocator("<ROOM_ID>")

val remoteOptions = CallCompositeRemoteOptions(
    locator,
    communicationTokenCredential,
    "DISPLAY_NAME",
)

val localOptions = CallCompositeLocalOptions().setRoleHint(participantRole)

val callComposite = CallCompositeBuilder().build()
callComposite.launch(context, remoteOptions, localOptions)
Launch the composite
To launch the call UI, inside the startCallComposite function, call launch on the CallComposite instance.
Subscribe to CallComposite error events
To receive error events, call setOnErrorHandler with CallComposite.
The following errorCode values might be sent to the error handler:
CallCompositeErrorCode.CALL_JOIN_FAILEDCallCompositeErrorCode.CALL_END_FAILEDCallCompositeErrorCode.TOKEN_EXPIREDCallCompositeErrorCode.CAMERA_FAILURECallCompositeErrorCode.MICROPHONE_PERMISSION_NOT_GRANTEDCallCompositeErrorCode.NETWORK_CONNECTION_NOT_AVAILABLE
The following example shows an error event for a failed composite event.
callComposite.addOnErrorEventHandler { callCompositeErrorEvent ->
    println(callCompositeErrorEvent.errorCode)
}
Apply a theme configuration
To change the primary color of the composite, create a new theme style in src/main/res/values/themes.xml and src/main/res/values-night/themes.xml by using AzureCommunicationUICalling.Theme as the parent theme. To apply the theme, inject the theme ID in CallCompositeBuilder:
<style name="MyCompany.CallComposite" parent="AzureCommunicationUICalling.Theme">
    <item name="azure_communication_ui_calling_primary_color">#27AC22</item>
    <item name="azure_communication_ui_calling_primary_color_tint10">#5EC65A</item>
    <item name="azure_communication_ui_calling_primary_color_tint20">#A7E3A5</item>
    <item name="azure_communication_ui_calling_primary_color_tint30">#CEF0CD</item>
</style>
val callComposite: CallComposite =
        CallCompositeBuilder()
            .theme(R.style.MyCompany_CallComposite)
            .build()
Apply a localization configuration
To change the language of the composite, use CallCompositeSupportedLocale to create CallCompositeLocalizationOptions with Locale. To apply language, inject the localization configuration in CallCompositeBuilder. By default, all text labels use English (en) strings. You can use CallCompositeLocalizationOptions to set a different value for language. By default, UI Library includes a set of language values that you can use with UI components. CallCompositeSupportedLocale provides the supported locales. For example, to access the English locale, you can use CallCompositeSupportedLocale.EN. CallCompositeSupportedLocale.getSupportedLocales() provides a list of locale objects for supported languages.
import com.azure.android.communication.ui.calling.models.CallCompositeLocalizationOptions
import com.azure.android.communication.ui.calling.models.CallCompositeSupportedLocale

// CallCompositeSupportedLocale provides list of supported locale
val callComposite: CallComposite =
            CallCompositeBuilder().localization(
                CallCompositeLocalizationOptions(CallCompositeSupportedLocale.EN)
            ).build()
Subscribe to CallComposite call state changed event
To receive call state changed events, call addOnCallStateChangedEventHandler with CallComposite.
The following example shows an event for a call state changed.
callComposite.addOnCallStateChangedEventHandler { callStateChangedEvent ->
    println(callStateChangedEvent.code)
}
Dismiss CallComposite and subscribe to dismissed event
To receive dismiss, call addOnDismissedEventHandler with CallComposite. To dismiss CallComposite, call dismiss.
The following example shows an event for a call state changed.
callComposite.addOnDismissedEventHandler { callCompositeDismissedEvent ->
    println(callCompositeDismissedEvent.errorCode)
}

callComposite.dismiss()
More features
The list of use cases has detailed information about more features.
Add notifications to your mobile app
Azure Communication Services integrates with Azure Event Grid and Azure Notification Hubs, so you can add push notifications to your apps in Azure. You can use push notifications to send information from your application to users' mobile devices. A push notification can show a dialog, play a sound, or display an incoming call UI.
Get the sample iOS application for this quickstart in the open source Azure Communication Services UI Library for iOS.
Prerequisites
- An Azure account and an active Azure subscription. Create an account for free.
- A Mac running Xcode 13 or later and a valid developer certificate installed in your keychain. CocoaPods must also be installed to fetch dependencies.
- A deployed Azure Communication Services resource.
- An Azure Communication Services access token.
Set up the project
Complete the following sections to set up the quickstart project.
Create a new Xcode project
In Xcode, create a new project:
In the File menu, select New > Project.
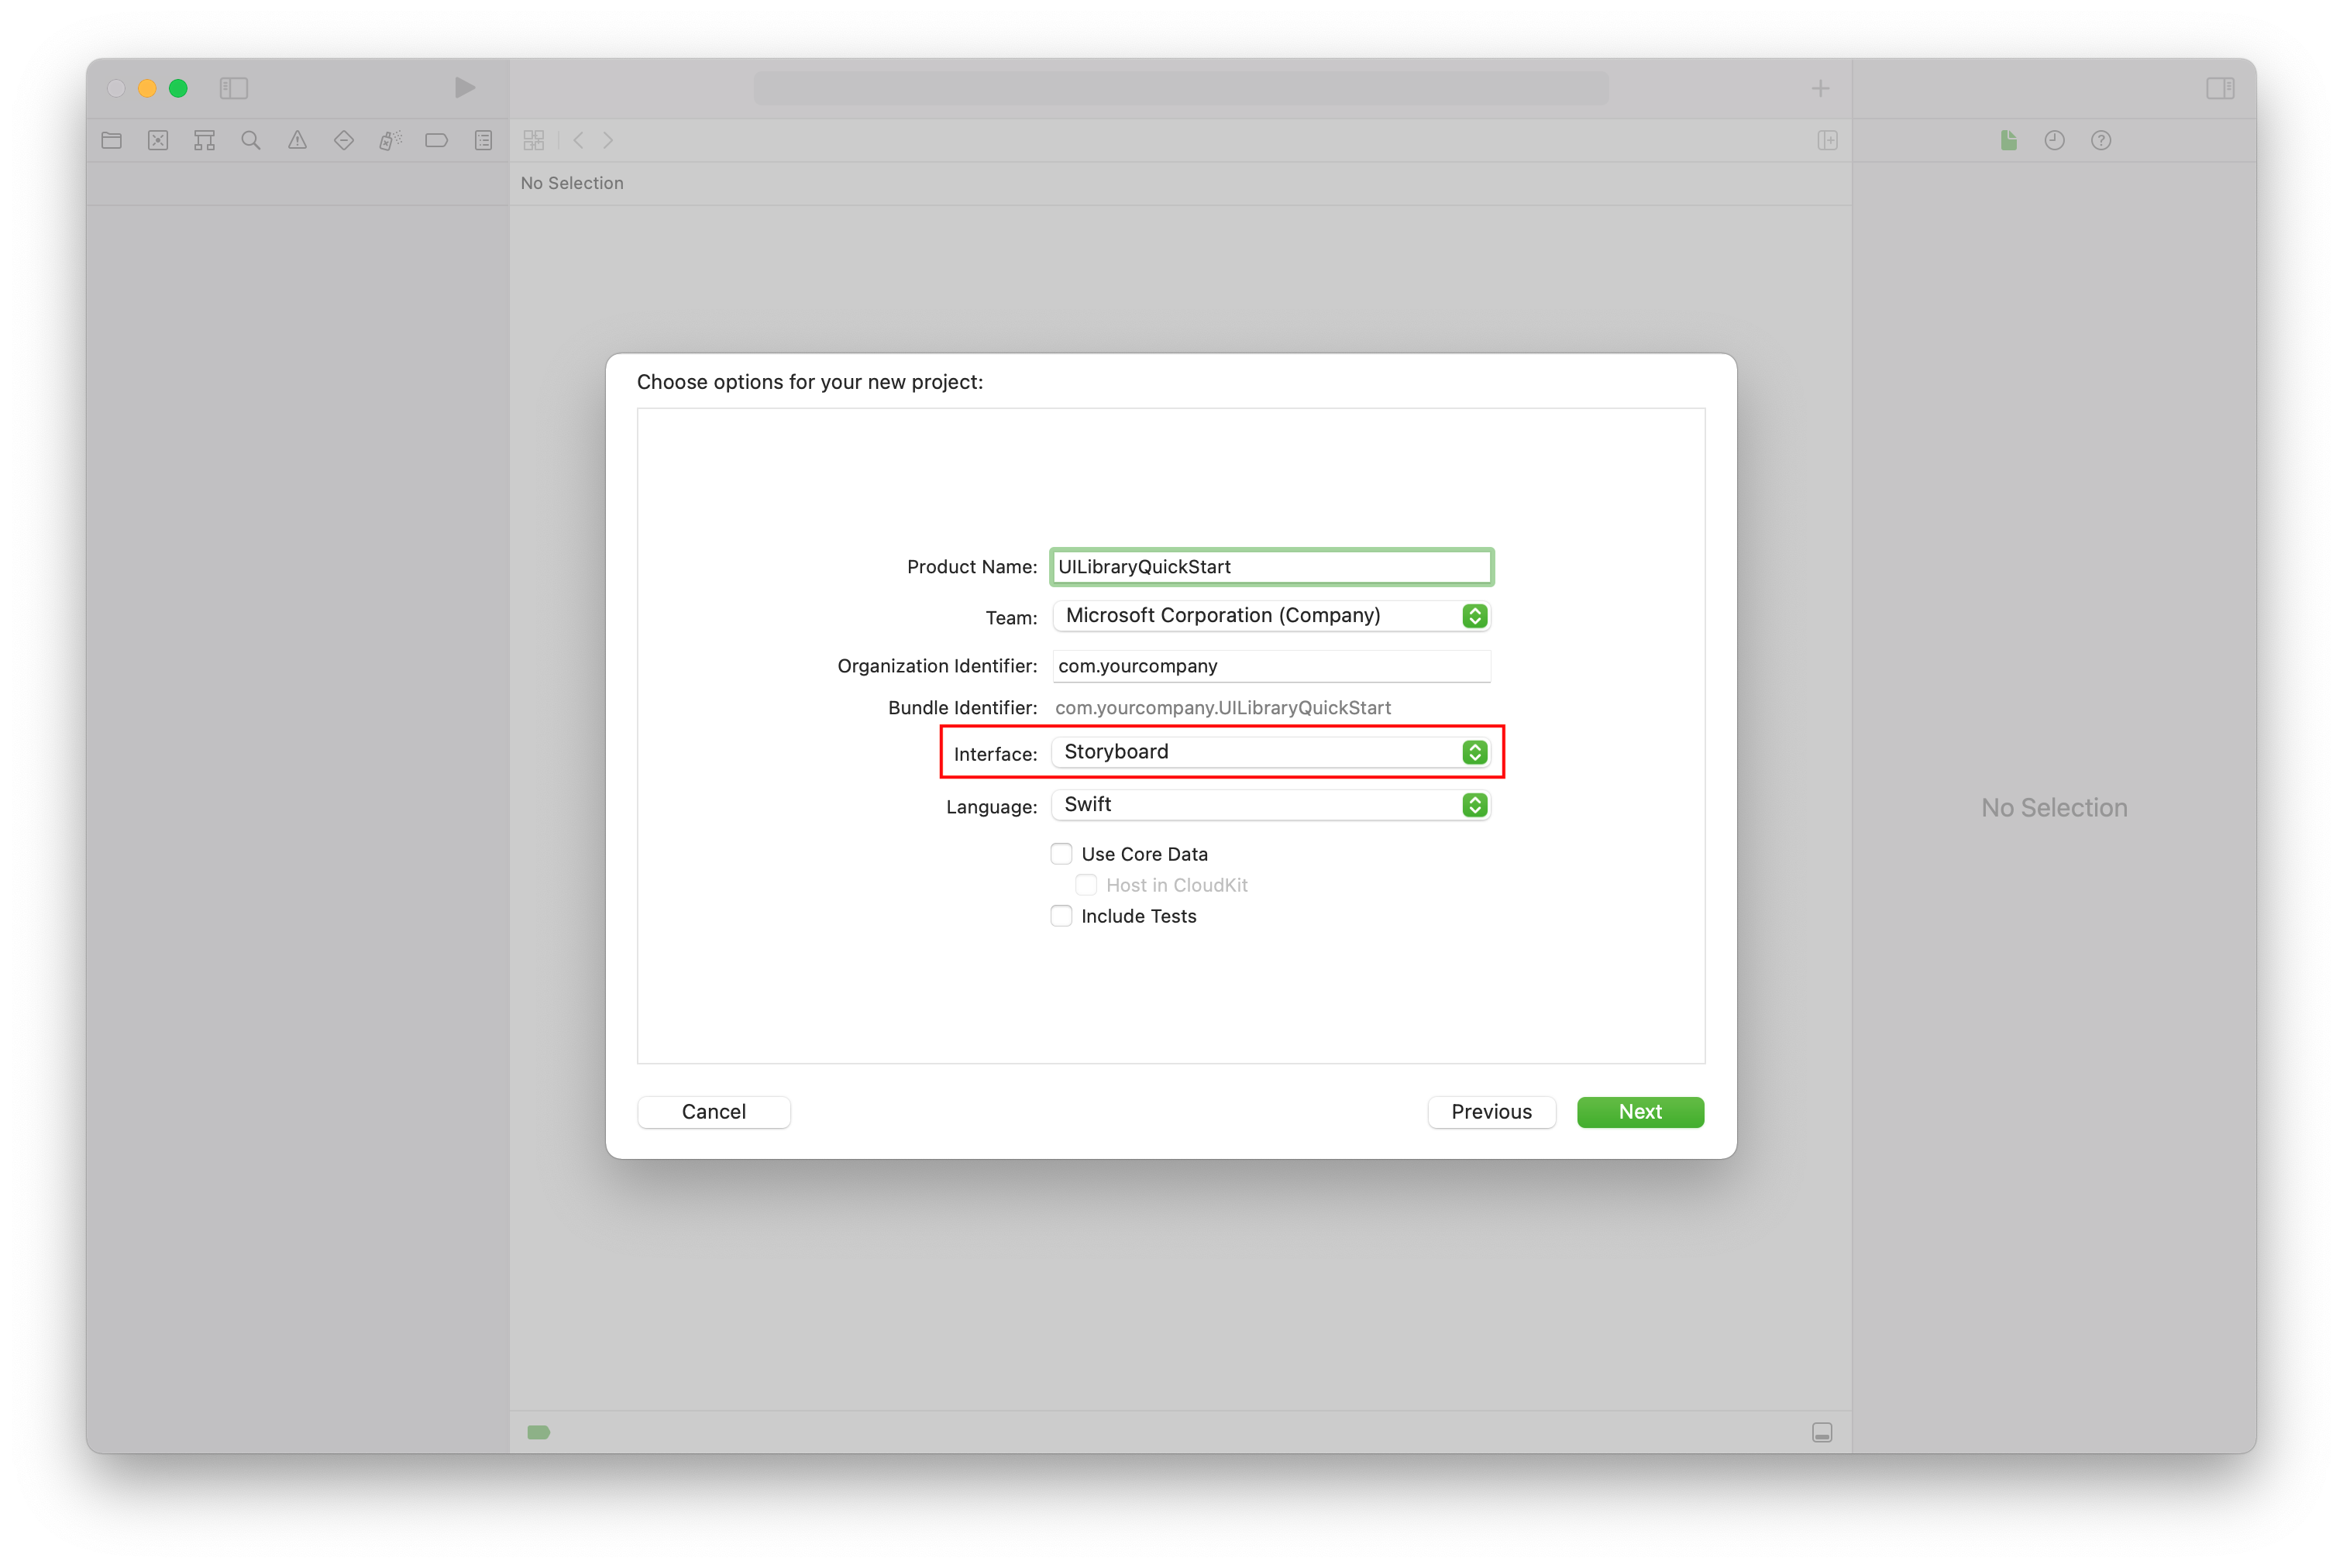
In Choose a template for your new project, select the iOS platform and select the App application template. The quickstart uses the UIKit storyboards. The quickstart doesn't create tests, so you can clear the Include Tests checkbox.

In Choose options for your new project, for the product name, enter UILibraryQuickStart. For the interface, select Storyboard.
Install the package and dependencies
(Optional) For MacBook with M1, install and enable Rosetta in Xcode.
In your project root directory, run
pod initto create a Podfile. If you encounter an error, update CocoaPods to the current version.Add the following code to your Podfile. Replace
UILibraryQuickStartwith your project name.platform :ios, '15.0' target 'UILibraryQuickStart' do use_frameworks! pod 'AzureCommunicationUICalling' endRun
pod install --repo-update.In Xcode, open the generated .xcworkspace file.
Request access to device hardware
To access the device's hardware, including the microphone and camera, update your app's information property list. Set the associated value to a string that's included in the dialog the system uses to request access from the user.
Right-click the
Info.plistentry of the project tree and select Open As > Source Code. Add the following lines to the top level<dict>section, and then save the file.<key>NSCameraUsageDescription</key> <string></string> <key>NSMicrophoneUsageDescription</key> <string></string>Here's an example of the
Info.plistsource code in an Xcode file: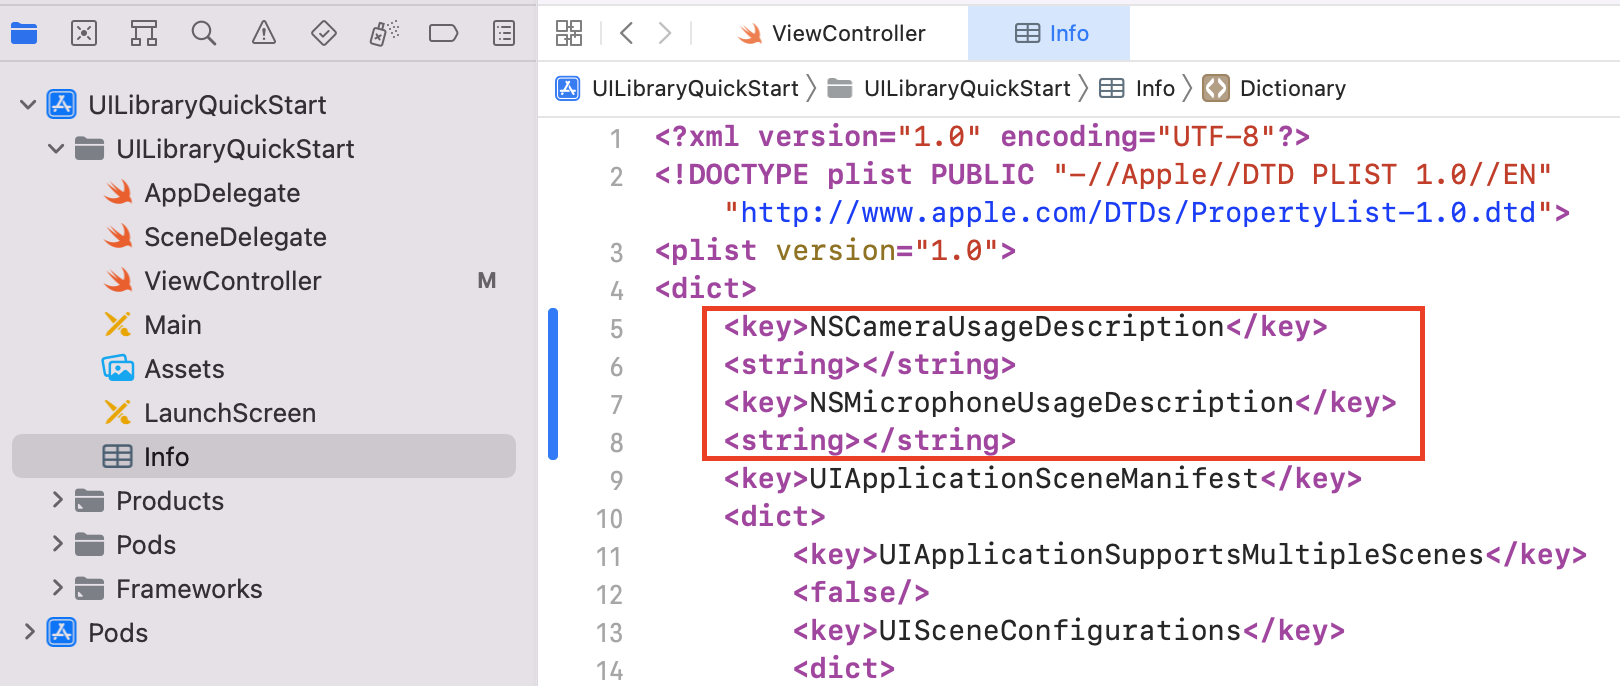
To verify that device permission requests are added correctly, select Open As > Property List. Check that the information property list looks similar to the following example:

Turn off Bitcode
In the Xcode project, under Build Settings, set the Enable Bitcode option to No. To find the setting, change the filter from Basic to All or use the search bar.

Initialize the composite
To initialize the composite:
Go to
ViewController.Add the following code to initialize your composite components for a call. Replace
<GROUP_CALL_ID>with either the group ID for your call or withUUID()to generate a group ID for the call. Replace<DISPLAY_NAME>with your name. (The string length limit for<DISPLAY_NAME>is 256 characters.) Replace<USER_ACCESS_TOKEN>with your access token.import UIKit import AzureCommunicationCalling import AzureCommunicationUICalling class ViewController: UIViewController { private var callComposite: CallComposite? override func viewDidLoad() { super.viewDidLoad() let button = UIButton(frame: CGRect(x: 100, y: 100, width: 200, height: 50)) button.contentEdgeInsets = UIEdgeInsets(top: 10.0, left: 20.0, bottom: 10.0, right: 20.0) button.layer.cornerRadius = 10 button.backgroundColor = .systemBlue button.setTitle("Start Experience", for: .normal) button.addTarget(self, action: #selector(startCallComposite), for: .touchUpInside) button.translatesAutoresizingMaskIntoConstraints = false self.view.addSubview(button) button.centerXAnchor.constraint(equalTo: view.centerXAnchor).isActive = true button.centerYAnchor.constraint(equalTo: view.centerYAnchor).isActive = true } @objc private func startCallComposite() { let callCompositeOptions = CallCompositeOptions() callComposite = CallComposite(withOptions: callCompositeOptions) let communicationTokenCredential = try! CommunicationTokenCredential(token: "<USER_ACCESS_TOKEN>") let remoteOptions = RemoteOptions(for: .groupCall(groupId: UUID(uuidString: "<GROUP_CALL_ID>")!), credential: communicationTokenCredential, displayName: "<DISPLAY_NAME>") callComposite?.launch(remoteOptions: remoteOptions) } }
Run the code
To build and run your app on the iOS simulator, select Product > Run or use the (⌘-R) keyboard shortcut. Then, try out the call experience on the simulator:
Select Start Experience.
Accept audio permissions, and then select device, mic, and video settings.
Select Start call.

Object model
The following classes and interfaces handle some key features of the Azure Communication Services UI client library:
| Name | Description |
|---|---|
| CallComposite | Component that renders a call experience that has a participant gallery and controls |
| CallCompositeOptions | Settings for options like themes and event handling |
| RemoteOptions | Remote options to send to Azure Communication Services to join a group call or a Teams meeting. |
| ThemeOptions | Customization options for the composite theme |
| LocalizationOptions | Language options for the composite |
UI Library functionality
Get the code to create key communication features for your iOS application.
Create CallComposite
To create CallComposite, inside the startCallComposite function, initialize a CallCompositeOptions instance and a CallComposite instance:
@objc private func startCallComposite() {
    let callCompositeOptions = CallCompositeOptions()

    callComposite = CallComposite(withOptions: callCompositeOptions)
}
Set up authentication
To set up authentication, inside the startCallComposite function, initialize a CommunicationTokenCredential instance. Replace <USER_ACCESS_TOKEN> with your access token.
let communicationTokenCredential = try! CommunicationTokenCredential(token: "<USER_ACCESS_TOKEN>")
If you don't already have an access token, create an Azure Communication Services access token.
Set up a group call
To set up a group call, inside the startCallComposite function, initialize a RemoteOptions instance for the .groupCall locator. Replace <GROUP_CALL_ID> with the group ID for your call. Replace <DISPLAY_NAME> with your name.
// let uuid = UUID() to create a new call
let uuid = UUID(uuidString: "<GROUP_CALL_ID>")!
let remoteOptions = RemoteOptions(for: .groupCall(groupId: uuid),
                                  credential: communicationTokenCredential,
                                  displayName: "<DISPLAY_NAME>")
For more information about using a group ID for calls, see Manage calls.
Set up a Teams meeting
To set up a Microsoft Teams meeting, inside the startCallComposite function, initialize a RemoteOptions instance for the .teamsMeeting locator. Replace <TEAMS_MEETING_LINK> with the Teams meeting link for your call. Replace <DISPLAY_NAME> with your name.
let remoteOptions = RemoteOptions(for: .teamsMeeting(teamsLink: "<TEAMS_MEETING_LINK>"),
                                  credential: communicationTokenCredential,
                                  displayName: "<DISPLAY_NAME>")
Get a Teams meeting link
You can get a Microsoft Teams meeting link by using Graph APIs. This process is detailed in Graph documentation.
The Communication Services Call SDK accepts a full Microsoft Teams meeting link. This link is returned as part of the onlineMeeting resource, under the joinWebUrl property. You also can get the required meeting information from the Join Meeting URL in the Teams meeting invite itself.
Set up a Rooms call
Important
This feature of Azure Communication Services is currently in preview.
Preview APIs and SDKs are provided without a service-level agreement. We recommend that you don't use them for production workloads. Some features might not be supported, or they might have constrained capabilities.
For more information, review Supplemental Terms of Use for Microsoft Azure Previews.
To set up a Azure Communication Services Rooms call, inside the startCallComposite function, initialize a RemoteOptions instance for the .roomCall locator. Replace <ROOM_ID> with the Room ID for your call. Initialize a LocalOptions instance with roleHint.
Replace <DISPLAY_NAME> with your name.
CallComposite will use role hint before connecting to the call. Once call is connected, actual up-to-date participant role is retrieved from Azure Communication Services.
For more information about Rooms, how to create and manage one see Rooms Quickstart
let remoteOptions = RemoteOptions(for: .roomCall(roomId: "<ROOM_ID>"),
                                  credential: communicationTokenCredential,
                                  displayName: "<DISPLAY_NAME>")
let localOptions = LocalOptions(roleHint: participantRole)

let callComposite = CallComposite()
callComposite.launch(remoteOptions: remoteOptions, localOptions: localOptions)
Launch the composite
Inside the startCallComposite function, call launch on the CallComposite instance:
callComposite?.launch(remoteOptions: remoteOptions)
Subscribe to events
You can implement closures to act on composite events. The following errorCodes might be sent to the error handler:
callJoincallEndcameraFailuretokenExpiredmicrophonePermissionNotGrantednetworkConnectionNotAvailable
The following example shows an error event for a failed composite event:
callComposite?.events.onError = { error in
    print("CallComposite failed with error:\(error)")
}
Apply theme options
To customize the communication experience in your application, create custom theme options that implement the ThemeOptions protocol. Include an instance of the new class in CallCompositeOptions:
class CustomThemeOptions: ThemeOptions {
   var primaryColor: UIColor {
       return UIColor.red
   }
}
let callCompositeOptions = CallCompositeOptions(theme: CustomThemeOptions())
For more information about how theming works, see the theming guide.
Apply localization options
To change the language in the composite, create custom localization options and include them in CallCompositeOptions. By default, all text labels use English (SupportedLocale.en) strings. You can use LocalizationOptions to set a different value for locale. By default, UI Library includes a set of locale values that you can use with the UI components. SupportedLocale.values provides a list of all supported languages.
In the following example, the composite is localized to French (fr):
// Option1: Use IntelliSense to get locales UI Library supports.
let localizationOptions = LocalizationOptions(locale: SupportedLocale.frFR)

// Option2: If UI Library doesn't support the locale you set, the Swift Locale struct defaults to English.
let localizationOptions = LocalizationOptions(locale: Locale(identifier: "fr-FR"))

let callCompositeOptions = CallCompositeOptions(localization: localizationOptions)
For more information about localization and for a list of supported languages, see the localization guide.
Subscribe to CallComposite call state changed event
You can implement closures to act on composite events. The call states will be sent to the call state changed handler.
The following example shows an event for a call state changed.
callComposite?.events.onCallStateChanged = { callStateEvent in
   print("CallComposite call state changed:\(callStateEvent.requestString)")
}
Dismiss CallComposite and subscribe to dismissed event
To dismiss CallComposite, call dismiss. The following dismiss event be sent on call composite dismissed:
callComposite?.events.onDismissed = { dismissed in
   print("CallComposite dismissed:\(dismissed.errorCode)")
}

callComposite.dismiss()
Add notifications to your mobile app
Azure Communication Services integrates with Azure Event Grid and Azure Notification Hubs, so you can add push notifications to your apps in Azure. You can use push notifications to send information from your application to users' mobile devices. A push notification can show a dialog, play a sound, or display an incoming call UI.
Clean up resources
If you want to clean up and remove a Communication Services subscription, you can delete the resource or resource group.
Deleting the resource group also deletes any other resources associated with it.
Learn more about cleaning up resources.
Feedback
Coming soon: Throughout 2024 we will be phasing out GitHub Issues as the feedback mechanism for content and replacing it with a new feedback system. For more information see: https://aka.ms/ContentUserFeedback.
Submit and view feedback for