Getting started with Call Readiness and the UI Library
Important
This feature of Azure Communication Services is currently in preview.
Preview APIs and SDKs are provided without a service-level agreement. We recommend that you don't use them for production workloads. Some features might not be supported, or they might have constrained capabilities.
For more information, review Supplemental Terms of Use for Microsoft Azure Previews.
When a user intends to join a web call, their primary focus is on the conversation they want to have with the other person(s) on the call – this persona could be a doctor, teacher, financial advisor, or friend. The conversation itself may pose enough stress, let alone navigating the process of making sure they and their device(s) are ready to be seen and/or heard. It's critical to ensure the device and client they're using is ready for the call
It may be impossible to predict every issue or combination of issues that may arise, but by applying this tutorial you can:
- Reduce the likelihood of issues affecting a user during a call
- Only expose an issue if it's going to negatively impact the experience
- Avoid making a user hunt for a resolution; Offer guided help to resolve the issue
Related to this tutorial is the Azure Communication Services Network Testing Diagnostic Tool. Users can use the Network Testing Diagnostics Tool for further troubleshooting in customer support scenarios.
Tutorial Structure
In this tutorial, we use the Azure Communication Services UI Library to create an experience that gets the user ready to join a call. This tutorial is structured into three parts:
- Part 1: Getting your user onto a supported browser
- Part 2: Ensuring your App has access to the microphone and camera
- Part 3: Having your user select their desired microphone and camera
Prerequisites
- Visual Studio Code on one of the supported platforms.
- Node.js, Active LTS and Maintenance LTS versions (10.14.1 recommended). Use the
node --versioncommand to check your version.
Download code
Access the full code for this tutorial on GitHub.
App Structure
Users have several hurdles to cross when joining a call from browser support to selecting the correct camera. This tutorial uses React with Azure Communication Services UI Library to create an app that performs call readiness checks. These checks guide the user through browser support, camera and microphone permissions and finally device setup.
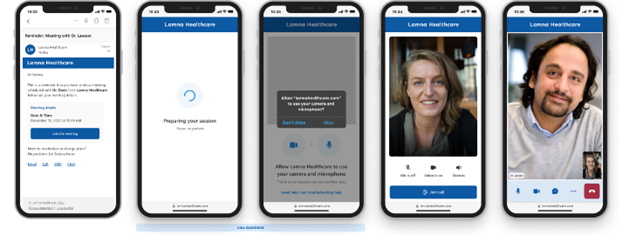
The user flow of the App is as follows:
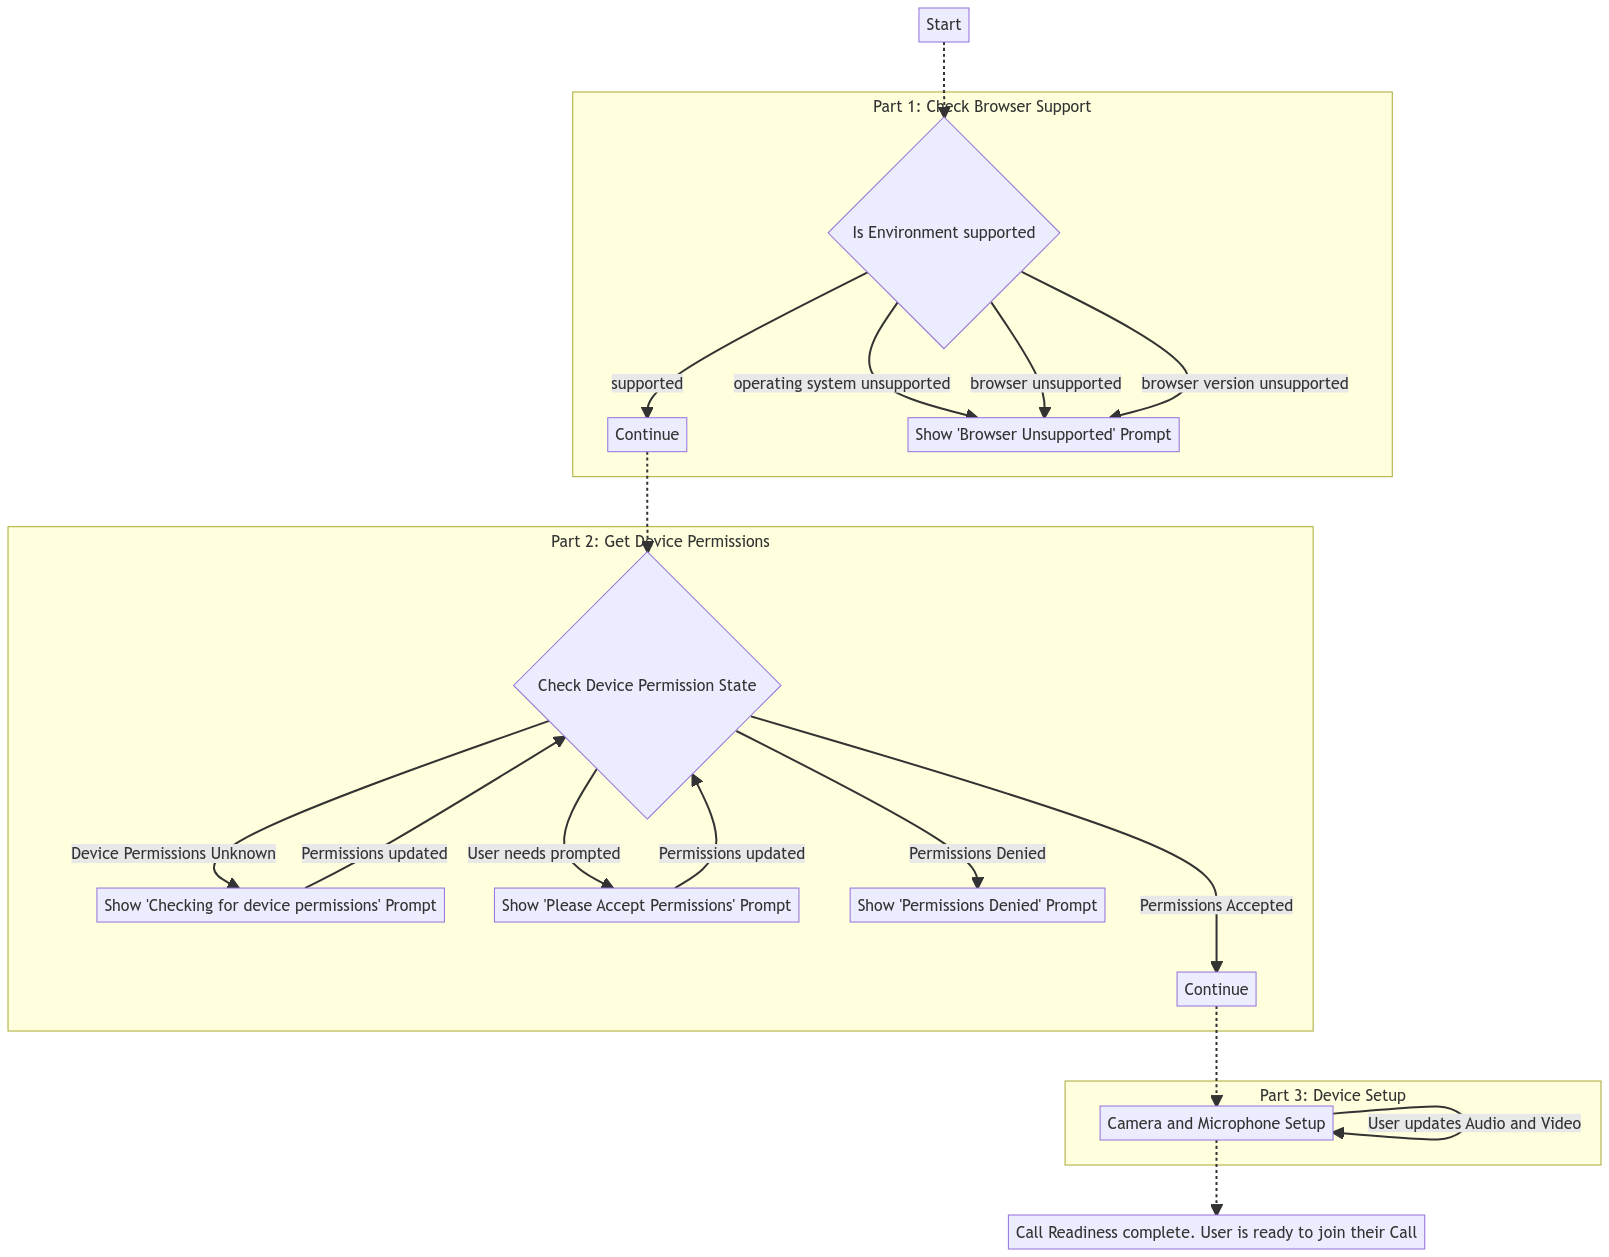
Your final app prompts the user onto a supported browser and access for the camera and microphone, then let the user choose and preview their microphone and camera settings before joining the call:
Set up the Project
To set up the React App, we use the create-react-app template for this quickstart. This create-react-app command creates an easy to run TypeScript App powered by React. The command installs the Azure Communication Services npm packages, and the FluentUI npm package for creating advanced UI. For more information on create-react-app, see: Get Started with React.
# Create an Azure Communication Services App powered by React.
npx create-react-app ui-library-call-readiness-app --template communication-react

# Change to the directory of the newly created App.
cd ui-library-call-readiness-app
At the end of this process, you should have a full application inside of the folder ui-library-call-readiness-app.
For this quickstart, we modify the files inside of the src folder.
Install Packages
As this feature is in public preview, you must use the beta versions of the Azure Communication Services npm packages. Use the npm install command to install these packages:
# Install Public Preview versions of the Azure Communication Services Libraries.
npm install @azure/communication-react@1.5.1-beta.1 @azure/communication-calling@1.10.0-beta.1
Note
If you are installing the communication packages into an existing App, @azure/communication-react currently does not support React v18. To downgrade to React v17 or less follow these instructions.
Initial App Setup
To get us started, we replace the create-react-app default App.tsx content with a basic setup that:
- Registers the necessary icons we use in this tutorial
- Sets a theme provider that can be used to set a custom theme
- Create a
StatefulCallClientwith a provider that gives child components access to the call client
src/App.tsx
import { CallClientProvider, createStatefulCallClient, FluentThemeProvider, useTheme } from '@azure/communication-react';
import { initializeIcons, registerIcons, Stack, Text } from '@fluentui/react';
import { DEFAULT_COMPONENT_ICONS } from '@azure/communication-react';
import { CheckmarkCircle48Filled } from '@fluentui/react-icons';

// Initializing and registering icons should only be done once per app.
initializeIcons();
registerIcons({ icons: DEFAULT_COMPONENT_ICONS });

const USER_ID = 'user1'; // In your production app replace this with an Azure Communication Services User ID
const callClient = createStatefulCallClient({ userId: { communicationUserId: USER_ID } });

/**
 * Entry point of a React app.
 */
const App = (): JSX.Element => {
  return (
    <FluentThemeProvider>
      <CallClientProvider callClient={callClient}>
        <TestComplete />
      </CallClientProvider>
    </FluentThemeProvider>
  );
}

export default App;

/**
 * Final page to highlight the call readiness checks have completed.
 * Replace this with your own App's next stage.
 */
export const TestComplete = (): JSX.Element => {
  const theme = useTheme();
  return (
    <Stack verticalFill verticalAlign="center" horizontalAlign="center" tokens={{ childrenGap: "1rem" }}>
      <CheckmarkCircle48Filled primaryFill={theme.palette.green} />
      <Text variant="xLarge">Call Readiness Complete</Text>
      <Text variant="medium">From here you can have the user join their call using their chosen settings.</Text>
    </Stack>
  );
};
Run Create React App
Let's test our setup by running:
# Run the React App
npm start
Once the App is running visit http://localhost:3000 in your browser to see your running App.
You should see a green checkmark with a Test Complete message.
Next steps
Feedback
Coming soon: Throughout 2024 we will be phasing out GitHub Issues as the feedback mechanism for content and replacing it with a new feedback system. For more information see: https://aka.ms/ContentUserFeedback.
Submit and view feedback for