Deploy to Azure Container Apps with GitHub Actions
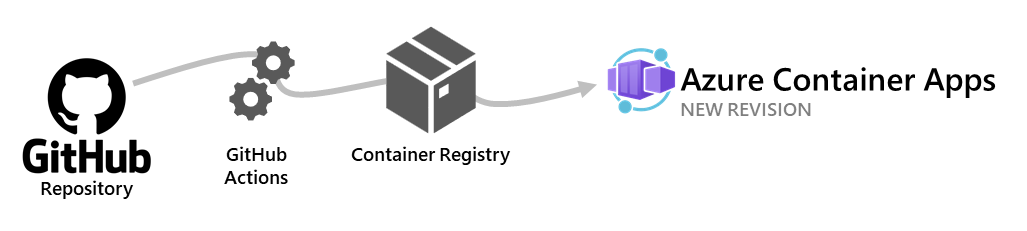
Azure Container Apps allows you to use GitHub Actions to publish revisions to your container app. As commits are pushed to your GitHub repository, a workflow is triggered which updates the container image in the container registry. Azure Container Apps creates a new revision based on the updated container image.
The GitHub Actions workflow is triggered by commits to a specific branch in your repository. When creating the workflow, you decide which branch triggers the workflow.
This article shows you how to create a fully customizable workflow. To generate a starter GitHub Actions workflow with Azure CLI, see Generate GitHub Actions workflow with Azure CLI.
Azure Container Apps GitHub action
To build and deploy your container app, you add the azure/container-apps-deploy-action action to your GitHub Actions workflow.
The action supports the following scenarios:
- Build from a Dockerfile and deploy to Container Apps
- Build from source code without a Dockerfile and deploy to Container Apps. Supported languages include .NET, Java, Node.js, PHP, and Python
- Deploy an existing container image to Container Apps
Usage examples
Here are some common scenarios for using the action. For more information, see the action's GitHub Marketplace page.
Build and deploy to Container Apps
The following snippet shows how to build a container image from source code and deploy it to Container Apps.
steps:

  - name: Log in to Azure
    uses: azure/login@v1
    with:
      creds: ${{ secrets.AZURE_CREDENTIALS }}

  - name: Build and deploy Container App
    uses: azure/container-apps-deploy-action@v1
    with:
      appSourcePath: ${{ github.workspace }}/src
      acrName: myregistry
      containerAppName: my-container-app
      resourceGroup: my-rg
The action uses the Dockerfile in appSourcePath to build the container image. If no Dockerfile is found, the action attempts to build the container image from source code in appSourcePath.
Deploy an existing container image to Container Apps
The following snippet shows how to deploy an existing container image to Container Apps.
steps:

  - name: Log in to Azure
    uses: azure/login@v1
    with:
      creds: ${{ secrets.AZURE_CREDENTIALS }}

  - name: Build and deploy Container App
    uses: azure/container-apps-deploy-action@v1
    with:
      acrName: myregistry
      containerAppName: my-container-app
      resourceGroup: my-rg
      imageToDeploy: myregistry.azurecr.io/app:${{ github.sha }}
Important
If you're building a container image in a separate step, make sure you use a unique tag such as the commit SHA instead of a stable tag like latest. For more information, see Image tag best practices.
Authenticate with Azure Container Registry
The Azure Container Apps action needs to authenticate with your Azure Container Registry to push the container image. The container app also needs to authenticate with your Azure Container Registry to pull the container image.
To push images, the action automatically authenticates with the container registry specified in acrName using the credentials provided to the azure/login action.
To pull images, Azure Container Apps uses either managed identity (recommended) or admin credentials to authenticate with the Azure Container Registry. To use managed identity, the container app the action is deploying must be configured to use managed identity. To authenticate with the registry's admin credentials, set the action's acrUsername and acrPassword inputs.
Configuration
You take the following steps to configure a GitHub Actions workflow to deploy to Azure Container Apps.
- Create a GitHub repository for your app
- Create a container app with managed identity enabled
- Assign the
AcrPullrole for the Azure Container Registry to the container app's managed identity - Configure secrets in your GitHub repository
- Create a GitHub Actions workflow
Prerequisites
| Requirement | Instructions |
|---|---|
| Azure account | If you don't have one, create an account for free. You need the Contributor or Owner permission on the Azure subscription to proceed. Refer to Assign Azure roles using the Azure portal for details. |
| GitHub Account | Sign up for free. |
| Azure CLI | Install the Azure CLI. |
Create a GitHub repository and clone source code
Before you create the workflow, the source code for your app must be in a GitHub repository.
Sign in to Azure with the Azure CLI.
az loginNext, install the latest Azure Container Apps extension for the CLI.
az extension add --name containerapp --upgradeIf you don't have your own GitHub repository, create one from a sample.
- Navigate to the following location to create a new repository:
- Name your repository
my-container-app.
Clone the repository to your local machine.
git clone https://github.com/<YOUR_GITHUB_ACCOUNT_NAME>/my-container-app.git
Create a container app with managed identity enabled
Create your container app using the az containerapp up command in the following steps. This command creates Azure resources, builds the container image, stores the image in a registry, and deploys to a container app.
After you create your app, you can add a managed identity to the app and assign the identity the AcrPull role to allow the identity to pull images from the registry.
Change into the src folder of the cloned repository.
cd my-container-app
cd src
Create Azure resources and deploy a container app with the
az containerapp upcommand.az containerapp up \ --name my-container-app \ --source . \ --ingress externalIn the command output, note the name of the Azure Container Registry.
Get the full resource ID of the container registry.
az acr show --name <ACR_NAME> --query id --output tsvReplace
<ACR_NAME>with the name of your registry.Enable managed identity for the container app.
az containerapp identity assign \
  --name my-container-app \
  --resource-group my-container-app-rg \
  --system-assigned \
  --output tsv
Note the principal ID of the managed identity in the command output.
Assign the
AcrPullrole for the Azure Container Registry to the container app's managed identity.az role assignment create \ --assignee <MANAGED_IDENTITY_PRINCIPAL_ID> \ --role AcrPull \ --scope <ACR_RESOURCE_ID>Replace
<MANAGED_IDENTITY_PRINCIPAL_ID>with the principal ID of the managed identity and<ACR_RESOURCE_ID>with the resource ID of the Azure Container Registry.Configure the container app to use the managed identity to pull images from the Azure Container Registry.
az containerapp registry set \
  --name my-container-app \
  --resource-group my-container-app-rg \
  --server <ACR_NAME>.azurecr.io \
  --identity system
Replace
<ACR_NAME>with the name of your Azure Container Registry.
Configure secrets in your GitHub repository
The GitHub workflow requires a secret named AZURE_CREDENTIALS to authenticate with Azure. The secret contains the credentials for a service principal with the Contributor role on the resource group containing the container app and container registry.
Create a service principal with the Contributor role on the resource group that contains the container app and container registry.
az ad sp create-for-rbac \
  --name my-app-credentials \
  --role contributor \
  --scopes /subscriptions/<SUBSCRIPTION_ID>/resourceGroups/my-container-app-rg \
  --json-auth \
  --output json
Replace
<SUBSCRIPTION_ID>with the ID of your Azure subscription. If your container registry is in a different resource group, specify both resource groups in the--scopesparameter.Copy the JSON output from the command.
In the GitHub repository, navigate to Settings > Secrets > Actions and select New repository secret.
Enter
AZURE_CREDENTIALSas the name and paste the contents of the JSON output as the value.Select Add secret.
Create a GitHub Actions workflow
In the GitHub repository, navigate to Actions and select New workflow.
Select Set up a workflow yourself.
Paste the following YAML into the editor.
name: Azure Container Apps Deploy

on:
  push:
    branches:
      - main

jobs:
  build:
    runs-on: ubuntu-latest

    steps:
      - uses: actions/checkout@v3

      - name: Log in to Azure
        uses: azure/login@v1
        with:
          creds: ${{ secrets.AZURE_CREDENTIALS }}

      - name: Build and deploy Container App
        uses: azure/container-apps-deploy-action@v1
        with:
          appSourcePath: ${{ github.workspace }}/src
          acrName: <ACR_NAME>
          containerAppName: my-container-app
          resourceGroup: my-container-app-rg
Replace
<ACR_NAME>with the name of your Azure Container Registry. Confirm that the branch name underbranchesand values forappSourcePath,containerAppName, andresourceGroupmatch the values for your repository and Azure resources.Commit the changes to the main branch.
A GitHub Actions workflow run should start to build and deploy your container app. To check its progress, navigate to Actions.
To deploy a new revision of your app, push a new commit to the main branch.
Feedback
Coming soon: Throughout 2024 we will be phasing out GitHub Issues as the feedback mechanism for content and replacing it with a new feedback system. For more information see: https://aka.ms/ContentUserFeedback.
Submit and view feedback for