Manually move a container registry to another region
You might need to move an Azure container registry from one Azure region to another. For example, you may run a development pipeline or host a new deployment target in a different region, and want to provide a nearby registry.
While Azure Resource Mover can't currently automate a move for an Azure container registry, you can manually move a container registry to a different region:
- Export registry settings to a Resource Manager template
- Use the template to deploy a registry in a different Azure region
- Import registry content from the source registry to the target registry
Note
If you need to distribute identical container images across multiple Azure regions, Azure Container Registry also supports geo-replication. By geo-replicating a registry (Premium service tier required), you can serve multiple regions with identical image and tag names from a single registry.
Prerequisites
Azure CLI
Use the Bash environment in Azure Cloud Shell. For more information, see Quickstart for Bash in Azure Cloud Shell.

If you prefer to run CLI reference commands locally, install the Azure CLI. If you're running on Windows or macOS, consider running Azure CLI in a Docker container. For more information, see How to run the Azure CLI in a Docker container.
If you're using a local installation, sign in to the Azure CLI by using the az login command. To finish the authentication process, follow the steps displayed in your terminal. For other sign-in options, see Sign in with the Azure CLI.
When you're prompted, install the Azure CLI extension on first use. For more information about extensions, see Use extensions with the Azure CLI.
Run az version to find the version and dependent libraries that are installed. To upgrade to the latest version, run az upgrade.
Considerations
- Use steps in this article to move the registry to a different region in the same subscription. More configuration may be needed to move a registry to a different Azure subscription in the same Active Directory tenant.
- Exporting and using a Resource Manager template can help re-create many registry settings. You can edit the template to configure more settings, or update the target registry after creation.
- Currently, Azure Container Registry doesn't support a registry move to a different Active Directory tenant. This limitation applies to both registries encrypted with a customer-managed key and unencrypted registries.
- If you are unable to move a registry is outlined in this article, create a new registry, manually recreate settings, and Import registry content in the target registry.
- You can find the steps to move resources of registry to a new resource group in the same subscription or move resources to a new subscription.
Export template from source registry
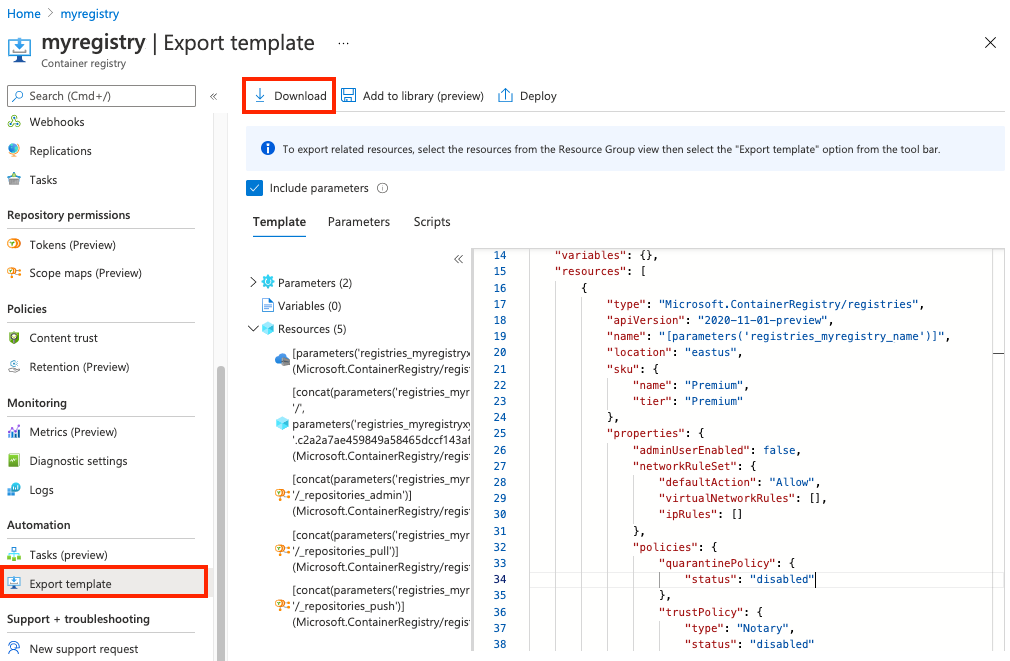
Use the Azure portal, Azure CLI, Azure PowerShell, or other Azure tools to export a Resource Manager template. To use the Azure portal:
In the Azure portal, navigate to your source registry.
In the menu, under Automation, select Export template > Download.
Redeploy target registry in new region
Modify template
Inspect the registry properties in the template JSON file you downloaded, and make necessary changes. At a minimum:
- Change the registry name's
defaultValueto the desired name of the target registry - Update the
locationto the desired Azure region for the target registry
{
    "$schema": "https://schema.management.azure.com/schemas/2019-04-01/deploymentTemplate.json#",
    "contentVersion": "1.0.0.0",
    "parameters": {
        "registries_myregistry_name": {
            "defaultValue": "myregistry",
            "type": "String"
        }
    },
    "variables": {},
    "resources": [
        {
            "type": "Microsoft.ContainerRegistry/registries",
            "apiVersion": "2020-11-01-preview",
            "name": "[parameters('myregistry_name')]",
            "location": "centralus",
        ...
        }
    ]
}
For more information, see Use exported template from the Azure portal and the template reference.
Important
If you want to encrypt the target registry using a customer-managed key, make sure to update the template with settings for the required managed identity, key vault, and key. You can only enable the customer-managed key when you deploy the registry.
For more information, see Encrypt registry using customer-managed key.
Create resource group
Create a resource group for the target registry using the az group create. The following example creates a resource group named myResourceGroup in the eastus location.
az group create --name myResourceGroup --location eastus
Deploy target registry in new region
Use the az deployment group create command to deploy the target registry, using the template:
az deployment group create --resource-group myResourceGroup \
   --template-file template.json --name mydeployment
Note
If you see errors during deployment, you might need to update certain configurations in the template file and retry the command.
Import registry content in target registry
After creating the registry in the target region, use the az acr import command, or the equivalent PowerShell command Import-AzContainerImage, to import images and other artifacts you want to preserve from the source registry to the target registry. For command examples, see Import container images to a container registry.
- Use the Azure CLI commands az acr repository list and az acr repository show-tags, or Azure PowerShell equivalents, to help enumerate the contents of your source registry.
- Run the import command for individual artifacts, or script it to run over a list of artifacts.
The following sample Azure CLI script enumerates the source repositories and tags and then imports the artifacts to a target registry in the same Azure subscription. Modify as needed to import specific repositories or tags. To import from a registry in a different subscription or tenant, see examples in Import container images to a container registry.
#!/bin/bash
# Modify registry names for your environment
SOURCE_REG=myregistry
TARGET_REG=targetregistry

# Get list of source repositories
REPO_LIST=$(az acr repository list \
    --name $SOURCE_REG --output tsv)

# Enumerate tags and import to target registry
for repo in $REPO_LIST; do
    TAGS_LIST=$(az acr repository show-tags --name $SOURCE_REG --repository $repo --output tsv);
    for tag in $TAGS_LIST; do
        echo "Importing $repo:$tag";
        az acr import --name $TARGET_REG --source $SOURCE_REG.azurecr.io/$repo":"$tag;
    done
done
Verify target registry
Confirm the following information in your target registry:
- Registry settings such as the registry name, service tier, public access, and replications
- Repositories and tags for content that you want to preserve.
Additional configuration
If needed, manually configure settings in the target registry such as private endpoints, IP access rules, and managed identities.
Update development and deployment systems to use the target registry instead of the source registry.
Update any client firewall rules to allow access to the target registry.
Delete original registry
After you have successfully deployed the target registry, migrated content, and verified registry settings, you may delete the source registry.
Next steps
- Learn more about importing container images to an Azure container registry from a public registry or another private registry.
- See the Resource Manager template reference for Azure Container Registry.
Feedback
Coming soon: Throughout 2024 we will be phasing out GitHub Issues as the feedback mechanism for content and replacing it with a new feedback system. For more information see: https://aka.ms/ContentUserFeedback.
Submit and view feedback for