Automated provisioning in Azure Data Explorer
Automated provisioning is a process for quickly deploying and configuring the resources you need to run your Azure Data Explorer cluster. It's a critical part of a DevOps or DataOps workflow. The provisioning process doesn't require you to manually configure the cluster, doesn't require human intervention, and is easy to set up.
You might use automated provisioning to deploy a preconfigured cluster with data, as part of a continuous integration and continuous delivery (CI/CD) pipeline. Some of the key benefits of doing so include the ability to:
- Define and maintain multiple environments.
- Keep track of deployments in source control.
- More easily roll back to previous versions.
- Facilitate automated testing by provisioning dedicated test environments.
This article provides an overview of the different mechanisms for automating the provisioning of Azure Data Explorer environments, including infrastructure, schema entities, and data ingestion. It also provides references to the different tools and techniques used to automate the provisioning process.

Deploy infrastructure
Infrastructure deployment pertains to the deployment of Azure resources, including clusters, databases, and data connections. There are several different types of infrastructure deployments, including:
ARM templates and Terraform scripts are the two main, declarative ways to deploy Azure Data Explorer infrastructure.
ARM template deployment
ARM templates are JSON or Bicep files that define the infrastructure and configuration of a deployment. You can use the templates to deploy clusters, databases, data connections, and many other infrastructure components. For more information, see Create an Azure Data Explorer cluster and database by using an Azure Resource Manager template.
You can also use ARM templates to deploy command scripts, which help you create a database schema and define policies. For more information, see Configure a database by using a Kusto Query Language script.
You can find more example templates on the Azure Quickstart Templates site.
Terraform deployment
Terraform is an open-source, infrastructure-as-code software tool. It provides a consistent CLI workflow to manage cloud services. Terraform codifies cloud APIs into declarative configuration files.
Terraform offers the same capabilities as ARM templates. You can use Terraform to deploy clusters, databases, data connections, and other infrastructure components.
You can also use Terraform to deploy command scripts, which help you create a database schema and define policies.
Imperative deployment
You can also deploy infrastructure imperatively, by using any of the supported platforms:
Deploy schema entities
Schema entities provisioning pertains to deploying tables, functions, policies, and permissions. You can create or update entities by running scripts that consist of management commands.
You can automate schema entities deployment by using the following methods:
- ARM templates
- Terraform scripts
- Kusto CLI
- SDKs
- Tools
- Sync Kusto. Use this interactive developer tool to extract the database schema or management command script. You can then use the extracted content command script for automatic deployment.
- Delta Kusto: Invoke this tool in a CI/CD pipeline. It can compare two sources, such as the database schema or management command script, and compute a delta management command script. You can then use the extracted content command script for automatic deployment.
- Azure DevOps task for Azure Data Explorer.
Ingest data
Sometimes you want to ingest data into your cluster. For example, you might want to ingest data to run tests or re-create an environment. You can use the following methods to ingest data:
- SDKs
- LightIngest CLI tool
- Triggering an Azure Data Factory pipeline
Example deployment using a CI/CD pipeline
In the following example, you use an Azure DevOps CI/CD pipeline that runs tools to automate the deployment of infrastructure, schema entities, and data. This is one example of a pipeline that uses a particular set of tools, but you can use other tools and steps. For example, in a production environment, you might want to create a pipeline that doesn't ingest data. You can also add further steps to the pipeline, such as running automated tests on the created cluster.
Here, you use the following tools:
| Deployment type | Tool | Task |
|---|---|---|
| Infrastructure | ARM templates | Create a cluster and a database |
| Schema entities | Kusto CLI | Create tables in the database |
| Data | LightIngest | Ingest data into one table |

Use the following steps to create a pipeline.
Step 1: Create a service connection
Define a service connection of type Azure Resource Manager. Point the connection to the subscription and resource group where you want to deploy your cluster to. An Azure service principal is created, and you use it to deploy the ARM template. You can use the same principal to deploy the schema entities and ingest data. You must explicitly pass the credentials to Kusto CLI and LightIngest tools.
Step 2: Create a pipeline
Define the pipeline (deploy-environ) that you'll use to deploy the cluster, create schema entities, and ingest data.
Before you can use the pipeline, you must create the following secret variables:
| Variable name | Description |
|---|---|
clusterName |
The name of the Azure Data Explorer cluster. |
serviceConnection |
The name of the Azure DevOps connection used to deploy the ARM template. |
appId |
The client ID of the service principal used to interact with the cluster. |
appSecret |
The secret of the service principal. |
appTenantId |
The tenant ID of the service principal. |
location |
The Azure region where you'll deploy the cluster. For example, eastus. |
resources:
- repo: self
stages:
- stage: deploy_cluster
displayName: Deploy cluster
variables: []
clusterName: specifyClusterName
serviceConnection: specifyServiceConnection
appId: specifyAppId
appSecret: specifyAppSecret
appTenantId: specifyAppTenantId
location: specifyLocation
jobs:
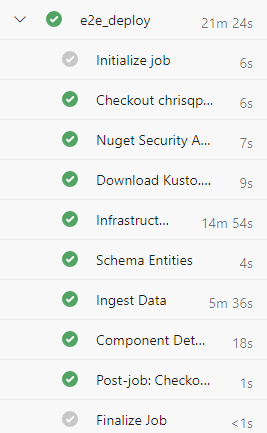
- job: e2e_deploy
pool:
vmImage: windows-latest
variables: []
steps:
- bash: |
nuget install Microsoft.Azure.Kusto.Tools -Version 5.3.1
# Rename the folder (including the most recent version)
mv Microsoft.Azure.Kusto.Tools.* kusto.tools
displayName: Download required Kusto.Tools Nuget package
- task: AzureResourceManagerTemplateDeployment@3
displayName: Deploy Infrastructure
inputs:
deploymentScope: 'Resource Group'
# subscriptionId and resourceGroupName are specified in the serviceConnection
azureResourceManagerConnection: $(serviceConnection)
action: 'Create Or Update Resource Group'
location: $(location)
templateLocation: 'Linked artifact'
csmFile: deploy-infra.json
overrideParameters: "-clusterName $(clusterName)"
deploymentMode: 'Incremental'
- bash: |
# Define connection string to cluster's database, including service principal's credentials
connectionString="https://$(clusterName).$(location).kusto.windows.net/myDatabase;Fed=true;AppClientId=$(appId);AppKey=$(appSecret);TenantId=$(appTenantId)"
# Execute a KQL script against the database
kusto.tools/tools/Kusto.Cli $connectionString -script:MyDatabase.kql
displayName: Create Schema Entities
- bash: |
connectionString="https://ingest-$(CLUSTERNAME).$(location).kusto.windows.net/;Fed=true;AppClientId=$(appId);AppKey=$(appSecret);TenantId=$(appTenantId)"
kusto.tools/tools/LightIngest $connectionString -table:Customer -sourcePath:customers.csv -db:myDatabase -format:csv -ignoreFirst:true
displayName: Ingest Data
Step 3: Create an ARM template to deploy the cluster
Define the ARM template (deploy-infra.json) that you'll use to deploy the cluster to your subscription and resource group.
{
    "$schema": "https://schema.management.azure.com/schemas/2019-04-01/deploymentTemplate.json#",
    "contentVersion": "1.0.0.0",
    "parameters": {
        "clusterName": {
            "type": "string",
            "minLength": 5
        }
    },
    "variables": {
    },
    "resources": [
        {
            "name": "[parameters('clusterName')]",
            "type": "Microsoft.Kusto/clusters",
            "apiVersion": "2021-01-01",
            "location": "[resourceGroup().location]",
            "sku": {
                "name": "Dev(No SLA)_Standard_E2a_v4",
                "tier": "Basic",
                "capacity": 1
            },
            "resources": [
                {
                    "name": "myDatabase",
                    "type": "databases",
                    "apiVersion": "2021-01-01",
                    "location": "[resourceGroup().location]",
                    "dependsOn": [
                        "[resourceId('Microsoft.Kusto/clusters', parameters('clusterName'))]"
                    ],
                    "kind": "ReadWrite",
                    "properties": {
                        "softDeletePeriodInDays": 365,
                        "hotCachePeriodInDays": 31
                    }
                }
            ]
        }
    ]
}
Step 4: Create a KQL script to create the schema entities
Define the KQL script (MyDatabase.kql) that you'll use to create the tables in the databases.
.create table Customer(CustomerName:string, CustomerAddress:string)

//  Set the ingestion batching policy to trigger ingestion quickly
//  This is to speedup reaction time for the sample
//  Do not do this in production
.alter table Customer policy ingestionbatching @'{"MaximumBatchingTimeSpan":"00:00:10", "MaximumNumberOfItems": 500, "MaximumRawDataSizeMB": 1024}'

.create table CustomerLogs(CustomerName:string, Log:string)
Step 5: Create a KQL script to ingest data
Create the CSV data file (customer.csv) to ingest.
customerName,customerAddress
Contoso Ltd,Paris
Datum Corporation,Seattle
Fabrikam,NYC
You create the cluster by using the service principal credentials that you specified in the pipeline. To give permissions to your users, follow the steps in Manage Azure Data Explorer database permissions.
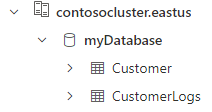
You can verify the deployment by running a query against the Customer table. You should see the three records that were imported from the CSV file.
Related content
- Create a cluster and database by using an Azure Resource Manager template.
- Configure a database by using a KQL script
Feedback
Coming soon: Throughout 2024 we will be phasing out GitHub Issues as the feedback mechanism for content and replacing it with a new feedback system. For more information see: https://aka.ms/ContentUserFeedback.
Submit and view feedback for