Encrypt Azure Data Factory with customer-managed keys
APPLIES TO:  Azure Data Factory
  Azure Synapse Analytics
Tip
Try out Data Factory in Microsoft Fabric, an all-in-one analytics solution for enterprises. Microsoft Fabric covers everything from data movement to data science, real-time analytics, business intelligence, and reporting. Learn how to start a new trial for free!
Azure Data Factory encrypts data at rest, including entity definitions and any data cached while runs are in progress. By default, data is encrypted with a randomly generated Microsoft-managed key that is uniquely assigned to your data factory. For extra security guarantees, you can now enable Bring Your Own Key (BYOK) with customer-managed keys feature in Azure Data Factory. When you specify a customer-managed key, Data Factory uses both the factory system key and the CMK to encrypt customer data. Missing either would result in Deny of Access to data and factory.
Azure Key Vault is required to store customer-managed keys. You can either create your own keys and store them in a key vault, or you can use the Azure Key Vault APIs to generate keys. Key vault and Data Factory must be in the same Microsoft Entra tenant and in the same region, but they may be in different subscriptions. For more information about Azure Key Vault, see What is Azure Key Vault?
About customer-managed keys
The following diagram shows how Data Factory uses Microsoft Entra ID and Azure Key Vault to make requests using the customer-managed key:
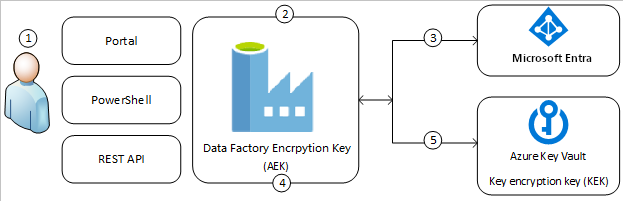
The following list explains the numbered steps in the diagram:
- An Azure Key Vault admin grants permissions to encryption keys to the managed identity that's associated with the Data Factory
- A Data Factory admin enables customer-managed key feature in the factory
- Data Factory uses the managed identity that's associated with the factory to authenticate access to Azure Key Vault via Microsoft Entra ID
- Data Factory wraps the factory encryption key with the customer key in Azure Key Vault
- For read/write operations, Data Factory sends requests to Azure Key Vault to unwrap the account encryption key to perform encryption and decryption operations
There are two ways of adding Customer Managed Key encryption to data factories. One is during factory creation time in Azure portal, and the other is post factory creation, in Data Factory UI.
Prerequisites - configure Azure Key Vault and generate keys
Enable Soft Delete and Do Not Purge on Azure Key Vault
Using customer-managed keys with Data Factory requires two properties to be set on the Key Vault, Soft Delete and Do Not Purge. These properties can be enabled using either PowerShell or Azure CLI on a new or existing key vault. To learn how to enable these properties on an existing key vault, see Azure Key Vault recovery management with soft delete and purge protection
If you are creating a new Azure Key Vault through Azure portal, Soft Delete and Do Not Purge can be enabled as follows:

Grant Data Factory access to Azure Key Vault
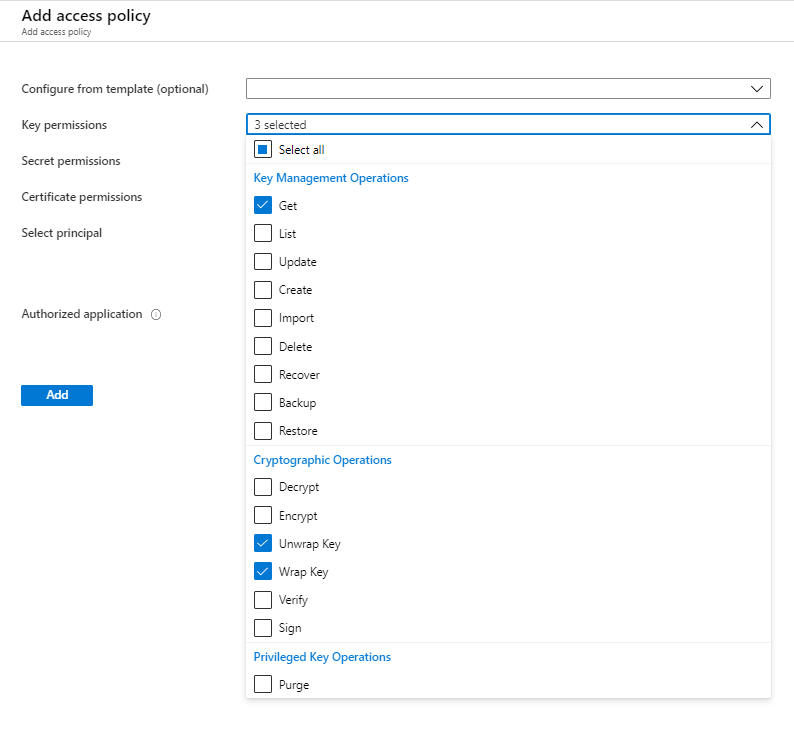
Make sure Azure Key Vault and Azure Data Factory are in the same Microsoft Entra tenant and in the same region. From Azure Key Vault access control, grant data factory following permissions: Get, Unwrap Key, and Wrap Key. These permissions are required to enable customer-managed keys in Data Factory.
If you want to add customer managed key encryption after factory creation in Data Factory UI, ensure data factory's managed service identity (MSI) has the three permissions to Key Vault
If you want to add customer managed key encryption during factory creation time in Azure portal, ensure the user-assigned managed identity (UA-MI) has the three permissions to Key Vault
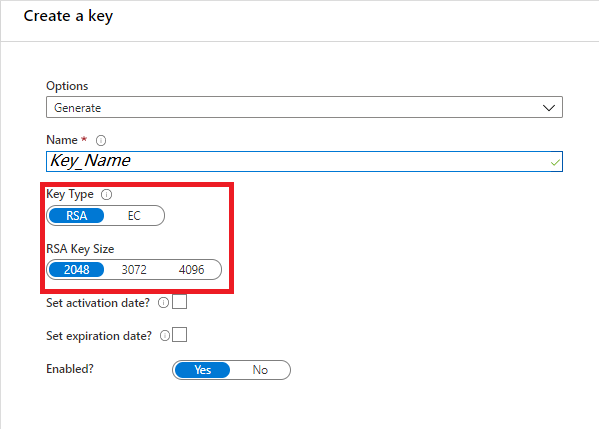
Generate or upload customer-managed key to Azure Key Vault
You can either create your own keys and store them in a key vault. Or you can use the Azure Key Vault APIs to generate keys. Only RSA keys are supported with Data Factory encryption. RSA-HSM is also supported. For more information, see About keys, secrets, and certificates.
Enable customer-managed keys
Post factory creation in Data Factory UI
This section walks through the process to add customer managed key encryption in Data Factory UI, after factory is created.
Note
A customer-managed key can only be configured on an empty data Factory. The data factory can't contain any resources such as linked services, pipelines and data flows. It is recommended to enable customer-managed key right after factory creation.
Important
This approach does not work with managed virtual network enabled factories. Please consider the alternative route, if you want encrypt such factories.
Make sure that data factory's Managed Service Identity (MSI) has Get, Unwrap Key and Wrap Key permissions to Key Vault.
Ensure the Data Factory is empty. The data factory can't contain any resources such as linked services, pipelines, and data flows. For now, deploying customer-managed key to a non-empty factory will result in an error.
To locate the key URI in the Azure portal, navigate to Azure Key Vault, and select the Keys setting. Select the wanted key, then select the key to view its versions. Select a key version to view the settings
Copy the value of the Key Identifier field, which provides the URI

Launch Azure Data Factory portal, and using the navigation bar on the left, jump to Data Factory Management Portal
Click on the Customer managed key icon
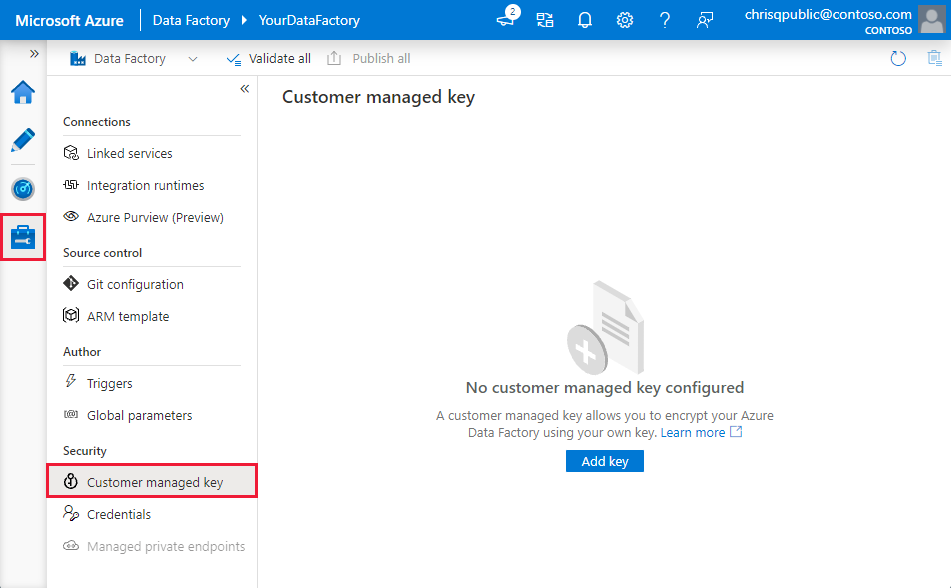
Enter the URI for customer-managed key that you copied before
Click Save and customer-managed key encryption is enabled for Data Factory
During factory creation in Azure portal
This section walks through steps to add customer managed key encryption in Azure portal, during factory deployment.
To encrypt the factory, Data Factory needs to first retrieve customer-managed key from Key Vault. Since factory deployment is still in progress, Managed Service Identity (MSI) isn't available yet to authenticate with Key Vault. As such, to use this approach, customer needs to assign a user-assigned managed identity (UA-MI) to data factory. We will assume the roles defined in the UA-MI and authenticate with Key Vault.
To learn more about user-assigned managed identity, see Managed identity types and Role assignment for user assigned managed identity.
Make sure that User-assigned Managed Identity (UA-MI) has Get, Unwrap Key and Wrap Key permissions to Key Vault
Under Advanced tab, check the box for Enable encryption using a customer managed key
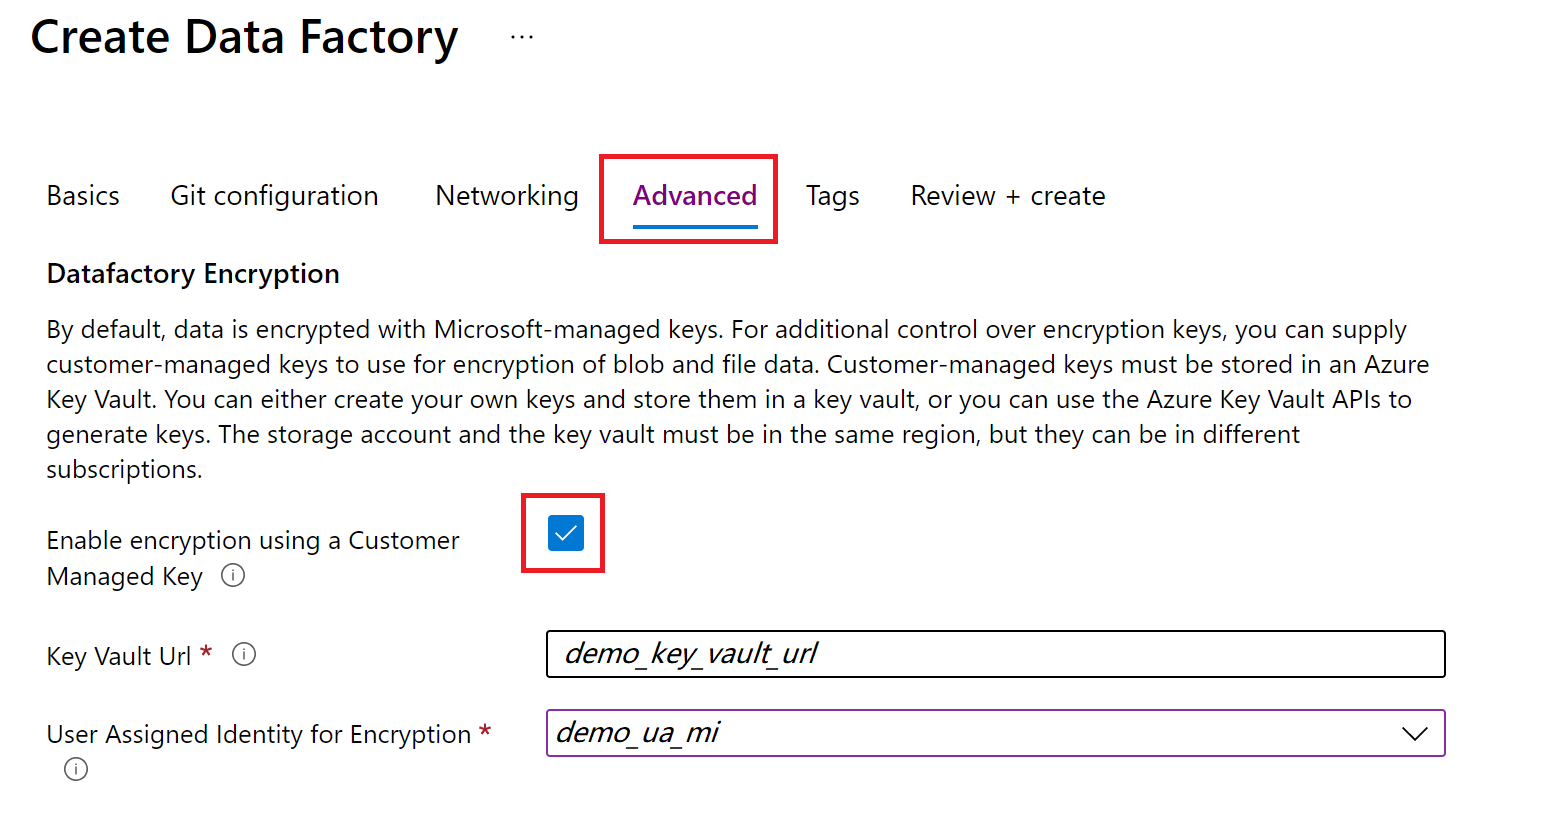
Provide the url for the customer managed key stored in Key Vault
Select an appropriate user assigned managed identity to authenticate with Key Vault
Continue with factory deployment
Update Key Version
When you create a new version of a key, update data factory to use the new version. Follow similar steps as described in section Data Factory UI, including:
Locate the URI for the new key version through Azure Key Vault Portal
Navigate to Customer-managed key setting
Replace and paste in the URI for the new key
Click Save and Data Factory will now encrypt with the new key version
Use a Different Key
To change key used for Data Factory encryption, you have to manually update the settings in Data Factory. Follow similar steps as described in section Data Factory UI, including:
Locate the URI for the new key through Azure Key Vault Portal
Navigate to Customer managed key setting
Replace and paste in the URI for the new key
Click Save and Data Factory will now encrypt with the new key
Disable Customer-managed Keys
By design, once the customer-managed key feature is enabled, you can't remove the extra security step. We will always expect a customer provided key to encrypt factory and data.
Customer managed key and continuous integration and continuous deployment
By default, CMK configuration is not included in the factory Azure Resource Manager (ARM) template. To include the customer managed key encryption settings in ARM template for continuous integration (CI/CD):
- Ensure the factory is in Git mode
- Navigate to management portal - customer managed key section
- Check Include in ARM template option

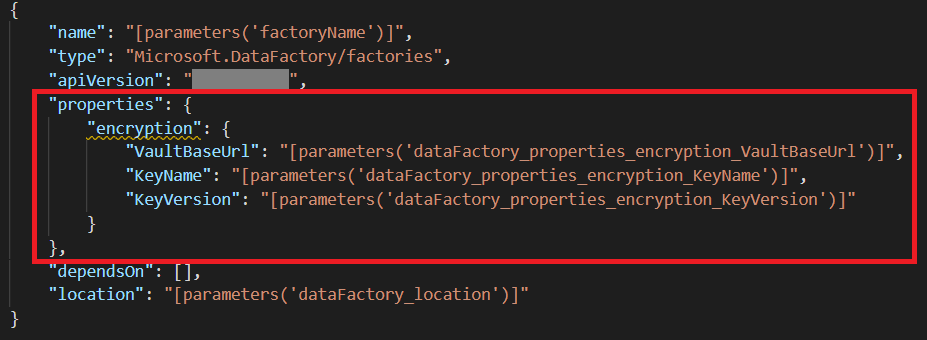
The following settings will be added in ARM template. These properties can be parameterized in Continuous Integration and Delivery pipelines by editing the Azure Resource Manager parameters configuration
Note
Adding the encryption setting to the ARM templates adds a factory-level setting that will override other factory level settings, such as git configurations, in other environments. If you have these settings enabled in an elevated environment such as UAT or PROD, please refer to Global Parameters in CI/CD.
Related content
Go through the tutorials to learn about using Data Factory in more scenarios.
Feedback
Coming soon: Throughout 2024 we will be phasing out GitHub Issues as the feedback mechanism for content and replacing it with a new feedback system. For more information see: https://aka.ms/ContentUserFeedback.
Submit and view feedback for