Tutorial: Copy data from a SQL Server database to Azure Blob storage
APPLIES TO:  Azure Data Factory
Azure Synapse Analytics
Azure Data Factory
Azure Synapse Analytics
Tip
Try out Data Factory in Microsoft Fabric, an all-in-one analytics solution for enterprises. Microsoft Fabric covers everything from data movement to data science, real-time analytics, business intelligence, and reporting. Learn how to start a new trial for free!
In this tutorial, you use Azure PowerShell to create a data-factory pipeline that copies data from a SQL Server database to Azure Blob storage. You create and use a self-hosted integration runtime, which moves data between on-premises and cloud data stores.
Note
This article does not provide a detailed introduction to the Data Factory service. For more information, see Introduction to Azure Data Factory.
In this tutorial, you perform the following steps:
- Create a data factory.
- Create a self-hosted integration runtime.
- Create SQL Server and Azure Storage linked services.
- Create SQL Server and Azure Blob datasets.
- Create a pipeline with a copy activity to move the data.
- Start a pipeline run.
- Monitor the pipeline run.
Prerequisites
Azure subscription
Before you begin, if you don't already have an Azure subscription, create a free account.
Azure roles
To create data factory instances, the user account you use to sign in to Azure must be assigned a Contributor or Owner role or must be an administrator of the Azure subscription.
To view the permissions you have in the subscription, go to the Azure portal, select your username at the top-right corner, and then select Permissions. If you have access to multiple subscriptions, select the appropriate subscription. For sample instructions on adding a user to a role, see the Assign Azure roles using the Azure portal article.
SQL Server 2014, 2016, and 2017
In this tutorial, you use a SQL Server database as a source data store. The pipeline in the data factory you create in this tutorial copies data from this SQL Server database (source) to Azure Blob storage (sink). You then create a table named emp in your SQL Server database, and insert a couple of sample entries into the table.
Start SQL Server Management Studio. If it is not already installed on your machine, go to Download SQL Server Management Studio.
Connect to your SQL Server instance by using your credentials.
Create a sample database. In the tree view, right-click Databases, and then select New Database.
In the New Database window, enter a name for the database, and then select OK.
To create the emp table and insert some sample data into it, run the following query script against the database. In the tree view, right-click the database that you created, and then select New Query.
CREATE TABLE dbo.emp
(
    ID int IDENTITY(1,1) NOT NULL,
    FirstName varchar(50),
    LastName varchar(50)
)
GO

INSERT INTO emp (FirstName, LastName) VALUES ('John', 'Doe')
INSERT INTO emp (FirstName, LastName) VALUES ('Jane', 'Doe')
GO
Azure Storage account
In this tutorial, you use a general-purpose Azure storage account (specifically, Azure Blob storage) as a destination/sink data store. If you don't have a general-purpose Azure storage account, see Create a storage account. The pipeline in the data factory you that create in this tutorial copies data from the SQL Server database (source) to this Azure Blob storage (sink).
Get storage account name and account key
You use the name and key of your Azure storage account in this tutorial. Get the name and key of your storage account by doing the following:
Sign in to the Azure portal with your Azure username and password.
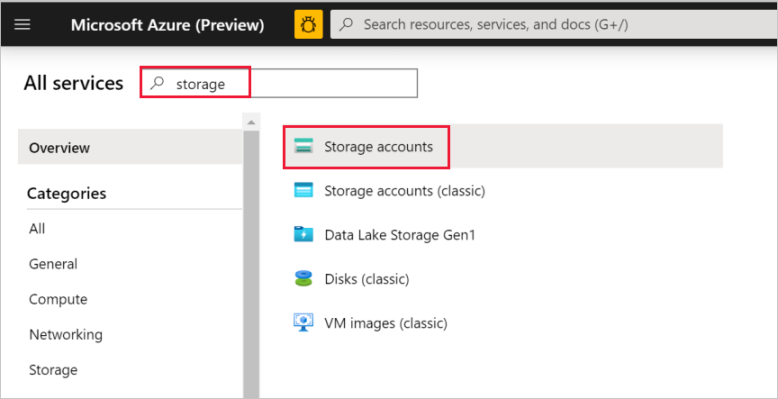
In the left pane, select More services, filter by using the Storage keyword, and then select Storage accounts.
In the list of storage accounts, filter for your storage account (if needed), and then select your storage account.
In the Storage account window, select Access keys.
In the Storage account name and key1 boxes, copy the values, and then paste them into Notepad or another editor for later use in the tutorial.
Create the adftutorial container
In this section, you create a blob container named adftutorial in your Azure Blob storage.
In the Storage account window, switch to Overview, and then select Blobs.

In the Blob service window, select Container.
In the New container window, in the Name box, enter adftutorial, and then select OK.

In the list of containers, select adftutorial.
Keep the container window for adftutorial open. You use it verify the output at the end of the tutorial. Data Factory automatically creates the output folder in this container, so you don't need to create one.
Windows PowerShell
Install Azure PowerShell
Note
We recommend that you use the Azure Az PowerShell module to interact with Azure. See Install Azure PowerShell to get started. To learn how to migrate to the Az PowerShell module, see Migrate Azure PowerShell from AzureRM to Az.
Install the latest version of Azure PowerShell if you don't already have it on your machine. For detailed instructions, see How to install and configure Azure PowerShell.
Log in to PowerShell
Start PowerShell on your machine, and keep it open through completion of this quickstart tutorial. If you close and reopen it, you'll need to run these commands again.
Run the following command, and then enter the Azure username and password that you use to sign in to the Azure portal:
Connect-AzAccountIf you have multiple Azure subscriptions, run the following command to select the subscription that you want to work with. Replace SubscriptionId with the ID of your Azure subscription:
Select-AzSubscription -SubscriptionId "<SubscriptionId>"
Create a data factory
Define a variable for the resource group name that you'll use later in PowerShell commands. Copy the following command to PowerShell, specify a name for the Azure resource group (enclosed in double quotation marks; for example,
"adfrg"), and then run the command.$resourceGroupName = "ADFTutorialResourceGroup"To create the Azure resource group, run the following command:
New-AzResourceGroup $resourceGroupName -location 'East US'If the resource group already exists, you may not want to overwrite it. Assign a different value to the
$resourceGroupNamevariable and run the command again.Define a variable for the data factory name that you can use in PowerShell commands later. The name must start with a letter or a number, and it can contain only letters, numbers, and the dash (-) character.
Important
Update the data factory name with a globally unique name. An example is ADFTutorialFactorySP1127.
$dataFactoryName = "ADFTutorialFactory"Define a variable for the location of the data factory:
$location = "East US"To create the data factory, run the following
Set-AzDataFactoryV2cmdlet:Set-AzDataFactoryV2 -ResourceGroupName $resourceGroupName -Location $location -Name $dataFactoryName
Note
- The name of the data factory must be globally unique. If you receive the following error, change the name and try again.
The specified data factory name 'ADFv2TutorialDataFactory' is already in use. Data factory names must be globally unique. - To create data-factory instances, the user account that you use to sign in to Azure must be assigned a contributor or owner role or must be an administrator of the Azure subscription.
- For a list of Azure regions in which Data Factory is currently available, select the regions that interest you on the following page, and then expand Analytics to locate Data Factory: Products available by region. The data stores (Azure Storage, Azure SQL Database, and so on) and computes (Azure HDInsight and so on) used by the data factory can be in other regions.
Create a self-hosted integration runtime
In this section, you create a self-hosted integration runtime and associate it with an on-premises machine with the SQL Server database. The self-hosted integration runtime is the component that copies data from the SQL Server database on your machine to Azure Blob storage.
Create a variable for the name of integration runtime. Use a unique name, and note the name. You use it later in this tutorial.
$integrationRuntimeName = "ADFTutorialIR"Create a self-hosted integration runtime.
Set-AzDataFactoryV2IntegrationRuntime -ResourceGroupName $resourceGroupName -DataFactoryName $dataFactoryName -Name $integrationRuntimeName -Type SelfHosted -Description "selfhosted IR description"Here is the sample output:
Name              : ADFTutorialIR
Type              : SelfHosted
ResourceGroupName : <resourceGroupName>
DataFactoryName   : <dataFactoryName>
Description       : selfhosted IR description
Id                : /subscriptions/<subscription ID>/resourceGroups/<resourceGroupName>/providers/Microsoft.DataFactory/factories/<dataFactoryName>/integrationruntimes/<integrationRuntimeName>
To retrieve the status of the created integration runtime, run the following command:
Get-AzDataFactoryV2IntegrationRuntime -name $integrationRuntimeName -ResourceGroupName $resourceGroupName -DataFactoryName $dataFactoryName -StatusHere is the sample output:
State                     : NeedRegistration
Version                   :
CreateTime                : 9/10/2019 3:24:09 AM
AutoUpdate                : On
ScheduledUpdateDate       :
UpdateDelayOffset         :
LocalTimeZoneOffset       :
InternalChannelEncryption :
Capabilities              : {}
ServiceUrls               : {eu.frontend.clouddatahub.net}
Nodes                     : {}
Links                     : {}
Name                      : <Integration Runtime name>
Type                      : SelfHosted
ResourceGroupName         : <resourceGroup name>
DataFactoryName           : <dataFactory name>
Description               : selfhosted IR description
Id                        : /subscriptions/<subscription ID>/resourceGroups/<resourceGroupName>/providers/Microsoft.DataFactory/factories/<dataFactoryName>/integrationruntimes/<integrationRuntimeName>
To retrieve the authentication keys for registering the self-hosted integration runtime with the Data Factory service in the cloud, run the following command. Copy one of the keys (excluding the quotation marks) for registering the self-hosted integration runtime that you install on your machine in the next step.
Get-AzDataFactoryV2IntegrationRuntimeKey -Name $integrationRuntimeName -DataFactoryName $dataFactoryName -ResourceGroupName $resourceGroupName | ConvertTo-JsonHere is the sample output:
{
    "AuthKey1":  "IR@0000000000-0000-0000-0000-000000000000@xy0@xy@xxxxxxxxxxxxxxxxxxxxxxxxxxxxxxxxxxxxxxxx=",
    "AuthKey2":  "IR@0000000000-0000-0000-0000-000000000000@xy0@xy@yyyyyyyyyyyyyyyyyyyyyyyyyyyyyyyyyyyyyyyy="
}
Install the integration runtime
Download Azure Data Factory Integration Runtime on a local Windows machine, and then run the installation.
In the Welcome to Microsoft Integration Runtime Setup wizard, select Next.
In the End-User License Agreement window, accept the terms and license agreement, and select Next.
In the Destination Folder window, select Next.
In the Ready to install Microsoft Integration Runtime window, select Install.
In the Completed the Microsoft Integration Runtime Setup wizard, select Finish.
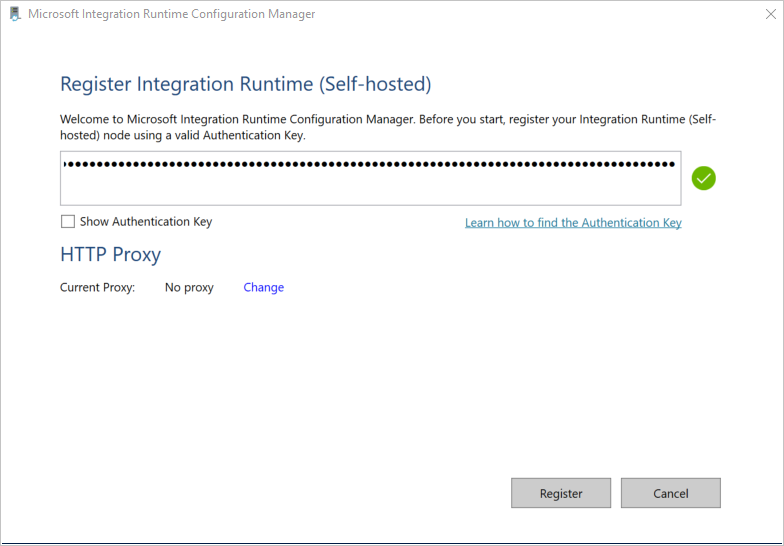
In the Register Integration Runtime (Self-hosted) window, paste the key you saved in the previous section, and then select Register.
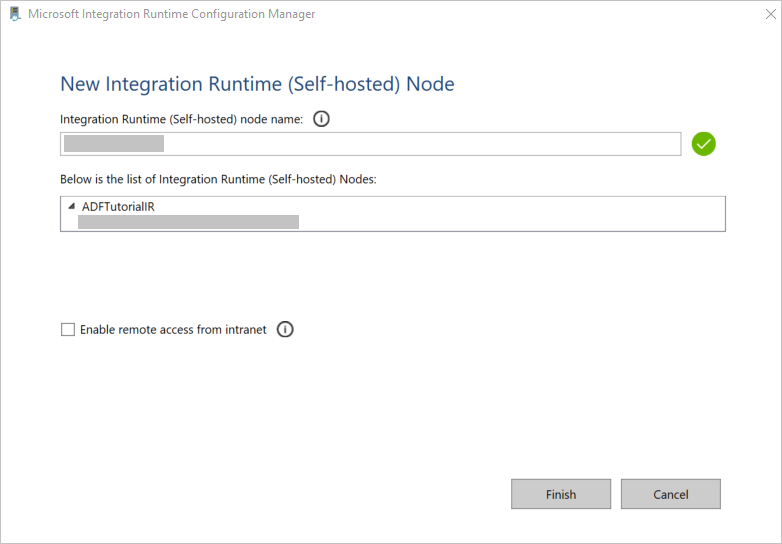
In the New Integration Runtime (Self-hosted) Node window, select Finish.
When the self-hosted integration runtime is registered successfully, the following message is displayed:

In the Register Integration Runtime (Self-hosted) window, select Launch Configuration Manager.
When the node is connected to the cloud service, the following message is displayed:

Test the connectivity to your SQL Server database by doing the following:
a. In the Configuration Manager window, switch to the Diagnostics tab.
b. In the Data source type box, select SqlServer.
c. Enter the server name.
d. Enter the database name.
e. Select the authentication mode.
f. Enter the username.
g. Enter the password that's associated with the username.
h. To confirm that integration runtime can connect to the SQL Server, select Test.
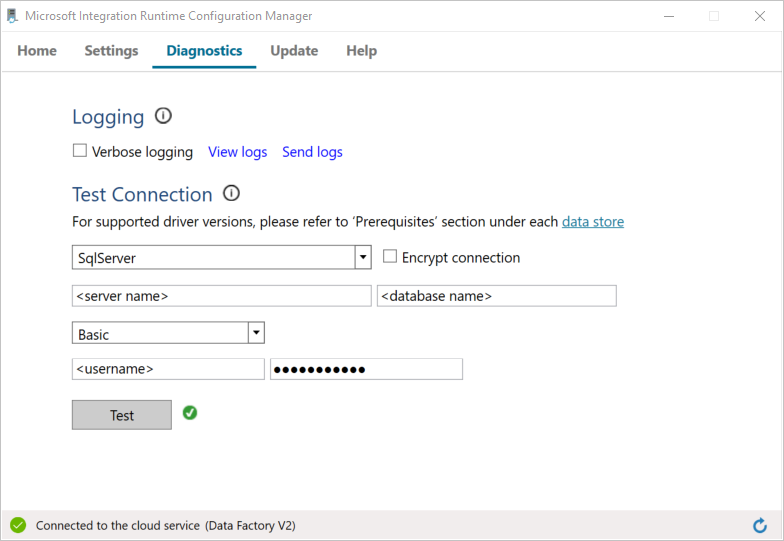
If the connection is successful, a green checkmark icon is displayed. Otherwise, you'll receive an error message associated with the failure. Fix any issues, and ensure that the integration runtime can connect to your SQL Server instance.
Note all the preceding values for later use in this tutorial.
Create linked services
To link your data stores and compute services to the data factory, create linked services in the data factory. In this tutorial, you link your Azure storage account and SQL Server instance to the data store. The linked services have the connection information that the Data Factory service uses at runtime to connect to them.
Create an Azure Storage linked service (destination/sink)
In this step, you link your Azure storage account to the data factory.
Create a JSON file named AzureStorageLinkedService.json in the C:\ADFv2Tutorial folder with the following code. If the ADFv2Tutorial folder does not already exist, create it.
Important
Before you save the file, replace <accountName> and <accountKey> with the name and key of your Azure storage account. You noted them in the Prerequisites section.
{
    "name": "AzureStorageLinkedService",
    "properties": {
        "annotations": [],
        "type": "AzureBlobStorage",
        "typeProperties": {
            "connectionString": "DefaultEndpointsProtocol=https;AccountName=<accountName>;AccountKey=<accountKey>;EndpointSuffix=core.windows.net"
        }
    }
}
In PowerShell, switch to the C:\ADFv2Tutorial folder.
Set-Location 'C:\ADFv2Tutorial'To create the linked service, AzureStorageLinkedService, run the following
Set-AzDataFactoryV2LinkedServicecmdlet:Set-AzDataFactoryV2LinkedService -DataFactoryName $dataFactoryName -ResourceGroupName $ResourceGroupName -Name "AzureStorageLinkedService" -File ".\AzureStorageLinkedService.json"Here is a sample output:
LinkedServiceName : AzureStorageLinkedService
ResourceGroupName : <resourceGroup name>
DataFactoryName   : <dataFactory name>
Properties        : Microsoft.Azure.Management.DataFactory.Models.AzureBlobStorageLinkedService
If you receive a "file not found" error, confirm that the file exists by running the
dircommand. If the file name has a .txt extension (for example, AzureStorageLinkedService.json.txt), remove it, and then run the PowerShell command again.
Create and encrypt a SQL Server linked service (source)
In this step, you link your SQL Server instance to the data factory.
Create a JSON file named SqlServerLinkedService.json in the C:\ADFv2Tutorial folder by using the following code:
Important
Select the section that's based on the authentication that you use to connect to SQL Server.
Using SQL authentication (sa):
{
    "name":"SqlServerLinkedService",
    "type":"Microsoft.DataFactory/factories/linkedservices",
    "properties":{
        "annotations":[

        ],
        "type":"SqlServer",
        "typeProperties":{
            "connectionString":"integrated security=False;data source=<serverName>;initial catalog=<databaseName>;user id=<userName>;password=<password>"
        },
        "connectVia":{
            "referenceName":"<integration runtime name> ",
            "type":"IntegrationRuntimeReference"
        }
    }
}
Using Windows authentication:
{
    "name":"SqlServerLinkedService",
    "type":"Microsoft.DataFactory/factories/linkedservices",
    "properties":{
        "annotations":[

        ],
        "type":"SqlServer",
        "typeProperties":{
            "connectionString":"integrated security=True;data source=<serverName>;initial catalog=<databaseName>",
            "userName":"<username> or <domain>\\<username>",
            "password":{
                "type":"SecureString",
                "value":"<password>"
            }
        },
        "connectVia":{
            "referenceName":"<integration runtime name>",
            "type":"IntegrationRuntimeReference"
        }
    }
}
Important
- Select the section that's based on the authentication you use to connect to your SQL Server instance.
- Replace <integration runtime name> with the name of your integration runtime.
- Before you save the file, replace <servername>, <databasename>, <username>, and <password> with the values of your SQL Server instance.
- If you need to use a backslash (\) in your user account or server name, precede it with the escape character (\). For example, use mydomain\\myuser.
To encrypt the sensitive data (username, password, and so on), run the
New-AzDataFactoryV2LinkedServiceEncryptedCredentialcmdlet.
This encryption ensures that the credentials are encrypted using Data Protection Application Programming Interface (DPAPI). The encrypted credentials are stored locally on the self-hosted integration runtime node (local machine). The output payload can be redirected to another JSON file (in this case, encryptedLinkedService.json) that contains encrypted credentials.New-AzDataFactoryV2LinkedServiceEncryptedCredential -DataFactoryName $dataFactoryName -ResourceGroupName $ResourceGroupName -IntegrationRuntimeName $integrationRuntimeName -File ".\SQLServerLinkedService.json" > encryptedSQLServerLinkedService.jsonRun the following command, which creates EncryptedSqlServerLinkedService:
Set-AzDataFactoryV2LinkedService -DataFactoryName $dataFactoryName -ResourceGroupName $ResourceGroupName -Name "EncryptedSqlServerLinkedService" -File ".\encryptedSqlServerLinkedService.json"
Create datasets
In this step, you create input and output datasets. They represent input and output data for the copy operation, which copies data from the SQL Server database to Azure Blob storage.
Create a dataset for the source SQL Server database
In this step, you define a dataset that represents data in the SQL Server database instance. The dataset is of type SqlServerTable. It refers to the SQL Server linked service that you created in the preceding step. The linked service has the connection information that the Data Factory service uses to connect to your SQL Server instance at runtime. This dataset specifies the SQL table in the database that contains the data. In this tutorial, the emp table contains the source data.
Create a JSON file named SqlServerDataset.json in the C:\ADFv2Tutorial folder, with the following code:
{
    "name":"SqlServerDataset",
    "properties":{
        "linkedServiceName":{
            "referenceName":"EncryptedSqlServerLinkedService",
            "type":"LinkedServiceReference"
        },
        "annotations":[

        ],
        "type":"SqlServerTable",
        "schema":[

        ],
        "typeProperties":{
            "schema":"dbo",
            "table":"emp"
        }
    }
}
To create the dataset SqlServerDataset, run the
Set-AzDataFactoryV2Datasetcmdlet.Set-AzDataFactoryV2Dataset -DataFactoryName $dataFactoryName -ResourceGroupName $resourceGroupName -Name "SqlServerDataset" -File ".\SqlServerDataset.json"Here is the sample output:
DatasetName       : SqlServerDataset
ResourceGroupName : <resourceGroupName>
DataFactoryName   : <dataFactoryName>
Structure         :
Properties        : Microsoft.Azure.Management.DataFactory.Models.SqlServerTableDataset
Create a dataset for Azure Blob storage (sink)
In this step, you define a dataset that represents data that will be copied to Azure Blob storage. The dataset is of the type AzureBlob. It refers to the Azure Storage linked service that you created earlier in this tutorial.
The linked service has the connection information that the data factory uses at runtime to connect to your Azure storage account. This dataset specifies the folder in the Azure storage to which the data is copied from the SQL Server database. In this tutorial, the folder is adftutorial/fromonprem, where adftutorial is the blob container and fromonprem is the folder.
Create a JSON file named AzureBlobDataset.json in the C:\ADFv2Tutorial folder, with the following code:
{
    "name":"AzureBlobDataset",
    "properties":{
        "linkedServiceName":{
            "referenceName":"AzureStorageLinkedService",
            "type":"LinkedServiceReference"
        },
        "annotations":[

        ],
        "type":"DelimitedText",
        "typeProperties":{
            "location":{
                "type":"AzureBlobStorageLocation",
                "folderPath":"fromonprem",
                "container":"adftutorial"
            },
            "columnDelimiter":",",
            "escapeChar":"\\",
            "quoteChar":"\""
        },
        "schema":[

        ]
    },
    "type":"Microsoft.DataFactory/factories/datasets"
}
To create the dataset AzureBlobDataset, run the
Set-AzDataFactoryV2Datasetcmdlet.Set-AzDataFactoryV2Dataset -DataFactoryName $dataFactoryName -ResourceGroupName $resourceGroupName -Name "AzureBlobDataset" -File ".\AzureBlobDataset.json"Here is the sample output:
DatasetName       : AzureBlobDataset
ResourceGroupName : <resourceGroupName>
DataFactoryName   : <dataFactoryName>
Structure         :
Properties        : Microsoft.Azure.Management.DataFactory.Models.DelimitedTextDataset
Create a pipeline
In this tutorial, you create a pipeline with a copy activity. The copy activity uses SqlServerDataset as the input dataset and AzureBlobDataset as the output dataset. The source type is set to SqlSource and the sink type is set to BlobSink.
Create a JSON file named SqlServerToBlobPipeline.json in the C:\ADFv2Tutorial folder, with the following code:
{
    "name":"SqlServerToBlobPipeline",
    "properties":{
        "activities":[
            {
                "name":"CopySqlServerToAzureBlobActivity",
                "type":"Copy",
                "dependsOn":[

                ],
                "policy":{
                    "timeout":"7.00:00:00",
                    "retry":0,
                    "retryIntervalInSeconds":30,
                    "secureOutput":false,
                    "secureInput":false
                },
                "userProperties":[

                ],
                "typeProperties":{
                    "source":{
                        "type":"SqlServerSource"
                    },
                    "sink":{
                        "type":"DelimitedTextSink",
                        "storeSettings":{
                            "type":"AzureBlobStorageWriteSettings"
                        },
                        "formatSettings":{
                            "type":"DelimitedTextWriteSettings",
                            "quoteAllText":true,
                            "fileExtension":".txt"
                        }
                    },
                    "enableStaging":false
                },
                "inputs":[
                    {
                        "referenceName":"SqlServerDataset",
                        "type":"DatasetReference"
                    }
                ],
                "outputs":[
                    {
                        "referenceName":"AzureBlobDataset",
                        "type":"DatasetReference"
                    }
                ]
            }
        ],
        "annotations":[

        ]
    }
}
To create the pipeline SQLServerToBlobPipeline, run the
Set-AzDataFactoryV2Pipelinecmdlet.Set-AzDataFactoryV2Pipeline -DataFactoryName $dataFactoryName -ResourceGroupName $resourceGroupName -Name "SQLServerToBlobPipeline" -File ".\SQLServerToBlobPipeline.json"Here is the sample output:
PipelineName      : SQLServerToBlobPipeline
ResourceGroupName : <resourceGroupName>
DataFactoryName   : <dataFactoryName>
Activities        : {CopySqlServerToAzureBlobActivity}
Parameters        :
Create a pipeline run
Start a pipeline run for the SQLServerToBlobPipeline pipeline, and capture the pipeline run ID for future monitoring.
$runId = Invoke-AzDataFactoryV2Pipeline -DataFactoryName $dataFactoryName -ResourceGroupName $resourceGroupName -PipelineName 'SQLServerToBlobPipeline'
Monitor the pipeline run
To continuously check the run status of pipeline SQLServerToBlobPipeline, run the following script in PowerShell, and print the final result:
while ($True) {
    $result = Get-AzDataFactoryV2ActivityRun -DataFactoryName $dataFactoryName -ResourceGroupName $resourceGroupName -PipelineRunId $runId -RunStartedAfter (Get-Date).AddMinutes(-30) -RunStartedBefore (Get-Date).AddMinutes(30)

    if (($result | Where-Object { $_.Status -eq "InProgress" } | Measure-Object).count -ne 0) {
        Write-Host "Pipeline run status: In Progress" -foregroundcolor "Yellow"
        Start-Sleep -Seconds 30
    }
    else {
        Write-Host "Pipeline 'SQLServerToBlobPipeline' run finished. Result:" -foregroundcolor "Yellow"
        $result
        break
    }
}
Here is the output of the sample run:
ResourceGroupName    : <resourceGroupName>
DataFactoryName      : <dataFactoryName>
ActivityRunId        : 24af7cf6-efca-4a95-931d-067c5c921c25
ActivityName         : CopySqlServerToAzureBlobActivity
ActivityType         : Copy
PipelineRunId        : 7b538846-fd4e-409c-99ef-2475329f5729
PipelineName         : SQLServerToBlobPipeline
Input                : {source, sink, enableStaging}
Output               : {dataRead, dataWritten, filesWritten, sourcePeakConnections...}
LinkedServiceName    :
ActivityRunStart     : 9/11/2019 7:10:37 AM
ActivityRunEnd       : 9/11/2019 7:10:58 AM
DurationInMs         : 21094
Status               : Succeeded
Error                : {errorCode, message, failureType, target}
AdditionalProperties : {[retryAttempt, ], [iterationHash, ], [userProperties, {}], [recoveryStatus, None]...}
You can get the run ID of pipeline SQLServerToBlobPipeline and check the detailed activity run result by running the following command:
Write-Host "Pipeline 'SQLServerToBlobPipeline' run result:" -foregroundcolor "Yellow"
($result | Where-Object {$_.ActivityName -eq "CopySqlServerToAzureBlobActivity"}).Output.ToString()
Here is the output of the sample run:
{
    "dataRead":36,
    "dataWritten":32,
    "filesWritten":1,
    "sourcePeakConnections":1,
    "sinkPeakConnections":1,
    "rowsRead":2,
    "rowsCopied":2,
    "copyDuration":18,
    "throughput":0.01,
    "errors":[

    ],
    "effectiveIntegrationRuntime":"ADFTutorialIR",
    "usedParallelCopies":1,
    "executionDetails":[
        {
            "source":{
                "type":"SqlServer"
            },
            "sink":{
                "type":"AzureBlobStorage",
                "region":"CentralUS"
            },
            "status":"Succeeded",
            "start":"2019-09-11T07:10:38.2342905Z",
            "duration":18,
            "usedParallelCopies":1,
            "detailedDurations":{
                "queuingDuration":6,
                "timeToFirstByte":0,
                "transferDuration":5
            }
        }
    ]
}
Verify the output
The pipeline automatically creates the output folder named fromonprem in the adftutorial blob container. Confirm that you see the dbo.emp.txt file in the output folder.
In the Azure portal, in the adftutorial container window, select Refresh to see the output folder.
Select
fromonpremin the list of folders.Confirm that you see a file named
dbo.emp.txt.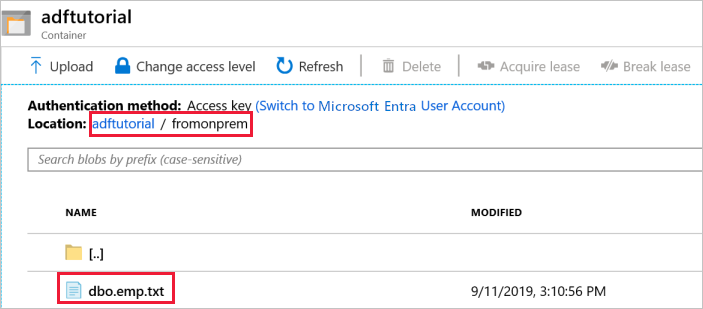
Related content
The pipeline in this sample copies data from one location to another in Azure Blob storage. You learned how to:
- Create a data factory.
- Create a self-hosted integration runtime.
- Create SQL Server and Azure Storage linked services.
- Create SQL Server and Azure Blob datasets.
- Create a pipeline with a copy activity to move the data.
- Start a pipeline run.
- Monitor the pipeline run.
For a list of data stores that are supported by Data Factory, see supported data stores.
To learn about copying data in bulk from a source to a destination, advance to the following tutorial:
Feedback
Coming soon: Throughout 2024 we will be phasing out GitHub Issues as the feedback mechanism for content and replacing it with a new feedback system. For more information see: https://aka.ms/ContentUserFeedback.
Submit and view feedback for