Deploy Azure Kubernetes service on Azure Stack Edge
APPLIES TO:  Azure Stack Edge Pro - GPUAzure Stack Edge Pro 2Azure Stack Edge Pro R
Note
Use this procedure only if you are an SAP or a PMEC customer.
This article describes how to deploy and manage Azure Kubernetes service (AKS) on your Azure Stack Edge device. You can also use this article to create persistent volumes, use GitOps to manage an Arc-enabled Kubernetes cluster, and remove AKS and Azure Arc.
The intended audience for this article is IT administrators who are familiar with setup and deployment of workloads on the Azure Stack Edge device.
About Azure Kubernetes service on Azure Stack Edge
Azure Stack Edge is an AI-enabled edge computing device with high performance network I/O capabilities. After you configure compute on your Azure Stack Edge device, you can use the Azure portal to deploy Azure Kubernetes service, including infrastructure VMs. The AKS cluster is then used for workload deployment via Azure Arc.
Prerequisites
Before you begin, ensure that:
You have a Microsoft account with credentials to access Azure portal, and access to an Azure Stack Edge Pro GPU device. The Azure Stack Edge device is configured and activated using instructions in Set up and activate your device.
You have at least one virtual switch created and enabled for compute on your Azure Stack Edge device. For detailed steps, see Create virtual switches.
You have a client to access your device that's running a supported operating system. If using a Windows client, make sure that it's running PowerShell 5.0 or later.
Before you enable Azure Arc on the Kubernetes cluster, make sure that you’ve enabled and registered
Microsoft.KubernetesandMicrosoft.KubernetesConfigurationresource providers against your subscription. For detailed steps, see Register resource providers via Azure CLI.If you intend to deploy Azure Arc for Kubernetes cluster, you need to create a resource group. You must have owner level access to the resource group.
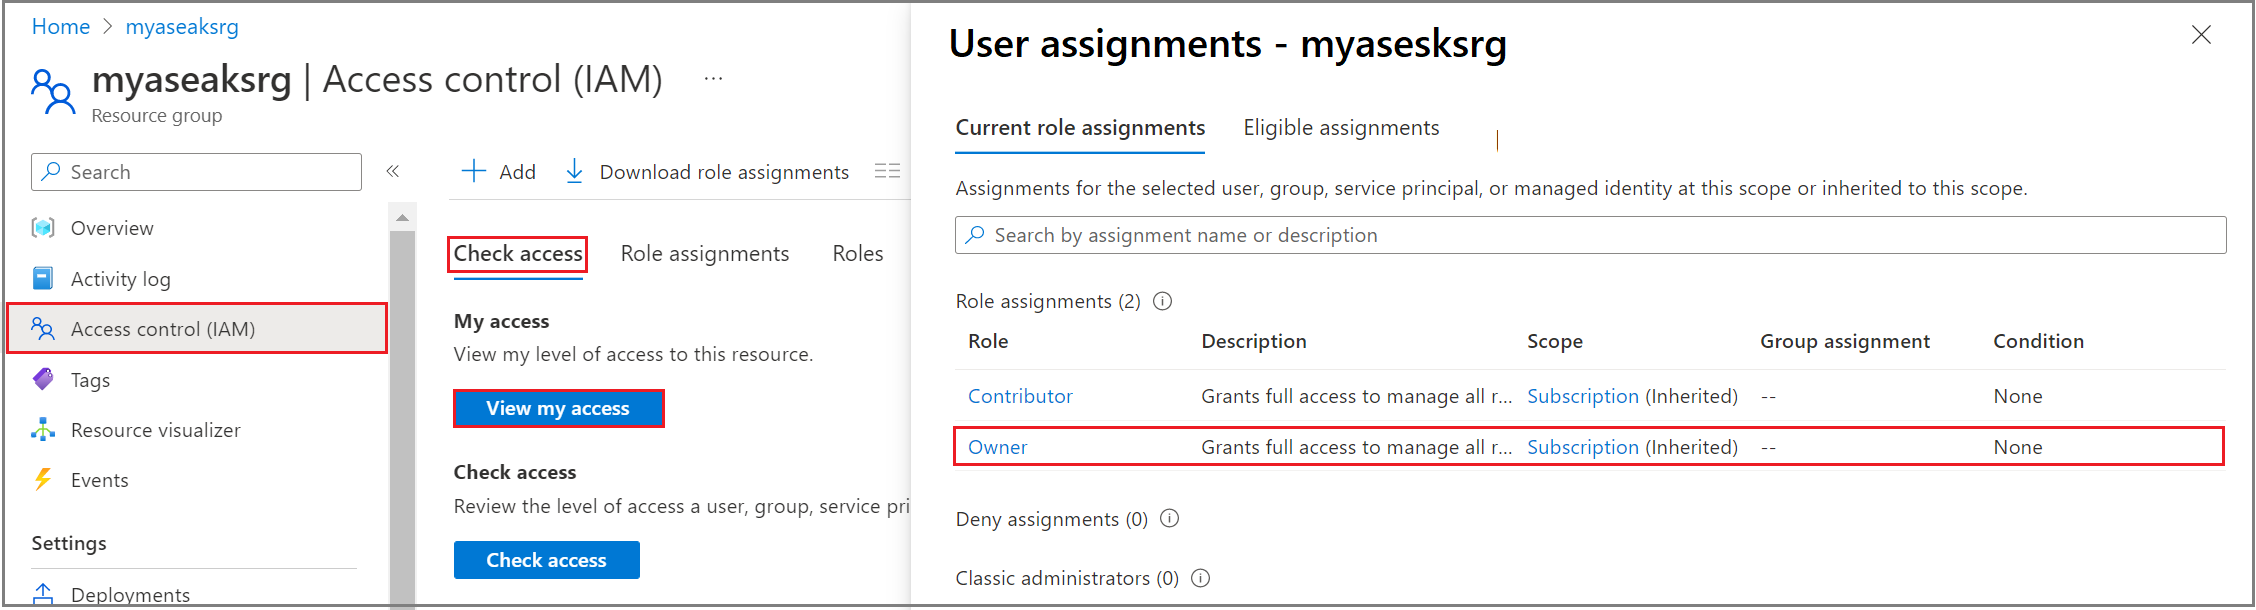
To verify the access level for the resource group, go to Resource group > Access control (IAM) > View my access. Under Role assignments, you must be listed as an Owner.

Depending on the workloads you intend to deploy, you may need to ensure the following optional steps are also completed:
If you intend to deploy custom locations on your Arc-enabled cluster, you need to register the
Microsoft.ExtendedLocationresource provider against your subscription.You must fetch the custom location object ID and use it to enable custom locations via the PowerShell interface of your device.
az login
az ad sp show --id bc313c14-387c-4e7d-a58e-70417303ee3b --query id -o tsv
Here's a sample output using the Azure CLI. You can run the same commands via the Cloud Shell in the Azure portal.
PS /home/user> az ad sp show --id bc313c14-388c-4e7d-a58e-70017303ee3b --query id -o tsv
51dfe1e8-70c6-4de5-a08e-e18aff23d815
PS /home/user>
For more information, see Create and manage custom locations in Arc-enabled Kubernetes.
If deploying Kubernetes or PMEC workloads:
- You may have selected a specific workload profile using the local UI or using PowerShell. Detailed steps are documented for the local UI in Configure compute IPS and for PowerShell in Change Kubernetes workload profiles.
- You may need virtual networks that you’ve added using the instructions in Create virtual networks.
If you're using HPN VMs as your infrastructure VMs, the vCPUs should be automatically reserved. Run the following command to verify the reservation:
Get-HcsNumaLpMappingThis configuration is applied when you install or update to Azure Stack Edge 2307. There are two scenarios where the configuration won't be applied during update:
When you have more minroot vCPUs configured than the four vCPUs from Numa0 + All vCPUs from Numa1. This scenario applies mainly to Azure Stack Edge gateway customers who configure all vCPUs for minroot. For Azure Stack Edge Pro 2, there's only one Numa. For Azure Stack Edge Pro 2 with 40 cores, it's more minroot vCPUs configured than 24 vCPUs, and for Azure Stack Edge Pro 2 with 48 vCPUs it's more than 28 vCPUs configured.
When you have HPN VMs deployed and you're consuming more than 16 vCPUs on a machine with 40 cores, or more than 20 vCPUs on a machine with 48 cores for HPN VMs.
Here's sample output for Azure Stack Edge Pro GPU:
Hardware:
  { Numa Node #0 : CPUs [0, 1, 2, 3, 4, 5, 6, 7, 8, 9, 10, 11, 12, 13, 14, 15, 16, 17, 18, 19] }

  { Numa Node #1 : CPUs [20, 21, 22, 23, 24, 25, 26, 27, 28, 29, 30, 31, 32, 33, 34, 35, 36, 37, 38, 39] }

HpnCapableLpMapping:
  { Numa Node #0 : CPUs [4, 5, 6, 7, 8, 9, 10, 11, 12, 13, 14, 15, 16, 17, 18, 19] }

  { Numa Node #1 : CPUs [24, 25, 26, 27, 28, 29, 30, 31, 32, 33, 34, 35, 36, 37, 38, 39] }

7MT0SZ2:
 HpnLpMapping:
  { Numa Node #0 : CPUs [4, 5, 6, 7, 8, 9, 10, 11, 12, 13, 14, 15, 16, 17, 18, 19] }

  { Numa Node #1 : CPUs [] }

HpnLpAvailable:
  { Numa Node #0 : CPUs [4, 5, 6, 7, 8, 9, 10, 11, 12, 13, 14, 15, 16, 17, 18, 19] }

  { Numa Node #1 : CPUs [] }
Deploy AKS on Azure Stack Edge
There are multiple steps to deploy AKS on Azure Stack Edge. Some steps are optional, as noted below.
Verify AKS is enabled
To verify that AKS is enabled, go to your Azure Stack Edge resource in the Azure portal. In the Overview pane, select the Azure Kubernetes Service tile.

Set custom locations (optional)
Run the following command as an option to set custom locations. Input the custom location object ID that you fetched when completing your prerequisites.
Set-HcsKubeClusterArcInfo –CustomLocationsObjectId <custom_location_object_id>Here's a sample output using the Azure CLI. You can run the same commands via the Cloud Shell in the Azure portal.
[1d9nhq2.microsoftdatabox.com]: PS> Set-HcsKubeClusterArcInfo –CustomLocationsObjectId 51dfe1e8-70c6-4de5-a08e-e18aff23d815
[1d9nhq2.microsoftdatabox.com]: PS>
Specify static IP pools (optional)
An optional step where you can assign IP pools for the virtual network used by Kubernetes pods.
Note
SAP customers can skip this step.
You can specify a static IP address pool for each virtual network that is enabled for Kubernetes. The virtual network enabled for Kubernetes generates a NetworkAttachmentDefinition that's created for the Kubernetes cluster.
During application provisioning, Kubernetes pods can use static IP addresses in the IP pool for container network interfaces, like container single root I/O virtualization (SR-IOV) interfaces. This can be done by pointing to a NetworkAttachmentDefinition in the PodSpec.
Use the following steps to assign static IP pools in the local UI of your device.
Go to the Advanced networking page in Azure portal.
If you didn’t create virtual networks earlier, select Add virtual network to create a Virtual network. You need to specify the virtual switch associated with the virtual network, VLAN ID, subnet mask, and gateway.
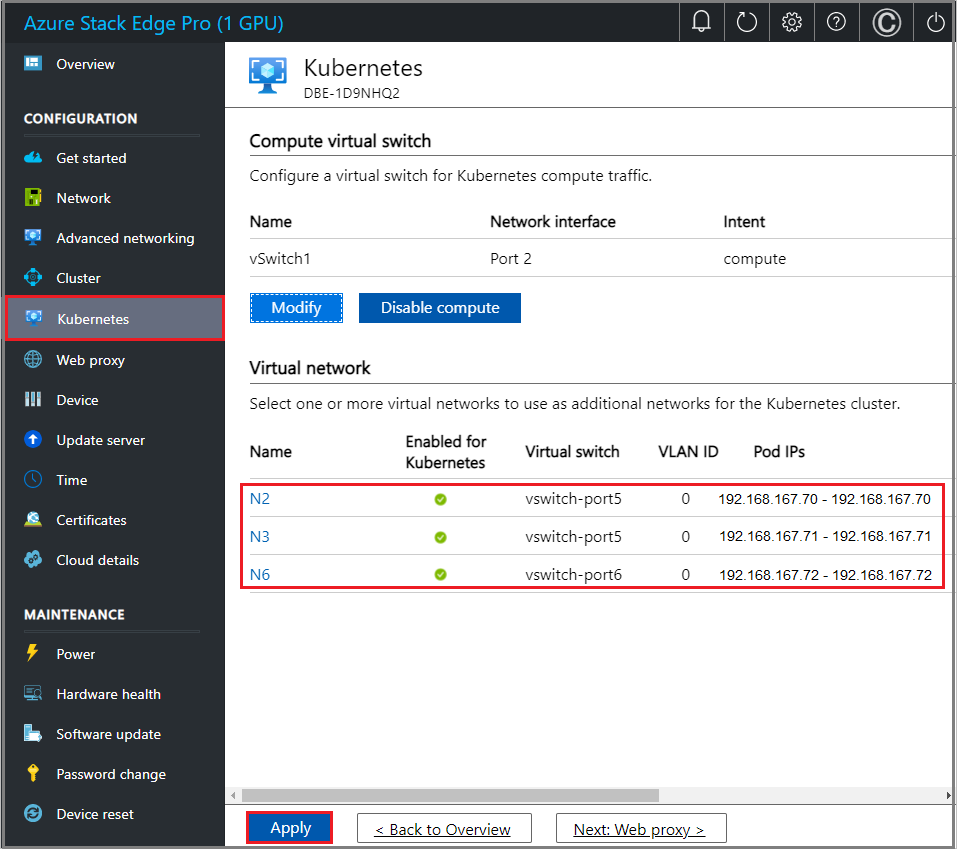
In an example shown here, we've configured three virtual networks. In each of these virtual networks, VLAN is 0 and subnet mask and gateway match the external values; for example, 255.255.0.0 and 192.168.0.1.
First virtual network – Name is N2 and associated with vswitch-port5.
Second virtual network – Name is N3 and associated with vswitch-port5.
Third virtual network – Name is N6 and associated with vswitch-port6.
Once all three virtual networks are configured, they are listed under the virtual networks, as follows:

Assign IP address pools to the virtual networks:
On the Kubernetes page, select a virtual network that you created and enable it for Kubernetes.
Specify a contiguous range of static IPs for Kubernetes pods in the virtual network. In this example, a range of one IP address was provided for each of the three virtual networks that we created.
Select Apply to apply the changes for all virtual networks.
Note
You can't modify the IP pool settings once the AKS cluster is deployed.


Configure the compute virtual switch
Use this step to configure the virtual switch for Kubernetes compute traffic.
In the local UI of your device, go to the Kubernetes page.
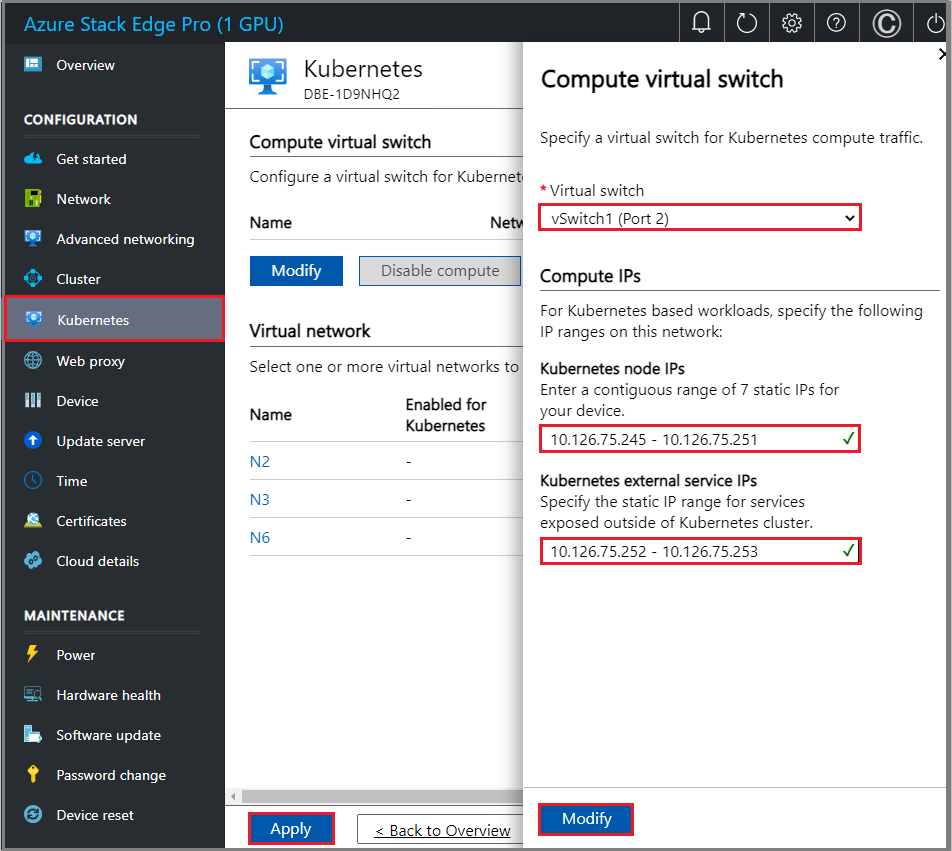
Select Modify to configure a virtual switch for Kubernetes compute traffic.

Enable the compute on a port that has internet access. For example, in this case, port 2 that was connected to the internet is enabled for compute. Internet access allows you to retrieve container images from AKS.
The Azure consistent services virtual IP must be able to reach this compute virtual switch network either via external routing or by creating an Azure consistent services virtual IP on the same network.
For Kubernetes nodes, specify a contiguous range of six static IPs in the same subnet as the network for this port.
As part of the AKS deployment, two clusters are created, a management cluster and a target cluster. The IPs that you specified are used as follows:
The management cluster needs two IPs = 1 IP for management control plane network interface + 1 IP for API server (VIP).
The target cluster needs (2+n) IPs = 1 IP for target cluster control plane network interface + 1 IP for API server (VIP) + number of nodes, n.
An extra IP is used for rolling updates.
For a single node device, the above results in six IPs to deploy a Kubernetes cluster. For a two node cluster, you need seven IPs.
For the Kubernetes external service IPs, supply static IPs for services that are exposed outside the Kubernetes cluster. Each such service requires one IP.


Enable VM cloud management
This step is required to allow the Azure Stack Edge portal to deploy the infrastructure VMs on Azure Stack Edge device for AKS; for example, for the target cluster worker node.
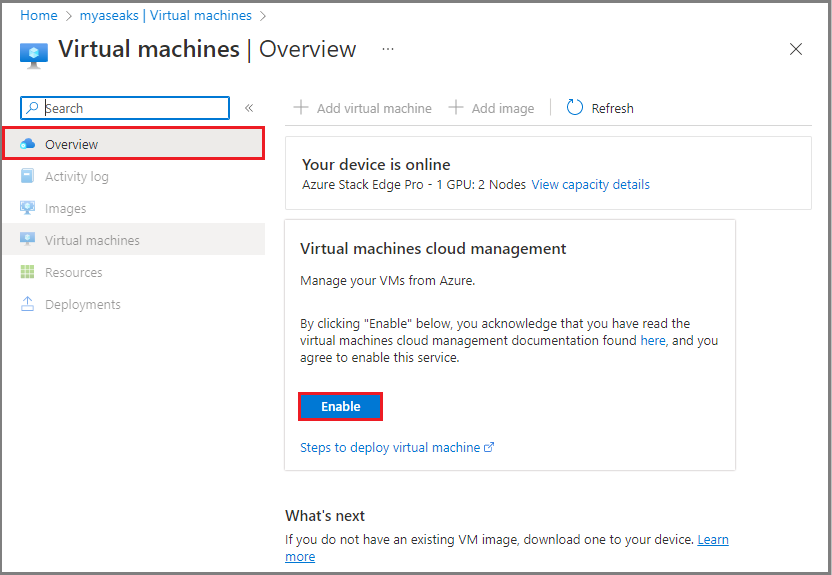
In the Azure portal, go to your Azure Stack Edge resource.
Go to Overview and select the Virtual machines tile.
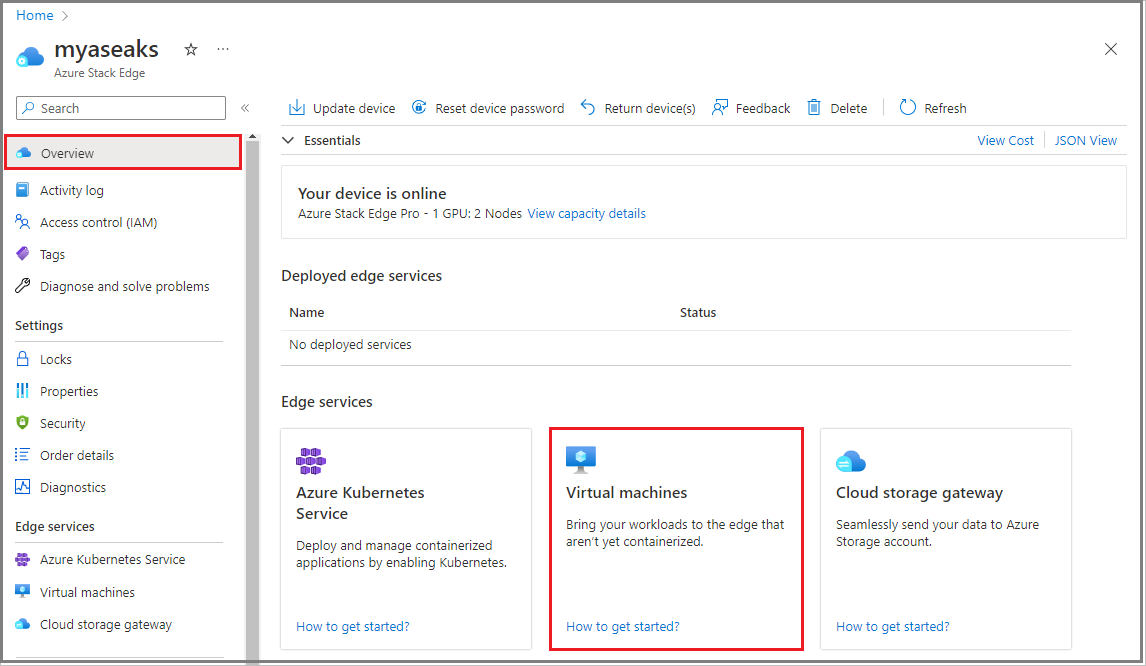
In the Virtual machines > Overview page, select Enable for Virtual machines cloud management.


Set up Kubernetes cluster and enable Arc
Use this step to set up and deploy the Kubernetes cluster, and enable it for management via Arc.
Important
Before you create the Kubernetes cluster, keep in mind that:
- You can't modify the IP pool settings after the AKS cluster is deployed.
- As part of Arc-enabling the AKS target cluster, custom locations will be enabled if the object ID was passed using the optional command in the Set custom locations (optional) section in this article. If you didn’t enable custom locations, you can still choose to do so before the Kubernetes cluster is created. After the cluster deployment has started, you won’t be able to set custom locations.
Follow these steps to deploy the AKS cluster.
In the Azure portal, go to your Azure Stack Edge resource.
Select the Azure Kubernetes Service tile.
Select Add to configure AKS.
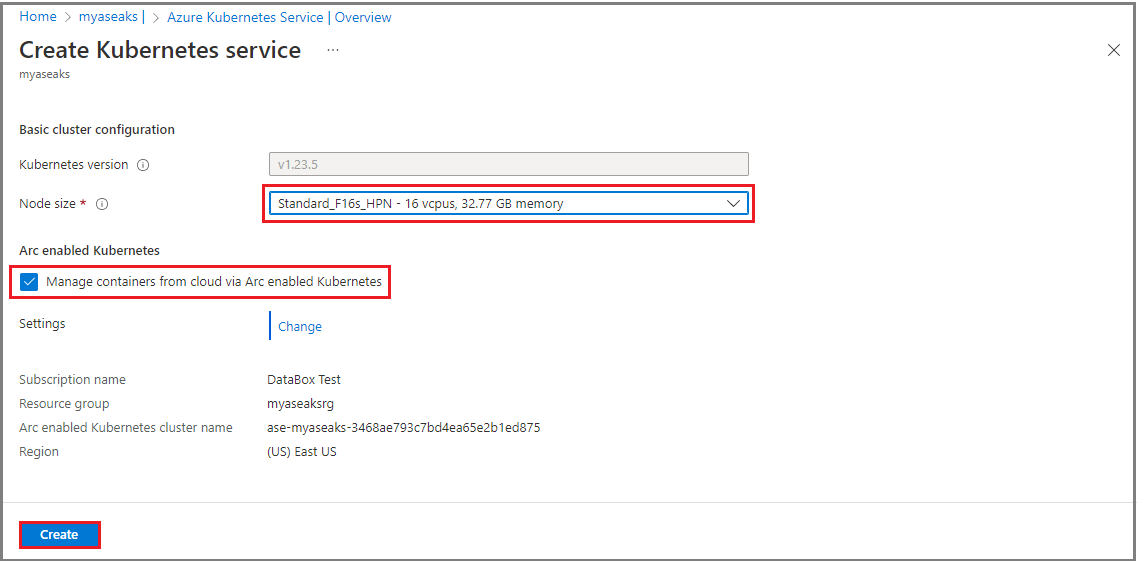
On the Create Kubernetes service dialog, select the Kubernetes Node size for the infrastructure VM. Select a VM node size that's appropriate for the workload size you're deploying. In this example, we've selected VM size Standard_F16s_HPN – 16 vCPUs, 32.77 GB memory.
For SAP deployments, select VM node size Standard_DS5_v2.
Note
If the node size dropdown menu isn’t populated, wait a few minutes so that it's synchronized after VMs are enabled in the preceding step.
Check Manage container from cloud via Arc enabled Kubernetes. This option, when checked, enables Arc when the Kubernetes cluster is created.
If you select Change, then you need to provide a subscription name, resource group, cluster name, and region.
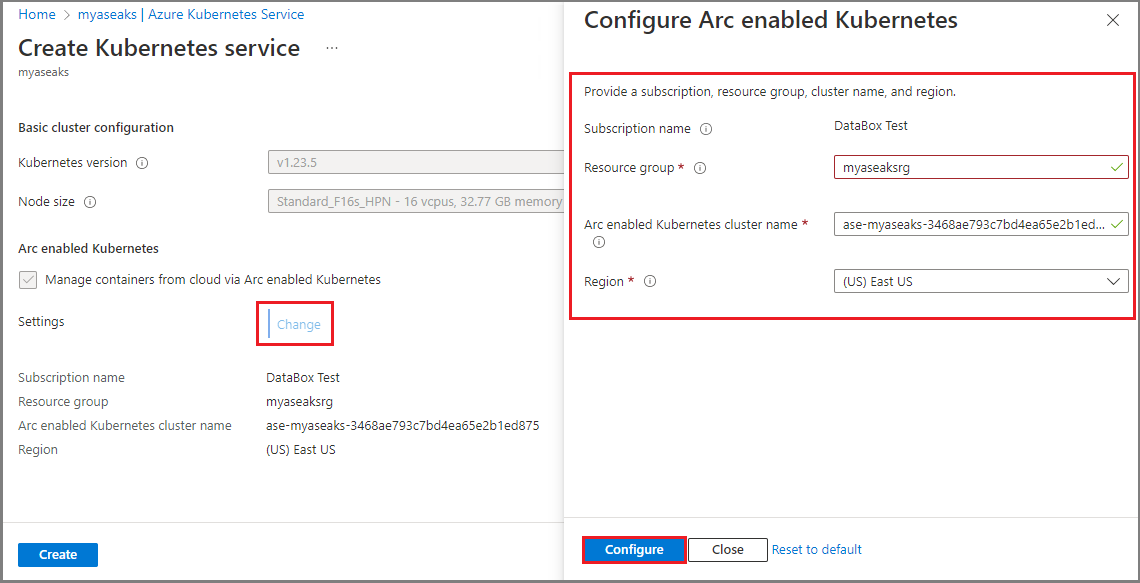
The subscription name should be automatically populated.
Specify a unique resource group name. You can also choose to use the same resource group in which you deployed your Azure Stack Edge resource. You must have owner level access to this resource group. To verify the access level for the resource group, go to Resource group > Access control (IAM) > View my access. Under Role assignments, you must be listed as an Owner.
Specify a name for your Arc enabled Kubernetes cluster or accept the default.
Select a region where the resource for your Arc enabled Kubernetes cluster will be created. A filtered list of supported regions is displayed in the dropdown list.
Select Configure. You can also reset the Arc settings by selecting the Reset to default option.
Select Create to create the Kubernetes service.
You're notified when the cluster creation starts.
Once the Kubernetes cluster is created, you’ll see that the Azure Kubernetes Service is Running.

The Arc-enabled Kubernetes will also show up as Running.

If you're planning to deploy Kubernetes workloads, you may next need to create Persistent Volumes to allocate storage.


Add a persistent volume
PersistentVolume (PV) refers to a piece of storage in the Kubernetes cluster. Kubernetes storage can be statically provisioned as PersistentVolume. It can also be dynamically provisioned as StorageClass. For more information, see Storage requirements for Kubernetes pods.
There are two different workflows for creating PVs depending on whether the compute is enabled inline when the share is created, or not. Each of these workflows is discussed in the following sections.
Create a persistent volume with compute enabled inline during share creation
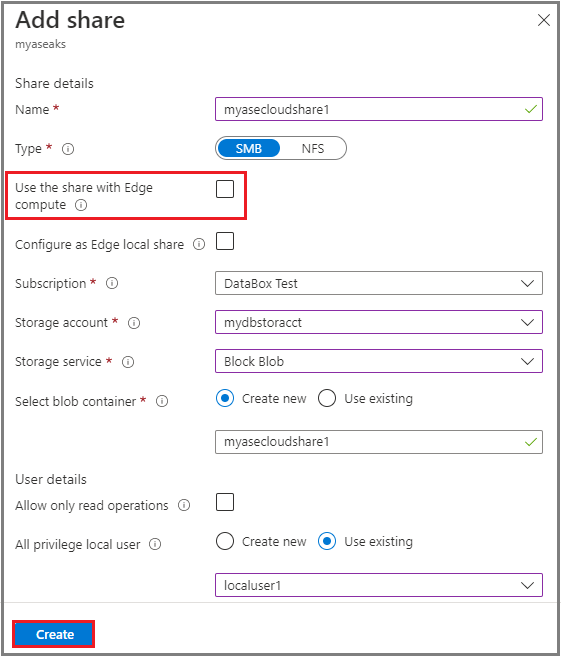
On your Azure Stack Edge Pro device, statically provisioned PersistentVolumes are created using the device's storage capabilities. When you provision a share and the Use the share with Edge compute option is enabled, this action automatically creates a PV resource in the Kubernetes cluster.

To use cloud tiering, you can create an Edge cloud share with the Use the share with Edge compute option enabled. A PV is again created automatically for this share. If you enable this option, any application data that you write to the Edge share is tiered to the cloud.

Create a persistent volume with compute not enabled inline during share creation
For the shares that were created with the Use the share with Edge compute option unchecked, you can add a persistent volume using the following steps.
In the Azure portal, go to the Azure Stack Edge resource for your device. Go to Cloud storage gateway > Shares. You can see that the device currently has shares with the Used for compute status enabled.
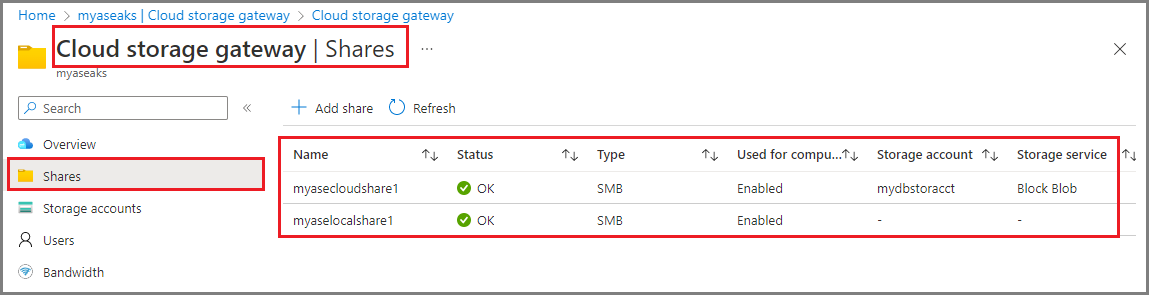
Select + Add share. For this share, make sure that the Use the share with Edge compute option is unchecked.
You can see the newly created share in the list of shares and the Used for compute status is Disabled.

Go back to the Azure Stack Edge resource > Overview. In the right-pane, select the Azure Kubernetes Service tile.

In the Azure Kubernetes Service > Overview page, the Persistent volumes tile shows the persistent volumes that exist. These volumes were created automatically when the shares were created with the Use the share with Edge compute option enabled. To create a new persistent volume, select + Add persistent volume.
In the Add Persistent volumes dialog, select the share for which you want to create the persistent volume.
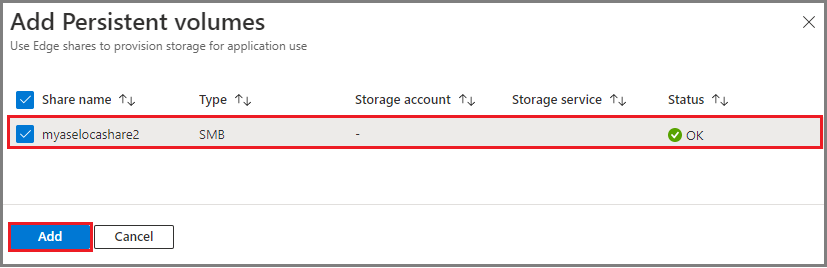
You see a notification that the persistent volume is being created. This operation takes a few minutes to complete.

After the persistent volume is created, the Overview page updates to include the newly added persistent volume.
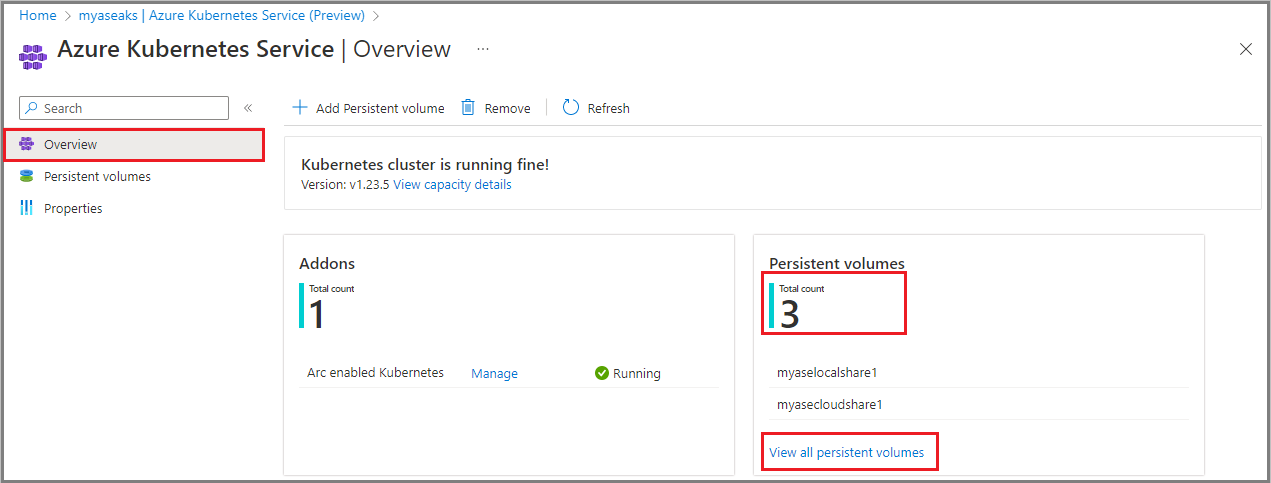
Select View all persistent volumes to see the newly created persistent volume.


Remove the Azure Kubernetes service
Use the following steps in the Azure portal to remove AKS.
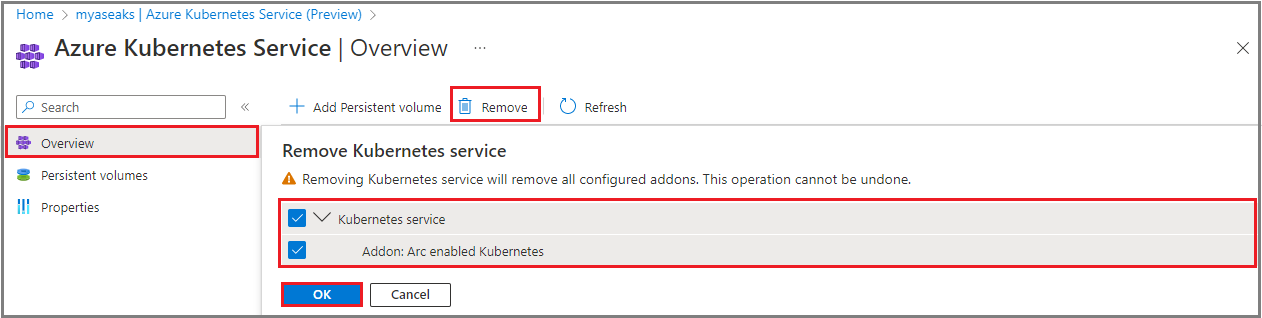
In your Azure Stack Edge resource, go to Azure Kubernetes Service > Overview.
From the top command bar, select Remove.
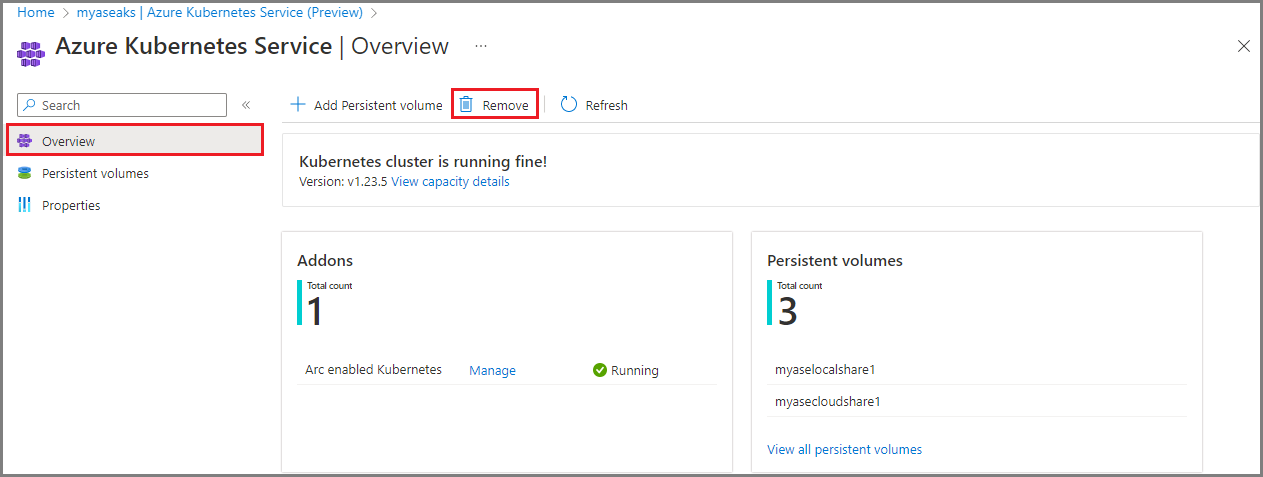
Select the configured addon that you want to remove along with AKS. Azure Arc enabled Kubernetes is an addon. Once you select Remove, all Kubernetes configurations and the selected addon will be removed. The operation is irreversible and can’t be undone.
Select OK to confirm the operation.


Next steps
Feedback
Coming soon: Throughout 2024 we will be phasing out GitHub Issues as the feedback mechanism for content and replacing it with a new feedback system. For more information see: https://aka.ms/ContentUserFeedback.
Submit and view feedback for