CI/CD with Jenkins on Azure Databricks
Note
This article covers Jenkins, which is neither provided nor supported by Databricks. To contact the provider, see Jenkins Help.
There are numerous CI/CD tools you can use to manage and run your CI/CD pipelines. This article illustrates how to use the Jenkins automation server. CI/CD is a design pattern, so the steps and stages outlined in this article should transfer with a few changes to the pipeline definition language in each tool. Furthermore, much of the code in this example pipeline runs standard Python code, which you can invoke in other tools. For an overview of CI/CD on Azure Databricks, see What is CI/CD on Azure Databricks?.
For information about using Azure DevOps with Azure Databricks instead, see Continuous integration and delivery on Azure Databricks using Azure DevOps.
CI/CD development workflow
Databricks suggests the following workflow for CI/CD development with Jenkins:
- Create a repository, or use an existing repository, with your third-party Git provider.
- Connect your local development machine to the same third-party repository. For instructions, see your third-party Git provider’s documentation.
- Pull any existing updated artifacts (such as notebooks, code files, and build scripts) from the third-party repository down onto your local development machine.
- As desired, create, update, and test artifacts on your local development machine. Then push any new and changed artifacts from your local development machine up into the third-party repository. For instructions, see your third-party Git provider’s documenation.
- Repeat steps 3 and 4 as needed.
- Use Jenkins periodically as an integrated approach to automatically pulling artifacts from your third-party repository down onto your local development machine or Azure Databricks workspace; building, testing, and running code on your local development machine or Azure Databricks workspace; and reporting test and run results. While you can run Jenkins manually, in real-world implementations you would instruct your third-party Git provider to run Jenkins every time a specific event happens, such as a repository pull request.
The rest of this article uses an example project to describe one way to use Jenkins to implement the preceding CI/CD development workflow.
For information about using Azure DevOps instead of Jenkins, see Continuous integration and delivery on Azure Databricks using Azure DevOps.
Local development machine setup
This article’s example uses Jenkins to instruct the Databricks CLI and Databricks Asset Bundles to do the following:
- Build a Python wheel file on your local development machine.
- Deploy the built Python wheel file along with additional Python files and Python notebooks from your local development machine to an Azure Databricks workspace.
- Test and run the uploaded Python wheel file and notebooks in that workspace.
To set up your local development machine to instruct your Azure Databricks workspace to perform the build and upload stages for this example, do the following on your local development machine:
Step 1: Install required tools
In this step, you install the Databricks CLI, Jenkins, jq, and Python wheel build tools on your local development machine. These tools are required to run this example.
Install Databricks CLI version 0.205 or above, if you have not done so already. Jenkins uses the Databricks CLI to pass this example’s test and run instructions on to your workspace. See Install or update the Databricks CLI.
Install and start Jenkins, if you have not done so already. See Installing Jenkins for Linux, macOS, or Windows.
Install jq. This example uses
jqto parse some JSON-formatted command output.Use
pipto install the Python wheel build tools with the following command (some systems might require you to usepip3instead ofpip):pip install --upgrade wheel
Step 2: Create a Jenkins Pipeline
In this step, you use Jenkins to create a Jenkins Pipeline for this article’s example. Jenkins provides a few different project types to create CI/CD pipelines. Jenkins Pipelines provide an interface to define stages in a Jenkins Pipeline by using Groovy code to call and configure Jenkins plugins.
To create the Jenkins Pipeline in Jenkins:
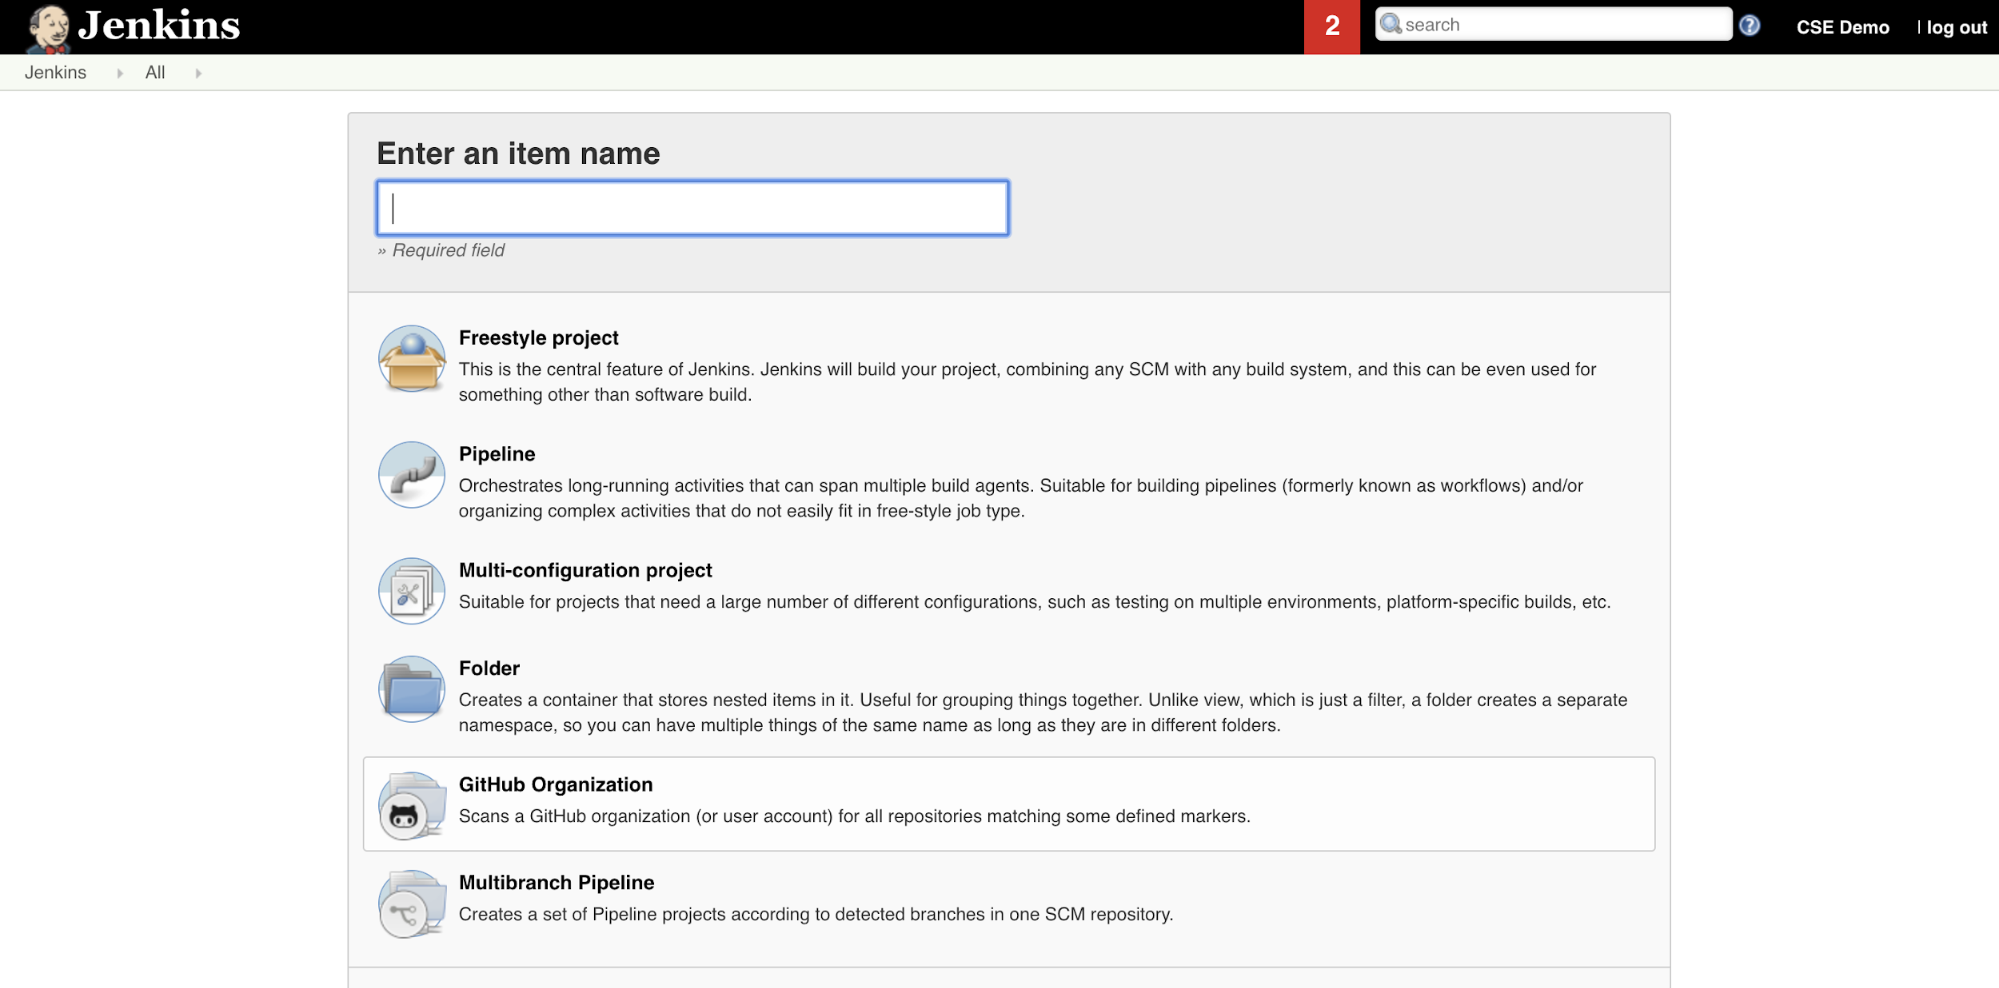
- After you start Jenkins, from your Jenkins Dashboard, click New Item.
- For Enter an item name, type a name for the Jenkins Pipeline, for example
jenkins-demo. - Click the Pipeline project type icon.
- Click OK. The Jenkins Pipeline’s Configure page appears.
- In the Pipeline area, in the Defintion drop-down list, select Pipeline script from SCM.
- In the SCM drop-down list, select Git.
- For Repository URL, type the URL to the repository that is hosted by your third-part Git provider.
- For Branch Specifier, type
*/<branch-name>, where<branch-name>is the name of the branch in your repository that you want to use, for example*/main. - For Script path, type
Jenkinsfile, if it is not already set. You create theJenkinsfilelater in this article. - Uncheck the box titled Lightweight checkout, if it is already checked.
- Click Save.
Step 3: Add global environment variables to Jenkins
In this step, you add three global environment variables to Jenkins. Jenkins passes these environment variables on to the Databricks CLI. The Databricks CLI needs the values for these environment variables to authenticate with your Azure Databricks workspace. This example uses OAuth machine-to-machine (M2M) authentication for a service principal (although other authentication types are also available). To set up OAuth M2M authentication for your Azure Databricks workspace, see OAuth machine-to-machine (M2M) authentication.
The three global environment variables for this example are:
DATABRICKS_HOST, set to your Azure Databricks workspace URL, starting withhttps://. See Workspace instance names, URLs, and IDs.DATABRICKS_CLIENT_ID, set to the service principal’s client ID, which is also known as its application ID.DATABRICKS_CLIENT_SECRET, set to the service principal’s Azure Databricks OAuth secret.
To set global environment variables in Jenkins, from your Jenkins Dashboard:
- In the sidebar, click Manage Jenkins.
- In the System Configuration section, click System.
- In the Global properties section, check the box tiled Environment variables.
- Click Add and then enter the environment variable’s Name and Value. Repeat this for each additional environment variable.
- When you are finished adding environment variables, click Save to return to your Jenkins Dashboard.
Design the Jenkins Pipeline
Jenkins provides a few different project types to create CI/CD pipelines. This example implements a Jenkins Pipeline. Jenkins Pipelines provide an interface to define stages in a Jenkins Pipeline by using Groovy code to call and configure Jenkins plugins.
You write a Jenkins Pipeline definition in a text file called a Jenkinsfile, which in turn is checked into a project’s source control repository. For more information, see Jenkins Pipeline. Here is the Jenkins Pipeline for this article’s example. In this example Jenkinsfile, replace the following placeholders:
- Replace
<user-name>and<repo-name>with the username and repository name for your hosted by your third-part Git provider. This article uses a GitHub URL as an example. - Replace
<release-branch-name>with the name of the release branch in your repository. For example, this could bemain. - Replace
<databricks-cli-installation-path>with the path on your local development machine where the Databricks CLI is installed. For example, on macOS this could be/usr/local/bin. - Replace
<jq-installation-path>with the path on your local development machine wherejqis installed. For example, on macOS this could be/usr/local/bin. - Replace
<job-prefix-name>with some string to help uniquely identify the Azure Databricks jobs that are created in your workspace for this example. For example, this could bejenkins-demo. - Notice that
BUNDLETARGETis set todev, which is the name of the Databricks Asset Bundle target that is defined later in this article. In real-world implementations you would change this to the name of your own bundle target. More details about bundle targets are provided later in this article.
Here is the Jenkinsfile, which must be added to the root of your repository:
// Filename: Jenkinsfile
node {
  def GITREPOREMOTE = "https://github.com/<user-name>/<repo-name>.git"
  def GITBRANCH     = "<release-branch-name>"
  def DBCLIPATH     = "<databricks-cli-installation-path>"
  def JQPATH        = "<jq-installation-path>"
  def JOBPREFIX     = "<job-prefix-name>"
  def BUNDLETARGET  = "dev"

  stage('Checkout') {
    git branch: GITBRANCH, url: GITREPOREMOTE
  }
  stage('Validate Bundle') {
    sh """#!/bin/bash
          ${DBCLIPATH}/databricks bundle validate -t ${BUNDLETARGET}
       """
  }
  stage('Deploy Bundle') {
    sh """#!/bin/bash
          ${DBCLIPATH}/databricks bundle deploy -t ${BUNDLETARGET}
       """
  }
  stage('Run Unit Tests') {
    sh """#!/bin/bash
          ${DBCLIPATH}/databricks bundle run -t ${BUNDLETARGET} run-unit-tests
       """
  }
  stage('Run Notebook') {
    sh """#!/bin/bash
          ${DBCLIPATH}/databricks bundle run -t ${BUNDLETARGET} run-dabdemo-notebook
       """
  }
  stage('Evaluate Notebook Runs') {
    sh """#!/bin/bash
          ${DBCLIPATH}/databricks bundle run -t ${BUNDLETARGET} evaluate-notebook-runs
       """
  }
  stage('Import Test Results') {
    def DATABRICKS_BUNDLE_WORKSPACE_ROOT_PATH
    def getPath = "${DBCLIPATH}/databricks bundle validate -t ${BUNDLETARGET} | ${JQPATH}/jq -r .workspace.file_path"
    def output = sh(script: getPath, returnStdout: true).trim()

    if (output) {
      DATABRICKS_BUNDLE_WORKSPACE_ROOT_PATH = "${output}"
    } else {
      error "Failed to capture output or command execution failed: ${getPath}"
    }

    sh """#!/bin/bash
          ${DBCLIPATH}/databricks workspace export-dir \
          ${DATABRICKS_BUNDLE_WORKSPACE_ROOT_PATH}/Validation/Output/test-results \
          ${WORKSPACE}/Validation/Output/test-results \
          -t ${BUNDLETARGET} \
          --overwrite
       """
  }
  stage('Publish Test Results') {
    junit allowEmptyResults: true, testResults: '**/test-results/*.xml', skipPublishingChecks: true
  }
}
The remainder of this article describes each stage in this Jenkins Pipeline and how to set up the artifacts and commands for Jenkins to run at that stage.
Pull the latest artifacts from the third-party repository
The first stage in this Jenkins Pipeline, the Checkout stage, is defined as follows:
stage('Checkout') {
  git branch: GITBRANCH, url: GITREPOREMOTE
}
This stage makes sure that the working directory that Jenkins uses on your local development machine has the latest artifacts from your third-party Git repository. Typically, Jenkins sets this working directory to <your-user-home-directory>/.jenkins/workspace/<pipeline-name>. This enables you on the same local development machine to keep your own copy of artifacts in development separate from the artifacts that Jenkins uses from your third-party Git repository.
Validate the Databricks Asset Bundle
The second stage in this Jenkins Pipeline, the Validate Bundle stage, is defined as follows:
stage('Validate Bundle') {
  sh """#!/bin/bash
        ${DBCLIPATH}/databricks bundle validate -t ${BUNDLETARGET}
     """
}
This stage makes sure that the Databricks Asset Bundle, which defines the workflows for testing and running your artifacts, is syntactically correct. Databricks Asset Bundles, known simply as bundles, make it possible to express complete data, analytics, and ML projects as a collection of source files. See What are Databricks Asset Bundles?.
To define the bundle for this article, create a file named databricks.yml in the root of the cloned repository on your local machine. In this example databricks.yml file, replace the following placeholders:
- Replace
<bundle-name>with a unique programmatic name for the bundle. For example, this could bejenkins-demo. - Replace
<job-prefix-name>with some string to help uniquely identify the Azure Databricks jobs that are created in your workspace for this example. For example, this could bejenkins-demo. It should match theJOBPREFIXvalue in your Jenkinsfile. - Replace
<spark-version-id>with the Databricks Runtime version ID for your job clusters, for example13.3.x-scala2.12. - Replace
<cluster-node-type-id>with the node type ID for your job clusters, for exampleStandard_DS3_v2. - Notice that
devin thetargetsmapping is the same as theBUNDLETARGETin your Jenkinsfile. A bundle target specifies the host and the related deployment behaviors.
Here is the databricks.yml file, which must be added to the root of your repository for this example to operate correctly:
# Filename: databricks.yml
bundle:
  name: <bundle-name>

variables:
  job_prefix:
    description: A unifying prefix for this bundle's job and task names.
    default: <job-prefix-name>
  spark_version:
    description: The cluster's Spark version ID.
    default: <spark-version-id>
  node_type_id:
    description: The cluster's node type ID.
    default: <cluster-node-type-id>

artifacts:
  dabdemo-wheel:
    type: whl
    path: ./Libraries/python/dabdemo

resources:
  jobs:
    run-unit-tests:
      name: ${var.job_prefix}-run-unit-tests
      tasks:
        - task_key: ${var.job_prefix}-run-unit-tests-task
          new_cluster:
            spark_version: ${var.spark_version}
            node_type_id: ${var.node_type_id}
            num_workers: 1
            spark_env_vars:
              WORKSPACEBUNDLEPATH: ${workspace.root_path}
          notebook_task:
            notebook_path: ./run_unit_tests.py
            source: WORKSPACE
          libraries:
            - pypi:
                package: pytest
    run-dabdemo-notebook:
      name: ${var.job_prefix}-run-dabdemo-notebook
      tasks:
        - task_key: ${var.job_prefix}-run-dabdemo-notebook-task
          new_cluster:
            spark_version: ${var.spark_version}
            node_type_id: ${var.node_type_id}
            num_workers: 1
            data_security_mode: SINGLE_USER
            spark_env_vars:
              WORKSPACEBUNDLEPATH: ${workspace.root_path}
          notebook_task:
            notebook_path: ./dabdemo_notebook.py
            source: WORKSPACE
          libraries:
            - whl: "/Workspace${workspace.root_path}/files/Libraries/python/dabdemo/dist/dabdemo-0.0.1-py3-none-any.whl"
    evaluate-notebook-runs:
      name: ${var.job_prefix}-evaluate-notebook-runs
      tasks:
        - task_key: ${var.job_prefix}-evaluate-notebook-runs-task
          new_cluster:
            spark_version: ${var.spark_version}
            node_type_id: ${var.node_type_id}
            num_workers: 1
            spark_env_vars:
              WORKSPACEBUNDLEPATH: ${workspace.root_path}
          spark_python_task:
            python_file: ./evaluate_notebook_runs.py
            source: WORKSPACE
          libraries:
            - pypi:
                package: unittest-xml-reporting

targets:
  dev:
    mode: development
For more information about the databricks.yml file, see Databricks Asset Bundle configurations.
Deploy the bundle to your workspace
The Jenkins Pipeline’s third stage, titled Deploy Bundle, is defined as follows:
stage('Deploy Bundle') {
  sh """#!/bin/bash
        ${DBCLIPATH}/databricks bundle deploy -t ${BUNDLETARGET}
     """
}
This stage does two things:
- Because the
artifactmapping in thedatabricks.ymlfile is set towhl, this instructs the Databricks CLI to build the Python wheel file using thesetup.pyfile in the specified location. - After the Python wheel file is built on your local development machine, the Databricks CLI deploys the built Python wheel file along with the specified Python files and notebooks to your Azure Databricks workspace. By default, Databricks Asset Bundles deploys the Python wheel file and other files to
/Workspace/Users/<your-username>/.bundle/<bundle-name>/<target-name>.
To enable the Python wheel file to be built as specified in the databricks.yml file, create the following folders and files in the root of your cloned repository on your local machine.
To define the logic and the unit tests for the Python wheel file that the notebook will run against, create two files named addcol.py and test_addcol.py, and add them to a folder structure named python/dabdemo/dabdemo within your repository’s Libraries folder, visualized as follows (ellipses indicate omitted folders in the repo, for brevity):
├── ...
├── Libraries
│    └── python
│          └── dabdemo
│                └── dabdemo
│                      ├── addcol.py
│                      └── test_addcol.py
├── ...
The addcol.py file contains a library function that is built later into a Python wheel file and then installed on an Azure Databricks cluster. It is
a simple function that adds a new column, populated by a literal, to an Apache Spark DataFrame:
# Filename: addcol.py
import pyspark.sql.functions as F

def with_status(df):
  return df.withColumn("status", F.lit("checked"))
The test_addcol.py file contains tests to pass a mock DataFrame object to the with_status function, defined in addcol.py. The
result is then compared to a DataFrame object containing the expected values. If the values match, which in this case they do, the test passes:
# Filename: test_addcol.py
import pytest
from pyspark.sql import SparkSession
from dabdemo.addcol import *

class TestAppendCol(object):

  def test_with_status(self):
    spark = SparkSession.builder.getOrCreate()

    source_data = [
      ("paula", "white", "paula.white@example.com"),
      ("john", "baer", "john.baer@example.com")
    ]

    source_df = spark.createDataFrame(
      source_data,
      ["first_name", "last_name", "email"]
    )

    actual_df = with_status(source_df)

    expected_data = [
      ("paula", "white", "paula.white@example.com", "checked"),
      ("john", "baer", "john.baer@example.com", "checked")
    ]
    expected_df = spark.createDataFrame(
      expected_data,
      ["first_name", "last_name", "email", "status"]
    )

    assert(expected_df.collect() == actual_df.collect())
To enable the Databricks CLI to correctly package this library code into a Python wheel file, create two files named __init__.py and __main__.py in the same folder as the preceding two files. Also, create a file named setup.py in the python/dabdemo folder, visualized as follows (ellipses indicate omitted folders, for brevity):
├── ...
├── Libraries
│    └── python
│          └── dabdemo
│                ├── dabdemo
│                │    ├── __init__.py
│                │    ├── __main__.py
│                │    ├── addcol.py
│                │    └── test_addcol.py
│                └── setup.py
├── ...
The __init__.py file contains the library’s version number and author. Replace <my-author-name> with your name:
# Filename: __init__.py
__version__ = '0.0.1'
__author__ = '<my-author-name>'

import sys, os

sys.path.append(os.path.join(os.path.dirname(__file__), "..", ".."))
The __main__.py file contains the library’s entry point:
# Filename: __main__.py
import sys, os

sys.path.append(os.path.join(os.path.dirname(__file__), "..", ".."))

from addcol import *

def main():
  pass

if __name__ == "__main__":
  main()
The setup.py file contains additional settings for building the library into a Python wheel file. Replace <my-url>, <my-author-name>@<my-organization>, and <my-package-description> with meaningful values:
# Filename: setup.py
from setuptools import setup, find_packages

import dabdemo

setup(
  name = "dabdemo",
  version = dabdemo.__version__,
  author = dabdemo.__author__,
  url = "https://<my-url>",
  author_email = "<my-author-name>@<my-organization>",
  description = "<my-package-description>",
  packages = find_packages(include = ["dabdemo"]),
  entry_points={"group_1": "run=dabdemo.__main__:main"},
  install_requires = ["setuptools"]
)
Test the Python wheel’s component logic
The Run Unit Tests stage, the fourth stage of this Jenkins Pipeline, uses pytest to test a library’s logic to make sure it works as built. This stage is defined as follows:
stage('Run Unit Tests') {
  sh """#!/bin/bash
        ${DBCLIPATH}/databricks bundle run -t ${BUNDLETARGET} run-unit-tests
     """
}
This stage uses the Databricks CLI to run a notebook job. This job runs the Python notebook with the filename of run-unit-test.py. This notebook runs pytest against the library’s logic.
To run the unit tests for this example, add a Python notebook file named run_unit_tests.py with the following contents to the root of your cloned repository on your local machine:
# Databricks notebook source

# COMMAND ----------

# MAGIC %sh
# MAGIC
# MAGIC mkdir -p "/Workspace${WORKSPACEBUNDLEPATH}/Validation/reports/junit/test-reports"

# COMMAND ----------

# Prepare to run pytest.
import sys, pytest, os

# Skip writing pyc files on a readonly filesystem.
sys.dont_write_bytecode = True

# Run pytest.
retcode = pytest.main(["--junit-xml", f"/Workspace{os.getenv('WORKSPACEBUNDLEPATH')}/Validation/reports/junit/test-reports/TEST-libout.xml",
                      f"/Workspace{os.getenv('WORKSPACEBUNDLEPATH')}/files/Libraries/python/dabdemo/dabdemo/"])

# Fail the cell execution if there are any test failures.
assert retcode == 0, "The pytest invocation failed. See the log for details."
Use the built Python wheel
The fifth stage of this Jenkins Pipeline, titled Run Notebook, runs a Python notebook that calls the logic in the built Python wheel file, as follows:
stage('Run Notebook') {
  sh """#!/bin/bash
        ${DBCLIPATH}/databricks bundle run -t ${BUNDLETARGET} run-dabdemo-notebook
     """
  }
This stage runs the Databricks CLI, which in turn instructs your workspace to run a notebook job. This notebook creates a DataFrame object, passes it to the library’s with_status function, prints the result, and report the job’s run results. Create the notebook by adding a Python notebook file named dabdaddemo_notebook.py with the following contents in the root of your cloned repository on your local development machine:
# Databricks notebook source

# COMMAND ----------

# Restart Python after installing the wheel.
dbutils.library.restartPython()

# COMMAND ----------

from dabdemo.addcol import with_status

df = (spark.createDataFrame(
  schema = ["first_name", "last_name", "email"],
  data = [
    ("paula", "white", "paula.white@example.com"),
    ("john", "baer", "john.baer@example.com")
  ]
))

new_df = with_status(df)

display(new_df)

# Expected output:
#
# +------------+-----------+-------------------------+---------+
# │first_name │last_name │email                   │status  |
# +============+===========+=========================+=========+
# │paula      │white     │paula.white@example.com │checked |
# +------------+-----------+-------------------------+---------+
# │john       │baer      │john.baer@example.com   │checked |
# +------------+-----------+-------------------------+---------+
Evaluate notebook job run results
The Evaluate Notebook Runs stage, the sixth stage of this Jenkins Pipeline, evaluates the results of the preceding notebook job run. This stage is defined as follows:
stage('Evaluate Notebook Runs') {
  sh """#!/bin/bash
        ${DBCLIPATH}/databricks bundle run -t ${BUNDLETARGET} evaluate-notebook-runs
     """
  }
This stage runs the Databricks CLI, which in turn instructs your workspace to run a Python file job. This Python file determines the failure and success criteria for the notebook job run and reports this failure or success result. Create a file named evaluate_notebook_runs.py with the following contents in the root of your cloned repository in your local development machine:
import unittest
import xmlrunner
import json
import glob
import os

class TestJobOutput(unittest.TestCase):

  test_output_path = f"/Workspace${os.getenv('WORKSPACEBUNDLEPATH')}/Validation/Output"

  def test_performance(self):
    path = self.test_output_path
    statuses = []

    for filename in glob.glob(os.path.join(path, '*.json')):
      print('Evaluating: ' + filename)

      with open(filename) as f:
        data = json.load(f)

        duration = data['tasks'][0]['execution_duration']

        if duration > 100000:
            status = 'FAILED'
        else:
            status = 'SUCCESS'

        statuses.append(status)
        f.close()

    self.assertFalse('FAILED' in statuses)

  def test_job_run(self):
    path = self.test_output_path
    statuses = []

    for filename in glob.glob(os.path.join(path, '*.json')):
      print('Evaluating: ' + filename)

      with open(filename) as f:
        data = json.load(f)
        status = data['state']['result_state']
        statuses.append(status)
        f.close()

    self.assertFalse('FAILED' in statuses)

if __name__ == '__main__':
  unittest.main(
    testRunner = xmlrunner.XMLTestRunner(
      output = f"/Workspace${os.getenv('WORKSPACEBUNDLEPATH')}/Validation/Output/test-results",
    ),
    failfast   = False,
    buffer     = False,
    catchbreak = False,
    exit       = False
  )
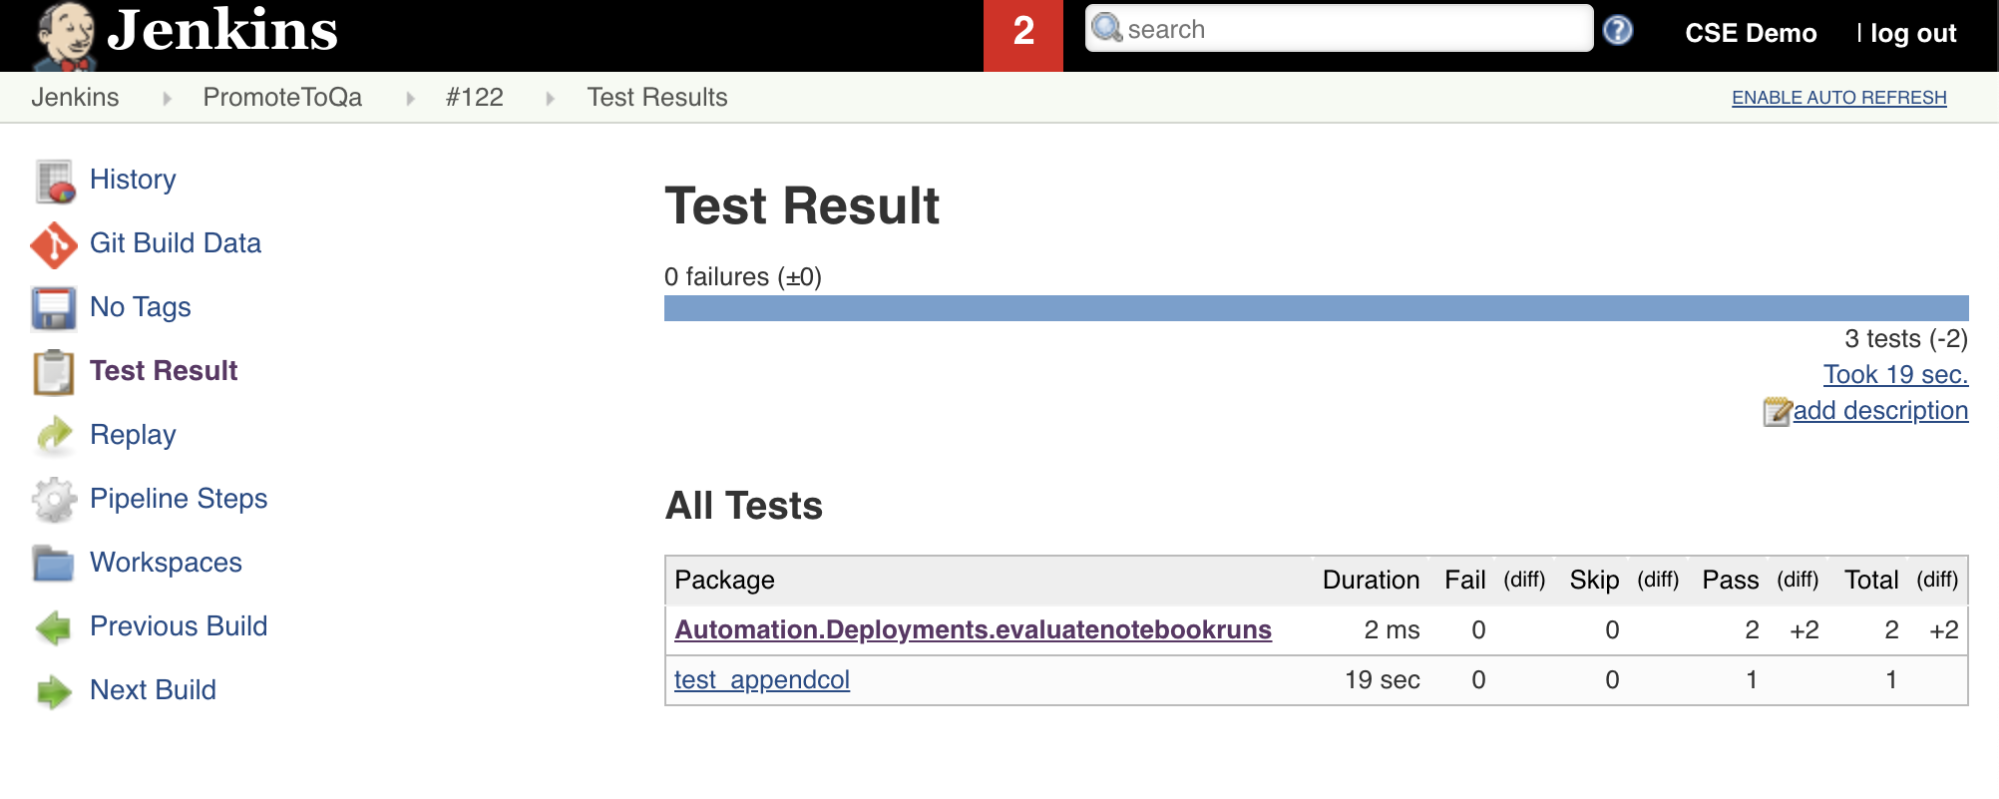
Import and report test results
The seventh stage in this Jenkins Pipeline, titled Import Test Results, uses the Databricks CLI to send the test results from your workspace over to your local development machine. The eighth and final stage, titled Publish Test Results, publishes the test results to Jenkins by using the junit Jenkins plugin. This enables you to visualize reports and dashboards related to the status of the test results. These stages are defined as follows:
stage('Import Test Results') {
  def DATABRICKS_BUNDLE_WORKSPACE_FILE_PATH
  def getPath = "${DBCLIPATH}/databricks bundle validate -t ${BUNDLETARGET} | ${JQPATH}/jq -r .workspace.file_path"
  def output = sh(script: getPath, returnStdout: true).trim()

  if (output) {
    DATABRICKS_BUNDLE_WORKSPACE_FILE_PATH = "${output}"
  } else {
    error "Failed to capture output or command execution failed: ${getPath}"
  }

  sh """#!/bin/bash
        ${DBCLIPATH}/databricks workspace export-dir \
        ${DATABRICKS_BUNDLE_WORKSPACE_FILE_PATH}/Validation/Output/test-results \
        ${WORKSPACE}/Validation/Output/test-results \
        --overwrite
     """
}
stage('Publish Test Results') {
  junit allowEmptyResults: true, testResults: '**/test-results/*.xml', skipPublishingChecks: true
}
Push all code changes to your third-party repository
You should now push the contents of your cloned repository on your local development machine to your third-party repository. Before you push, you should first add the following entries to the .gitignore file in your cloned repository, as you should probably not push internal Databricks Asset Bundle working files, validation reports, Python build files, and Python caches into your third-party repository. Typically, you will want to regenerate new validation reports and the lastest Python wheel builds in your Azure Databricks workspace, instead of using potentially out-of-date validation reports and Python wheel builds:
.databricks/
.vscode/
Libraries/python/dabdemo/build/
Libraries/python/dabdemo/__pycache__/
Libraries/python/dabdemo/dabdemo.egg-info/
Validation/
Run your Jenkins Pipeline
You are now be ready to run your Jenkins Pipeline manually. To do this, from your Jenkins Dashboard:
- Click the name of your Jenkins Pipeline.
- On the sidebar, click Build Now.
- To see the results, click the latest Pipeline run (for example,
#1) and then click Console Output.
At this point, the CI/CD pipeline has completed an integration and deployment cycle. By automating this process, you can ensure that your code has been tested and deployed by an efficient, consistent, and repeatable process. To instruct your third-party Git provider to run Jenkins every time a specific event happens, such as a repository pull request, see your third-party Git provider’s documentation.
Feedback
Coming soon: Throughout 2024 we will be phasing out GitHub Issues as the feedback mechanism for content and replacing it with a new feedback system. For more information see: https://aka.ms/ContentUserFeedback.
Submit and view feedback for