Tutorial: Migrate a WebLogic Server cluster to Azure with Azure Application Gateway as a load balancer
This tutorial walks you through the process of deploying WebLogic Server (WLS) with Azure Application Gateway. It covers the specific steps for creating a Key Vault, storing a TLS/SSL certificate in the Key Vault, and using that certificate for TLS/SSL termination. While all of these elements are well documented in their own right, this tutorial shows the specific way all of these elements come together to create a simple, yet powerful load-balancing solution for WLS on Azure.

Load balancing is an essential part of migrating your Oracle WebLogic Server cluster to Azure. The easiest solution is to use the built-in support for Azure Application Gateway. App Gateway is included as part of the WebLogic Cluster support on Azure. For an overview of WebLogic Cluster support on Azure, see What is Oracle WebLogic Server on Azure?.
In this tutorial, you learn how to:
- Choose how to provide the TLS/SSL certificate to the App Gateway
- Deploy WebLogic Server with Azure Application Gateway to Azure
- Validate successful deployment of WLS and App Gateway
Prerequisites
OpenSSL on a computer running a UNIX-like command-line environment.
While there could be other tools available for certificate management, this tutorial uses OpenSSL. You can find OpenSSL bundled with many GNU/Linux distributions, such as Ubuntu.
An active Azure subscription.
- If you don't have an Azure subscription, create a free account.
The ability to deploy one of the WLS Azure Applications listed at Oracle WebLogic Server Azure Applications.
Migration context
Here are some things to consider about migrating on-premise WLS installations and Azure Application Gateway. While the steps of this tutorial are the easiest way to stand up a load-balancer in front of your WebLogic Server Cluster on Azure, there are many other ways to do it. This list shows some other things to consider.
- If you have an existing load-balancing solution, ensure that its capabilities are met or exceeded by Azure Application Gateway. For a summary of the capabilities of Azure Application Gateway compared to other Azure load-balancing solutions, see Overview of load-balancing options in Azure.
- If your existing load-balancing solution provides security protection from common exploits and vulnerabilities, the Application Gateway has you covered. Application Gateway's built-in Web Application Firewall (WAF) implements the OWASP (Open Web Application Security Project) core rule sets. For more information on WAF support in Application Gateway, see the Web Application Firewall section of Azure Application Gateway features.
- If your existing load-balancing solution requires end-to-end TLS/SSL encryption, you'll need to do additional configuration after following the steps in this guide. See the End-to-end TLS encryption section of Overview of TLS termination and end to end TLS with Application Gateway and the Oracle documentation on Configuring SSL in Oracle Fusion Middleware.
- If you're optimizing for the cloud, this guide shows you how to start from scratch with Azure App Gateway and WLS.
- For a comprehensive survey of migrating WebLogic Server to Azure Virtual Machines, see Migrate WebLogic Server applications to Azure Virtual Machines.
Deploy WebLogic Server with Application Gateway to Azure
This section will show you how to provision a WLS cluster with Azure Application Gateway automatically created as the load balancer for the cluster nodes. The Application Gateway will use the provided TLS/SSL certificate for TLS/SSL termination. For advanced details on TLS/SSL termination with Application Gateway, see Overview of TLS termination and end to end TLS with Application Gateway.
To create the WLS cluster and Application Gateway, use the following steps.
First, begin the process of deploying a WebLogic Server configured or dynamic cluster as described in the Oracle documentation, but come back to this page when you reach Azure Application Gateway, as shown here.
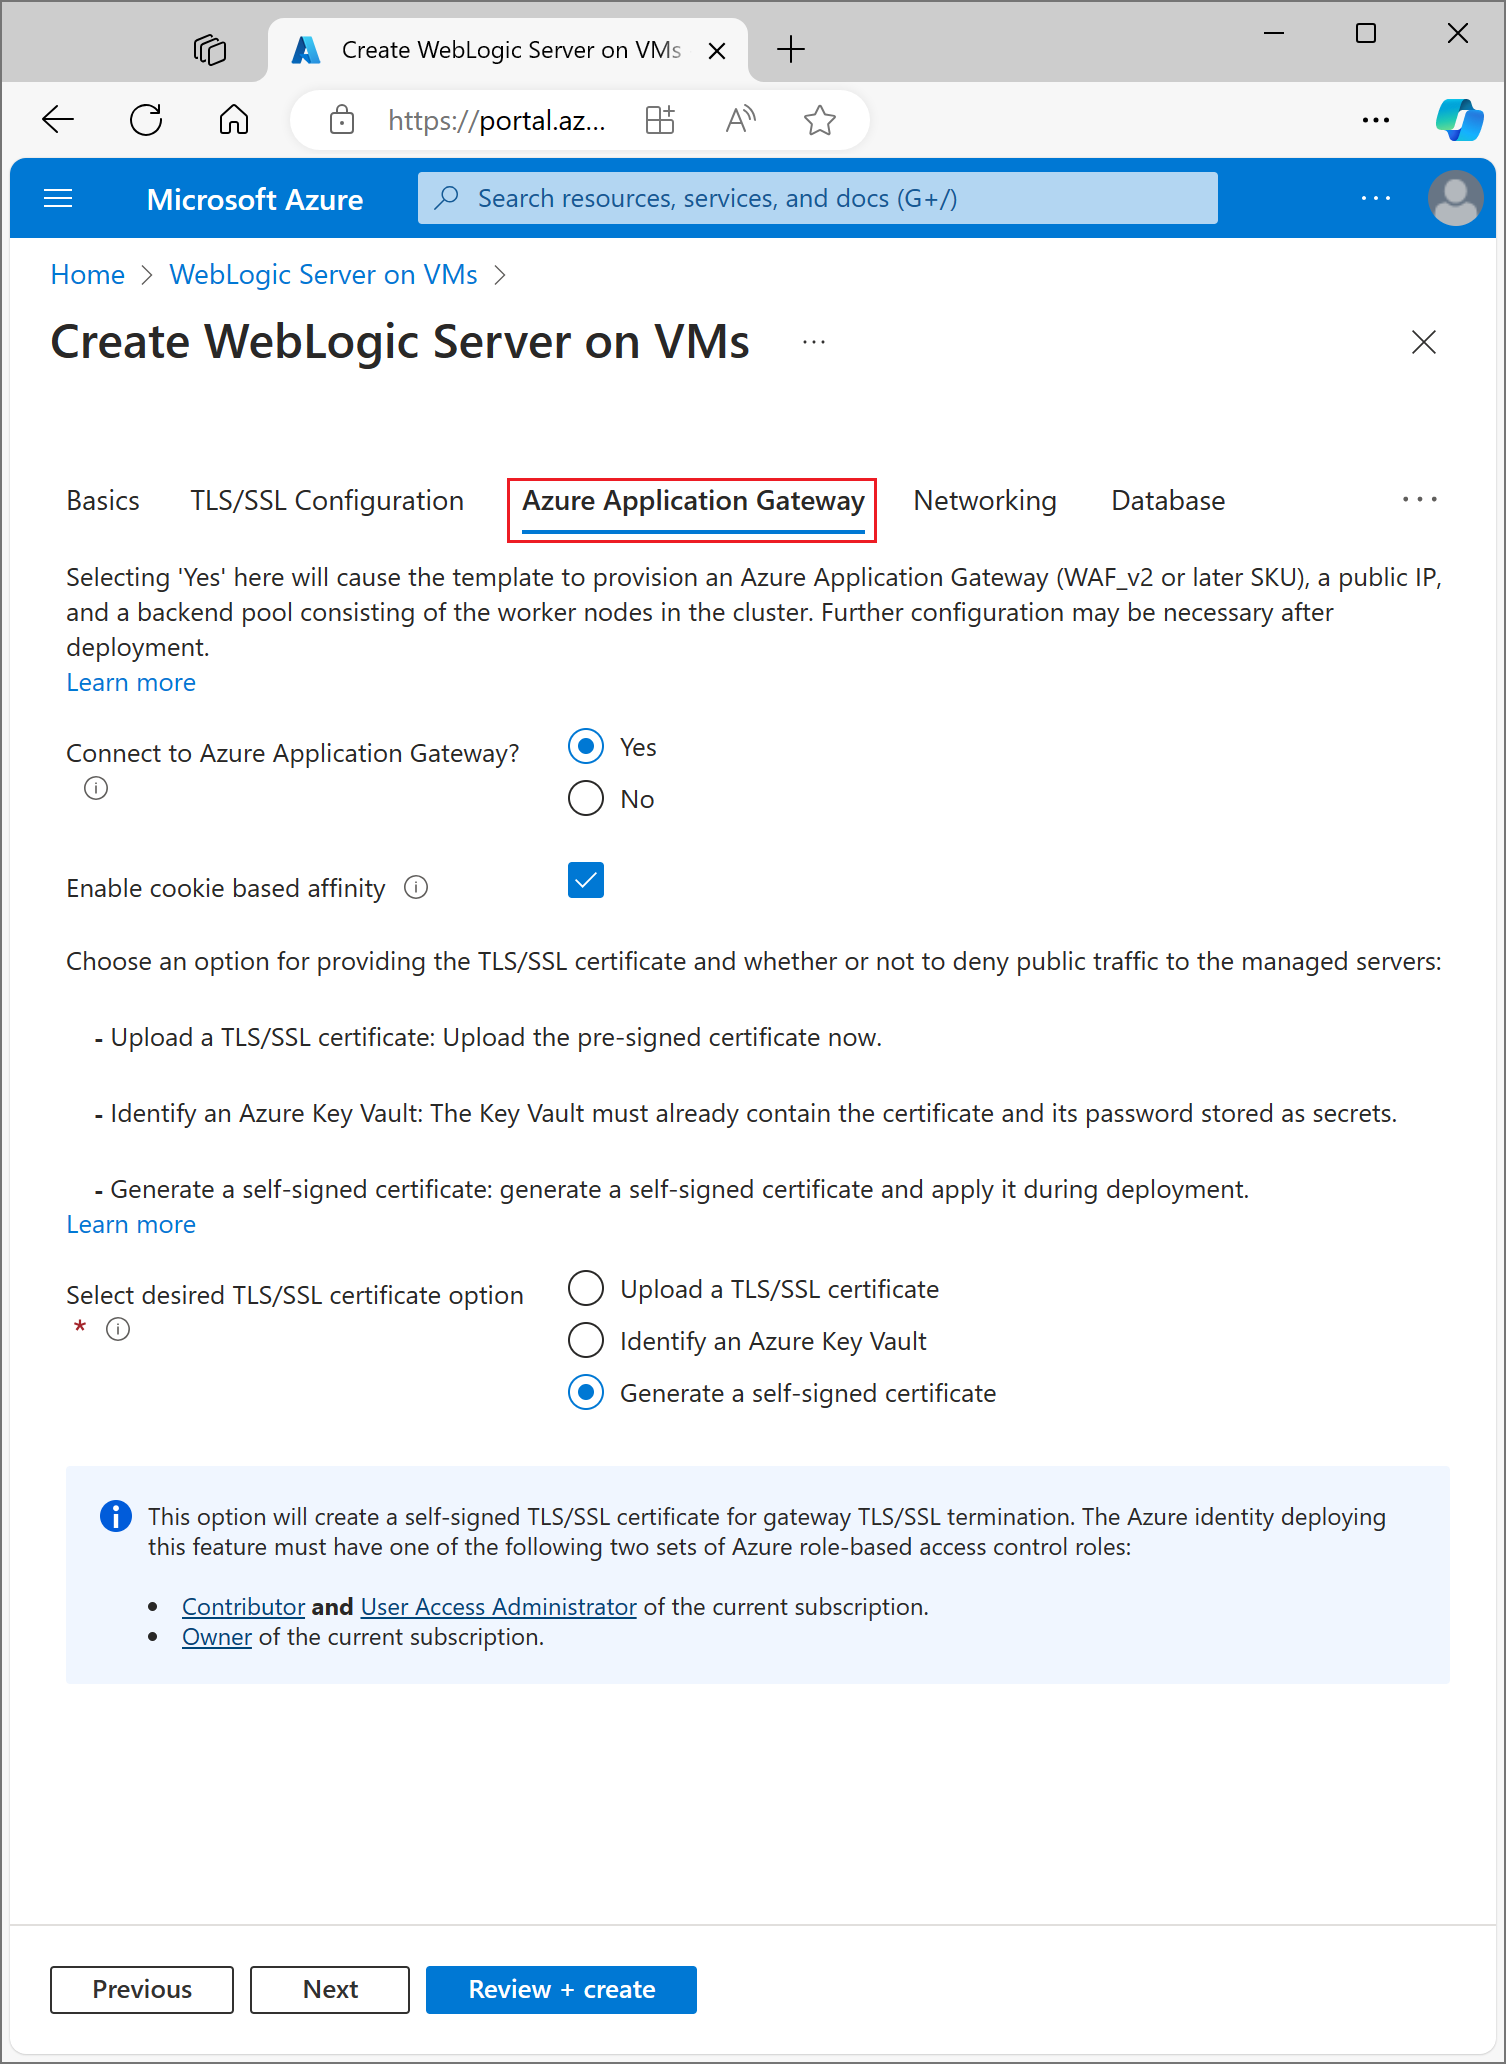
Choose how to provide the TLS/SSL certificate to the App Gateway
You have several options to provide the TLS/SSL certificate to the application gateway, but can only choose one. This section explains each option so you can choose the best one for your deployment.
Option one: Upload an TLS/SSL certificate
This option is suitable for production workloads where the App Gateway faces the public Internet, or for intranet workloads that require TLS/SSL. By choosing this option, an Azure Key Vault is automatically provisioned to contain the TLS/SSL certificate used by the App Gateway.
To upload an existing, signed, TLS/SSL certificate, use the following steps:
- Follow the steps from your certificate issuer to create a password-protected TLS/SSL certificate and specify the DNS name for the certificate. How to choose wildcard vs. single-name certificate is beyond the scope of this document. Either one will work here.
- Export the certificate from your issuer using the PFX file format and download it to your local machine. If your issuer doesn't support exporting as PFX, tools exist to convert many certificate formats to PFX format.
- Select the Azure Application Gateway section.
- Next to Connect to Azure Application Gateway, select Yes.
- Select Upload an SSL certificate.
- Select the file browser icon for the field SSL certificate. Navigate to the downloaded PFX format certificate and select Open.
- Enter the password for the certificate in the Password and Confirm password boxes.
- Choose whether or not to deny public traffic directly to the nodes of the managed servers. Selecting Yes will make it so the managed servers are only accessible through the App Gateway.
Select DNS Configuration
TLS/SSL certificates are associated with a DNS domain name at the time they're issued by the certificate issuer. Follow the steps in this section to configure the deployment with the DNS name for the certificate. You can use a DNS Zone you already have created or allow the deployment to create one for you. Select the DNS Configuration section to continue.
Use an existing Azure DNS Zone
To use an existing Azure DNS Zone with the App Gateway, use the following steps:
- Next to Configure Custom DNS Alias, select Yes.
- Next to Use an existing Azure DNS Zone select Yes.
- Enter the name of the Azure DNS Zone next to DNS Zone Name.
- Enter the resource group that contains the Azure DNS Zone from the preceding step.
Allow the deployment to create a new Azure DNS Zone
To create an Azure DNS Zone to use with the App Gateway, use the following steps:
- Next to Configure Custom DNS Alias, select Yes.
- Next to Use an existing Azure DNS Zone select No.
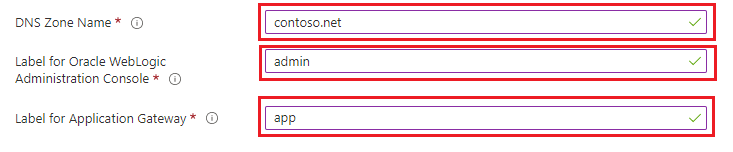
- Enter the name of the Azure DNS Zone next to DNS Zone Name. A new DNS Zone will be created in the same resource group as WLS.
Finally, specify the names for the child DNS zones. The deployment will create two child DNS zones for use with WLS: one for the admin console, and one for the App Gateway. For example, if your DNS Zone Name was 'contoso.net', you could enter admin and app as the values. The admin console would be available at 'admin.contoso.net' and the app gateway would be available at 'app.contoso.net'. Don't forget set up DNS delegation as described in Delegation of DNS zones with Azure DNS.
The other options for providing an TLS/SSL certificate to the App Gateway are detailed in the following sections. If you're satisfied with your chosen option, you can skip to the section Continue with deployment.
Option two: Identify an Azure Key Vault
This option is suitable for production or non-production workloads, depending on the TLS/SSL certificate provided. If you don't want the deployment to create an Azure Key Vault, you can identify an existing one or create one yourself. This option requires you to store the certificate and its password in the Azure Key Vault before continuing. If you have an existing Key Vault you want to use, skip to the section Create a TLS/SSL certificate. Otherwise, continue to the next section.
Create an Azure Key Vault
This section shows how to use the Azure portal to create an Azure Key Vault.
- From the Azure portal menu, or from the Home page, select Create a resource.
- In the Search box, enter Key Vault.
- From the results list, choose Key Vault.
- On the Key Vault section, choose Create.
- On the Create key vault section provide the following information:
- Subscription: Choose a subscription.
- Under Resource group, choose Create new and enter a resource group name. Take note of the key vault name. You'll need it later when deploying WLS.
- Key Vault Name: A unique name is required. Take note of the key vault name. You'll need it later when deploying WLS.
Note
You may use the same name for both Resource group and Key vault name.
- In the Location pull-down menu, choose a location.
- Leave the other options to their defaults.
- Select Next: Access Policy.
- Under Enable Access to, select Azure Resource Manager for template deployment.
- Select Review + Create.
- Select Create.
Key vault creation is fairly lightweight, typically completing in less than two minutes. When deployment completes, select Go to resource and continue to the next section.
Create a TLS/SSL certificate
This section shows how to create a self-signed TLS/SSL certificate in a format suitable for use by Application Gateway deployed with WebLogic Server on Azure. The certificate must have a non-empty password. If you already have a valid, non-empty password TLS/SSL certificate in .pfx format, you can skip this section and move on to the next. If your existing, valid, non-empty password TLS/SSL certificate is not in the .pfx format, first convert it to a .pfx file before skipping to the next section. Otherwise, open a command shell and enter the following commands.
Note
This section shows how to base 64 encode the certificate before storing it as a secret in the Key Vault. This is required by the underlying Azure deployment that creates the WebLogic Server and Application Gateway.
Follow these steps to create and base 64 encode the certificate:
Create an
RSA PRIVATE KEYopenssl genrsa 2048 > private.pemCreate a corresponding public key.
openssl req -x509 -new -key private.pem -out public.pemYou'll have to answer several questions when prompted by the OpenSSL tool. These values will be included in the certificate. This tutorial uses a self-signed certificate, therefore the values are irrelevant. The following literal values are fine.
- For Country Name, enter a two letter code.
- For State or Province Name, enter WA.
- For Organization Name, enter Contoso. For Organizational Unit Name enter billing.
- For Common Name, enter Contoso.
- For Email Address, enter billing@contoso.com.
Export the certificate as a .pfx file
openssl pkcs12 -export -in public.pem -inkey private.pem -out mycert.pfxEnter the password twice. Take note of the password. You'll need it later when deploying WLS.
Base 64 encode the mycert.pfx file
base64 mycert.pfx > mycert.txt
Now that you have a Key Vault and a valid TLS/SSL certificate with a non-empty password, you can store the certificate in the Key Vault.
Store the TLS/SSL certificate in the Key Vault
This section shows how to store the certificate and its password in the Key Vault created in the preceding sections.
To store the certificate, follow these steps:
- From the Azure portal, put the cursor in the search bar at the top of the page and type the name of the Key Vault you created earlier in the tutorial.
- Your Key Vault should appear under the Resources heading. Select it.
- In the Settings section, select Secrets.
- Select Generate/Import.
- Under Upload options, leave the default value.
- Under Name, enter
myCertSecretData, or whatever name you like. - Under Value, enter the content of the mycert.txt file. The length of the value, and the presence of newlines, aren't a problem for the text field.
- Leave the remaining values at their defaults and select Create.
To store the password for the certificate, follow these steps:
- You'll be returned to the Secrets page. Select Generate/Import.
- Under Upload options, leave the default value.
- Under Name, enter
myCertSecretPassword, or whatever name you like. - Under Value, enter the password for the certificate.
- Leave the remaining values at their defaults and select Create.
- You'll be returned to the Secrets page.
Identify the Key Vault
Now that you have a Key Vault with a signed TLS/SSL certificate and its password stored as secrets, return to the Azure Application Gateway section to identify the Key Vault for the deployment.
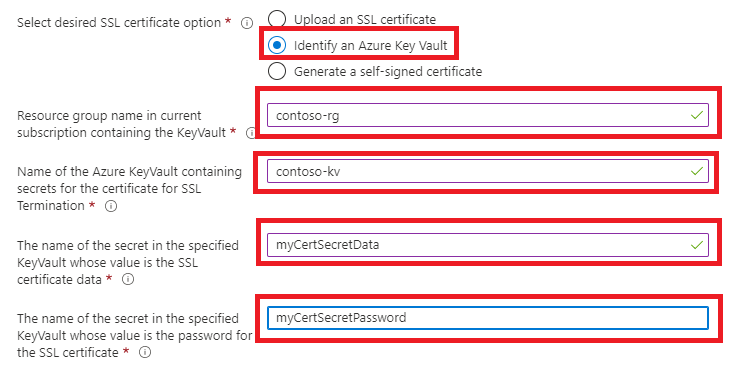
- Under Resource group name in current subscription containing the KeyVault, enter the name of the resource group containing the Key Vault you created earlier.
- Under Name of the Azure KeyVault containing secrets for the Certificate for SSL Termination, enter the name of the Key Vault.
- Under The name of the secret in the specified KeyVault whose value is the SSL Certificate Data, enter
myCertSecretData, or whatever name you entered previously. - Under The name of the secret in the specified KeyVault whose value is the password for the SSL Certificate, enter
myCertSecretData, or whatever name you entered previously. - Select Review + Create.
- Select Create. This will do a validation the certificate can be obtained from the Key Vault, and that its password matches the value you stored in for the password in the Key Vault. If this validation step fails, review the properties of the Key Vault, ensure the certificate was entered correctly, and ensure the password was entered correctly.
- Once you see Validation passed, select Create.
This will start the process of creating the WLS cluster and its front-end Application Gateway, which may take about 15 minutes. When the deployment completes, select Go to resource group. From the list of resources in the resource group, select myAppGateway.
The final option for providing a TLS/SSL certificate to the App Gateway is detailed in the next section. If you're satisfied with your chosen option, you can skip to the section Continue with deployment.
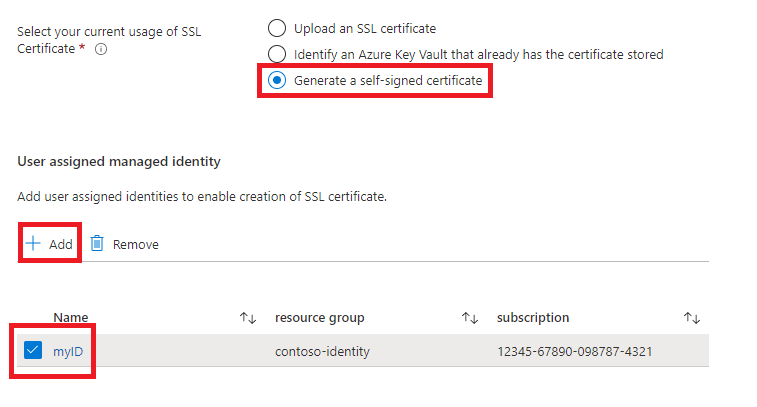
Option three: Generate a self-signed certificate
This option is suitable for test and development deployments only. With this option, both an Azure Key Vault and a self-signed certificate are automatically created, and the certificate is provided to App Gateway.
To request the deployment to perform these actions, use the following steps:
- In the Azure Application Gateway section, select Generate a self-signed certificate.
- Select a user-assigned managed identity. This is necessary to allow the deployment to create the Azure Key Vault and certificate.
- If you don't already have a user-assigned managed identity, select Add to begin the process of creating one.
- To create a user-assigned managed identity, follow the steps in the Create a user-assigned managed identity section of Create, list, delete, or assign a role to a user-assigned managed identity using the Azure portal. Once you've selected the user-assigned managed identity, make sure the checkbox next to the user-assigned managed identity is checked.
Continue with deployment
You can now continue with the other aspects of the WLS deployment as described in the Oracle documentation.
Validate successful deployment of WLS and App Gateway
This section shows a technique to quickly validate the successful deployment of the WLS cluster and Application Gateway.
If you had selected Go to resource group and then myAppGateway at the end of the preceding section, you'll be looking at overview page for the Application Gateway. If not, you can find this page by typing myAppGateway in the text box at the top of the Azure portal, and then selecting the correct one that appears. Be sure to select the one within the resource group you created for the WLS cluster. Then, complete the following steps.
- In the left pane of the overview page for myAppGateway, scroll down to the Monitoring section and select Backend health.
- After the loading message disappears, you should see a table in the middle of the screen showing the nodes of your cluster configured as nodes in the backend pool.
- Verify that the status shows Healthy for each node.
Clean up resources
If you're not going to continue to use the WLS cluster, delete the Key Vault and the WLS Cluster with the following steps:
- Visit the overview page for myAppGateway as shown in the preceding section.
- At the top of the page, under the text Resource group, select the resource group.
- Select Delete resource group.
- The input focus will be set to the field labeled TYPE THE RESOURCE GROUP NAME. Type the resource group name as requested.
- This will cause the Delete button to become enabled. Select the Delete button. This operation will take some time, but you can continue to the next step while the deletion is processing.
- Locate the Key Vault by following the first step of the section Store the TLS/SSL certificate in the Key Vault.
- Select Delete.
- Select Delete in the pane that appears.
Next steps
Continue to explore options to run WLS on Azure.
Feedback
Coming soon: Throughout 2024 we will be phasing out GitHub Issues as the feedback mechanism for content and replacing it with a new feedback system. For more information see: https://aka.ms/ContentUserFeedback.
Submit and view feedback for