Use security groups to manage users and groups
Azure DevOps Services | Azure DevOps Server 2022 - Azure DevOps Server 2019
To manage permissions and access, use security groups. You can use default or custom groups to set permissions. You can add users and groups to multiple groups. For instance, you add most developers to the Contributors group. When they join a team, they also join the team’s group.
For more information, see the following articles:
- Add Active Directory / Microsoft Entra users or groups to a built-in security group
- Add users & manage access
- Add users or groups to a team or project
- Remove user accounts
- Grant or restrict access using permissions
- Change project-level permissions
- Change project collection-level permissions
Users inherit permissions from the group(s) that they belong to. If a permission is set to Allow for one group and Deny for another group to which the user belongs, then their effective permission assignment is Deny. For more information, see About permissions/Inheritance.
How Azure DevOps uses security groups
Azure DevOps uses security groups for the following purposes:
- Determine permissions allocated to a group or user
- Determine access level allocated to a group or user
- Filter work item queries based on membership within a group
- Use @mention of a project-level group to send email notifications to members of that group
- Send team notifications to members of a team group
- Add a group to a role-based permission
- Set object-level permissions to a security group
Note
Security groups belong to the organization level, even if they only access a specific project. Some groups may be hidden in the web portal depending on user permissions. You can find all group names in an organization with the azure devops CLI tool or our REST APIs. For more information, see Add and manage security groups.
Note
Security groups belong to the collection level, even if they only access a specific project. Some groups may be hidden in the web portal depending on user permissions. You can find all group names in an organization with the azure devops CLI tool or our REST APIs. For more information, see Add and manage security groups.
Note
Security groups belong to the collection level, even if they only access a specific project. Some groups may be hidden in the web portal depending on user permissions. However, you can discover the names of all groups in an organization using the REST APIs. For more information, see Add and manage security groups.
Prerequisites
- To manage permissions or groups at the project level, you must be a member of the Project Administrators Group. If you created the project, you're automatically added as a member of this group.
- To manage permissions or groups at the collection or instance level, you must be a member of the Project Collection Administrators Group. If you created the organization or collection, you're automatically added as a member of this group.
Note
Users added to the Project-Scoped Users group can't access most Organization Settings pages, including Permissions. For more information, see Manage your organization, Limit user visibility for projects and more.
Create a custom security group
Create a project-level group when you want to manage permissions at the project- or object-level for a project. Create a collection-level group when you want to manage permissions at the collection level. For more information, see Change project-level permissions and Change project collection-level permissions.
Note
To turn on the Project Permissions Settings Page or the Organization Permissions Settings Page v2 preview pages, see Enable preview features. Both preview pages provide a group settings page that the current page doesn't.
Create a project-level group
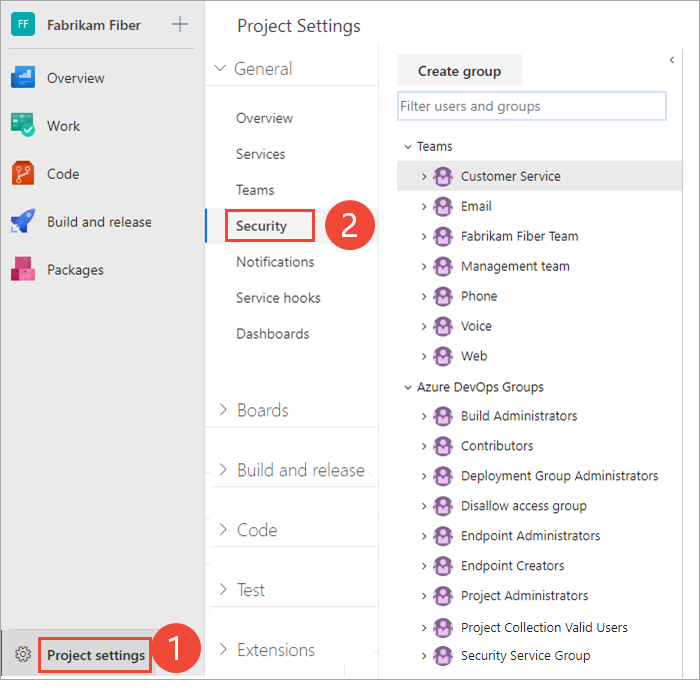
Open the web portal and select the project where you want to add users or groups. To choose another project, see Switch project, repository, team.
Select Project settings > Permissions.

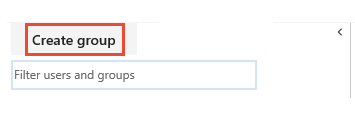
Select New Group to open the dialog for adding a group.
Create a project collection-level group
Open the web portal and select the
 Azure DevOps icon, and then select
  Organization settings.
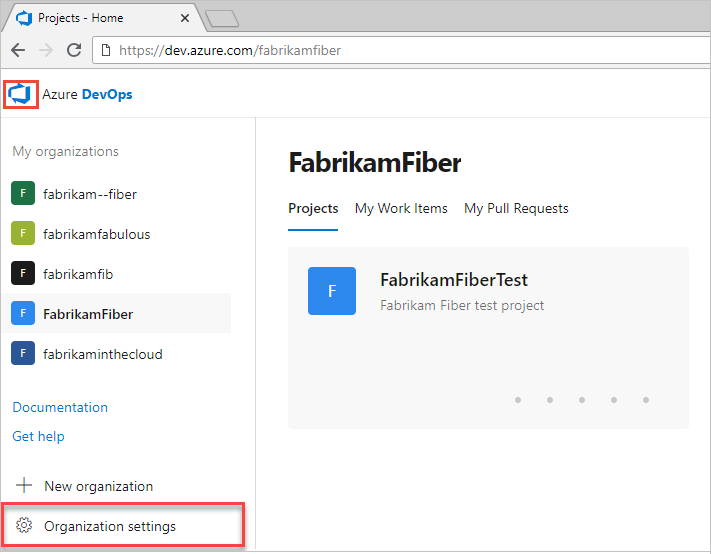
Under Security, select Permissions, and then choose New group to open the dialog for adding a group.

Define the new group
In the dialog that opens, enter a Name for the group. Optionally, add members and a description for the group.
For example, here we define a Work Tracking Administrators group.
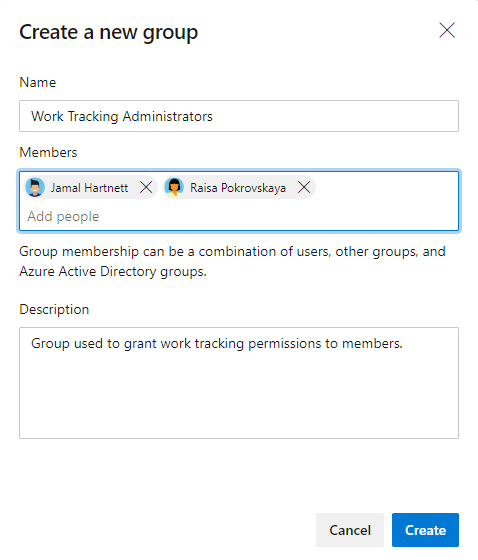
Choose Create when you're done.
Open the web portal and select the project where you want to add users or groups. To choose another project, see Switch project, repository, team.
Select Project settings > Security.
To see the full image, select to expand.
Under Groups, choose one of the following options:
- Readers: To add users who require read-only access to the project, choose.
- Contributors: To add users who contribute fully to this project or who have been granted Stakeholder access.
- Project Administrators: To add users who need to administrate the project. For more information, see Change project-level permissions.
Select the Members tab.
Here we choose the Contributors group.
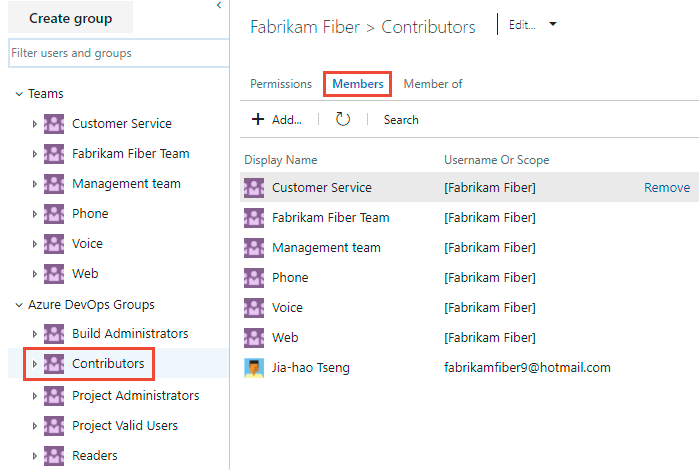
The default team group, and any other teams you add to the project, get included as members of the Contributors group. Add a new user as a member of a team instead, and the user automatically inherits Contributor permissions.
Tip
Managing users is much easier using groups, not individual users.
Choose
 Add to add a user or a user group.
Enter the name of the user account into the text box. You can enter several identities into the text box, separated by commas. The system automatically searches for matches. choose the match(es) that meets your requirements.
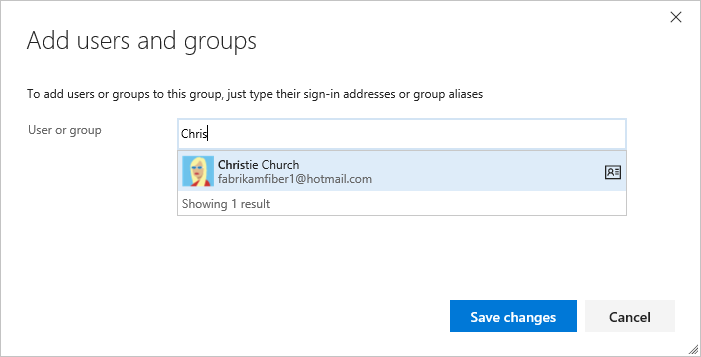
The first time you add a user or group to Azure DevOps, you can't browse to it or check the friendly name. After the identity gets added, you can just enter the friendly name.
Choose Save changes when you're done.
(Optional) You can customize a user's permission for other functionality in the project. For example, in areas and iterations or shared queries.
Note
Users with limited access, such as Stakeholders, can't access select features even if granted permissions to those features. For more information, see Permissions and access.

Add users or groups to a security group
As roles and responsibilities change, you might need to change the permission levels for individual members of a project. The easiest way to do that is to add the user or a group of users to either a default or custom security group. If roles change, you can then remove the user from a group.
Here we show how to add a user to the built-in Project Administrators group. The method is similar no matter what group you're adding. If your organization is connected to Microsoft Entra ID or Active Directory, then you can add security groups defined in those directories to Azure DevOps security groups. For more information, see Add Active Directory / Microsoft Entra users or groups to a built-in security group. If you need to add more than 10k users or groups to an Azure DevOps security group, we recommend adding an Azure Directory / Microsoft Entra group containing the users, instead of adding the users directly.
Note
To turn on the Project Permissions Settings Page or the Organization Permissions Settings Page v2 preview pages, see Enable preview features. Both preview pages provide a group settings page that the current page doesn't.
Open the Permissions page for either the project-level or organization-level as described in the previous section, Create a custom security group.
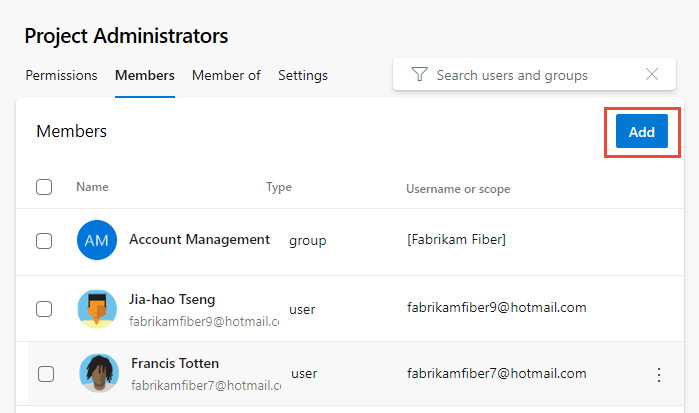
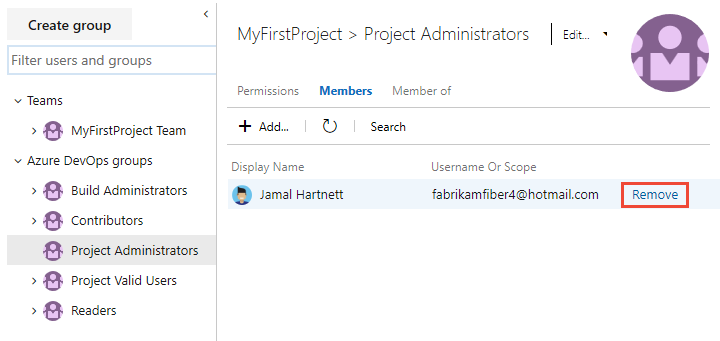
Choose the security group whose members you want to manage, then choose the Members tab, and then choose Add.
For example, here we choose the Project Administrators group, Members, and then Add.
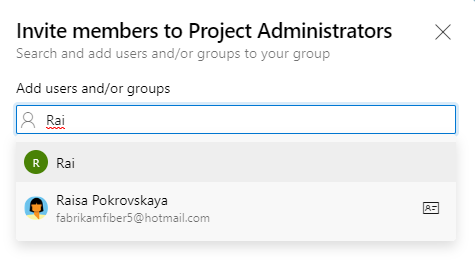
Enter the name of the user account into the text box and then select from the match that appears. You can enter several identities recognized by the system into the Add users and/or groups box. The system automatically searches for matches. Choose the matches that meet your choices.
Note
Users with limited access, such as Stakeholders, can't access select features even if granted permissions to those features. For more information, see Permissions and access.
Select Save.
Open the Permissions page for either the project-level or organization-level as described in the previous section, Create a custom security group.
Choose the security group whose members you want to manage, then choose the Members tab, and then choose Add.
For example, here we choose the Project Administrators group, Members, and then Add.

Enter the name of the user account into the text box. You can enter several identities into the text box, separated by commas. The system automatically searches for matches. Choose the match(es) that meets your choice.
Note
Users with limited access, such as Stakeholders, can't access select features even if granted permissions to those features. For more information, see Permissions and access.
Choose Save changes. Choose the
 refresh icon to see the additions.
Change permissions for a user or group
Because permissions are defined at different levels, review the following articles to open the dialog for the permissions you want to change:
Remove users or groups from a security group
For the user or group you want to remove, select
 More options > Remove.
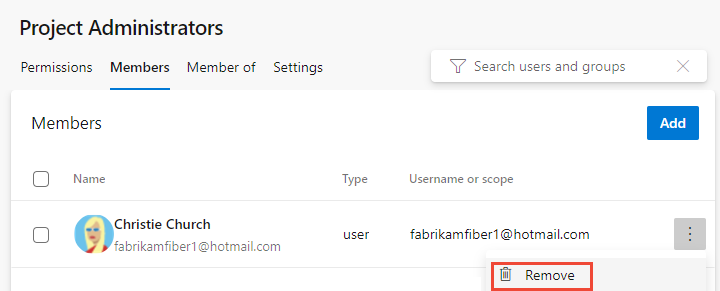
Select Delete to confirm removal of the group member.
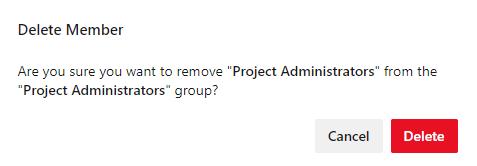
To remove a user from a group, choose Remove next to the user's name that you want to remove.
Manage group settings
Note
To turn on the Project Permissions Settings Page or the Organization Permissions Settings Page v2 preview pages, see Enable preview features. Both preview pages provide a group settings page that the current page doesn't.
Open the Permissions page for either the project-level or organization-level as described earlier in this article, Create a custom security group.
Choose the Settings tab. You can change a group description, add a group image, or delete a group through the group Settings page.
From the Project settings > Permissions or Organization settings > Permissions page, choose the group you want to manage, and then choose Settings.
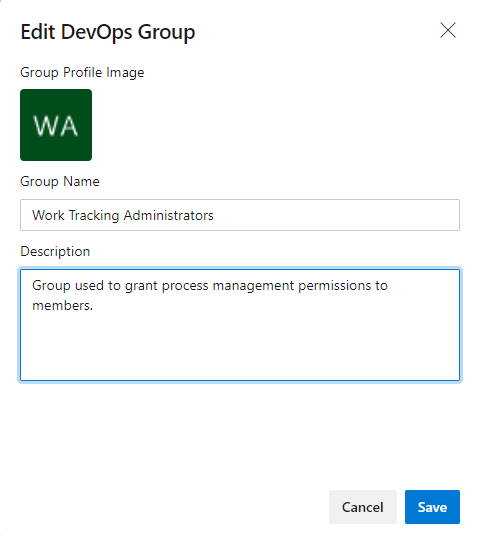
For example, here we open the Settings for the Work Tracking Administrators group.
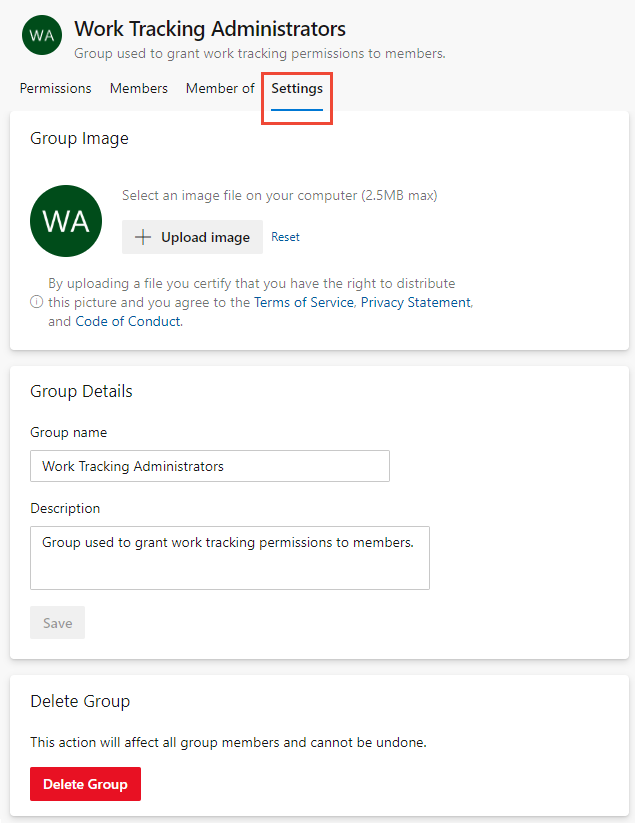
You can modify the group name, group description, upload an image, or delete the group.

You can change a group name, description, add a group image, or delete a group.
From the Project > Settings > Security or Organization > Settings > Security page, choose the group you want to manage
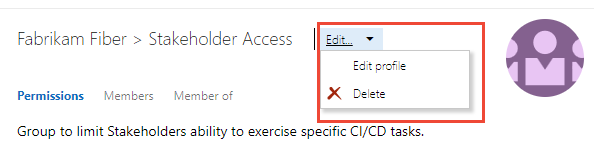
Choose from the Edit menu to either Edit profile or Delete.
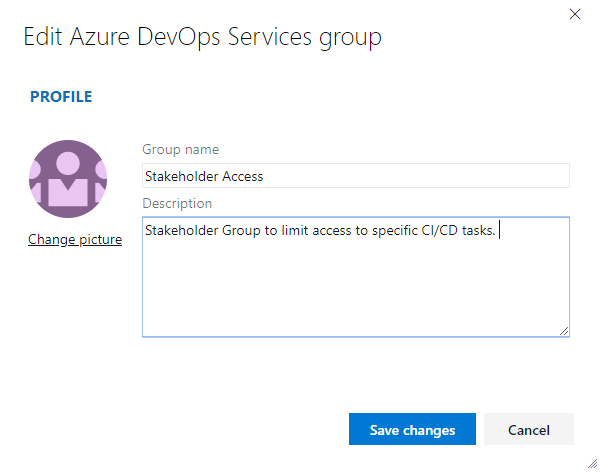
For example, here we open the Edit profile for the Stakeholder Access group.
. . . and change the description. You can change the name of the group as well.
Choose Save to save your changes.
On-premises deployments
For on-premises deployments, see these other articles:
If your on-premises deployment is integrated with SQL Server Reports, you need to manage membership for those products separately from their websites. See Grant permissions to view or create SQL Server reports in TFS.
Next steps
Related articles
Feedback
Coming soon: Throughout 2024 we will be phasing out GitHub Issues as the feedback mechanism for content and replacing it with a new feedback system. For more information see: https://aka.ms/ContentUserFeedback.
Submit and view feedback for