Self-hosted Linux agents
TFS 2017 | TFS 2015
Note
In Microsoft Team Foundation Server (TFS) 2018 and previous versions, build and release pipelines are called definitions, runs are called builds, service connections are called service endpoints, stages are called environments, and jobs are called phases.
To run your jobs, you'll need at least one agent. A Linux agent can build and deploy different kinds of apps, including Java and Android apps. We support Ubuntu, Red Hat, and CentOS.
Before you begin:
- If your pipelines are in Azure Pipelines and a Microsoft-hosted agent meets your needs, you can skip setting up a private Linux agent.
- Otherwise, you've come to the right place to set up an agent on Linux. Continue to the next section.
Learn about agents
If you already know what an agent is and how it works, feel free to jump right in to the following sections. But if you'd like some more background about what they do and how they work, see Azure Pipelines agents.
Check prerequisites
TFS 2018 RTM and older: The shipped agent is based on CoreCLR 1.0. We recommend that, if able, you should upgrade to a later agent version (2.125.0 or higher). See Azure Pipelines agent prereqs for more about what's required to run a newer agent.
If you must stay on the older agent, make sure your machine is prepared with our prerequisites for either of the supported distributions:
Subversion
If you're building from a Subversion repo, you must install the Subversion client on the machine.
You should run agent setup manually the first time. After you get a feel for how agents work, or if you want to automate setting up many agents, consider using unattended config.
TFVC
If you'll be using TFVC, you'll also need the Oracle Java JDK 1.6 or higher. (The Oracle JRE and OpenJDK aren't sufficient for this purpose.)
TEE plugin is used for TFVC functionality. It has an EULA, which you'll need to accept during configuration if you plan to work with TFVC.
Since the TEE plugin is no longer maintained and contains some out-of-date Java dependencies, starting from Agent 2.198.0 it's no longer included in the agent distribution. However, the TEE plugin will be downloaded during checkout task execution if you're checking out a TFVC repo. The TEE plugin will be removed after the job execution.
Note
Note: You may notice your checkout task taking a long time to start working because of this download mechanism.
If the agent is running behind a proxy or a firewall, you'll need to ensure access to the following site: https://vstsagenttools.blob.core.windows.net/. The TEE plugin will be downloaded from this address.
If you're using a self-hosted agent and facing issues with TEE downloading, you may install TEE manually:
- Set
DISABLE_TEE_PLUGIN_REMOVALenvironment or pipeline variable totrue. This variable prevents the agent from removing the TEE plugin after TFVC repository checkout. - Download TEE-CLC version 14.135.0 manually from Team Explorer Everywhere GitHub releases.
- Extract the contents of
TEE-CLC-14.135.0folder to<agent_directory>/externals/tee.
Prepare permissions
Information security for self-hosted agents
The user configuring the agent needs pool admin permissions, but the user running the agent does not.
The folders controlled by the agent should be restricted to as few users as possible and they contain secrets that could be decrypted or exfiltrated.
The ADO pipelines agent is a software product designed to execute code it downloads from external sources. It inherently could be a target for Remote Code Execution (RCE) attacks.
Therefore, it is important to consider the threat model surrounding each individual usage of Pipelines Agents to perform work, and decide what are the minimum permissions could be granted to the user running the agent, to the machine where the agent runs, to the users who have write access to the Pipeline definition, the git repos where the yaml is stored, or the group of users who control access to the pool for new pipelines.
It is a best practice to have the identity running the agent be different from the identity with permissions to connect the agent to the pool. The user generating the credentials (and other agent-related files) is different than the user that needs to read them. Therefore, it is safer to carefully consider access granted to the agent machine itself, and the agent folders which contain sensitive files, such as logs and artifacts.
It makes sense to grant access to the agent folder only for DevOps administrators and the user identity running the agent process. Administrators may need to investigate the file system to understand build failures or get log files to be able to report Azure DevOps failures.
Decide which user you'll use
As a one-time step, you must register the agent. Someone with permission to administer the agent queue must complete these steps. The agent will not use this person's credentials in everyday operation, but they're required to complete registration. Learn more about how agents communicate.
Authenticate with a personal access token (PAT)
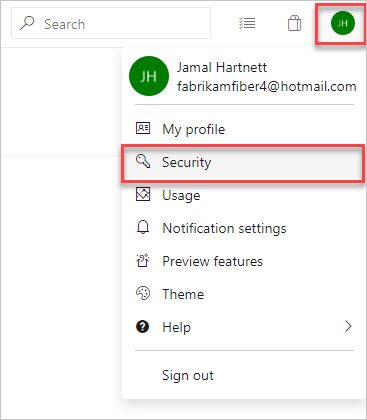
Sign in with the user account you plan to use in your Team Foundation Server web portal (
https://{your-server}:8080/tfs/).From your home page, open your profile. Go to your security details.
Create a personal access token.

For the scope select Agent Pools (read, manage) and make sure all the other boxes are cleared. If it's a deployment group agent, for the scope select Deployment group (read, manage) and make sure all the other boxes are cleared.
Select Show all scopes at the bottom of the Create a new personal access token window window to see the complete list of scopes.
Copy the token. You'll use this token when you configure the agent.
Authenticate as a Windows user (TFS 2015 and TFS 2017)
As an alternative, on TFS 2017, you can use either a domain user or a local Windows user on each of your TFS application tiers.
Confirm the user has permission
Make sure the user account that you're going to use has permission to register the agent.
Is the user an Azure DevOps organization owner or TFS or Azure DevOps Server administrator? Stop here, you have permission.
Otherwise:
Open a browser and navigate to the Agent pools tab for your Azure Pipelines organization or Azure DevOps Server or TFS server:
Navigate to your project and choose Settings (gear icon) > Agent Queues.

Choose Manage pools.

Select the pool on the right side of the page and then click Security.
If the user account you're going to use is not shown, then get an administrator to add it. The administrator can be an agent pool administrator, an Azure DevOps organization owner, or a TFS or Azure DevOps Server administrator.
If it's a deployment group agent, the administrator can be an deployment group administrator, an Azure DevOps organization owner, or a TFS or Azure DevOps Server administrator.
You can add a user to the deployment group administrator role in the Security tab on the Deployment Groups page in Azure Pipelines.
Note
If you see a message like this: Sorry, we couldn't add the identity. Please try a different identity., you probably followed the above steps for an organization owner or TFS or Azure DevOps Server administrator. You don't need to do anything; you already have permission to administer the agent queue.
Download and configure the agent
TFS 2017 and TFS 2018
Log on to the machine using the account for which you've prepared permissions as explained above.
In your web browser, sign in to TFS, and navigate to the Agent pools tab:
Navigate to your project and choose Settings (gear icon) > Agent Queues.

Choose Manage pools.

Click Download agent.
On the Get agent dialog box, click Linux.
Click the Download button.
Follow the instructions on the page.
Unpack the agent into the directory of your choice.
cdto that directory and run./config.sh. Make sure that the path to the directory contains no spaces because tools and scripts don't always properly escape spaces.
Server URL
TFS 2017: https://{your_server}/tfs
Authentication type
Azure Pipelines
Choose PAT, and then paste the PAT token you created into the command prompt window.
Note
When using PAT as the authentication method, the PAT token is used only for the initial configuration of the agent. Learn more at Communication with Azure Pipelines or TFS.
TFS or Azure DevOps Server
Important
Make sure your server is configured to support the authentication method you want to use.
When you configure your agent to connect to TFS, you've got the following options:
Alternate Connect to TFS or Azure DevOps Server using Basic authentication. After you select Alternate you'll be prompted for your credentials.
Integrated Not supported on macOS or Linux.
Negotiate (Default) Connect to TFS or Azure DevOps Server as a user other than the signed-in user via a Windows authentication scheme such as NTLM or Kerberos. After you select Negotiate you'll be prompted for credentials.
PAT Supported only on Azure Pipelines and TFS 2017 and newer. After you choose PAT, paste the PAT token you created into the command prompt window. Use a personal access token (PAT) if your Azure DevOps Server or TFS instance and the agent machine are not in a trusted domain. PAT authentication is handled by your Azure DevOps Server or TFS instance instead of the domain controller.
Note
When using PAT as the authentication method, the PAT token is used only for the initial configuration of the agent on Azure DevOps Server and the newer versions of TFS. Learn more at Communication with Azure Pipelines or TFS.
Run interactively
For guidance on whether to run the agent in interactive mode or as a service, see Agents: Interactive vs. service.
To run the agent interactively:
If you have been running the agent as a service, uninstall the service.
Run the agent.
./run.sh
To restart the agent, press Ctrl+C and then run run.sh to restart it.
To use your agent, run a job using the agent's pool. If you didn't choose a different pool, your agent will be in the Default pool.
Run once
For agents configured to run interactively, you can choose to have the agent accept only one job. To run in this configuration:
./run.sh --once
Agents in this mode will accept only one job and then spin down gracefully (useful for running in Docker on a service like Azure Container Instances).
Run as a systemd service
If your agent is running on these operating systems you can run the agent as a systemd service:
- Ubuntu 16 LTS or newer
- Red Hat 7.1 or newer
We provide an example ./svc.sh script for you to run and manage your agent as a systemd service.
This script will be generated after you configure the agent.
We encourage you to review, and if needed, update the script before running it.
Some important caveats:
- If you run your agent as a service, you cannot run the agent service as
rootuser. - Users running SELinux have reported difficulties with the provided
svc.shscript. Refer to this agent issue as a starting point. SELinux is not an officially supported configuration.
Note
If you have a different distribution, or if you prefer other approaches, you can use whatever kind of service mechanism you prefer. See Service files.
Commands
Change to the agent directory
For example, if you installed in the myagent subfolder of your home directory:
cd ~/myagent$
Install
Command:
sudo ./svc.sh install [username]
This command creates a service file that points to ./runsvc.sh. This script sets up the environment (more details below) and starts the agents host. If username parameter is not specified then the username is taken from the $SUDO_USER environment variable which is set by sudo command. This variable is always equal to the name of the user who invoked the sudo command.
Start
sudo ./svc.sh start
Status
sudo ./svc.sh status
Stop
sudo ./svc.sh stop
Uninstall
You should stop before you uninstall.
sudo ./svc.sh uninstall
Update environment variables
When you configure the service, it takes a snapshot of some useful environment variables for your current logon user such as PATH, LANG, JAVA_HOME, ANT_HOME, and MYSQL_PATH. If you need to update the variables (for example, after installing some new software):
./env.sh
sudo ./svc.sh stop
sudo ./svc.sh start
The snapshot of the environment variables is stored in .env file (PATH is stored in .path) under agent root directory, you can also change these files directly to apply environment variable changes.
Run instructions before the service starts
You can also run your own instructions and commands to run when the service starts. For example, you could set up the environment or call scripts.
Edit
runsvc.sh.Replace the following line with your instructions:
# insert anything to setup env when running as a service
Service files
When you install the service, some service files are put in place.
systemd service file
A systemd service file is created:
/etc/systemd/system/vsts.agent.{tfs-name}.{agent-name}.service
For example, you have configured an agent (see above) with the name our-linux-agent. The service file will be either:
Azure Pipelines: the name of your organization. For example if you connect to
https://dev.azure.com/fabrikam, then the service name would be/etc/systemd/system/vsts.agent.fabrikam.our-linux-agent.serviceTFS or Azure DevOps Server: the name of your on-premises server. For example if you connect to
http://our-server:8080/tfs, then the service name would be/etc/systemd/system/vsts.agent.our-server.our-linux-agent.service
sudo ./svc.sh install generates this file from this template: ./bin/vsts.agent.service.template
.service file
sudo ./svc.sh start finds the service by reading the .service file, which contains the name of systemd service file described above.
Alternative service mechanisms
We provide the ./svc.sh script as a convenient way for you to run and manage your agent as a systemd service. But you can use whatever kind of service mechanism you prefer (for example: initd or upstart).
You can use the template described above as to facilitate generating other kinds of service files.
Use a cgroup to avoid agent failure
It's important to avoid situations in which the agent fails or become unusable because otherwise the agent can't stream pipeline logs or report pipeline status back to the server. You can mitigate the risk of this kind of problem being caused by high memory pressure by using cgroups and a lower oom_score_adj. After you've done this, Linux reclaims system memory from pipeline job processes before reclaiming memory from the agent process. Learn how to configure cgroups and OOM score.
Replace an agent
To replace an agent, follow the Download and configure the agent steps again.
When you configure an agent using the same name as an agent that already exists,
you're asked if you want to replace the existing agent. If you answer Y,
then make sure you remove the agent (see below) that you're replacing. Otherwise,
after a few minutes of conflicts, one of the agents will shut down.
Remove and re-configure an agent
To remove the agent:
Stop and uninstall the service as explained above.
Remove the agent.
./config.sh removeEnter your credentials.
After you've removed the agent, you can configure it again.
Unattended config
The agent can be set up from a script with no human intervention.
You must pass --unattended and the answers to all questions.
./config.sh --help always lists the latest required and optional responses.
Diagnostics
If you're having trouble with your self-hosted agent, you can try running diagnostics. After configuring the agent:
./run.sh --diagnostics
This will run through a diagnostic suite that may help you troubleshoot the problem. The diagnostics feature is available starting with agent version 2.165.0.
Help on other options
To learn about other options:
./config.sh --help
The help provides information on authentication alternatives and unattended configuration.
Capabilities
Your agent's capabilities are cataloged and advertised in the pool so that only the builds and releases it can handle are assigned to it. See Build and release agent capabilities.
In many cases, after you deploy an agent, you'll need to install software or utilities. Generally you should install on your agents whatever software and tools you use on your development machine.
For example, if your build includes the npm task, then the build won't run unless there's a build agent in the pool that has npm installed.
Important
Capabilities include all environment variables and the values that are set when the agent runs. If any of these values change while the agent is running, the agent must be restarted to pick up the new values. After you install new software on an agent, you must restart the agent for the new capability to show up in the pool, so that the build can run.
If you want to exclude environment variables as capabilities, you can designate them by setting an environment variable VSO_AGENT_IGNORE with a comma-delimited list of variables to ignore.
FAQ
How do I make sure I have the latest v2 agent version?
Navigate to the Agent pools tab:
Navigate to your project and choose Settings (gear icon) > Agent Queues.
Choose Manage pools.
Click the pool that contains the agent.
Make sure the agent is enabled.
Navigate to the capabilities tab:
Select the desired agent, and choose the Capabilities tab.

Look for the
Agent.Versioncapability. You can check this value against the latest published agent version. See Azure Pipelines Agent and check the page for the highest version number listed.Each agent automatically updates itself when it runs a task that requires a newer version of the agent. If you want to manually update some agents, right-click the pool, and select Update all agents.
Can I update my v2 agents that are part of an Azure DevOps Server pool?
Yes. Beginning with Azure DevOps Server 2019, you can configure your server to look for the agent package files on a local disk. This configuration will override the default version that came with the server at the time of its release. This scenario also applies when the server doesn't have access to the internet.
From a computer with Internet access, download the latest version of the agent package files (in .zip or .tar.gz form) from the Azure Pipelines Agent GitHub Releases page.
Transfer the downloaded package files to each Azure DevOps Server Application Tier by using a method of your choice (such as USB drive, Network transfer, and so on). Place the agent files under the
%ProgramData%\Microsoft\Azure DevOps\Agentsfolder.You're all set! Your Azure DevOps Server will now use the local files whenever the agents are updated. Each agent automatically updates itself when it runs a task that requires a newer version of the agent. But if you want to manually update some agents, right-click the pool, and then choose Update all agents.
Why is sudo needed to run the service commands?
./svc.sh uses systemctl, which requires sudo.
Source code: systemd.svc.sh.template on GitHub
How do I run the agent with self-signed certificate?
Run the agent with self-signed certificate
How do I run the agent behind a web proxy?
Run the agent behind a web proxy
How do I restart the agent
If you are running the agent interactively, see the restart instructions in Run interactively. If you are running the agent as a systemd service, follow the steps to Stop and then Start the agent.
I use TFS on-premises and I don't see some of these features. Why not?
Some of these features are available only on Azure Pipelines and not yet available on-premises. Some features are available on-premises if you have upgraded to the latest version of TFS.