Sign your mobile app
Azure DevOps Services | Azure DevOps Server 2022 - Azure DevOps Server 2019
When developing an app for Android or Apple operating systems, you'll eventually need to manage signing certificates, and in the case of Apple apps, provisioning profiles. This article describes how to securely manage them for signing and provisioning your app.
Tip
Use a Microsoft-hosted Linux, macOS, or Windows build agent, or set up your own agent. See Build and release agents.
This article covers:
Sign your Android app
Follow these steps to sign your Android app while keeping your signing certificate secure:
First, obtain a keystore file that contains your signing certificate. The Android documentation describes the process of generating a keystore file and its corresponding key.
Create your build pipeline from the Android or Xamarin.Android build template. Or, if you already have a build pipeline, add the Android Signing task after the task that builds your APK.
Find the Android Signing task's Sign the APK checkbox and enable it.
Next to the Keystore file field, select the settings icon and upload your keystore file to the Secure Files library. During upload, your keystore will be encrypted and securely stored.
Once your keystore has been uploaded to the Secure Files library, select it in the Keystore file dropdown.
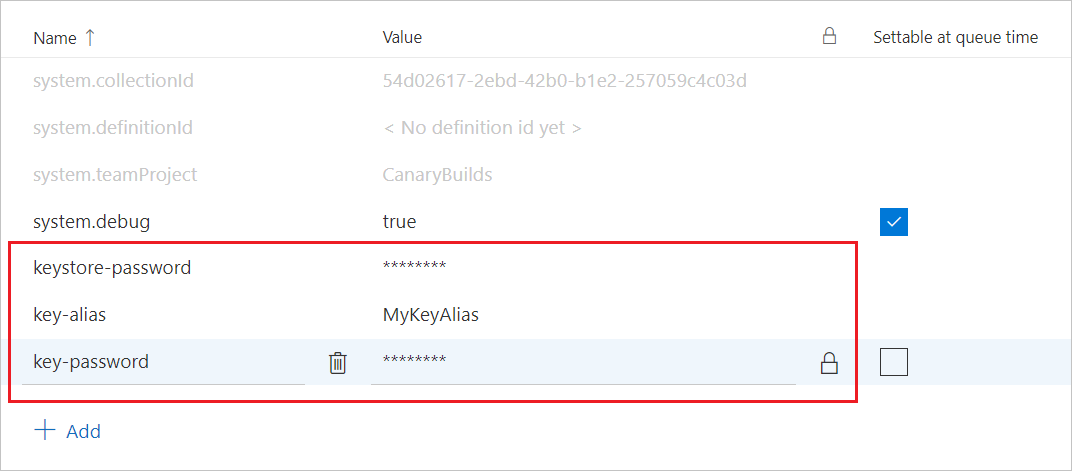
Go to the Variables tab and add the following variables. In their Value column, enter your Keystore password, Key alias, and Key password.
keystore-password: Password to the unencrypted keystore file. Be sure to select the lock icon. This will secure your password and obscure it in logs.
key-alias: The key alias for the signing certificate you generated.
key-password: The password for the key associated with the specified alias. Again, be sure to select the lock icon.
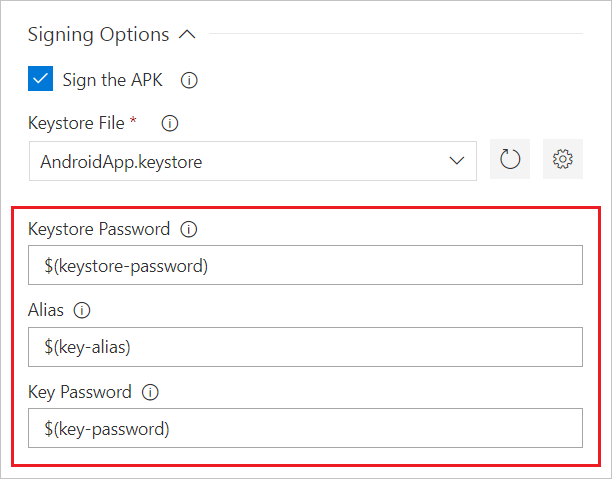
Go back to the Tasks tab and reference the names of your newly created variables in the signing options.
Save your build pipeline, and you're all set! Any build agent will now be able to securely sign your app without any certificate management on the build machine itself.
Sign your Apple iOS, macOS, tvOS, or watchOS app
For your Xcode or Xamarin.iOS build to sign and provision your app, it needs access to your P12 signing certificate and one or more provisioning profiles. The following sections explain how to obtain these files.
Obtain your P12 signing certificate
After creating your development or distribution signing certificate, export it to a .p12 file using either Xcode or the Keychain Access app on macOS.
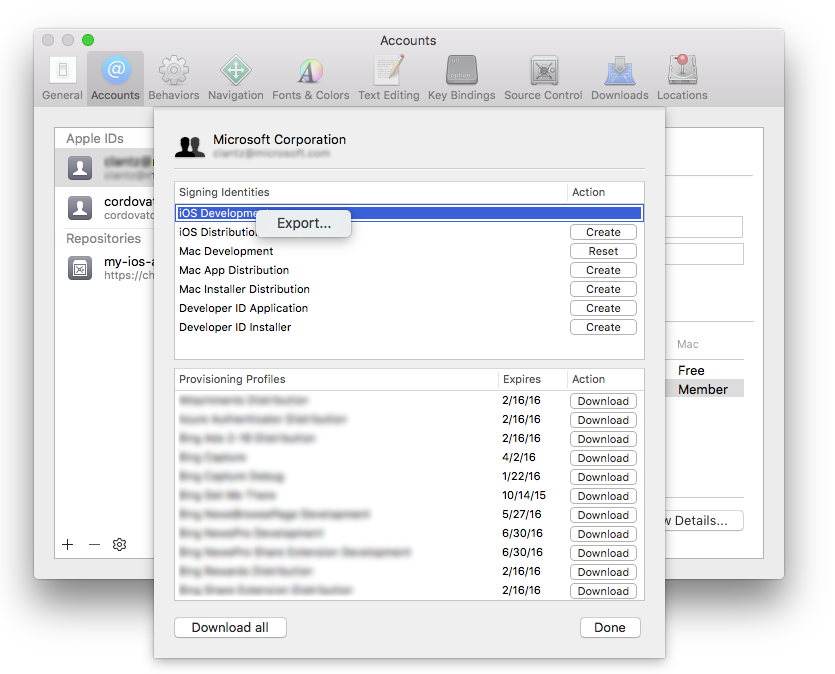
To export using Xcode 8 or lower, go to Xcode > Preferences... > Accounts and select your Apple Developer account.
Select View Details..., right-click on the signing identity you wish to export, and select Export....
Enter a filename and password. Take note of the password as you'll need it later.
Alternatively, follow a similar process using the Keychain Access app on macOS or generate a signing certificate on Windows. Use the procedure described in this article if you prefer this method.
Obtain your provisioning profile
You can download your app provisioning profile from the Apple Developer portal, unless your app uses automatic signing. Learn how to download a provisioning profile in the Apple Developer portal.
You can also use Xcode to access those that are installed on your Mac.
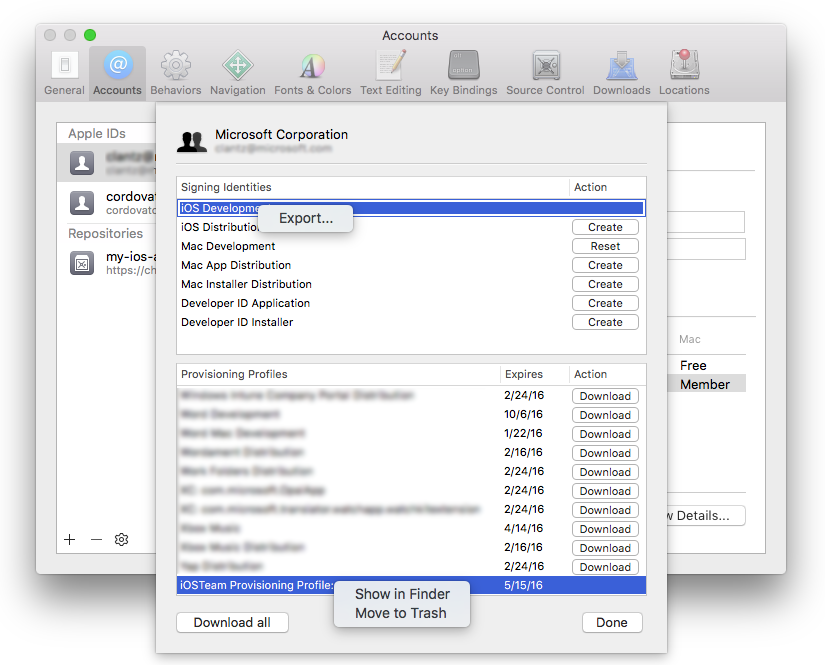
Using Xcode 8 or lower, go to Xcode > Preferences... > Accounts and select your Apple Developer account.
Right-click the provisioning profile you want to use and select Show in Finder.
Copy the highlighted file from Finder to another location and give it a descriptive filename.
Configure your build
There are two recommended ways for your build to access signing certificates and provisioning profiles for signing and provisioning your app:
- Installing them during the build
- Preinstalling them on a macOS build agent
Choose either of the tabs below for details.
Use this method when you don't have enduring access to the build agent, such as the hosted macOS agents. The P12 certificate and provisioning profile are installed at the beginning of the build and removed when the build completes.
Install the P12 certificate during your build
Visual Editor
- Add the Install Apple Certificate task to your build before the Xcode or Xamarin.iOS task.
- Next to the Certificate (P12) field, select the settings icon and upload your P12 file to the Secure Files library. During upload, your certificate will be encrypted and securely stored.
- Once your certificate has been uploaded to the Secure Files library, select it in the Certificate (P12) dropdown.
- Go to the Variables tab and add a variable named
P12password. Set its value to the password of your certificate. Be sure to select the lock icon. This will secure your password and obscure it in logs. - Go back to the Tasks tab. In the Install Apple Certificate task's settings, reference your newly created variable in the Certificate (P12) password field as:
$(P12password)
Sample YAML
Upload your P12 file to the Secure Files library. During upload, your certificate will be encrypted and securely stored.
Go to the Variables tab and add a variable named
P12password. Set its value to the password of your certificate. Be sure to select the lock icon. This will secure your password and obscure it in logs.Add the Install Apple Certificate task to your YAML before the Xcode or Xamarin.iOS task:
- task: InstallAppleCertificate@2
    inputs:
      certSecureFile: 'my-secure-file.p12' # replace my-secure-file.p12 with the name of your P12 file.
      certPwd: '$(P12password)'
Install the provisioning profile during your build
Visual Editor
- Add the Install Apple Provisioning Profile task to your build before the Xcode or Xamarin.iOS task.
- For the Provisioning profile location option, choose Secure Files (in YAML,
secureFiles). - Next to the Provisioning profile field, select the settings icon and upload your provisioning profile file to the Secure Files library. During upload, your certificate will be encrypted and securely stored.
- Once your certificate has been uploaded to the Secure Files library, select it in the Provisioning profile dropdown.
- Enable the checkbox labeled Remove profile after build. This will ensure that the provisioning profile isn't left on the agent machine.
Sample YAML
Upload your provisioning profile to the Secure Files library. During upload, your certificate will be encrypted and securely stored.
Add the Install Apple Provisioning Profile task to your YAML before the Xcode or Xamarin.iOS task:
- task: InstallAppleProvisioningProfile@1
    inputs:
      provProfileSecureFile: 'my-provisioning-profile.mobileprovision' # replace my-provisioning-profile.mobileprovision with the name of your provisioning profile file.
[NOTE] Remove profile after build defaults to true.
Reference the files in your Xcode task
Visual Editor
- Select the Xcode task.
- For the Signing style option, choose Manual signing.
- In the Signing identity field, enter
$(APPLE_CERTIFICATE_SIGNING_IDENTITY). This variable is automatically set by the Install Apple Certificate task for the certificate you selected. - In the Provisioning profile UUID field, enter
$(APPLE_PROV_PROFILE_UUID). This variable is automatically set by the Install Apple Provisioning Profile task for the provisioning profile you selected.
Sample YAML
- task: Xcode@5
  inputs:
    signingOption: 'manual'
    signingIdentity: '$(APPLE_CERTIFICATE_SIGNING_IDENTITY)'
    provisioningProfileUuid: '$(APPLE_PROV_PROFILE_UUID)'
Reference the files in your Xamarin.iOS task
Visual Editor
- Select the Xamarin.iOS task.
- For the Override using option, choose Identifiers.
- In the Signing identity field, enter
$(APPLE_CERTIFICATE_SIGNING_IDENTITY). This variable is automatically set by the Install Apple Certificate task for the certificate you selected. - In the Provisioning profile UUID field, enter
$(APPLE_PROV_PROFILE_UUID). This variable is automatically set by the Install Apple Provisioning Profile task for the provisioning profile you selected.
Sample YAML
- task: XamariniOS@2
    inputs:
      solutionFile: '**/*.iOS.csproj'
      signingIdentity: '$(APPLE_CERTIFICATE_SIGNING_IDENTITY)'
      signingProvisioningProfileID: '$(APPLE_PROV_PROFILE_UUID)'
Save your build pipeline, and you're all set! The build agent will now be able to securely sign and provision your app.
FAQ
Do I need an agent?
You need at least one agent to run your build or release.
I'm having problems. How can I troubleshoot them?
See Troubleshoot Build and Release.
I can't select a default agent pool and I can't queue my build or release. How do I fix this?
See Agent pools.
My NuGet push task is failing with the following error: "Error: unable to get local issuer certificate". How can I fix this?
This can be fixed by adding a trusted root certificate. You can either add the NODE_EXTRA_CA_CERTS=file environment variable to your build agent, or you can add the NODE.EXTRA.CA.CERTS=file task variable in your pipeline. See Node.js documentation for more details about this variable. See Set variables in a pipeline for instructions on setting a variable in your pipeline.
I use TFS on-premises and I don't see some of these features. Why not?
Some of these features are available only on Azure Pipelines and not yet available on-premises. Some features are available on-premises if you have upgraded to the latest version of TFS.
Feedback
Coming soon: Throughout 2024 we will be phasing out GitHub Issues as the feedback mechanism for content and replacing it with a new feedback system. For more information see: https://aka.ms/ContentUserFeedback.
Submit and view feedback for