UI test with Selenium
Azure DevOps Services | Azure DevOps Server 2022 - Azure DevOps Server 2019
Performing user interface (UI) testing as part of the release pipeline is a great way of detecting unexpected changes, and need not be difficult. This topic describes using Selenium to test your website during a continuous deployment release and test automation. Special considerations that apply when running UI tests are discussed in UI testing considerations.
Typically you will run unit tests in your build workflow, and functional (UI) tests in your release workflow after your app is deployed (usually to a QA environment).
For more information about Selenium browser automation, see:
Create your test project
As there is no template for Selenium testing, the easiest way to get started is to use the Unit Test template. This automatically adds the test framework references and enables you run and view the results from Visual Studio Test Explorer.
In Visual Studio, open the File menu and choose New Project, then choose Test and select Unit Test Project. Alternatively, open the shortcut menu for the solution and choose Add then New Project and then Unit Test Project.
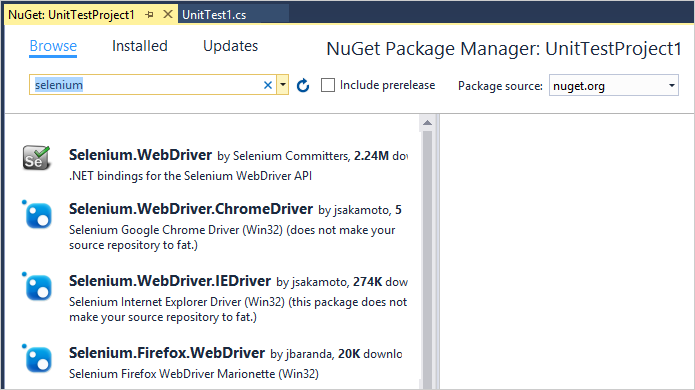
After the project is created, add the Selenium and browser driver references used by the browser to execute the tests. Open the shortcut menu for the Unit Test project and choose Manage NuGet Packages. Add the following packages to your project:
- Selenium.WebDriver
- Selenium.Firefox.WebDriver
- Selenium.WebDriver.ChromeDriver
- Selenium.WebDriver.IEDriver
Create your tests. For example, the following code creates a default class named MySeleniumTests that performs a simple test on the Bing.com website. Replace the contents of the TheBingSearchTest function with the Selenium code required to test your web app or website. Change the browser assignment in the SetupTest function to the browser you want to use for the test.
using System;
using System.Text;
using Microsoft.VisualStudio.TestTools.UnitTesting;
using OpenQA.Selenium;
using OpenQA.Selenium.Firefox;
using OpenQA.Selenium.Chrome;
using OpenQA.Selenium.IE;

namespace SeleniumBingTests
{
  /// <summary>
  /// Summary description for MySeleniumTests
  /// </summary>
  [TestClass]
  public class MySeleniumTests
  {
    private TestContext testContextInstance;
    private IWebDriver driver;
    private string appURL;

    public MySeleniumTests()
    {
    }

    [TestMethod]
    [TestCategory("Chrome")]
    public void TheBingSearchTest()
    {
      driver.Navigate().GoToUrl(appURL + "/");
      driver.FindElement(By.Id("sb_form_q")).SendKeys("Azure Pipelines");
      driver.FindElement(By.Id("sb_form_go")).Click();
      driver.FindElement(By.XPath("//ol[@id='b_results']/li/h2/a/strong[3]")).Click();
      Assert.IsTrue(driver.Title.Contains("Azure Pipelines"), "Verified title of the page");
    }

    /// <summary>
    ///Gets or sets the test context which provides
    ///information about and functionality for the current test run.
    ///</summary>
    public TestContext TestContext
    {
      get
      {
        return testContextInstance;
      }
      set
      {
        testContextInstance = value;
      }
    }

    [TestInitialize()]
    public void SetupTest()
    {
      appURL = "http://www.bing.com/";

      string browser = "Chrome";
      switch(browser)
      {
        case "Chrome":
          driver = new ChromeDriver();
          break;
        case "Firefox":
          driver = new FirefoxDriver();
          break;
        case "IE":
          driver = new InternetExplorerDriver();
          break;
        default:
          driver = new ChromeDriver();
          break;
      }

    }

    [TestCleanup()]
    public void MyTestCleanup()
    {
      driver.Quit();
    }
  }
}
Run the Selenium test locally using Test Explorer and check that it works.
Define your build pipeline
You'll need a continuous integration (CI) build pipeline that builds your Selenium tests. For more details, see Build your .NET desktop app for Windows.
Create your web app
You'll need a web app to test. You can use an existing app, or deploy one in your continuous deployment (CD) release pipeline. The example code above runs tests against Bing.com. For details of how to set up your own release pipeline to deploy a web app, see Deploy to Azure Web Apps.
Decide how you will deploy and test your app
You can deploy and test your app using either the Microsoft-hosted agent in Azure, or a self-hosted agent that you install on the target servers.
When using the Microsoft-hosted agent, you should use the Selenium web drivers that are pre-installed on the Windows agents (agents named Hosted VS 20xx) because they are compatible with the browser versions installed on the Microsoft-hosted agent images. The paths to the folders containing these drivers can be obtained from the environment variables named
IEWebDriver(Internet Explorer),ChromeWebDriver(Google Chrome), andGeckoWebDriver(Firefox). The drivers are not pre-installed on other agents such as Linux, Ubuntu, and macOS agents. Also see UI testing considerations.When using a self-hosted agent that you deploy on your target servers, agents must be configured to run interactively with auto-logon enabled. See Build and release agents and UI testing considerations.
Include the test in a release
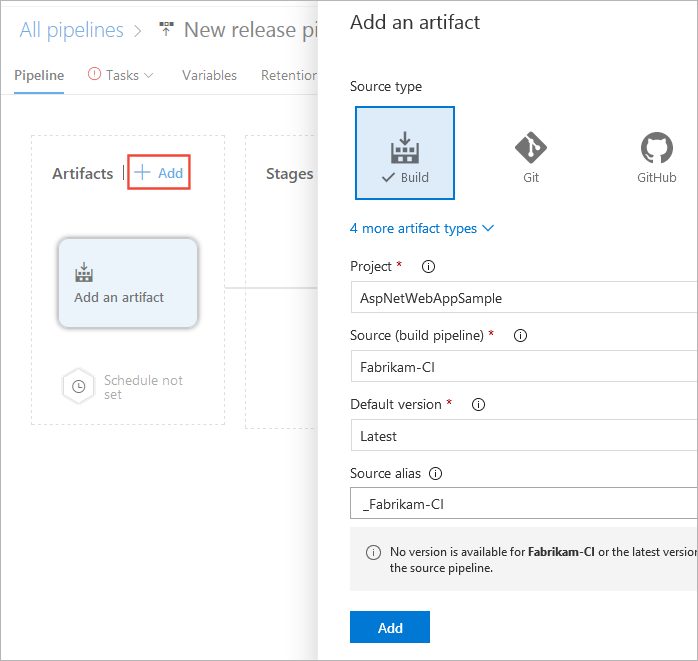
If you don't have an existing release pipeline that deploys your web app:
Open the Releases page in the Azure Pipelines section in Azure DevOps or the Build & Release hub in TFS (see Web portal navigation) and choose the + icon, then choose Create release pipeline.

Select the Azure App Service Deployment template and choose Apply.
In the Artifacts section of the Pipeline tab, choose + Add. Select your build artifacts and choose Add.
Choose the Continuous deployment trigger icon in the Artifacts section of the Pipeline tab. In the Continuous deployment trigger pane, enable the trigger so that a new release is created from every build. Add a filter for the default branch.

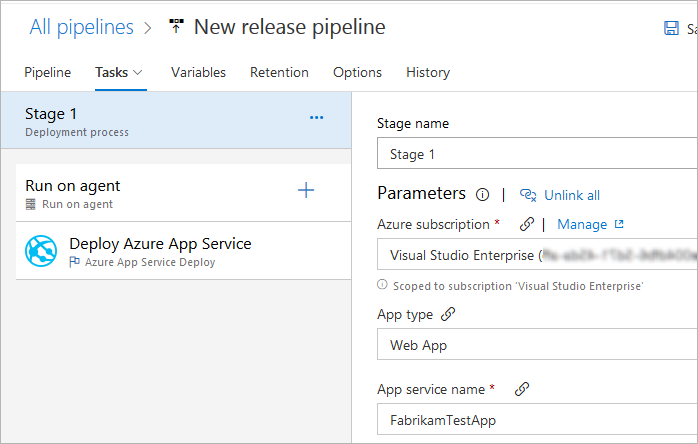
Open the Tasks tab, select the Stage 1 section, and enter your subscription information and the name of the web app where you want to deploy the app and tests. These settings are applied to the Deploy Azure App Service task.
If you are deploying your app and tests to environments where the target machines that host the agents do not have Visual Studio installed:
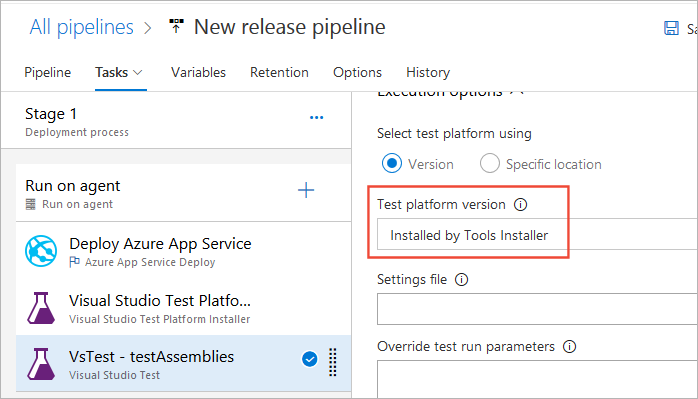
In the Tasks tab of the release pipeline, choose the + icon in the Run on agent section. Select the Visual Studio Test Platform Installer task and choose Add. Leave all the settings at the default values.
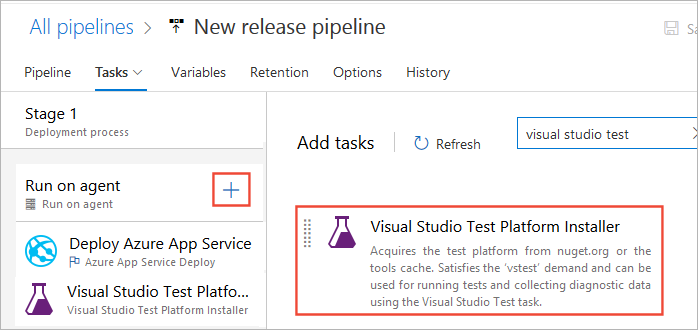
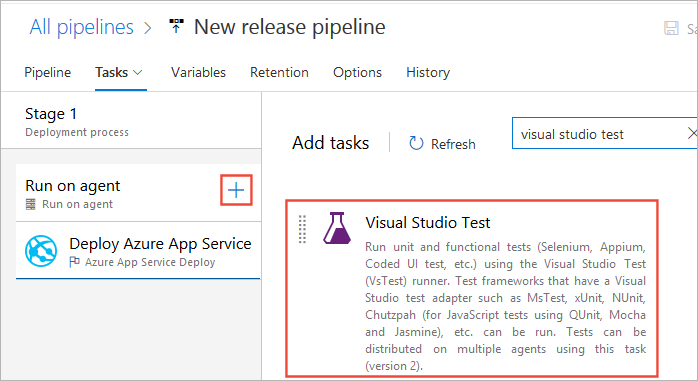
You can find a task more easily by using the search textbox.
In the Tasks tab of the release pipeline, choose the + icon in the Run on agent section. Select the Visual Studio Test task and choose Add.
If you added the Visual Studio Test Platform Installer task to your pipeline, change the Test platform version setting in the Execution options section of the Visual Studio Test task to Installed by Tools Installer.
How do I pass parameters to my test code from a build pipeline?
Save the release pipeline and start a new release. You can do this by queuing a new CI build, or by choosing Create release from the Release drop-down list in the release pipeline.

To view the test results, open the release summary from the Releases page and choose the Tests link.
Next steps
Feedback
Coming soon: Throughout 2024 we will be phasing out GitHub Issues as the feedback mechanism for content and replacing it with a new feedback system. For more information see: https://aka.ms/ContentUserFeedback.
Submit and view feedback for