Add widgets to a dashboard
Azure DevOps Services | Azure DevOps Server 2022 - Azure DevOps Server 2019
Widgets smartly format data to provide access to easily consumable data. You add widgets to your team dashboards to gain visibility into the status and trends occurring as you develop your software project.
Each widget provides access to a chart, user-configurable information, or a set of links that open a feature or function. You can add one or more charts or widgets to your dashboard. Up to 200 widgets total. You add several widgets at a time simply by selecting each one. See Manage dashboards to determine the permissions you need to add and remove widgets from a dashboard.
Prerequisites
- You must be a member of the project.
- Anyone with access to a project, including Stakeholders, can view dashboards.
- To add, edit, or manage a team dashboard, you must have Basic access, be a member of the team, a member of the Project Administrators group, or have dashboard permissions granted to you.
- To add, edit, or manage a project dashboard, you must have Basic access or have dashboard permissions granted to you for the select project dashboard.
- You must be a member of the project.
- Anyone with access to a project, including Stakeholders, can view dashboards.
- To add, edit, or manage a team dashboard, you must have Basic access, be a member of the team, a member of the Project Administrators group, or have dashboard permissions granted to you. Team members added to the team administrator role can manage permissions for the team.
- To add, edit, or manage a project dashboard, you must have Basic access or have dashboard permissions granted to you for the select project dashboard.
- For Analytics widgets to work within a dashboard, you must have Analytics enabled.
- You must be a member of the project.
- Install or enable the Analytics Marketplace extension. Analytics widgets aren't available if Analytics isn't installed, enabled, or running.
- Anyone with access to a project, including Stakeholders, can view dashboards.
- To add, edit, or manage a team dashboard, you must have Basic access, be a member of the team, a member of the Project Administrators group, or have dashboard permissions granted to you. Team members added to the team administrator role can manage permissions for the team.
- For Analytics widgets to work within a dashboard, you must have Analytics enabled.
Note
Data that's displayed within a chart or widget is subject to permissions granted to the signed in user. For example, if a user doesn't have permissions to view work items under an area path, then those items don't display in a query results widget in a dashboard. For more information, see FAQs on Azure DevOps dashboards, charts, and reports, Access and permissions.
Note
Widgets specific to a service are disabled if the service they depend on has been disabled. For example, if Boards is disabled, New Work item and all work tracking Analytics widgets are disabled and won't appear in the widget catalog. If Analytics is disabled or not installed, then all Analytics widgets are disabled.
To re-enable a service, see Turn an Azure DevOps service on or off. For Analytics, see enable or install Analytics].
Open a dashboard
All dashboards are associated with a team. You must be a team administrator, project administrator, or a team member with permissions to modify a dashboard.
Open a web browser, connect to your project, and select Overview > Dashboards. The dashboard directory page opens.
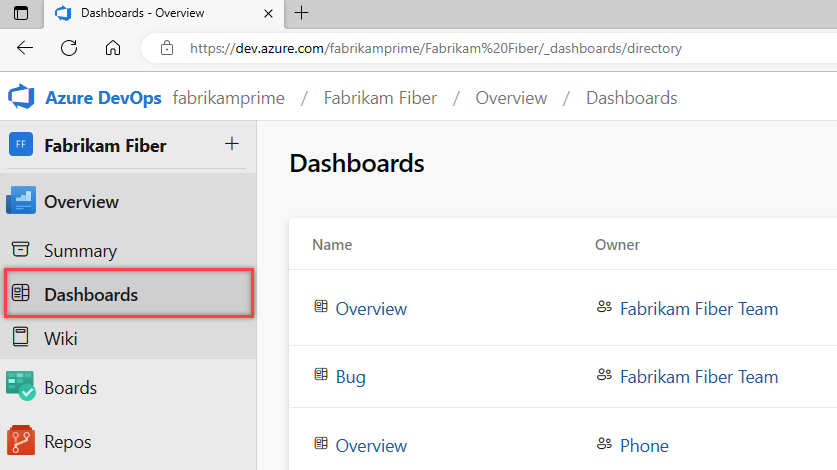
If you need to switch to a different project, select the
 Azure DevOps logo to browse all projects.
Select the dashboard you want to modify.
Add a widget
To add widgets to the dashboard, select ![]() Edit.
Edit.
The widget catalog automatically opens. Add all the widgets that you want and drag their tiles into the sequence you want.
When you're finished with your additions, select Done editing to exit dashboard editing. The widget catalog closes. You can then configure the widgets as needed.
Tip
When you're in dashboard edit mode, you can remove, rearrange, and configure widgets, as well as add new widgets. Once you leave edit mode, the widget tiles remain locked, reducing the chances of accidentally moving a widget.
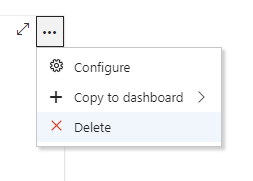
To remove a widget, select ![]() More actions and select Delete from the menu.
More actions and select Delete from the menu.
Or, you can drag and drop a widget from the catalog onto the dashboard.
Add an Analytics widget
This example shows how to add the Velocity widget available from Analytics to a dashboard.
Select
 Edit to modify a dashboard. The widget catalog opens.
In the right pane search box, enter Velocity to quickly locate the Velocity widget within the widget catalog.
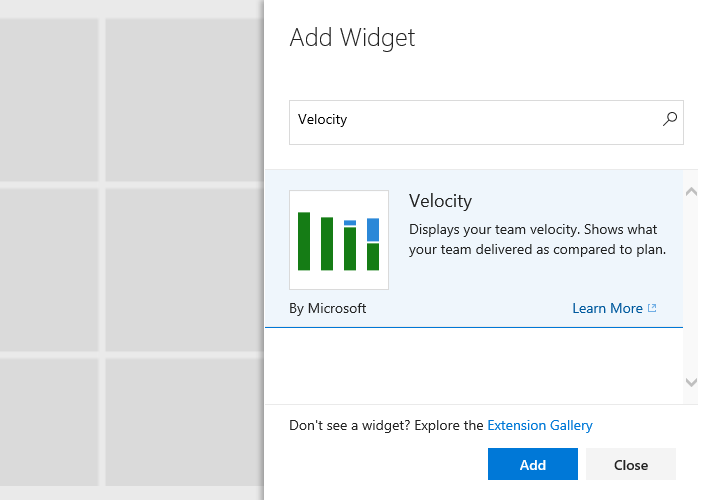
Select the widget, then Add to add it to the dashboard. Or, you can drag-and-drop it onto the dashboard.
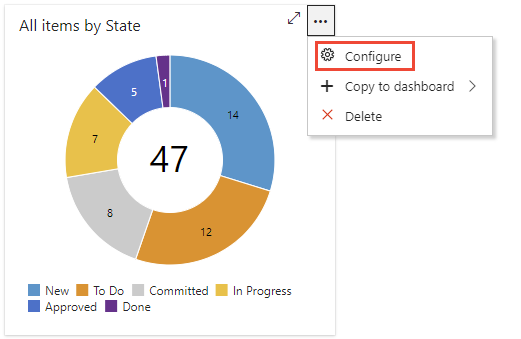
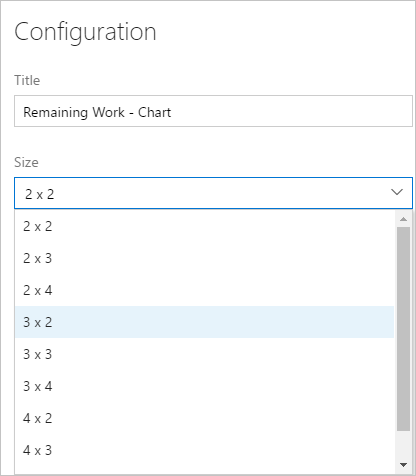
Configure a widget
Most widgets support configuration, which might include specifying the title, setting the widget size, and other widget-specific variables.
To configure a widget, add the widget to a dashboard, select open the ![]() menu, and select Configure.
menu, and select Configure.
For more information about configuring widgets, see the following articles:
For more information about configuring widgets, see the following articles:
Move or delete a widget
To move a widget, you need to enable the dashboard edit mode. To delete a widget, select the delete option provided from the widget's More actions menu.
Select ![]() Edit to modify your dashboard. You can then add widgets or drag tiles to reorder their sequence on the dashboard.
Edit to modify your dashboard. You can then add widgets or drag tiles to reorder their sequence on the dashboard.
To remove a widget, select the ![]() actions icon and then Delete it.
actions icon and then Delete it.
When you're finished with your changes, select Done Editing to exit dashboard editing.
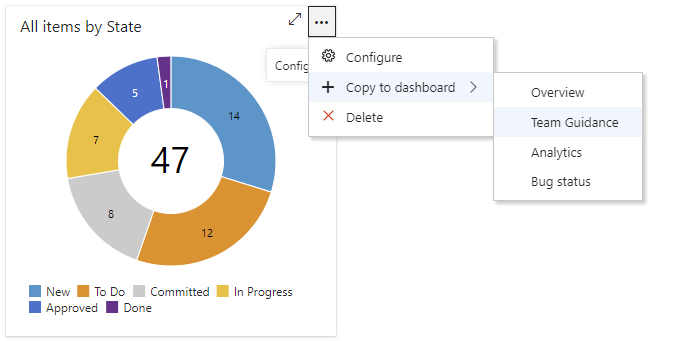
Copy a widget
You can copy a widget to the same dashboard or to another team dashboard. If you want to move widgets you configured to another dashboard, here's how you do it. Before you begin, add the dashboard that you want to copy or move the widget to. Once you copy the widget, you can delete it from the current dashboard.
To copy a configured widget to another team dashboard, select the ![]() actions icon and select Copy to dashboard and then the dashboard to copy it to.
actions icon and select Copy to dashboard and then the dashboard to copy it to.
Widget size
Some widgets are presized and can't be changed. Others are configurable through their configuration dialog.
For example, the Chart for work items widget allows you to select an area size ranging from 2 x 2 to 4 x 4 (tiles).
Extensibility and Marketplace widgets
In addition to the widgets described in the Widget catalog, you can:
- Add widgets from the Marketplace.
- Create your own widgets using the Widget REST APIs.
Disabled Marketplace widgets
If your organization owner or project collection administrator disables a marketplace widget, the following notification displays:
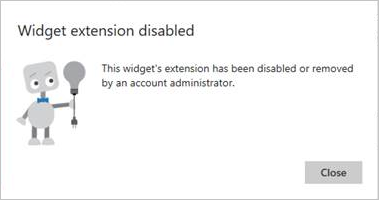
To regain access to it, request your admin to reinstate or reinstall the widget.
Next steps
Related articles
Feedback
Coming soon: Throughout 2024 we will be phasing out GitHub Issues as the feedback mechanism for content and replacing it with a new feedback system. For more information see: https://aka.ms/ContentUserFeedback.
Submit and view feedback for