Git preferences and settings in Visual Studio
Azure DevOps Services | Azure DevOps Server 2022 - Azure DevOps Server 2019
Visual Studio 2019 | Visual Studio 2022
In Visual Studio, you can view and configure several Git-related settings and preferences. For example, you can set your name and email address for commit metadata, specify your preferred diff and merge tools, and set the default folder path for repo clones.
Git settings and preferences in Visual Studio fall into two main categories:
Git Global Settings, which apply to all Git repos for the current user.
Git Repository Settings, which apply to the active Git repo.
Within those categories, settings can be:
Git configuration file settings, which you can view and modify either in Visual Studio, on the command line, or by editing a Git configuration file. Examples of Git configuration file settings are user name, email address, and remote aliases. Git stores settings in system, global, and local Git configuration files:
System Git configuration file settings apply to all users and repos on your computer.
Global Git configuration file settings apply to all repos for the current user. Global settings take precedence over system settings.
Local Git configuration file settings apply to the local repo that contains the local Git configuration file. System settings take precedence over global settings.
Visual Studio Git-related settings, which are Visual Studio settings that relate to Git but aren't stored in any Git configuration file. You can only view and modify these settings in Visual Studio. An example of one of these settings is the default folder path where Visual Studio clones repos.
In this article you learn how to:
- Explore Git settings
- Modify Git configuration file settings
- Modify Visual Studio Git-related settings
Explore Git settings
- Visual Studio 2022
- Visual Studio 2019 - Git menu
- Visual Studio 2019 - Team Explorer
- Git Command Line
Visual Studio 2022 provides a Git version control experience by using the Git menu, Git Changes, and through context menus in Solution Explorer. Visual Studio 2019 version 16.8 also offers the Team Explorer Git user interface. For more information, see the Visual Studio 2019 - Team Explorer tab.
To configure Git settings in Visual Studio, choose Git > Settings from the menu bar to open the Options view.
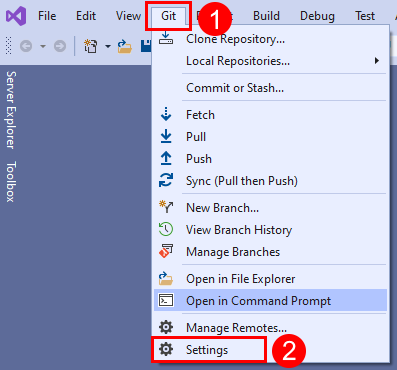
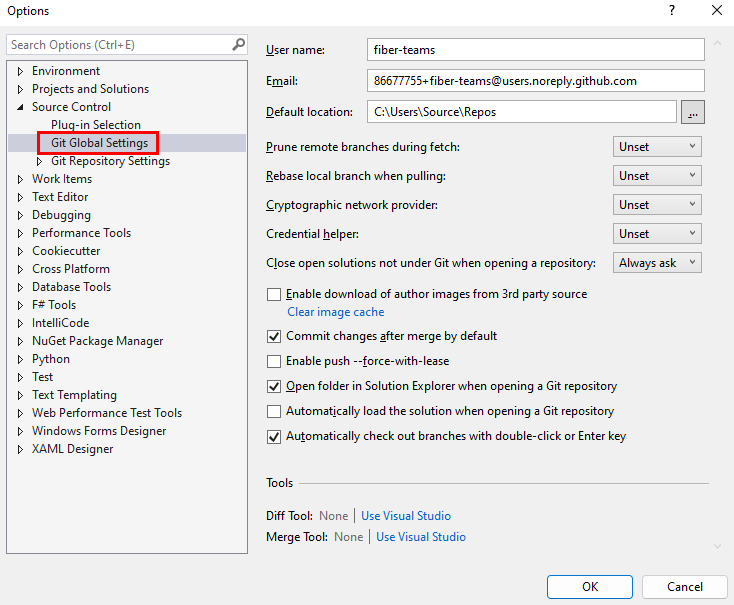
In the Options view, choose Git Global Settings to view settings that apply to all your repos.
Or, in the Options view, choose Git Repository Settings > General to view settings that only apply to the current Visual Studio project repo.


Modify Git configuration file settings
You can view and edit Git configuration settings in Visual Studio or by directly editing the applicable Git configuration file. For more information about Git configuration file settings, see Customizing Git and git-config documentation. In the following sections, we discuss how you can edit each of the listed Git configuration file settings:
- Name and email
- Prune remote branches during fetch
- Rebase local branch when pulling
- Cryptographic network provider
- Diff and merge tools
- Remotes
- Other settings
Name and email
When you commit changes, Git adds your name and email address to the commit metadata. You can edit the name and email address that Git will use.
Name and email settings are available at the global or repo scope.
- Visual Studio 2022
- Visual Studio 2019 - Git menu
- Visual Studio 2019 - Team Explorer
- Git Command Line
From the Git menu, choose Git > Settings and then select the Git Global Settings view. That view contains the name and email settings for the current user.

Or, choose Git Repository Settings > General to edit the name and email settings for the current Visual Studio project repo.

Prune remote branches during fetch
You can tell Git to prune remote branches during every fetch to remove stale remote-tracking branches in your local repo that no longer exist on the corresponding remote repo.
- Visual Studio 2022
- Visual Studio 2019 - Git menu
- Visual Studio 2019 - Team Explorer
- Git Command Line
From the Git menu, choose Git > Settings and then select the Git Global Settings view. That view contains the Prune remote branches during fetch option for the current user.

Or, choose Git Repository Settings > General to edit the Prune remote branches during fetch setting for the current Visual Studio project repo.
Valid values are:
True(recommended)FalseUnset(default)

Rebase local branch when pulling
You can choose to rebase your local branch when pulling to replay the changes in your local branch on top of the remote branch history.
- Visual Studio 2022
- Visual Studio 2019 - Git menu
- Visual Studio 2019 - Team Explorer
- Git Command Line
The Rebase local branch when pulling setting corresponds to the git config pull.rebase command. You can specify this setting at the global or repo scope.
From the Git menu, choose Git > Settings and then select the Git Global Settings view. That view contains the Rebase local branch when pulling option for the current user.

Or, choose Git Repository Settings > General to edit the Rebase local branch when pulling option for the current Visual Studio project repo.
Valid values are:
True: rebase the current branch on top of the remote branch after fetch.False: merge the remote branch into the current branch.Merges: rebase without flattening locally created merge commits.Unset(default): unless specified otherwise in a Git configuration file, merge the remote branch into the current branch.

Cryptographic network provider
You can specify the cryptographic network provider as the TLS/SSL backend that Git will use at runtime.
- Visual Studio 2022
- Visual Studio 2019 - Git menu
- Visual Studio 2019 - Team Explorer
- Git Command Line
The Cryptographic network provider setting corresponds to the git config http.sslBackend command. This setting is only available at the global scope.
From the Git menu, choose Git > Settings and then select the Git Global Settings view. That view contains the Cryptographic network provider option for the current user.

Valid values are:
OpenSSL: use OpenSSL for TLS and SSL protocols.Secure Channel: use Secure Channel for TLS and SSL protocols. Secure Channel is the native Windows solution that contains a set of security protocols that provide identity authentication and secure, private communication through encryption.Unset(default): if this setting is unset, the Cryptographic network provider defaults to OpenSSL.

Credential helper
When Visual Studio performs a remote Git operation, the remote endpoint might reject the request because it requires credentials for the request. When that happens, Git invokes a credential helper to obtain the necessary credentials and then retries the request. You can specify the credential helper that Git will use.
- Visual Studio 2022
- Visual Studio 2019 - Git menu
- Visual Studio 2019 - Team Explorer
- Git Command Line
The Credential helper setting corresponds to the git config credential.helper command. This setting is only available at the global scope.
From the Git menu, choose Git > Settings and then select the Git Global Settings view to configure this setting.
Set Credential helper to the desired value, and select OK to save.


Valid values are:
GCM for Windows: use Git Credential Manager for Windows as the helper.GCM Core: use Git Credential Manager Core as the helper.Unset(default): if this setting is unset, the credential helper set in the system config is used. As of Git for Windows 2.29, the default credential helper isGCM Core.
Diff and merge tools
You can specify which tools Git will use to display diffs or merge conflicts.
- Visual Studio 2022
- Visual Studio 2019 - Git menu
- Visual Studio 2019 - Team Explorer
- Git Command Line
The diff and merge tool settings correspond to the git config diff.tool and git config merge.tool commands. You can set Visual Studio as the merge or diff tool, or configure other diff and merge tools from the Git command line. You can specify diff and merge tool settings at the global or repository scope.
From the Git menu, choose Git > Settings and then select the Git Global Settings view. That view contains the diff and merge tools settings.
Set the diff and merge tool settings to the desired value, and select OK to save.

Or, choose Git Repository Settings > General to edit the diff and merge tool settings for the current Visual Studio project repo.

Valid diff and merge tools are:
Visual StudioNone(default)
To configure other diff and merge tool settings, use the Git command line.

Remotes
You can use the Remotes pane under Git Repository Settings to add, edit, or remove remotes for your repository. This setting corresponds to the git remote add command. The Remotes pane is only available at the repository scope.
When you clone a remote repo, Git assigns the alias origin as shorthand for the URL of the remote repo you cloned. For convenience, you can add another alias named upstream for the repo you forked from, which is referred to as the upstream repo. The following steps describe how to add an upstream alias.
To add an upstream alias in Visual Studio, follow these steps:
Choose Tools > Options from the menu bar to open the Options window. Select Source Control > Git Repository Settings > Remotes, and then choose Add to open the Add Remote dialog.

In the Add Remote dialog, add a new remote called
upstreamand enter the Git clone URL of the repo you forked. Then, choose Save.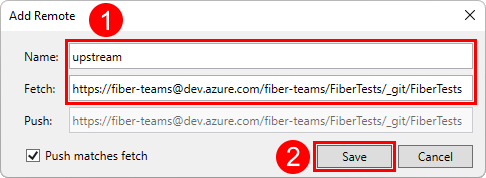


Other settings
To view all of other Git configuration settings, you can open and view the Git configuration files themselves, or you can run git config --list to display the settings.
Modify Visual Studio Git-related settings
The following settings manage Git-related preferences in Visual Studio. You can only view and edit these settings from within Visual Studio.
- Default repository location
- Close open solutions not under Git when opening a repository
- Enable download of author images from third-party sources
- Commit changes after merge by default
- Enable push --force-with-lease
- Open folder in Solution Explorer when opening a Git repository
- Automatically load the solution when opening a Git repository
- Automatically check out branches with double-click or the Enter key
- Edit Git ignore and attributes files
For more information about how to access Visual Studio Git-related settings, see Explore Git settings. Next, we discuss how you can edit each of these Visual Studio Git-related settings.
Default repository location
You can set the default repository folder in which Visual Studio will clone repos.
- Visual Studio 2022
- Visual Studio 2019 - Git menu
- Visual Studio 2019 - Team Explorer
- Git Command Line
The Default repository location setting is only available at the global scope.
From the Git menu, choose Git > Settings and then select the Git Global Settings view. That view contains the Default repository location setting.
Set the default repository location, and select OK to save.


Close open solutions not under Git when opening a repository
By default, Visual Studio closes any open solution or folder in a Git repo when you switch to a different repo. The Close open solutions not under Git when opening a repository setting keeps the open solution or folder consistent with the selected repo. However, if your solution or folder isn't inside a repo, you might want to keep the solution open when you switch repository. You can do that with this setting.
Tip
If you pair this setting with Automatically load the solution when opening a Git repository, then Visual Studio will open the solution for the Git repo you're switching to.
- Visual Studio 2022
- Visual Studio 2019 - Git menu
- Visual Studio 2019 - Team Explorer
- Git Command Line
The Close open solutions not under Git when opening a repository setting is only available at the global scope.
From the Git menu, choose Git > Settings and then select the Git Global Settings view to configure this setting.
Set the default repository location, and select OK to save.


Valid values are:
Yes: when you switch repo, Visual Studio closes any open solution.No: when you switch repo and the current solution or folder isn't under Git, Visual Studio will keep the solution or folder open.Always ask(default): when you switch repo and the current solution or folder isn't under Git, Visual Studio will ask whether you want to keep the current solution open.
Enable download of author images from third-party sources
When enabled, Visual Studio will download an author image from the Gravatar image service for display in the commit and history views. If you haven't configured a Gravatar image, the Gravatar image service will return a randomly generated image for you.
Important
To provide author images in the commit and history views, Visual Studio creates an MD5 hash using the author email address stored in the active repository and sends that hash to Gravatar. If Gravatar finds a user with a matching hash, Visual Studio will retrieve and display the user's image. Microsoft doesn't record or share email addresses with Gravatar or any other third-party.
- Visual Studio 2022
- Visual Studio 2019 - Git menu
- Visual Studio 2019 - Team Explorer
- Git Command Line
The Enable download of author images from third-party sources setting is only available at the global scope.
From the Git menu, choose Git > Settings and then select the Git Global Settings view. That view contains the Enable download of author images from third-party sources setting.
Choose whether to enable download of author images from third-party sources, and select OK to save.


Commit changes after merge by default
With Commit changes after merge by default enabled, Git automatically creates a new commit on branch merge.
- When checked, all
git mergecommands issued by Visual Studio are run with the--commitoption. - When unchecked, all
git mergecommands issued by Visual Studio are run with the--no-commit --no-ffoptions.
For more information on these merge options, see --commit and --no-commit and --no-ff.
- Visual Studio 2022
- Visual Studio 2019 - Git menu
- Visual Studio 2019 - Team Explorer
- Git Command Line
The Commit changes after merge by default setting is only available at the global scope.
From the Git menu, choose Git > Settings and then select the Git Global Settings view. That view contains the Commit changes after merge by default setting.
Choose whether to commit changes after merge by default, and select OK to save.


Enable push --force-with-lease
With this setting enabled, you can push changes that overwrite work in a remote branch—if no one else has pushed to the remote branch since your last pull.
- Visual Studio 2022
- Visual Studio 2019 - Git menu
- Visual Studio 2019 - Team Explorer
- Git Command Line
The Enable push --force-with-lease option corresponds to the push --force-with-lease command. This setting is only available at the global scope. By default, Enable push --force-with-lease is disabled.
From the Git menu, choose Git > Settings and then select the Git Global Settings view. That view contains the Enable push --force-with-lease setting.
Choose whether to enable
push --force-with-lease, and select OK to save.


Open folder in Solution Explorer when opening a Git repository
When enabled and you open a Git repo in Visual Studio, Visual Studio will scan the repository folder for solutions, CMakeLists.txt, or other view files and display them as a list in Solution Explorer. You can then load a solution or view the contents of a folder. This setting is enabled by default.
When disabled and you open a Git repo in Visual Studio, Visual Studio won't open the repo folder in Solution Explorer and is only a Git repo manager.
- Visual Studio 2022
- Visual Studio 2019 - Git menu
- Visual Studio 2019 - Team Explorer
- Git Command Line
From the Git menu, choose Git > Settings and then select the Git Global Settings view to configure this setting.
Choose whether to enable Open folder in Solution Explorer when opening a Git repository, and select OK to save.


Automatically load the solution when opening a Git repository
The Automatically load the solution when opening a Git repository setting is applicable only if the Open folder in Solution Explorer when opening a Git repository setting is also enabled. When you open a Git repository in Visual Studio, and the subsequent folder scan detects there's only one solution present in your repository, then Visual Studio automatically loads that solution. If you turn off this setting, then Solution Explorer will display the single solution present in the repository in the list of views, but won't load the solution. This setting is disabled by default
- Visual Studio 2022
- Visual Studio 2019 - Git menu
- Visual Studio 2019 - Team Explorer
- Git Command Line
From the Git menu, choose Git > Settings and then select the Git Global Settings view to configure this setting.
Choose whether to enable Automatically load the solution when opening a Git repository, and select OK to save.


Automatically check out branches with double-click or the Enter key
The Git Repository window has a list of branches displayed in a tree structure. Select a branch to switch the commit history pane to display the commits for that branch. To check out a branch, right-click to open the context menu and choose Checkout. With the Automatically check out branches with double-click or the Enter key setting enabled, you can double-click or select the Enter key to check out a branch and display its commits.
- Visual Studio 2022
- Visual Studio 2019 - Git menu
- Visual Studio 2019 - Team Explorer
- Git Command Line
From the Git menu, choose Git > Settings and then select the Git Global Settings view to configure this setting.
Choose whether to enable Automatically check out branches with double-click or the Enter key, and select OK to save.


Edit Git ignore and attributes files
Visual Studio provides a quick way to add or edit gitignore and gitattributes files at the root of your repo.
- Visual Studio 2022
- Visual Studio 2019 - Git menu
- Visual Studio 2019 - Team Explorer
- Git Command Line
The option to add or edit a gitignore or gitattributes file is only available at the repository scope.
From the Git menu, choose Git > Settings and choose the Git Repository Settings > General view. That view contains options to edit
gitignoreorgitattributesfiles.Choose Edit to open the ignore or attribute file in a Visual Studio editor window.


For information about how to configure .gitignore and .gitattributes files, see gitignore and gitattributes.
Next steps
Related articles
Feedback
Coming soon: Throughout 2024 we will be phasing out GitHub Issues as the feedback mechanism for content and replacing it with a new feedback system. For more information see: https://aka.ms/ContentUserFeedback.
Submit and view feedback for