Reconnect services and users
Azure DevOps Server 2022 | Azure DevOps Server 2020 | Azure DevOps Server 2019
This topic, the fourth part of the Restore a Single-Server tutorial, teaches you how to start project collections and verify user groups on the new server. You will also learn how to clear the data caches on the new server, and how to help ensure that your users do not experience data caching problems when they connect to the new server.
Use this topic to:
- Start project collections and verify permissions
- Refresh the version control cache on client computers and reconnect to TFS
Prerequisites
To invoke the StampWorkitemCache web method, you must be a member of the Administrators security group on the server.
To use the tf workspaces command on the client computer, your Read permission must be set to Allow.
Start project collections and verify permissions
After you have completed restoring the data and software on the new server, start the project collections, and then make sure that all users, groups, and service accounts for your deployment are configured with the permissions that they require to perform tasks and function correctly.
You cannot automatically migrate all permissions. For example, administrators for Team Foundation must be members of the local Administrators group on the server so that they can open the administration console, and you must manually add them to that group.
To start a project collection:
Open the administration console, and in Project Collections, start the default collection.
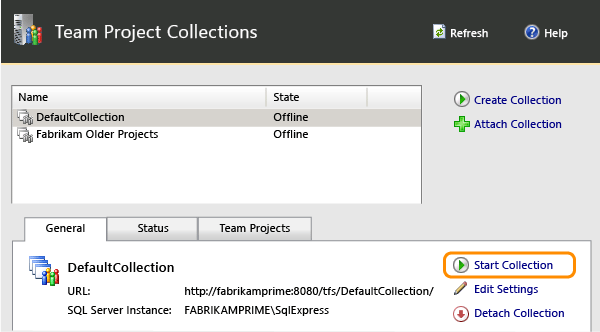
Repeat this action for any other project collections in the deployment.
To verify permissions:
Log on to the server and make sure that users, groups, and service accounts are configured with the permissions that they need to operate.
For more information, see Add users to projects, Set administrator permissions for project collections, Set administrator permissions for Team Foundation Server, and Service accounts and dependencies in Team Foundation Server.
Refresh the work item cache
Note
This procedure is optional. You should perform it only if you receive errors with work item tracking.
To update the cache for tracking work items, you invoke the StampWorkitemCache web method. This method forces client computers to update the cache the next time that they connect to the application-tier server. This method also synchronizes the workspaces that are defined on the client computers.
To refresh the cache for tracking work items on client computers:
On the new server, open Internet Explorer.
In the Address bar, enter the following address to connect to the ClientService web service:
http://PublicURL:8080/VirtualDirectory/WorkItemTracking/v3.0/ClientService.asmxNote
Even if you are logged on with administrative credentials, you might need to start Internet Explorer as an administrator, and you might be prompted for your credentials.
Choose StampWorkitemCache, and then choose Invoke.
Note
The StampWorkitemCache method returns no data.
Refresh the version control cache on client computers and reconnect to Azure DevOps Server
To prevent workspace errors from occurring during version control or build operations in Team Foundation, you have to update the data cache on client computers.
To refresh the version control cache, each user must run the tf workspaces command on any computer that uses version control and that connects to the restored server.
To refresh the version control cache on client computers:
On the client computer, open a Command Prompt window with administrative permissions, and change directories to Drive:\Program Files (x86)\Microsoft Visual Studio 12.0\Common7\IDE.
At the command prompt, enter the following command, including the URL of the collection, which includes the server name and the port number of the new server:
tf workspaces /collection:http://ServerName:Port/VirtualDirectoryName/CollectionNameFor example, to refresh the version control cache for a project that is a member of the DefaultCollection collection, which is hosted in the FabrikamPrime deployment of Team Foundation Server, type the following string:
tf workspaces /collection:http://FabrikamPrime:8080/tfs/DefaultCollectionFor more information, see Workspaces Command.